You will sculpt the Basic Head model that comes with Mudbox into a likeness of Amy. The Basic Head model is a great starting point because it is the correct scale for the Mudbox environment, and it is made up of quads (polygons with four sides) that are all about the same size, which is perfect for predictable subdivisions. To guide the sculpting process, you will use many reference photographs and reference sketches loaded into Mudbox’s cameras.
Sculpting In the Neutral Position
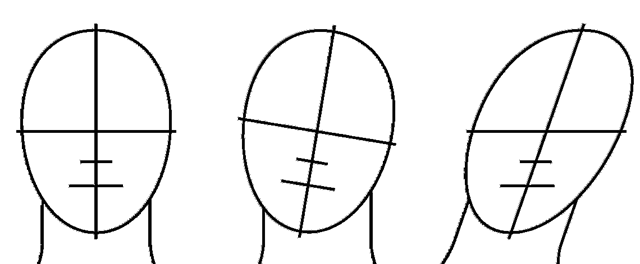
Although it is important to know the final pose of the subject in the sculpture or the ultimate use of the model such as animation or three-dimensional (3D) printing, it is equally important to first work on the sculpture in the neutral position, otherwise its form and proportions could become skewed (Figure 3.4). When sculpting a clay portrait bust, the facial features are often sculpted while the sculpture is in the neutral position and then the sculpture is posed by bending the underlying armature.
FIG 3.4 Sculpt First in the Neutral Position to Avoid Time-Consuming Mistakes.
Symmetrical Modeling
Throughout much of this tutorial, the mirroring property of the Mudbox sculpting tools will be enabled. Mirroring (also known as symmetrical modeling) makes it possible to simultaneously sculpt on opposites sides of the sculpture. You will be sculpting with mirroring enabled across the x axis, thus sculpting the left and right sides at the same time. Mirroring helps to prevent errors in proportions, speeds up the sculpting process, and makes it difficult to skew the facial features. However, mirrored sculpting should be used with caution because humans and other creatures are not symmetrical. Creating symmetrical sculptures without introducing some natural asymmetry to the facial features will produce a stale and unrealistic sculpture.
Loading the Basic Head Model
Launch Mudbox, and from the Welcome dialog, select the Basic Head model by clicking on it once (Figure 3.5). An alternate method to load the Basic Head model or any stock model that comes with Mudbox is to go to the Create menu, and from the Mesh submenu, select the model you want. The figures in this tutorial show the grid and the background gradient turned off.
Setting Up Reference Sketches
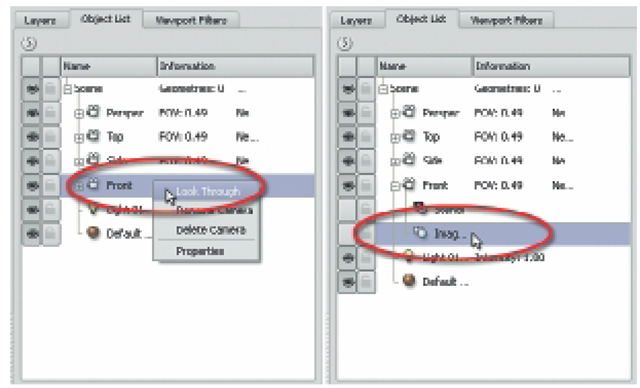
In the following steps, you will set up the reference sketches that will guide you in sculpting a likeness of Amy. In Mudbox reference, images are loaded into the Image Plane associated with each camera. To load the front reference sketch into the Front camera, click on the Object List tab, right-click on the Front camera object, and select Look Through (Figure 3.6). You should now be looking at the scene through the Front camera. Then, while still in the Object List, click on the plus (+) symbol next to the Front camera to display the Image Plane, and click on the Image Plane. The Image Plane properties will display in the Properties window. Click on the Import button and browse to the file front_sketch.jpg that you found at www.digitalsculpt-ing.net to import it. The reference sketch will appear in front of the model; so, for the moment, you will not see the model in the scene, but only the sketch (Figure 3.6).
FIG 3.5 Select the Basic Head from the Dialog Box.
FIG 3.6 In the Object List, Right-Click on the Front Camera and Choose Look Through. Then Expand the Camera Tree and Select Image Plane. In the Properties Window, Click on Import to Load the Reference Sketch.
To see the model again, you could do one of two things: either you could move the sketch back in the scene behind the model, or you could change the visibility (transparency) of the sketch. In this case, you will change the visibility. Make sure that the Image Plane is still selected in the Object List, expand the Advanced tab in Properties window, and set the Visibility amount to about 0.30 by moving the slider or typing the value. Leave the Depth set to 0 (Figure 3.7).
Next, you will align the model with the front reference image by moving the camera – not by moving the model. At no point, in this tutorial, will you be asked to move the model by using the Translate, Rotate, or Scale tools located in the Select/Move Tools tray. Although it is possible to move the model around the scene, it is best to leave it in the middle of the scene, so that your work will match with the instructions and figures in this tutorial and instead, move the camera. While still looking through the Front camera, zoom until the chin and top of the head of the model match with the reference image as best as possible. Then, pan to align the nose of the model with the reference image (Figure 3.8). Repeat the process you just completed for loading the front reference sketch into the Front camera and aligning the front reference sketch to the model; but this time, do it for the Side camera. The reference sketch for the Side camera is side_sketch.jpg.
FIG 3.7 Adjust the Visibility of the Reference Sketch to See the Model.
FIG 3.8 Align the Model with Front and Side Reference Sketches.
Adding a Camera Bookmark
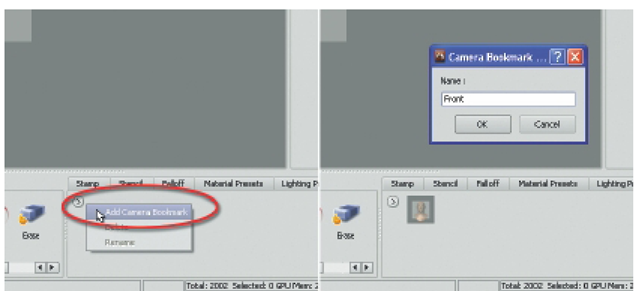
Camera bookmarks allow you to record camera positions, so that you can recall them at a later time. This feature is very useful because it makes it possible to compare your sculpture with the reference sketches or photographs from the same point of view, at any time. To create a camera bookmark for the Front camera view, look through the Front camera, then in the Camera Bookmarks tray, click on the small arrow in the upper left corner, and select Add Camera Bookmark. In the Camera Bookmark dialog, name the bookmark as Front (Figure 3.9). Repeat the process to create a bookmark for the Side camera view.
You have now completed setting up the scene by loading the model you will sculpt, importing the reference sketches, aligning the model with the reference sketches, and creating the first couple of camera bookmarks. This would be a good time to save your work as an incremental copy. In the next part of this tutorial, you will rough in Amy’s basic proportions.
FIG 3.9 Create Camera Bookmarks for the Front and Side Cameras.
Best Digital Sculpting Practices
• Organize the reference materials so that they are handy when needed.
• Save often and save incremental files at important milestones (i.e., sculpt01.mud, sculpt02.mud …).
• Move the scene light (L + MMB) to check forms by examining shadows.
• View the model with different materials. Lighter materials bring out details hidden by dark materials.
• Rough in larger shapes first to build up general forms first, and then add details later.
• Rotate around the model often to inspect it from all angles while working.
• Use the lowest subdivision level that will hold the desired forms. Subdivide only when adding more details. Working at very high-subdivision levels unnecessarily produces lumpy sculptures and wastes computer resources.
• Most important, when building up forms, blend them into the surrounding areas with the Smooth tool. Then, build up and smooth again. Repeatedly using the Smooth tool with the other sculpting tools will create smoother less lumpy forms.


