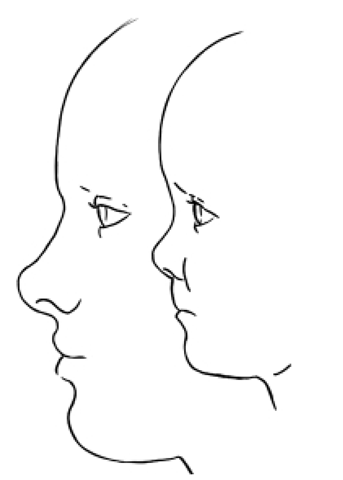
Amy’s features and proportions are very different from the features and proportions of the Basic Head model. This is because the Basic Head model has the proportions of an adult, and there are marked differences between the proportions of an adult and a child. The following are key things to know about the differences between an adult’s head and face and a child’s head and face (Figure 3.10):
FIG 3.10 The Proportions of a Child Are Very Different than an Adult’s Proportions.
• A child’s face is squattier and more rounded than an adult. Adults tend to have longer faces.
• A child’s chin is farther back than an adult’s chin.
• The back of the head and the forehead is more round in a child than in an adult.
• As the upper and lower jaws increase in size, it changes the proportions of the face.
• The size and shape of teeth affect the shape of the mouth and lower face.
• The eye sockets are round in a child but gradually become more rectangular in an adult.
Creating a Sculpt Layer and Subdividing
In the Layers tab, create a new layer and name it something that will indicate what it contains, such as Proportions. Next, subdivide the model twice by pressing Shift + D two times. As you subdivide, you should see the Heads Up Display (HUD) displaying the subdivision level and number of polygons in the model. After subdividing the model twice, you should be at level 2, and the model should have 32,032 polygons.As a result, it is important to keep track in which layer and what subdivision level you are working and also how many polygons the model has at that level. If you haven’t already turned on the model’s wireframe, do so now by pressing W. This will allow you to see how you are changing the model’s geometry.
Adjusting the Proportions of the Chest, Back, and Shoulders
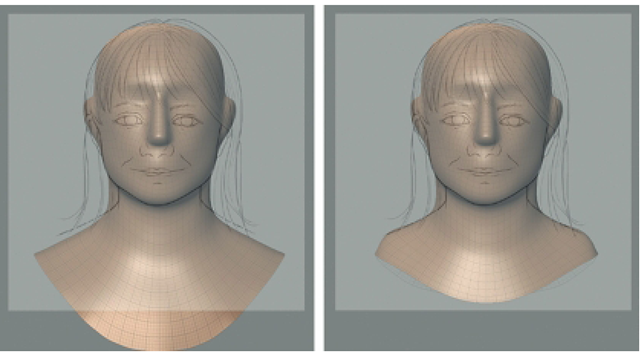
The Basic Head model has broader shoulders and a larger chest than Amy. So, your first sculpting task will be to change the adult proportions of model’s shoulders and chest into the proportions of a child. You will use a combination of the Smooth and Grab tools to accomplish this task. Make sure that you are looking at the model through the Perspective camera. From the Sculpt tools tray, select the Smooth tool and in the Properties window, set the size to about 20 and strength to about 40, and turn on mirroring across the x axis by selecting X from the Mirror menu. Now, begin brushing over the lower edge of the chest, and you should see the chest getting smaller on the left and right sides because mirroring is turned on. Use short controlled strokes to slowly reshape the model. If you don’t get the desired result, simply press Ctrl + Z (Mac Command + Z) to undo and try again. You may switch to the Front camera and use the front reference sketch as a guide. If necessary, switch to the Grab tool and set it to about the same size and strength as the Smooth tool and carefully move any areas of the chest and shoulders that need to be adjusted (Figure 3.11). Use the Grab and Smooth tools to make the back a bit smaller also. The goal is to make the chest, back, and shoulders smaller and more in scale with a child’s proportions. However, you don’t have to make it perfect because this is not the focal area of the sculpture.
FIG 3.11 Changing the Chest, Back, and Shoulders of the Adult Model to Match with Amy’s Smaller Proportions.
Changing the Proportions of the Head
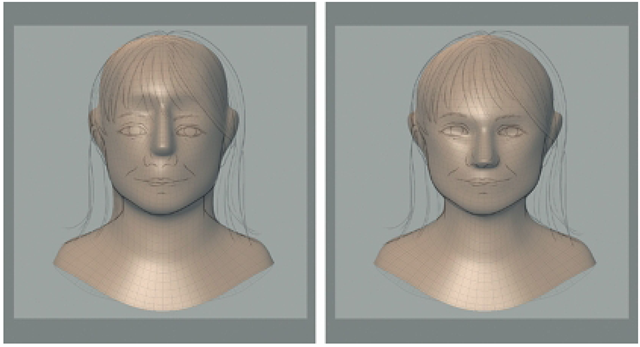
Next, you will change the shape of the model’s head and neck to match with Amy’s proportions. Use the Grab tool (size 60, strength 60) while looking through the Front camera and move the outer edges of the model’s neck to align with Amy’s neck. Then, move the model’s jawline, temples, and cheeks to match with the front reference sketch. Also move the eye sockets, brows, and bridge of the nose to match with the front reference sketch (Figure 3.12). You will have to vary the size of the Grab tool as you work from a large amount to a smaller amount of strength.
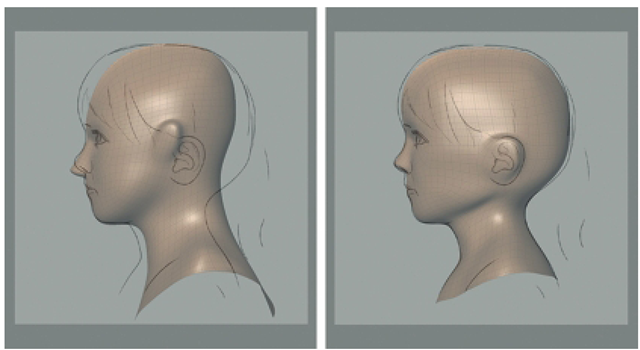
Switch to the Side camera and use the Grab tool to adjust the model’s profile, as seen in Figure 3.13, so that the model matches with the side reference sketch. The reference sketches were drawn and edited, so that the size and facial features align almost perfectly between the front and side views. However, because these sketches were drawn from photographs, there are going to be some slight differences. If you find that what you sculpt in the front view changes the model’s alignment in the side view (or visa versa), make sure that you are using the camera bookmarks when looking through the Front or Side cameras. If there are still some slight differences, just split the difference between the views when sculpting, and remember that the goal is just to sculpt a good likeness of Amy.
FIG 3.12 Use the Grab Tool to Adjust the Model’s Features as Seen from the Front.
FIG 3.13 Adjust the Model’s Features as Seen from the Side.
It’s important to note that your sculpture may not look exactly like the sculpture in the figures – and that’s okay. Expect that there will be some differences between your work and the figures because things like how you initially aligned the model with the reference sketches could be slightly different than what is shown in the figures. If you see some slight differences, don’t be discouraged, just keep sculpting. When you are finished, you will still end up with a good likeness.
At this point, you should have the correct proportions and general shape of Amy’s head. Switch to the Perspective camera and take time to inspect the model from all angles. Make sure that the head is round as seen from the top and sides. If you notice any artifacts such as dents and bumps, correct them now. One artifact that may occur is a crease that is down the midline of the mode. This is caused by working with the Grab tool in the side view. This artifact can be deleted by going over it with the Smooth tool. As you work, switch back to the Front and Side views to make sure that you are not changing the basic proportions. This is a good time to save an incremental copy of your work.


