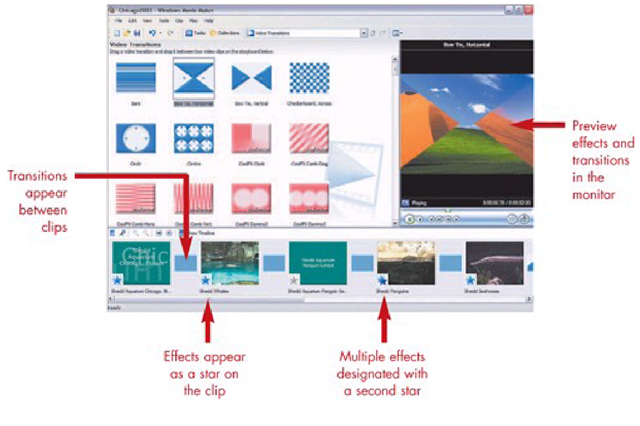
Once you determine the order of video clips and trim them to fit the parameters of your movie, it’s time to add additional production features. Effects serve several purposes in movie making, including artistic enhancements, color correction, and unique image manipulations. Transitions are inserted between scenes, helping to identify a change in the storyline of the movie. Titles are an effective way to give credit to participants in the movie, set the scene for events within the story, or to fill in the blanks where no video is available.
Windows Movie Maker includes several transitions and effects. Microsoft includes additional effects and transitions through the release of seasonal Fun Packs. Fun Packs may be downloaded from the Windows Movie Maker site on Microsoft.com: http://www.microsoft .com/windowsxp/moviemaker/default .asp.
Bundled effects and transitions are further extended using the SpiceFX packs from Pixelan (www.pixelan. com/mm/intro. htm). 94 different effects and 74 transitions make up the SpiceFX collection, including contrast adjustments and a variety of color corrective solutions.
Movie Maker includes a selection of preset title effects, making it easy to create scrolling credits, overlay text on top of video, and animate title text throughout the movie. Movie Maker titles allow the user to customize fonts and background colors, and to make minor choices about text screen position. For completely custom titles, additional programs are required. This is illustrated here using Microsoft Paint, which ships with every copy of Windows XP. Microsoft PowerPoint is also demonstrated as a valuable title creation tool.
In this part of the topic, we examine a variety of effects and transitions for enhancing movies, as well as creating titles.
Effects and Transitions Enhance Your Movie
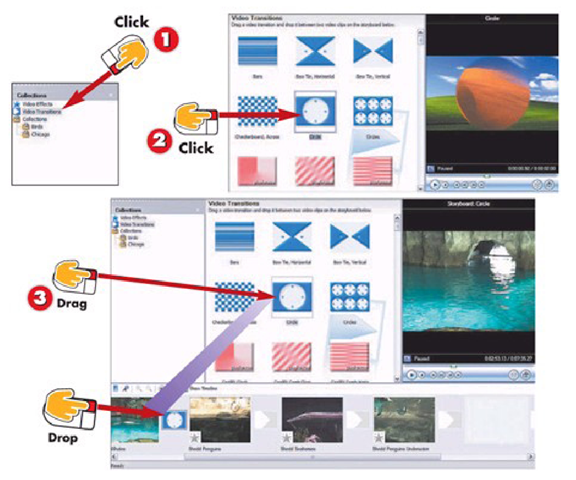
Insert a Transition Between Clips
1 Open the Transitions collection by clicking on Video Transitions.
2 Click to select a transition in the group of available video transitions and then click Play in the monitor to preview it.
3 Find the transition you want to use between two clips and drag and drop it onto the Storyboard.
INTRODUCTION
Rather than abruptly moving from one clip to the next, you insert a transition between clips to give the movie a more seamless appearance. Transitions take many different forms depending on the software you are using. In Movie Maker, transitions are a separate collection and can be added from either the Storyboard or the Timeline.
HINT
Use Transitions Sparingly
Watch TV and look at how professional editors use transitions. Unless you are watching music videos, you barely notice the change from one scene to the next. Keep this in mind before adding bow tie and star wipes between every clip.
4 Click Play on the monitor to preview the transition you inserted between movie clips.
5 Click the Show Timeline button.
6 Expand the video timeline by clicking the plus sign next to video, which reveals the transition.
7 Select the transition by clicking on it, and then drag the left side of the transition to increase or decrease the duration as needed.
HINT
Finishing Up
Preview the transition after you add it and make adjustments in the Timeline as necessary. Repeat the steps to add transitions between other video clips.
TIP
Deleting Unwanted Transitions
If you decide you don’t want to use a transition after adding it to the storyboard or timeline, simply highlight it and press the Delete key on the keyboard.
HINT
Rendering Time
Rendering is what Movie Maker does to output the completed movie to a file. While adding transitions between clips looks cool, it also increases file size, complicates the rendering process, and doesn’t translate well to video compressed for viewing on the Web.
Adding Dissolves Between Clips
1 Click Video Transitions in the Collections pane.
2 Scroll through the list of transitions, until you find Dissolve, and then drag the dissolve transition between two video clips on the Storyboard or Timeline.
3 Click the Play button on the monitor to preview the transition.
4 If you are in Storyboard view, switch to Timeline view by clicking the Show Timeline button.
INTRODUCTION
Dissolves are one of the most common transitions used in video production. They gradually replace the current scene with the next scene by fading in pieces of the new scene as the old scene disappears.
HINT
Directional Dissolves
Pixelan’s SpiceFX Pack 1 includes several directional dissolves, which function like a regular dissolve and start at one side of the screen, gradually dissolving the picture across the screen until reaching the other side.
5 Adjust the length of the dissolve as necessary by dragging the leftedge of the dissolve.
6 Click Play on the monitor to preview the changes.
TIP
Movie Maker Memory
If you expanded the Timeline at any point during the editing process, Movie Maker remembers this and the Timeline remains expanded even after switching the view back to Storyboard.
HINT
Moving the Story Along
When there are abrupt changes in the movie, like a sudden shift in a person’s location in a room, or passage of time, dissolves are typically used to show a shift in perspective without causing the viewer to feel like they missed something.
Adding Fades Between Clips
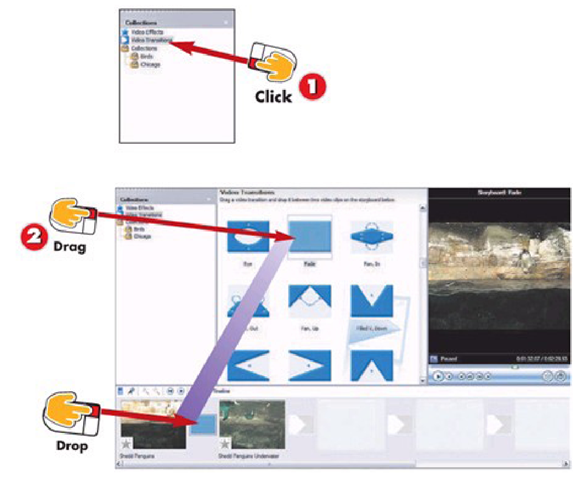
1 Click Video Transitions in the Collections pane.
2 Scroll through the list of transitions, until you find Fade, and then drag and drop the Fade transition between two video clips on the Storyboard or Timeline.
INTRODUCTION
More subtle than a dissolve is the fade transition. This smooth transition between scenes is one of the cleanest ways to change scenes or introduce new clips.
HINT
Only One Transition
Movie Maker supports the use of only one transition between two movie clips. You can’t dissolve into a different transition.
3 Click Play on the monitor to preview the fade transition.
4 If you are in Storyboard view, switch to Timeline view by clicking the Show Timeline button.
5 Adjust the length of the fade as necessary by dragging the left edge of the fade.
6 Click Play on the monitor to preview the changes.
TIP
Transition Duration
Movie Maker sets the default duration of a transition to 1.25 seconds. In most instances, this is long enough as is.
HINT
Cross Fading
The type of fade described here is known as a cross fade, which is a less-abrupt dissolve of one scene into the next. This is not to be confused with a Fade In or Fade Out which takes the scene from or to black respectively.
Adding Titles to the Beginning of the Movie
1 Open the Titles pane from the menu by selecting Tools, Titles and Credits.
2 Click Add title at the beginning of the movie.
3 Type the main text for the title in the top text box. Subtext may be included in the bottom box.
4 Click Change the title animation to modify the way Movie Maker presents the opening credit text.
INTRODUCTION
Titles at the beginning of a movie generally consist of opening credits and can also be used to preface a movie with information about what the viewer will see.
HINT
Not Just a Title
The opening title slide can be more than just the title of your movie. Include background information like the name of the city, time of day, and any other details to help set the stage for onscreen events.
5 Select a new animation style, if desired, and then click Change the text font and color.
6 Modify text attributes like background color, font text color, and positioning by making selections at the top of the dialog box.
7 Finish the opening title by clicking Done, add title to movie.
8 The title is now located at the beginning of the storyboard.
HINT
Adding Multiple Titles
Add additional title screens to the beginning of your movie for more complex opening credits. This offers you the chance to feature information about the director and featured members of the movie using a sequence of screens rather than trying to fit all information on one title segment.
HINT
Title Transitions
Transitions may be inserted between a title and a movie clip, just like any other two segments of your project.
Adding a Title Between Movie Clips
1 Click the movie clip on the storyboard that requires a lead- in title.
2 Choose Tools, Titles and Credits from the Menu.
3 Click Add title before the selected clip on the storyboard
INTRODUCTION
Insert titles between movie clips to provide a quick way to explain passage of time or abrupt scene changes. Titles can make great substitutes for transitions between clips.
HINT Subtitles
Movie Maker also includes a subtitles title option that allows you to place text on top of the video at the bottom of the screen.
4 Type the text for the title slide.
5 Click Change the title animation.
6 Select the animation for the title text and then click Change the text font and color.
7 You can change the text formatting options at the top of the window. Click Done, add title to movie when finished.
HINT
Long Text Gets Cut Off
Title animations, like Newspaper and Sports Scoreboards, are prone to having long text cut off. Aside from abbreviating your title text, using small font sizes and fonts with narrow spacing between letters will help prevent text cutoff.
TIP
Choose Title Fonts with Care
It’s tempting to use fancy text styles for titles. The more complex a font is, the harder it will be to read it on the TV screen or in a tiny video created for the Web.


