Pasteboard/Scratch Area
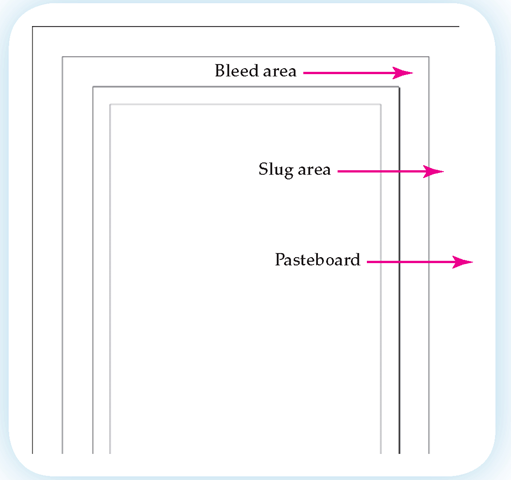
The area outside the working page is called the pasteboard or scratch area. In this area text and images may be put aside until they are ready for placement on a page. If you have inserted images or short text boxes into a document, but are undecided on where they will be used, this is a good temporary storage area. As long as these items do not "touch" the working page, they will be available to you regardless of the page on which you are working.
Bleed
In your original InDesign setup, you had the option of setting the amount of bleed (located under More Options).The bleed is an area outside your working page that allows an image or color to extend to the outer edge of the printed page. Bleeds are seldom used when you are producing a document using a printer attached to a computer or a photocopier. Each of these restrict the area in which you can print, creating a white border around each page. Professional printing services, however, have more options and can use bleeds.
Slug
Another option available in the InDesign setup is slug space. This is space outside the printed area in which you can place instructions that should stay with your document. Often this information is used to communicate with those who need to do further design of the page. It is also a place to store notes for future use. Figure 3.6 shows the bleed area outlined in red. The slug area is outlined in blue. The pasteboard is the area outside the slug area.
Figure 3.6
InDesign builds in an option that allows space for the slug or a bleed. The pasteboard is always available.
Pasteboard or scratch area is the area outside the document page itself.
Bleed is the practice of placing an image or color so that it extends to the edge of the page.
Slug is a nonprinting area in which details about the document are stored for other uses.
In the topic discussion of picas and points, you read that there are 72 points to an inch. Actually, that number is not exactly correct. There is a long and convoluted history of the establishment and acceptance of the actual measurement.Traditionally, in the United States and the United Kingdom the number of points was 72.27. European points, which were defined by the French, were slightly smaller at 72.23. When PostScript was developed, the Inumber was rounded down. Generally, this is nota problem, but you may [encounter professional printers who are using the more precise measurement.
Rulers
Rulers are set up dependent upon the measurement used for the document as a whole. If you have selected inches as your measurement, your document’s rulers will be in inches. If you are using picas, then the rulers will be in increments of 6. The starting or zero point of the ruler is set at the upper left corner of the page (see Figure 3.7). It can be moved, however, so that your zero point is wherever you want it on the ruler.
Figure 3.7
The zero point of the page can be moved to any location and changed whenever you want.
Guides
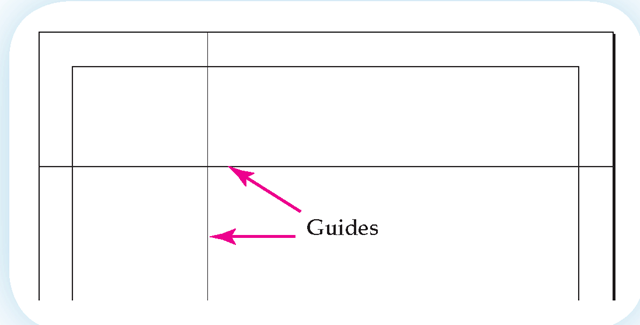
To make it easier to line up text and graphics on your page, your document has guides. Guides are lines that can be "pulled" from the document’s rulers to any position, as shown in Figure 3.8. These can be removed by sliding them back to the ruler. You may add as many of these nonprinting guides to your document as you want. Guides can be set to snap to or adhere to the lines. This means that if you place a frame near a guide, the frame will move to the line automatically.
Figure 3.8
Guides are useful for lining up frames. Since they do not print, you may use as many as you want.
Zero point is the point on the vertical and horizontal page where the ruler is set to zero.
Guides are nonprinting lines that provide visual points of reference, making it easy to align text, images, or frames.
Figure 3.9a
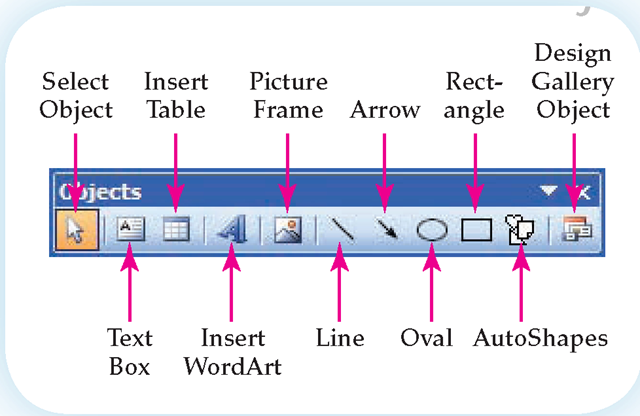
Publisher’s tools are located on the Objects toolbar. Because this is a limited desktop publishing program, there are few options.
tyargins
The margins are set in the opening window, but they can be changed at any time. Unlike word processors that include the margins in the page setup, desktop publishing software includes this information under a separate menu such as layout.
Tools
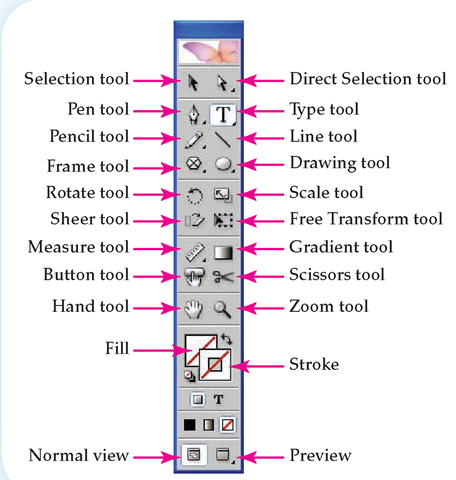
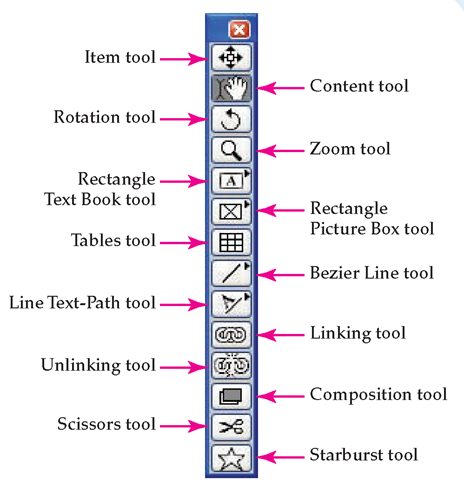
The tools you have available are determined by the DTP software you are using. Generally, you have a toolbar that lets you make selections, draw, add text, rotate, change size, add color, remove areas, zoom, and select colors. Figures 3.9a, 3.9b, and 3.9c show you the various tool options available to you in InDesign, Quark, and Publisher.
Figure 3.9b
InDesign offers a wider selection of tools. Small arrows in the lower corner of a tool button indicate multiple choices for that tool.
Figure 3.9c
The QuarkXPress Tools palette has fewer choices than InDesign. Arrows reveal additional choices for some tools.
Fill and Stroke
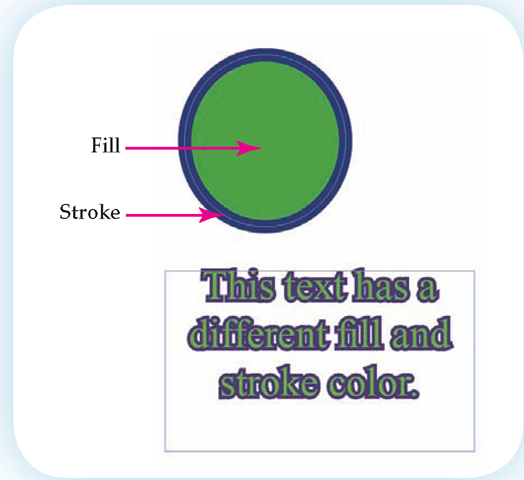
When using InDesign, a tool is available that allows you to select the fill and stroke of a drawing or text. Drawings of objects or frames in DTP programs consist of a fill and a stroke, as shown in Figure 3.10. An outline or border, called the stroke, can be a wide variety of color and width choices. The inside of a drawing or text is called the fill. Fills can be a color or a gradient different from the stroke.
Fill is the area inside an object or text.
Stroke is the border around an object or text.
Figure 3.10
The fill of an image places color inside, while the stroke determines the appearance of the border.
