In This Chapter
Getting ready to say “cheese”
Saving and organizing your pictures
Sharing your photos with other people
Getting ready to say “action”
Configuring your video camera
Oh, shoot, you forgot your camera. Don’t worry! Your BlackBerry is there when you need to capture the unbelievable: Grandma doing a handstand, Grandpa doing a cartwheel, or your roommate doing her laundry.
And if pictures aren’t enough, you can record your unbelievable scene in full motion.
Before you try taking pictures, read this chapter so you know what to expect and how to get the best shot. We walk you through the easy steps for capturing that funny pose and tell you how to store those photos and videos. And don’t miss reading how to share the joy with your buddies.
Saying “Cheese”
Snapping shots with your BlackBerry Curve couldn’t be easier. Just turn on the Camera app, line up your shot, and snap away. Here’s the bird’s-eye view:
1. Press the right convenience key (bottom key on the right side of your BlackBerry) to bring up the Camera application.
Figure 13-1 shows the 8900, and Figure 13-2, the 8500. Most network carriers set the right convenience key on the Curve to bring up the Camera application. However, network carriers may change this setting. So if you don’t see the Camera app when pressing the right-side key, the alternative to launching the Camera application is selecting the Camera icon from the Home screen.
Make sure that your finger isn’t blocking the lens on the back side of your device.
The camera button on the right side of your Curve is really a convenience key, which you can program to open your favorite application. By default, it’s set to launch Camera. Chapter 3 shows how to change this setting.
2. When you see the image onscreen, press the Camera key to take the picture.
You should hear a funky shutterlike sound. Neat and easy, isn’t it?
That’s the quick version. Keep reading to discover more about Camera’s features.
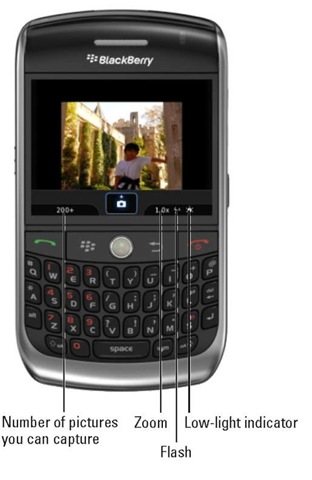
Figure 13-1:
The camera screen ready to take pictures on the 8900.
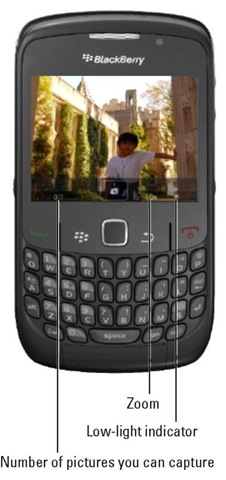
Figure 13-2:
The camera screen ready to take pictures on the 8500.
Reading the screen indicators
When you open the Camera application, the first thing you see is the screen shown in Figure 13-1 (8900) or Figure 13-2 (8500). The top portion of this screen shows you the image you’re about to capture. Immediately below the preview are icons that indicate (starting from the left)
Number of pictures you can capture Zoom
Flash for 8900
Low-light indicator
Choosing the picture quality
Your Curve can capture images with as much resolution as 2.0 megapixels (MP) for the 8500 and 3.2 MP for the 8900. Saving images at this resolution requires considerable space, though. Just be mindful when shooting, and consider saving images at a lower quality to save some space on your BlackBerry.
Get a big microSD card. Nowadays, even a 32GB microSD card is inexpensive, and it holds thousands of pictures.
Here are the three resolutions you can choose:
Normal: The default setting. This is the lowest quality but lets you save the most pictures. The trade-off is that Normal picture quality won’t be as smooth or as fine as the other resolution choices.
If you’re just taking pictures of your friends’ faces so you can attach them as Caller IDs, Normal is appropriate.
Fine: A middle setting between Normal and SuperFine. This is a compromise if you’re concerned about space and want to capture more pictures. The best use is for any electronic viewer; this option isn’t good for printing.
SuperFine: The best quality that your Camera can capture. Choose this if you plan on printing the images.
Changing picture quality is a snap. Follow these steps:
1. Open the Camera application.
2. Press the menu key and then select the Options icon.
3. Highlight Picture Quality and then press the Space key until the setting you want is highlighted.
Pressing the Space key toggles the picture quality value among Normal, Fine, and SuperFine.
4. Press the menu key and then select Save.
The picture quality you chose is active.
Zooming and focusing
You need to be steady to get a good focus while taking your shots. Although it’s convenient to use one hand while taking pictures, most of the time, you’ll get a blurry image if you try that.
When taking pictures, hold your Curve with both hands, one holding the smartphone steady and the other pressing the trackball or trackpad. If the right convenience key is set to Camera, you can press that instead of the trackball or trackpad.
Holding the smartphone with both hands is even more important if you’re zooming in. Yes, your camera is capable of up to 3.0x digital zoom. Here’s what you need to do to focus and zoom:
‘ To focus: Your camera has autofocus. Just hold it steady. ‘ To zoom in: Slide up with the trackball or trackpad. ‘ To zoom out: Slide down with the trackball or trackpad.
While zooming, the value in the indicator changes from 1.0x to 2.0x to 3.0x and vice versa, depending on the direction you scroll.
When zooming, your thumb is already on the trackball or trackpad. What a convenient way to take the picture — just press.
We don’t recommend using the zoom. Digital zoom (which is what your camera has) gives poor results because it’s done through software and degrades the quality of the picture. The higher the zoom factor, the more pix-elated the picture becomes. To get a clearer picture, get closer to the object.
Setting the flash
If you have the BlackBerry Curve 8900, your smartphone comes with a flash. The rightmost indicator on the Camera screen is the flash. The default is Automatic, which shows a lightning bolt with the letter A. Automatic means that the camera detects the amount of light you have at the moment you capture the image. Where it’s dark, the flash fires; otherwise, it doesn’t.
You can turn the flash on, off, or to automatic. The default setting is Automatic. When set to Off, the lightning bolt is encircled with a diagonal line, just like you see on No Smoking signs. You can toggle the settings on the camera’s Options screen, which is accessible by pressing the menu key and selecting Options.
The 8500 has no flash.
Setting the white balance
In photography, filters are used to compensate for the dominant light. For instance, a fluorescent versus an incandescent light could affect how warm the picture appears. Instead of using filters, most digital cameras, including the Curve, have a feature called white balance that corrects or compensates for many types of light settings.
You can choose Sunny, Cloudy, Night, Incandescent, Fluorescent, or Automatic (the default). Automatic means your camera determines what it thinks are the best settings to apply. You can change the white balance through the camera’s Options screen, which is accessible by pressing the menu key and then selecting Options.
Setting the picture size
Aside from picture quality, you can adjust the size of the photo:
Large: 1600 x 1200. This is the default setting.
Large uses more memory. ‘ Medium: 1024 x 768
Small: 640 x 480
Again, camera settings are accessible through the camera’s Options screen — press the menu key and then select Options from the menu that appears.
Geotagging
Because your Curve has GPS capability, your location based on longitude and latitude can be determined easily. This information can be added to your media files, including pictures taken from your camera. Now you don’t have to wonder where you took that crazy pose. Adding geographic information is known as geotagging.
Geotagging is disabled by default. Enable it from the camera’s Options screen: Press the menu key and then select Options to get to the Options screen.
If you have longitude and latitude information from one of your photos, you can use one of the free sites on the Web to locate where you were when you took the photo. One such site is www.travelgis.com/geocode/ default.aspx.
Working with Pictures
You’ve taken a bunch of pictures, and you want to see them. And maybe delete the unflattering ones. Or perhaps organize them. No problem.
Viewing pictures
If you take a picture, you want to see it, right? You can see an image you just captured right then and there, as shown in Figure 13-3.
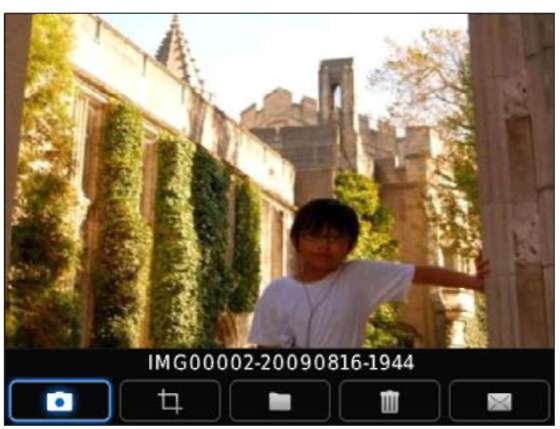
Figure 13-3:
The Camera screen after taking a picture.
All the pictures you took on your Camera are filed directly to a folder in your system. The possible default folder location of pictures is based on whether you opted to save it in
Device Memory: /Device Memory/home/user/pictures Media Card: /Media Card/BlackBerry/pictures
Let your device file the pictures in the media card (microSD). The first time you use Camera, it prompts you whether to save pictures to the media card. If you aren’t sure what the current setting is, simply close the Camera application and then take out the microSD card and put it back in. The next time you open Camera, it displays the same prompt about letting you save pictures to the media card.
The format of the filename is based on the current date and time and named as IMG<counter>-<yyyymmdd>-<hhmm>.jpg. So if you took the 21st picture at 9:30 a.m. on December 20, 2009, you end up with IMG00021-20091220-0930.jpg.
If you’re browsing through your picture folders, view a picture by highlighting it and pressing the trackball or trackpad.
Creating a slide show
To see your pictures in a slide show, follow these steps:
1. From the Camera screen, press the menu key, and then select View Pictures from the menu that appears.
2. Press the menu key.
3. Select Slide Show.
Voila! Your BlackBerry displays your pictures one at a time at a regular time interval. The default interval between each picture is two seconds; if you aren’t happy with this interval, change it in the Options screen. (Press the menu key and then select Options to get to the Options screen.)
Trashing pictures
If you don’t like an image you captured, you can delete it. Follow these steps:
1. Highlight the picture you want to trash.
2. Press the menu key and then select Delete from the menu that appears; alternatively, press the Del key.
A confirmation screen appears.
3. Select Delete.
You can also delete an image right after taking the picture; just select the trash-can icon when viewing the photo (refer to Figure 13-3).
Listing filenames versus thumbnails
When you open a folder packed with pictures, your BlackBerry automatically shows thumbnails, which are small previews of your pictures.
A preview is nice, but suppose you want to search for a picture by filename. Here’s how:
1. Go to a picture folder.
2. Press the menu key.
3. Select View List.
That’s exactly what you get: a list of all the pictures in the folder. What’s neat is that the option also displays the file size, which can give you a clue about what settings you used to take the picture. For example, a photo taken at a SuperFine quality produces a much bigger file size compared with one taken at Normal.
Checking picture properties
Curious about the amount of memory your picture is using? Want to know the time you took the photo?
1. Highlight the picture from a list.
On the Camera screen, view the list of your pictures by pressing the menu key and then selecting View Pictures.
2. Press the menu key.
3. Select Properties.
You see a screen similar to Figure 13-4, which displays the file’s location in your BlackBerry, size, and last modification. The arrow with Removable text indicates that it’s filed in the media card. The Hidden check box allows you to hide the file when navigating through your picture list. Once hidden, the file disappears from the list, and the only way to see the file in your Curve again is to use Explore. Check Chapter 14 for details about Explore.
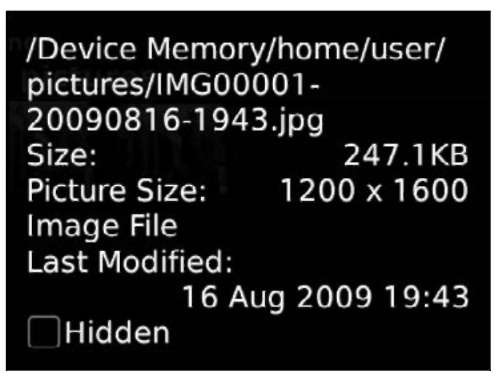
Figure 13-4:
Your picture’s properties.
Organizing your pictures
Organization is all about time and the best use of it. After all, you want to spend your time enjoying looking at your pictures — not looking for them. Your BlackBerry Curve enables you to rename and move pictures to different folders. You can create folders, too. With those capabilities, you should be on your way to organization nirvana.
Renaming a picture file
BlackBerry autonames a file when you capture a picture. However, the name of the picture is generic, something like IMGxxxx-currentdate-time, where x is a number. Not very helpful.
Make it a habit to rename a photo as soon as you capture it. Using a name like Dean blows birthday candles is much more helpful than MG0029-20081013-0029.
Renaming a photo file is a snap. Here’s how:
1. Display the picture screen or highlight the photo file in the list.
The list is displayed from Camera when you press the menu key and select View Pictures.
2. Press the menu key and select Rename.
A Rename screen appears, as shown in Figure 13-5.
3. Enter the name you want for this picture and then select Save.
Your picture is renamed.
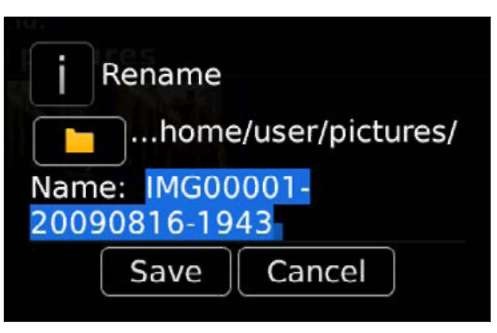
Figure 13-5:
Rename your picture here.
Creating a folder
Being the organized person you are, you must be wondering about folders. Don’t fret; it’s simple to create one. Here’s how:
1. From the Camera screen, press the menu key and then select View Pictures.
The screen displays the list of pictures in the folder where Camera saves the pictures.
• If the current folder is still the default pictures-folder location, this folder will be the root of where you can create your subfolder. You can proceed to Step 3.
• Otherwise, follow Step 2 to select the Up icon to navigate up to the folder above this folder.
2. Select the Up icon to navigate to the main folder where you want your new folder to be created.
You should be within the folder where you want your new folder to be created. If you are not, repeat this step to navigate to that folder.
3. Press the menu key and then select New Folder.
4. Type the name of the folder and then select OK.
Your folder is created.
Moving pictures
Here’s how to move pictures to a different folder:
1. From the Camera screen, press the menu key and then select View Pictures.
The screen displays the list of pictures in the current folder. If the picture you want to move isn’t in this folder, click the Up icon to navigate up to other folders.
2. Highlight the picture you want to move, press the menu key, and then select Move.
In the screen that opens, navigate to the folder where you want to move this picture.
3. Click the Up icon, and use the trackball or trackpad to navigate to the folder where you want to move this picture.
4. Press the menu key and then select Move Here.
Your picture is moved.
You can easily transfer your pictures to your PC or copy pictures from your PC to your Curve. See Chapter 15 for details.
Sharing your pictures
Where’s the joy in taking great pictures if you’re the only one seeing them? Your BlackBerry has several options for sharing your bundle of joy:
1. From the Camera screen, press the menu key and then select View Pictures.
2. Highlight a picture you want to share.
3. Press the menu key.
4. Select one of the choices listed here:
• Send as E-mail: This goes directly to the Message screen for composing an e-mail, with the selected picture as an attachment.
• Send as MMS: Similar to Send as Email, this opens a Compose MMS screen with the selected picture as an attachment. MMS first displays Contacts, though, letting you select the person’s phone number to receive the MMS before going to the Compose screen. Another difference is that in MMS, the Curve sends a tiny version of the picture.
• Send to Messenger Contact: This option is available if you have BlackBerry Messenger installed. This function is similar to Send as MMS but displays only those contacts you have in BlackBerry Messenger. It uses BlackBerry Messenger to send a tiny version of the picture file.
• Send Using Bluetooth: Send the picture to any Bluetooth-capable device.
You might see other ways to send a picture file if you have other instant messaging (IM) clients installed. For example, if you have Google Talk installed, you will see the Send as Google Talk option.
Setting a picture as Caller ID
Wouldn’t it be nice when your girlfriend calls if you also could see her beautiful face? You can. Start with a photo of her saved on your BlackBerry Curve. Then follow these steps:
1. Select the Media icon from the Home screen and then select Pictures.
2. Navigate to the location of the photo.
3. Highlight the photo you want to appear when the person calls.
4. Press the menu key and then select Set as Caller ID.
The photo is displayed onscreen, with a superimposed, portrait-size cropping rectangle. Inside the rectangle is a clear view of the photo; outside the rectangle, the photo is blurry. The clear view represents the portion of the photo that you want to show up as Caller ID. You can move the trackball or trackpad to move the rectangle to make sure that you crop to capture the face.
5. Crop the photo by pressing the trackball or trackpad and selecting Crop and Save.
Contacts appears.
6. Select the contact you want this picture to appear for.
A message indicating a picture is set for that contact appears. You’re set.
Adding a photo to your contacts can also be done through the Contacts application (refer to Chapter 4).
Setting a Home screen image
Suppose you have a stunning picture that you want to use as the background image for your BlackBerry. Follow these steps to set the image:
1. Select the Media icon from the Home screen and then select Pictures.
2. Navigate to the location of the picture you want to use.
3. Highlight the picture.
4. Press the menu key and then select Set as Wallpaper.
You can always reset the screen image or go back to the default Home screen image by following the preceding steps but selecting Reset Wallpaper from the Menu screen in Step 4.
Say Action: Capturing Video
Your BlackBerry Curve camera application can do more than take still photos. You can also use it to take videos.
Here are the quick and easy steps to use Video Camera mode:
1. Open the Camera application.
2. Press the menu key and then select Video Camera.
The screen displays like a viewfinder on a typical digital video camera, as shown in Figure 13-6. Press the trackball or trackpad to start recording.
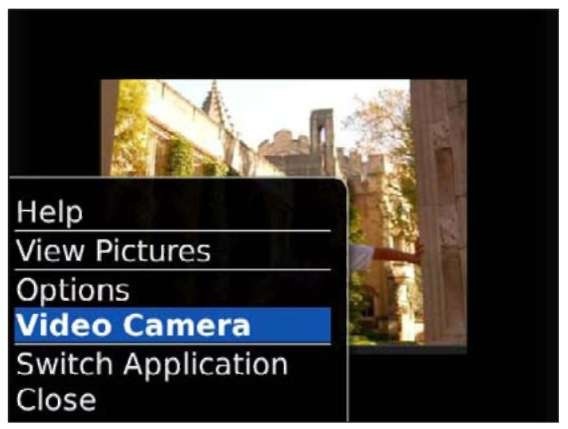
Figure 13-6:
Toggle to Video Camera mode here.
The onscreen controls are all context related. When you first launch the video camera, all you see is the Record button with the big white dot at the bottom of the screen (shown in Figure 13-7). When you use the trackball or trackpad to select the Record button, the video camera starts taking video, and the only available control is a Pause button.
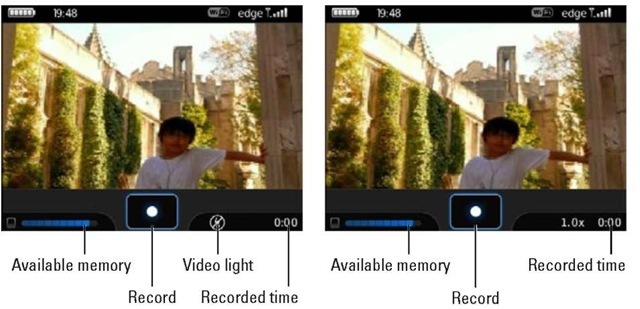
Figure 13-7:
BlackBerry as a digital video camera on the 8900 (left) and 8500 (right).
The indicators on your screen, as shown in Figure 13-7, are as follows:
Available Memory: The more squares you see, the more free space you have for saving videos to the device memory or the media card.
Video Light: Shows up only if you have the 8900. A circle around the lightning icon, like you see on the left side of Figure 13-7, indicates that Video light is off, which is the default setting.
The following section shows how to enable Video light.
Zoom: Like your still camera, it’s capable of giving you 3.0x digital zoom.
Recorded Time: Tells you how long, in seconds, you’ve been recording.
You can use the escape key to stop recording and save the captured video or press the trackball or trackpad to pause recording. When you pause the recording, the screen updates to show the rest of the controls, as you see in Figure 13-8.
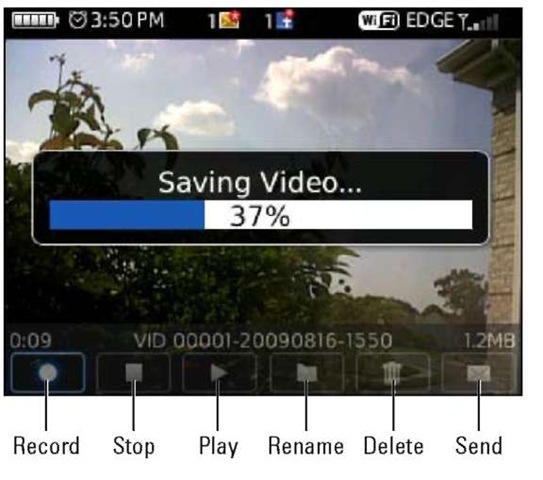
Figure 13-8:
The video camera controls.
The controls are the familiar buttons you see on a typical video recorder/ player. From left to right, they are as follows:
Record: Continue recording.
Stop: End the current recording.
Play: Play the current video you just recorded.
Rename: Rename the video file.
Delete: Get rid of the video file of the current recording.
‘ Send: Share your current video recording. You have the option to send it as e-mail, as MMS, or through Bluetooth. If you have IM clients installed, such as Google Talk or Yahoo! Messenger, the IM client will be listed as one of the options for sending the video file.
Customizing the Video Camera
Your BlackBerry has a few settings you can tweak to change the behavior of the video camera. And as with every other BlackBerry application, to see what you can customize, don’t look anywhere else but the application’s Options screen — in this case, the Video Camera Options screen.
Follow these steps to get to the Video Camera Options screen:
1. Open the Camera application.
2. Press the menu key and then select Video Camera (refer to Figure 13-6).
3. Press the menu key and then select Options.
The Video Camera Options screen appears, as shown in Figure 13-9.
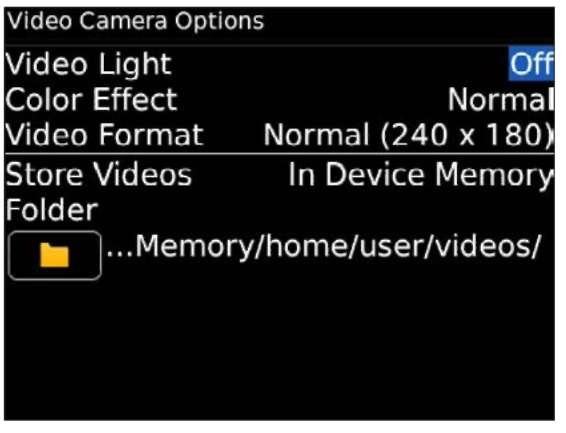
Figure 13-9:
Customize your video camera here.
The available options are easy to digest, but in case you need a little help, here’s what you can tweak:
Video Light: In case it’s a little dim, you can turn on the video camera’s lights. This is available only if you have the 8900. The Curve 8500 doesn’t have a video light. While on the video camera screen, you can toggle this setting on or off simply by pressing the Space key.
Dropped something in a dark alley? This video light is a good alternative to a flashlight when you need one.
Video Light is the flash that you use when taking still pictures. It stays lit when you set the setting to On and open the Video Camera. The default is Off.
Using Video Light is a drain on your battery.
Color Effect: The default color effect is Normal, which is standard color. If you’re in the mood for effects, you can opt for Black & White or Sepia.
Video Format: This option is the screen resolution size. The default here is Normal, at 240 x 180 for the 8900 and 320 x 240 for the 8500. If you’re planning to send your video to friends through MMS, you can choose MMS mode, which has the smaller size of 176 x 144 and is optimal for MMS.
Folder: You can use this option to change the default location where your BlackBerry saves the video file.
