In This Chapter
Listening to music
Selecting a ring tone
Recording your voice
Controlling your media files
If one word describes today’s phone market trends, it’s convergence. Your BlackBerry Curve is among the participants in this convergence race. In addition to sending and receiving e-mail and being a phone, a camera, and a PDA, the Curve is an excellent portable media player.
In this small package, you can
Listen to music
Record and watch video clips
Sample ring tones
Snap and view pictures
These capabilities are bundled into an application with a name you’d recognize even after sipping a couple of pints of strong ale — Media.
Accessing Media
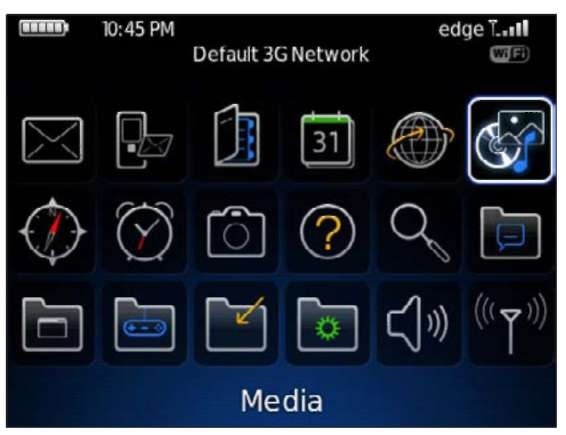
To run Media, simply select the Media icon from the Home screen. The Media icon is easy to distinguish because it bears the image of a CD and a musical note.
Media is a collection of the following media applications:
Music Video Ring Tones Pictures Voice Notes
When you open Media, you see that each application is represented with an icon, as shown in Figure 14-1. It’s not that difficult to figure out what each one of these media applications is used for. Ready to have some fun?

Figure 14-1:
Explore Media here.
Let the music play
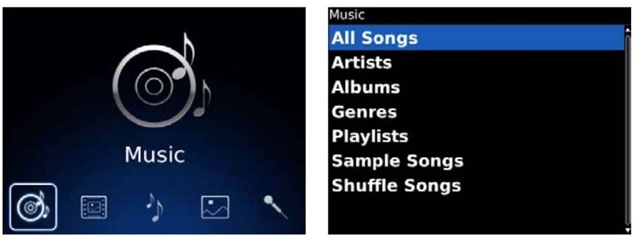
You don’t need a quarter to play music on your BlackBerry Curve. Just select the Music application from the Home screen (the left side of Figure 14-2) or Music from the Media screen (refer to Figure 14-1). Either method launches the same Music application.
Several potential views of your music collection appear, as shown on the right side of Figure 14-2. Music is the screen heading. The views are
All Songs: Displays all your music files in alphabetical order.
Artists: Lists your music files by artist so that you can play your John Mayer songs in one go.
Albums: Views your music collection one album at a time.
Genres: If you prefer not to mingle your country with your cutting-edge techno, navigate through this view.
Playlists: Organizes and plays songs as you prefer — the perfect mix tape!
Sample Songs: Go here when you’re dying to check the player but haven’t yet put your collection into the BlackBerry.
Shuffle Songs: Life is all about variety, and when you’re tired of the song order in your playlist, select this.

Figure 14-2:
Launch Music from the Media screen (left), and choose how to view your music collection (right).
After you choose a view, select one of the songs to start playing it. After BlackBerry starts playing a song, it plays the rest of the music listed in the view you selected. The standard interface shown in Figure 14-3 doesn’t require much explanation.

Figure 14-3:
The music plays here.
The two small icons at the bottom left indicate repeat and shuffle:
If you want the songs to be played again after the last song in the list is played, just press the menu key and select Repeat.
Tired of hearing the same sequence of songs played? Press the menu key and select Shuffle. Your songs will be played randomly.
You can’t fast-forward or rewind, but you can position where Curve is playing by dragging the progress slider. Use the trackball or trackpad to select the progress slider and then slide the trackball or trackpad to change the slider’s position. Press the trackball or trackpad again, and the music starts playing from that position.
BlackBerry supports many music formats. The following list shows the supported formats, along with the file extensions:
ACC: Audio compression formats AAC, AAC+, EAAC+, and AAC-LC (.aac and .m4a)
AMR: Adaptive Multi-Rate-Narrow Band (AMR-NB) speech coder standard (.mmr and .3gp)
MIDI: Polyphonic MIDI (.mid, .midi, and .smf)
MP3: MPEG Part 1 and Part 2 audio layer 3 (.mp3 and .mp4)
WMA: Windows Media Audio 9, Pro, and 10 (.wma and .asf)
The earpiece/mic combo that comes with your Curve is for one ear only. This is an issue when you’re on a train. You may prefer using a stereo (two-ear) headset — or a Bluetooth headset is a good option.
The 8500 series has three media keys at the top. Starting from left, they are
Backward: This is the standard two arrow keys pointing to the left, which you can use to go back to the previous song or movie in your playlist.
Play/Pause: Pressing this middle media key launches the Media application. If the list of songs or videos is displayed, pressing this key plays the currently highlighted media file. If a media file is playing, pressing this key pauses the file.
Forward: This is the standard two arrow keys pointing to the right. Press this key to go to the next media file.
Creating a playlist
Sure, you have favorites in your song library. Having a playlist would be nice, right? On your Curve, you can create two types of playlists:
Standard: A bare-bones playlist in which you manually add the music you want.
Automatic: You can specify a combination by Artists, by Album, by Genres, or any combination thereof.
To create a playlist, follow these steps:
1. From the Music screen, select Playlists.
To get to the Music screen, select Music in Media or from the Home screen.
2. Select [New Playlist].
3. Select Standard Playlist or Automatic Playlist.
The screen that follows allows you to enter the name of your playlist and either
• Add songs you select (Standard Playlist).
• Specify your playlist criteria (Automatic Playlist). Skip to Step 5 if you selected Automatic Playlist.
4. If you select Standard Playlist, do the following:
a. Press the menu key and then select Add Songs. Your music library listing appears.
b. Scroll to your music list, and select the song you want to add to your playlist.
You return to the preceding screen, with the selected song added to your playlist. Repeat this step for each song you want to add.
c. After you’ve added all the songs you want in Standard Playlist, press the menu key and select Save.
You’re finished!
5. If you select Automatic Playlist, do the following:
a. Select the + button to the right of the music type criteria, and select one of the listed combinations.
Again, you can choose by Artist, by Albums, by Genres, or a combination of any of the three options. If you choose by Artist, you’ll be presented with the list of artists; the same is true for by Albums, where a list of albums will be shown for you to select.
b. Repeat Step 5a to add more values to your criteria.
c. After you add all the criteria you want in Automatic Playlist, press the menu key and select Save.
You’re finished!
From time to time, you may have played a song and happened to like it. Want to add it to your playlist? No problem. While you’re playing the song, simply press the menu key and select Add to Playlist. Then select the playlist you want that song added to from the screen that follows.
Playing from your playlist
Playing your playlist is a no-brainer:
1. From the Music screen, select Playlists.
To get to the Music screen, select Music in Media or from the Home screen.
2. Scroll to highlight the playlist you want to start playing.
3. Press the menu key and then select Play.
Now showing
Playing or recording a video is similar to playing music:
1. From the Media screen, select Video.
You can launch Media by selecting the Media icon from the Home screen. The screen shows Video Camera, and a list of video files appears at the bottom. If you want to watch a video, skip to Step 5.
2. To start video recording, select Video Camera.
A screen shows the image in front of the camera.
3. Select the screen again to start recording.
Don’t wait for “Cut!” You can pause the camera by pressing the trackball or trackpad. The familiar video and audio controls appear. From left to right, they are Continue Recording, Stop, and Play. The other buttons are Rename (for renaming the filename), Delete, and Send via e-Mail.
4. Select the Stop button when you’re ready to wrap up your home video.
You wind up at the previous screen ,with the video clip file listed. We know you’re itching to watch it.
5. Select the file to play it onscreen.
Lord of the ring tones
Ah, the proliferation of ring tones. Nothing beats hearing a loud funky ring tone while you’re sleeping on a bus or a train. You can wake other passengers, too, whether you want to use the Top 40, old-fashioned digital beats, or something you recorded.
To hear ring tones that come with your BlackBerry, do the following:
1. From the Media screen, select Ring Tones.
You see three views: All Ring Tones, My Ring Tones, and Preloaded Ring Tones.
2. Select Preloaded Ring Tones.
The preloaded ring tones are displayed.
3. Select any one of them, and enjoy.
While playing a ring tone, select the right arrow to go to the next tone; select the left arrow to go the preceding one.
4. Choose a ring tone you like.
5. Press the menu key, and select Set as Ring Tone.
That ring tone is what plays when your phone rings.
A ring tone is similar to a music file and includes many of the same music formats:
ACC: Advanced Auto Coding format, used by iTunes
AMR: Adaptive Multi-Rate, a popular audio format for mobile transmission and mobile applications
M4A: A subset of ACC for audio only
MIDI: Musical Instrument Digital Interface, a popular audio format for musical instruments
MP3: MPEG Audio Layer 3, the most popular music format WMA: Windows Media Audio, a Microsoft audio file format
If you’re familiar with any audio-editing software, you can make your own ring tones. Save the file in one of the formats in the preceding list and copy it to your Curve. You can also find many free ring tones on the Internet. The only possible harm from downloading one is being annoyed with how it sounds. The Browser default Home page (http: //mobile.blackberry.com) has links to sources of ring tones as well. See the Fun and Pages link on the Home page.
Picture this
If you upgraded from an older BlackBerry, you may already know about Pictures, which you use to view, zoom into, and rotate pictures:
1. From the Media screen, select Pictures.
Your options are similar to those for other Media applications.
2. Navigate to the view you want.
3. Find the picture you’re looking for.
4. Select the file.
Pretty easy, right? At this point, your photo file is displayed in the screen.
Check out Sample Pictures. Your BlackBerry comes with a collection of pictures that you can use as your Home screen background. Or assign one of the cartoons to a contact as a Caller ID until you get a chance to take the person’s picture and use that instead. (We describe how to do that in Chapter 13.)
Your Curve supports the following standard picture formats:
BMP: Bitmap file format (.bmp)
JPEG: Developed by the Joint Photographic Experts Group committee (•jpg); typically compresses the image file to a tenth of its size with little perceptible loss of image quality
PNG: Portable Network Graphics (.png), which is a bitmapped image format that employs a lossless data transmission
TIFF: Tagged Image File Format (.tif), which is mostly used in scanners and is under the control of Adobe Systems
WBMP: Wireless Bitmap (.wbmp) file format, which is optimized for mobile devices
View in Pictures
When you’re in Pictures and navigating in a folder, the default view is always showing thumbnails. This allows you to quickly view many pictures at the same time before deciding which one to open.
Want to view all of them? Run a slide show. Press the menu key and select View Slide Show.
A convenient way to view pictures in OS 5.0 is to slide the trackball or trackpad sideways. Scrolling right transitions the view to the next picture, and you’ll see a smooth sideways movement of the picture in the screen. Scrolling left transitions in the opposite direction until the preceding picture is displayed.
Zoom to details
To zoom in a photo, open it, press the trackball or trackpad, and then select Zoom. A tiny unobtrusive slider bar appears on the left side of the image. Now use your trackball or trackpad: Sliding up zooms in, and sliding down zooms out.
Rotating a photo
Want to view yourself upside down? Maybe not. But sometimes your pictures look better when viewed horizontally. If your Curve runs OS 4.6, you can rotate an image on the screen while you view it in Pictures: Just press the trackball or trackpad and select Rotate. The image rotates 90 degrees clockwise. By repeating the same steps, you can keep rotating it; each press is an additional 90-degree clockwise rotation. The Rotate feature isn’t available in OS 5.0.
While you’re scrolling, the slider bar indicates the degree of zoom. The exact center of this bar is the original image (no zooming applied). You can easily go back to the original zoom size by pressing the menu key and selecting Zoom All.
An image normally defaults to fit the screen, but you can toggle it by pressing the menu key and selecting one of these options:
Fit to Screen View Actual Size
Pressing the trackball or trackpad while a picture is displayed is equivalent to zooming in 5.0. Once zoomed in, you can zoom out by pressing the escape key.
Record your voice
A feature-packed smartphone like your Curve should come with a voice recorder, and it does. Within Media, you can find Voice Notes, a neat recording application. Now you can record your billion-dollar ideas:
1. Select Voice Notes (that little microphone icon) from the Media screen.
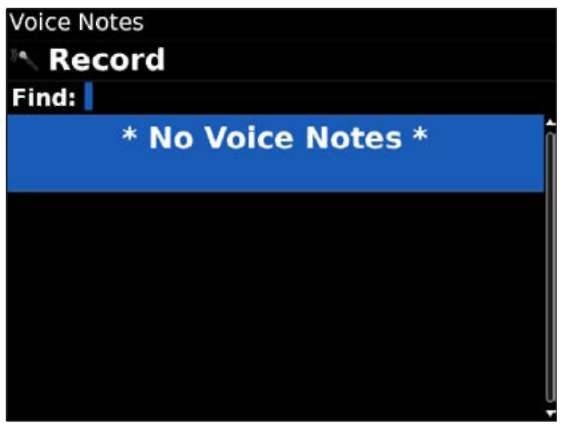
The Voice Notes application launches, sporting the simple and clean screen shown in Figure 14-4. At the top of the screen is a Record button, and the bottom part lists your previous recordings.
2. Select Record.
3. Press the trackball or trackpad.
Your BlackBerry’s microphone is designed to be close to your mouth, like any mobile phone’s mic should be.
You can pause any time you want by pressing the Pause button. Familiar video/audio controls appear. From left to right, they are Continue Recording, Stop, and Play. Other buttons are Rename (for renaming the file), Delete, and Send via E-Mail.
4. Press the trackball or trackpad and then select the Stop button to wrap it up.
You return to the preceding screen. Your recent voice recording appears in the list.
5. Select the voice recording to play it.

Figure 14-4:
Record your voice here.
Viewing and Controlling Media Files
The previous sections show what types of files you can record or play on your BlackBerry. The following sections give you the lowdown on controlling those files when you’re playing or viewing them.
Turning it up (or down)
Whether you’re listening to music or watching a video, adjusting the volume is easy.
Your Curve comes with dedicated volume buttons on the upper-right side of the device. The top button (with the plus sign) turns up the volume, and the button below (with the minus sign) turns down the volume. The onscreen volume slider reflects anything you did with the volume buttons.
Media shortcuts
Taking the time to master the following shortcuts now will pay you back in time later. Here are the must-know Media shortcuts:
Mute: Toggle between pausing and playing music and video. (The key is located at the upper right of the device and has a muted-speaker label.)
6: Move to the next item.
4: Move to the preceding item.
3: Zoom in on a picture.
9: Zoom out on a picture.
5: Zoom back to the original picture size.
, (comma): Rotate a picture counterclockwise.
Space: Toggle between pausing and resuming a slide show.
Navigating the menu
Almost all Media applications have a common menu, with the exception of Pictures. The menu items are mostly self-explanatory, but the following sections quickly highlights what you’ll see.
Navigating the Pictures menu
You can easily jump to the next item in the list. Press the menu key while you are viewing an image. In the menu that appears, you see the following items:
Next: Jumps to the next item in the list. This item appears only if there’s an item after this image file in the current folder.
Previous: Jumps to the preceding item. This item appears only if there’s a previous item in the current folder.
Delete: Deletes the image file.
Move: Moves the file to a different folder.
Rename: Renames the image file.
Properties: Displays a screen that shows the location of the image file, its size, and the time it was last modified.
Navigating the Music, Videos, Ring Tones, and Voice Notes menu
Whether you are watching a video, playing music, hearing a ring tone, or listening to a voice note, you see the following after pressing the menu key:
Replay: Plays the media file again from the start. Repeat: Plays the same media after it reaches the end.
Show Playlist: Displays the list of media files on the current folder or playlist.
Activate Handset: Mutes the device’s speaker. Use this if you want to use the earpiece. This menu item appears only if you have activated the speakerphone.
Activate Speakerphone: Uses the device’s speaker and mutes the earpiece. This menu item appears only if the handset is activated.
Using Explore
You can navigate to your media file in many ways, but Explore is probably the quickest way to find a file. It’s easy to use because it has some similarities to Windows Explorer, and it also has a search facility similar to Find in other BlackBerry applications such as Contacts, MemoPad, and Tasks.
To launch Explore, simply select Media from the Home screen, press the menu key, and select Explore. The Explore screen starts with the device root folders: Media Card, Device Memory, and System.
Folders are in a tree hierarchy. You can get into the child folders (subfolders) by selecting from the parent folder, starting from one of the root folders.
If you’ve set a property of a picture to hidden, Explore is the only place in your Curve through which you’ll be able to locate the file again:
1. Navigate to the folder where your picture file is located.
2. Press the menu key and select Show Hidden.
The default location for pictures taken by Camera is either /Device Memory/home/user/pictures or /Media Card/BlackBerry/pictures.
Changing the media flavor
Like the rest of your BlackBerry applications, you can customize Media:
1. From the Media screen, press the menu key.
2. Select Options.
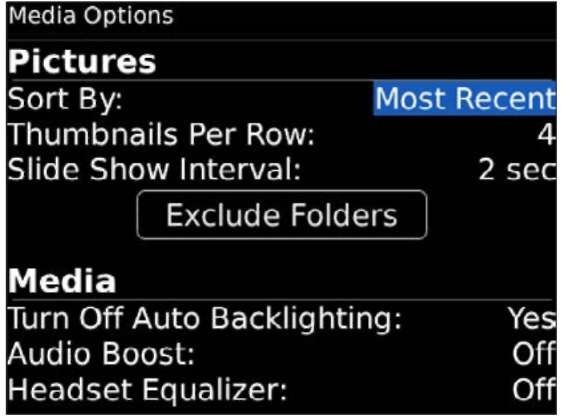
The screen looks like the one shown in Figure 14-5. Each media customization option is described in the following sections.

Figure 14-5:
The Media Options screen.
Customizing pictures
You can change the Pictures application in the following ways:
Sort By: Toggle file sorting based on recent updates or name.
Thumbnails per Row: When your files appear as a grid of thumbnails (small versions of your photos), this number of thumbnails is displayed per row. The higher the number, the smaller the thumbnails.
Slide Show Interval: When you’re viewing your files in a slide show, a picture appears for this many seconds before moving to the next picture.
Exclude Folders: Use this option when you don’t want to display any pictures inside a particular folder. This makes it faster to load the list of pictures. (The fewer pictures you have, the faster the Pictures application can load the list.) This option isn’t for your secret folders.
Set Convenience Keys: A button available only in OS 5.0 allows you to change the settings for the right and left convenience keys, which are shortcut keys to an application. The defaults are for the right-side key to launch Camera and the left-side key to launch Voice Dialing.
Customizing media
You can finesse the rest of Media as follows:
Auto Stop Media Player When Idle: You can set this to Off (the default), 5, 10, 20, 30, or 45 minutes. This can save you battery life if you get distracted and leave your Curve on a table playing video.
Turn Off Auto Backlighting: The backlighting feature provides additional screen lighting when Curve detects that you need it. You’ll notice it when you move your Curve from shade to direct sunlight. We find it bothersome when watching a movie. For that reason — and to extend battery life — toggle it Off here.
Audio Boost: Allows you to increase the volume beyond the normal level. The default setting is Off. If you set it On, it gives you a fair warning about possible ear discomfort when you’re using headphones.
Headset Equalizer: The default is Off, but if you want to have a different audio setting, you have several options: Bass Boost, Bass Lower, Dance, Hip Hop, Jazz, Lounge, Loud, R&B, Rock, Treble Boost, Treble Lower, and Vocal Boost.
