In This Chapter
Introducing BlackBerry Desktop Manager
Preparing your PC for PIM synchronization
Using manual and automatic synchronization
What better way to keep your BlackBerry Curve updated than to synchronize it with your desktop application’s data?
Arguably, most of the data you need to synchronize is from your personal information manager (PIM) applications: notes, appointments, addresses, and tasks. The crucial piece for data synchronization to and from your device and desktop computer is Synchronize. This software within BlackBerry Desktop Manager allows you to synchronize your PIM data as well as upload and download media files between your PC and your Curve.
In this chapter, you explore Synchronize and see how to manually and automatically synchronize your Curve with your desktop computer. You find tips about which options you may want to use. Before all that, however, is a section on BlackBerry Desktop Manager.
If you’re a Mac user, good news! The folks at Research In Motion have finally rolled out a Mac version of BlackBerry Desktop Manager. You no longer have to use PocketMac, which is way behind on features and capabilities compared to its Windows cousin BlackBerry Desktop Manager. In this topic, we focus mainly on the PC version of BlackBerry Desktop Manager, but we also show screenshots of the Mac version of the application in different areas to let you Mac users out there know that you can do the same tasks in the Mac BlackBerry Desktop Manager.
If you’re using a corporate BlackBerry Curve that’s running under BlackBerry Enterprise Server, you can skip this chapter. BlackBerry smartphones running under BlackBerry Enterprise Server synchronize over the air (OTA), via serial bypass, or wirelessly.
Meeting BlackBerry Desktop Manager
The centerpiece of your desktop activities — such as data synchronization, switching smartphones, and data backup on the BlackBerry — is BlackBerry Desktop Manager, which is a suite of programs that includes the following:
Application Loader: Installs BlackBerry applications and updates the BlackBerry OS.
Backup and Restore: Backs up your Curve data and settings. Check out Chapter 18 for details.
Synchronize: Synchronizes Curve data with your PC (um, the topic of this chapter).
Media Manager: Uploads media files to your Curve from your PC and vice versa (another topic in this chapter).
Device Switch Wizard: Helps you transfer data from your existing mobile device to your Curve. See Chapter 17 for details.
BlackBerry Desktop Manager is software loaded on the CD that comes with your Curve. Your Curve’s packaging provides instructions on how to install BlackBerry Desktop Manager on your desktop computer. For corporate users, check with your BlackBerry system administrator for more details.
Installing BlackBerry Desktop Manager and Desktop Redirector
As we mention, use the CD that comes with your Curve to install BlackBerry Desktop Manager on your computer. At the same time, you can also install Desktop Redirector. (Read more about this in Chapter 8.) Desktop Redirector allows you to redirect e-mail that you receive in Outlook. This means that even if you get e-mails through Outlook (such as work e-mails), you can have those e-mails redirected to your Curve.
Only e-mails from mailboxes connected to your Outlook mailbox are redirected. Your PC and the redirector must run all the time to keep redirection active.
When you insert the CD, the installation wizard runs automatically. Follow the onscreen instructions. On one of the wizard screens, you choose whether this installation is for personal or work e-mail. Choosing the option for work e-mail enables you to use Desktop Redirector for both personal and work e-mail.
If you aren’t using a corporate BlackBerry Enterprise Server, and you want to redirect your Outlook e-mail to your Curve, when you’re installing BlackBerry Desktop Manager, make sure that you select the Redirect Messages Using the BlackBerry Desktop Redirector option on the installation screen, as shown in Figure 16-1.
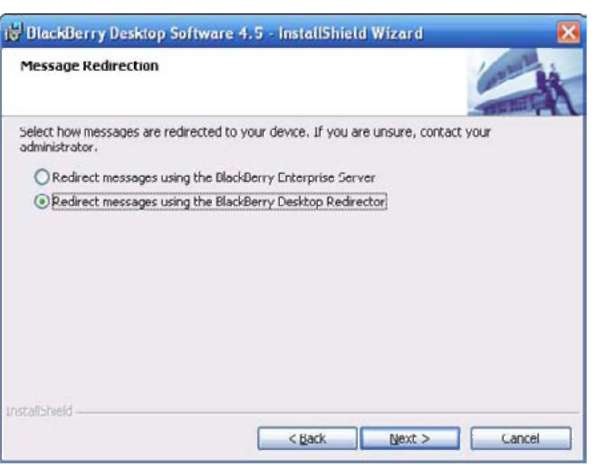
Figure 16-1:
Configure the BlackBerry Desktop Manager installation to include Desktop Redirector.
If your Curve is running under a corporate BlackBerry Enterprise Server, your e-mail is already redirected to your smartphone wirelessly, and choosing the BlackBerry Desktop Redirector could really mess things up. So don’t do it! Most companies are protective of corporate data, including your work e-mails. Make sure you aren’t violating your company’s policy before you decide to redirect your work e-mails to your personal BlackBerry.
Launching BlackBerry Desktop Manager
In most Windows installations, you find the shortcut to launch BlackBerry Desktop Manager through your computer’s Start menu. Follow these steps to launch BlackBerry Desktop Manager:
1. Choose Start All Programs BlackBerry Desktop Manager.
2. Connect your Curve to your computer, using the USB cable that came with your device.
With the microSD card in your Curve, upon connecting to your PC, your Curve screen displays a prompt for enabling mass storage mode. It also asks for your Curve’s password when you answer Yes to the prompt. Upon answering Yes and entering your password, your Curve will behave like a flash drive. A drive letter will be added to My Computer
(or just plain Computer in Microsoft Vista) in Windows Explorer, allowing you to treat the microSD card as a normal flash drive.
3. Launch BlackBerry Desktop Manager.
The BlackBerry Desktop Manager opening screen appears (see Figures 16-2 and 16-3).
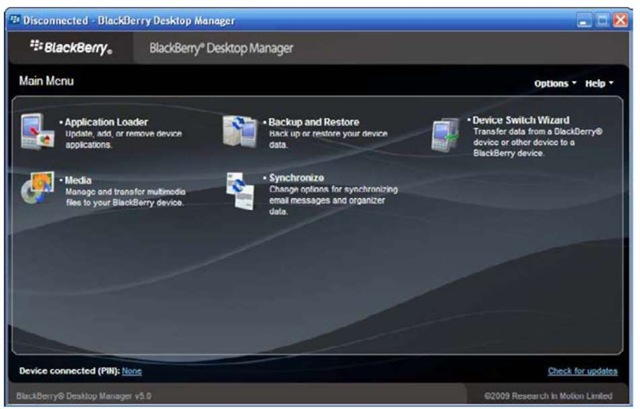
Figure 16-2:
BlackBerry Desktop Manager under Windows.
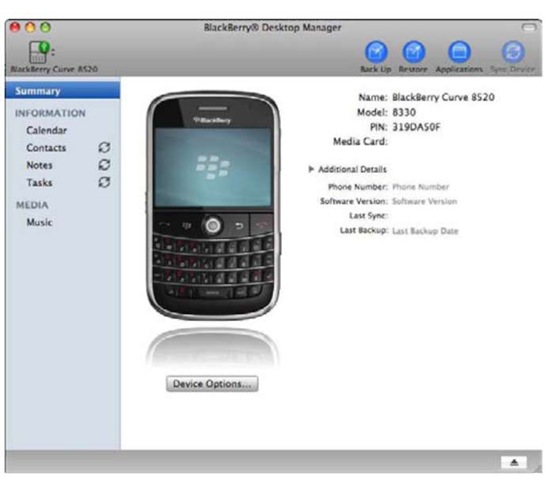
Figure 16-3:
BlackBerry Desktop Manager on the Mac.
BlackBerry Desktop Manager installation can vary from phone provider to provider. You should see at least the following four icons, or applications:
Application Loader (see Chapter 19) Backup and Restore (see Chapter 18) Media (see Chapter 15) Synchronize
Connecting BlackBerry Desktop Manager to your Curve
You establish a connection between your Curve and BlackBerry Desktop Manager through the USB cable. After BlackBerry Desktop Manager is running, it tries to find a BlackBerry (your Curve) on the type of connection specified. The default connection is USB, so you shouldn’t need to configure anything.
Follow these steps to connect your Curve to BlackBerry Desktop Manager:
1. Plug in your device to your desktop.
Keep your device on.
2. Launch BlackBerry Desktop Manager.
BlackBerry Desktop Manager tries to find a BlackBerry (your Curve) on a USB connection.
3. If your device has a password, BlackBerry Desktop Manager prompts you for the password.
4. Enter the password.
You see Connected as the screen heading. If, for some reason, you see Disconnected and no password prompt, one of the following is happening:
• BlackBerry Desktop Manager can’t find the device being connected via the USB cable. Make sure that the USB cable is properly attached at both ends.
• The connection setting isn’t set to use USB. To check this connectivity setting, go to Step 5.
5. Choose Options Connection Options on the right side of the BlackBerry Desktop Manager screen.
The screen shown in Figure 16-4 appears. Make sure that the connection setting uses USB.
6. In the Connection Type drop-down list, select the USB connection with your Curve’s PIN.
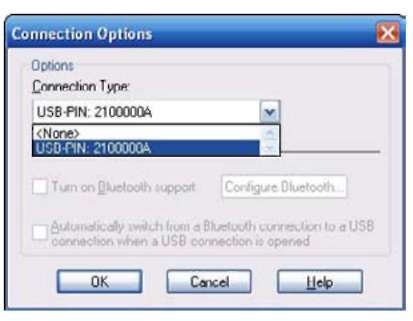
Figure 16-4:
Possible connection types for your BlackBerry Curve.
Running BlackBerry Desktop Manager for the first time
If you’re running BlackBerry Desktop Manager for the first time, the program does the following:
Tries to make the initial configuration on your machine, which includes security encryption setup. It asks you to randomly move your mouse to generate security encryption keys.
Checks which applications are on your device and which required applications need to be installed. If it can’t find a required application on your device, it prompts you to install it. Of course, you have the option to cancel and install later.
Looks at the settings you have for your Synchronize software. If auto-synchronization is turned on, BlackBerry Desktop Manager attempts to run synchronization for your PIM. This is discussed in the section “Synchronizing automatically,” later in this chapter.
Setting Up Synchronize
Synchronize is the part of BlackBerry Desktop Manager that allows you to synchronize your data between your desktop computer and your Curve. (If your Curve is running on BlackBerry Enterprise Server, your data is already synced wirelessly, so you don’t need your desktop for synchronization.) Synchronize is an icon on the BlackBerry Desktop Manager screen with two opposing arrows on top of two paper images. To launch Synchronize, simply double-click its icon. A screen like the one shown in Figure 16-5 appears.
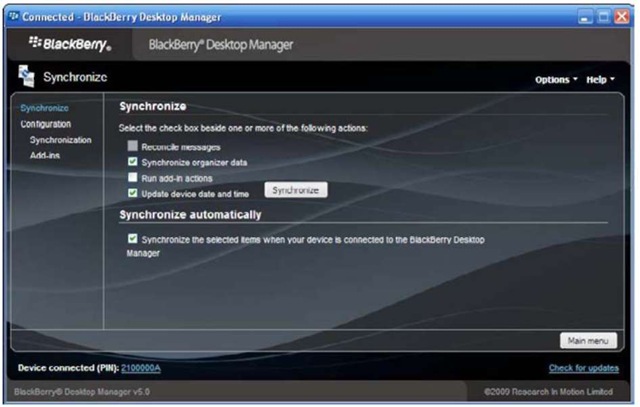
Figure 16-5:
The Synchronize screen.
The Synchronize screen is divided into two sections. You can navigate through the links on the left:
Synchronize, the default view, allows you to manually trigger synchronization (refer to Figure 16-5). See the “Using on-demand synchronization” and “Synchronizing Automatically” sections, later in this chapter, for more details and for when you use this screen.
Configuration is where you can set up configuration and rules for reconciling data. Under the Configuration link are two subsections, Synchronization and Add-ins. These further help you organize the interface (see Figure 16-6). The first thing you need to work with is the Synchronization Configuration screen. The following section helps you do that.
Configuring PIM synchronization
The important item in the Synchronization Configuration subsection, as shown in Figure 16-6, is the Synchronization button. You use that button to configure PIM synchronization.
Click the Synchronization button to display the screen shown in Figure 16-7. You can see that the names correspond to the BlackBerry Curve applications, except for Contacts, which goes by the name Address Book. This screen is the entry point of the entire synchronization configuration for PIM applications. Selecting an application on this screen allows you to pair the PIM handheld application to a desktop application (most likely Outlook).
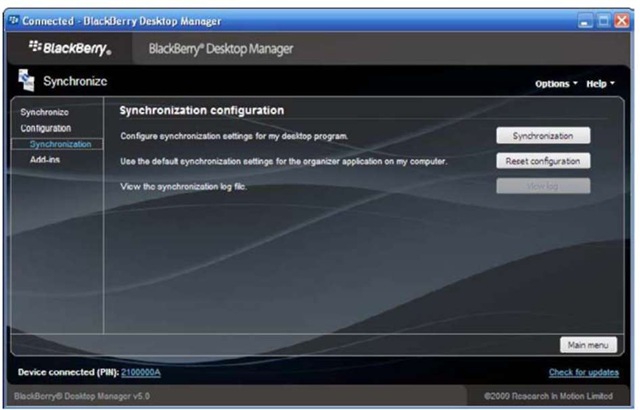
Figure 16-6:
The Synchronization Configuration screen.
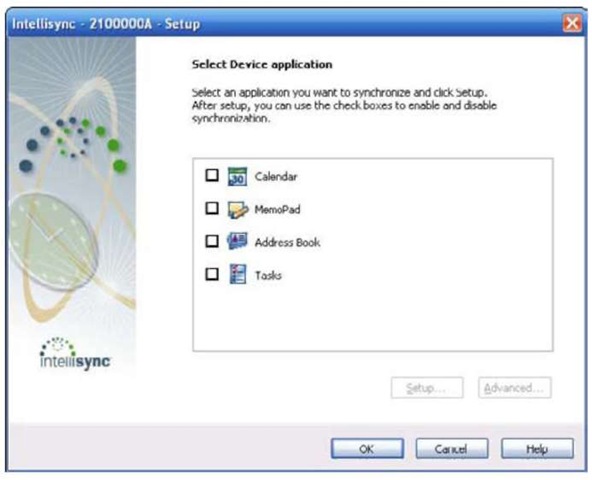
Figure 16-7:
The PIM configuration screen.
From the PIM configuration screen, select which application data you want to sync with your Curve. The following popular PIM applications can be synced to your Curve: ACT!, ASCII Text File Converter, Lotus Notes, Lotus Organizer, Microsoft Outlook, Microsoft Outlook Express, and Microsoft Schedule.
The types of application data that can be synchronized to your Curve are
Calendar: Synchronize your appointments and events stored in your favorite PIM application.
MemoPad: Synchronize any notes or text that you have been storing in your PIM application.
Address Book: Synchronize any contact information with your Curve. Tasks: Synchronize your to-do list.
Follow these steps to set up your device’s synchronization:
1. Connect your Curve to BlackBerry Desktop Manager.
2. Click the Synchronize icon.
3. Click the Synchronization link.
(The link is below the Configuration link on the left side of the screen; refer to Figure 16-6.) In the Synchronization Configuration section is the Configure Synchronization Settings for My Desktop Program label.
4. Click the Synchronization button.
5. Select the check box next to an application data type (Calendar, MemoPad, Address Book, or Tasks) that you want to synchronize.
For example, we selected the Calendar application data type.
6. Click the Setup button.
This opens the Calendar Setup screen.
7. Select a PIM application from which to retrieve application data by clicking your desired application.
BlackBerry Desktop Manager pulls your selected application data from the application selected from this screen. In Figure 16-8, we selected Microsoft Outlook. This means that when we synchronize the Curve, BlackBerry Desktop Manager retrieves Calendar data from Microsoft Outlook.
8. Click Next.
9. On the Synchronization Options screen that opens, select which direction the synchronization will follow (see Figures 16-9 and 16-10).
Here are the three available synchronization options:
• Two Way Sync allows you to synchronize changes in both your Curve and in your desktop application.
• One Way Sync from Device synchronizes only the changes made to your Curve. Changes to your desktop application aren’t reflected in your Curve.
• One Way Sync to Device synchronizes changes made in your desktop application with your Curve. Any changes made in your Curve aren’t reflected in your desktop application.
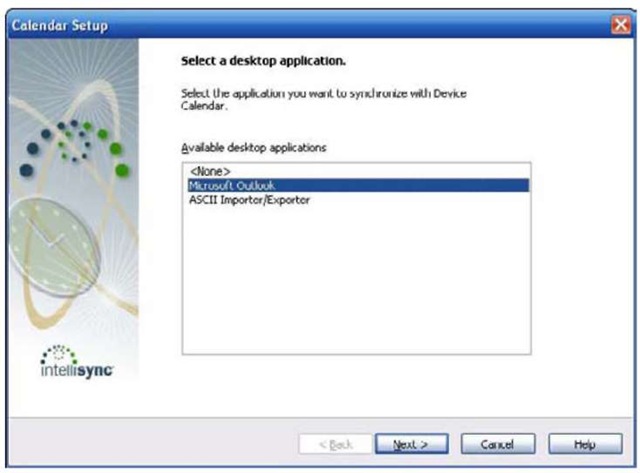
Figure 16-8:
Choose the desktop application here.
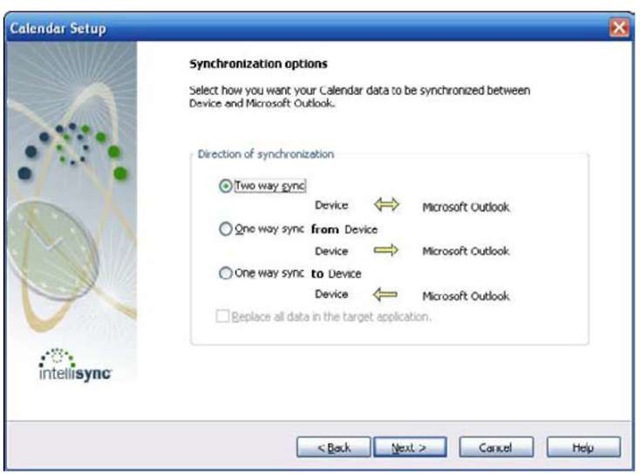
Figure 16-9:
Decide which direction synchronization follows (under Windows).
10. Click Next.
The Options screen opens for the PIM application you selected in Step 7. Figure 16-11 shows the Microsoft Outlook Options screen.
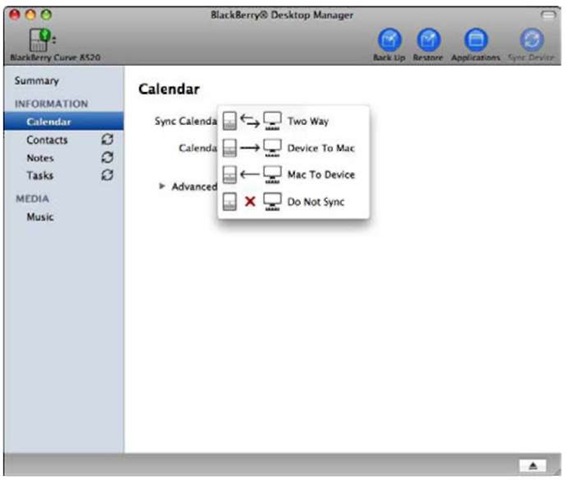
Figure 16-10:
Decide which direction synchronization follows (on the Mac).
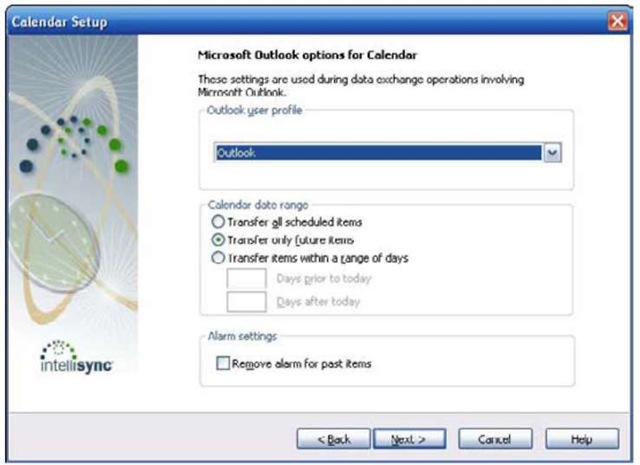
Figure 16-11:
Select specific application settings here.
For synchronization to Microsoft Outlook, make sure that you select the correct user profile in the Outlook User Profile drop-down list. This is particularly pertinent in cases in which you have multiple user profiles in your computer. Choosing the wrong one may result in putting the wrong data into your Curve.
The amount of data that is reconciled or synchronized in a given application can also be controlled. For example, as shown in Figure 16-11, the center portion of the configuration allows you to specify whether to transfer all Calendar items, transfer just a set of appointments in the future, or transfer items within a range of dates you enter.
Select the Remove Alarm for Past Items check box if you don’t want to keep the alarm setting for events that have already occurred.
11. Click Next and then click Finish.
Clicking the Next button brings you to the Calendar Setup Finish screen, and clicking the Finish button completes configuring the Calendar synchronization you selected.
Mapping fields for synchronization
For all four PIM applications, Synchronize is intelligent enough to know what information — such as names, phone numbers, and addresses in Contacts — corresponds to Outlook. A specific bit of information, or attribute, is a field. For instance, the value of a home phone number field in Contacts needs to be mapped to the corresponding field in Outlook so that information is transferred correctly.
But not all fields on the desktop side exist on the handheld (and vice versa). For example, a Nick Name field doesn’t exist in Curve Contacts but is available in Exchange (Outlook) Address Book. In some instances, Synchronize provides an alternative field and lets you decide whether to map it.
If you ever need to change the default mapping, you can. The interface is the same for all PIM applications. To illustrate how to map and unmap fields, we use Contacts in the following steps :
1. From BlackBerry Desktop Manager, click the Synchronize link.
The Synchronize screen appears.
2. Click the Synchronization link.
3. Click the Synchronize button.
The PIM configuration screen appears (refer to Figure 16-7).
4. Select the Address Book check box.
The Advanced button is enabled.
5. Click the Advanced button.
The Advanced screen opens, as shown in Figure 16-12.
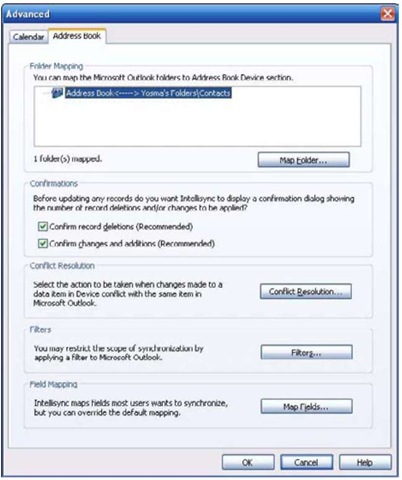
Figure 16-12:
The Advanced screen for Address Book.
6. Click the Map Fields button.
The Map Fields screen for the Address Book/Contacts application appears (see Figure 16-13). To map or unmap, click the arrow icons.
If you aren’t careful, you can inadvertently unclick a mapping (such as Job Title), and suddenly your titles aren’t in sync. Double-check your mapping before you click OK. If you think you made a mistake, click Cancel to save yourself from having to restore settings.
7. Click OK to save your changes.
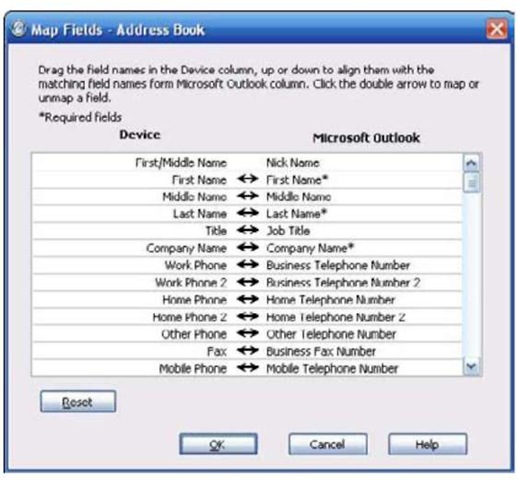
Figure 16-13:
The Map Fields screen for Address Book.
Confirming record changes
Face facts: Doing a desktop synchronization isn’t a very interesting task, and few people perform it on a regular basis.
You can tell Synchronize to prompt you for any changes it’s trying to make (or perhaps undo) on either side of the fence. The Advanced screen comes into picture here. To get to this view, follow these steps:
1. From BlackBerry Desktop Manager, click the Synchronize link.
The Synchronize screen appears.
2. Click the Synchronization link.
3. Click the Synchronize button.
The PIM configuration screen appears (refer to Figure 16-7).
4. Select the Address Book check box.
If you want a PIM application other than Address Book, select that application from the list.
5. Click the Advanced button.
The Advanced screen for Address Book appears (refer to Figure 16-12). This screen has a Confirmations section and gives you two options:
• Confirm Record Deletions (Recommended)
• Confirm Changes and Additions (Recommended)
Regardless of whether you select the first option, Synchronize displays a prompt if it detects that it’s about to delete all records.
Resolving update conflicts
Synchronize needs to know how you want to handle any conflicts between your Curve and your desktop application. A conflict normally happens when the same record is updated on your Curve and also in Outlook. For instance, you change Jane Doe’s mobile number on both your Curve and PC in Outlook. Where you resolve these conflicts is the same for all PIM applications. Again, for illustration, we use Address Book as an example:
1. From BlackBerry Desktop Manager, click the Synchronize link.
The Synchronize screen appears.
2. Click the Synchronization link.
3. Click the Synchronize button.
The PIM configuration screen appears (refer to Figure 16-7).
4. Select the Address Book check box.
If you want a PIM application other than Address Book, select that application from the list.
5. Click the Advanced button.
The Advanced screen for Address Book appears (refer to Figure 16-12). This screen has five sections, and the third section is Conflict Resolution.
6. Click the Conflict Resolution button.
The Conflict Resolution screen is shown in Figure 16-14. From the Conflict Resolution screen, you can tell Synchronize to handle conflicts in a few ways. Here are the options:
• Add All Conflicting Items: When a conflict happens, adds a new record to the Curve for the changes on the desktop, and adds a new record to the desktop for the changes on the Curve.
• Ignore All Conflicting Items: Ignores the change and keeps the data the same on both sides.
• Notify Me When Conflicts Occur: This option is the safest. Synchronize displays the details of the conflict and lets you resolve it.
• Device Wins: Unless you’re sure this is the case, you shouldn’t choose this option. It tells Synchronize to disregard the changes in the desktop and use handheld changes every time it encounters a conflict.
• Microsoft Outlook Wins: If you aren’t using MS Outlook, this option is based on your application. This option tells Synchronize to always discard changes on the handheld and use the desktop application change when it encounters a conflict. We don’t recommend this option, because there’s no telling on which side you made the good update.
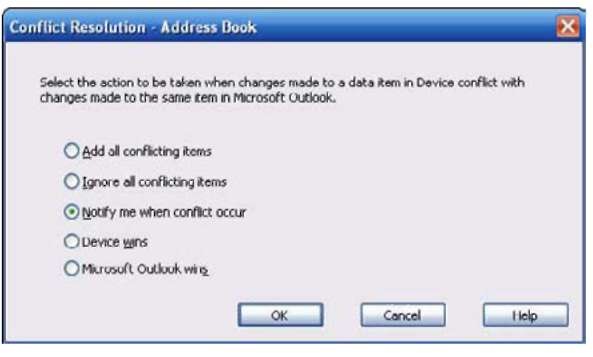
Figure 16-14:
Manage conflicts here.
7. Select the option you want.
8. Click OK to save the settings.
Ready, Set, Synchronize!
Are you ready to synchronize? Previously in this chapter, we show you ways to define synchronization filters and rules for your e-mail and PIM data. Now it’s time to be brave and click the button. You can synchronize in one of two ways:
Manually: Click the Synchronize Now icon. Automatically: Choose How Often on the calendar.
Using on-demand synchronization
On-demand synchronization is a feature in Synchronize that lets you run synchronization manually. Remember that even if you set up automatic synchronization, actual synchronization doesn’t happen right away. So if you make updates to your appointments in Outlook while your Curve is connected to your PC, this feature allows you to be sure that your updates make it to your Curve before heading out the door.
Without delay, here are the steps:
1. From BlackBerry Desktop Manager, click the Synchronize link.
The Synchronize screen appears (refer to Figure 16-5). The following four check boxes let you be selective:
• Reconcile Messages: Synchronize your e-mails between Outlook and your Curve.
• Synchronize Organizer Data: Include notes, appointments, addresses, and tasks.
• Run Add-in Actions: You have third-party applications that require data synchronization between your PC and your Curve.
• Update Device Date and Time: You want both the PC and Curve to have the same time. This ensures that you’re reminded of your appointments at the same time for both Outlook and your Curve.
2. Select the check boxes for the data you want to synchronize.
3. Click the Synchronize button.
Synchronize starts running the synchronization, and you see a progress screen. If you set up prompts for conflicts, and Synchronize encounters one, a screen appears so that you can resolve that conflict. When finished, the progress screen disappears and the Synchronize screen reappears.
If you turned on automatic synchronization (see the next section), the items you select in Step 2 automatically sync every time you connect your Curve to your PC.
4. Click the Close button.
Synchronizing automatically
How many times do you think you reconfigure your Synchronize setup? Rarely, right? After you have it configured, that’s it. And if you’re like us, the reason you open BlackBerry Desktop Manager is because you want to run Synchronize. So opening Synchronize and clicking the Synchronize button are somewhat annoying.
To make Synchronize run automatically every time you connect your Curve to your PC, simply make sure that you select the last check box on the Synchronize screen (refer to Figure 16-5) — Synchronize the Selected Items When Your Device Is Connected to the BlackBerry Desktop Manager.
You may be asking, “What items will auto synchronization sync?” Good question. Synchronize automatically syncs the items you selected in the top portion of the Synchronize screen. Note that if you make a change, selecting or deselecting an item on the Synchronize screen, only the selected items will be synced automatically the next time you connect your Curve to your PC.
