At first glance, the ZBrush interface (see Figure 1.13) can be a daunting sight, especially if you have previously worked in software like Autodesk Maya, 3ds Max, or XSI. The truth is, it looks far more complex than it actually is. Many menus you won’t often visit, and a few will form the backbone of your workflow. In this section, I will give you a brief overview of the interface and identify the location of some of the major palettes and their functions.
This tutorial is designed to introduce you to the sculpting brushes and some of their basic settings. We’ll also explore ZBrush’s 2.5D Illustration brushes and briefly discuss lighting and rendering within ZBrush. By completing an illustration in ZBrush, we’ll touch on each facet of the program and introduce tools and workflows that will be valuable as you progress through the topic. We’ll delve into each menu in more depth as it becomes pertinent. To begin, it will be good to have a fundamental understanding of what is where and why.
Another Take: Gesture, Rhythm, Proportion Featured Artist: Zack Petroc
You don’t have to worry about gesture, rhythm, and proportion in all of your sculpts—only in the ones that you don’t want to look lifeless.
Being aware of these foundational concepts, and what they can bring to your art, marks the first step down the endless path that leads toward perfecting your skills. I say endless because the more you learn about these concepts, the more you will realize just how complex and intricate their execution can be. To infuse your work with gesture and rhythm is to give it life, and to give it life is to create a work that can transcend its basic visual concept and become a true masterpiece.
No matter the subject—from animal, to human, to creature, to foliage—I always start by trying to understand its gesture and, more important, what its gesture is going to convey about the character. A powerful superhero archetype will have a distinctly different gesture than a cowering villain. There are countless conscious and subconscious gesture cues that give instant insight into the nature of your character. Hero types lead with their chest; from a side view, the character’s chest is the farthest point forward on the figure. The head is typically pulled back, creating a straighter line from the base of the skull to the upper area of the back where the neck inserts into the torso. By pulling the head back and pushing the chest forward, you are automatically creating a larger distance between the front and back of the arm. This allows our hero character to have wider shoulders and larger-than-life upper arms. It’s the setup of the gesture, from the head to the chest, that allows all of these proportional cues to be possible. In this respect, the gesture truly is the foundation for our character to be built on.
Rhythm is linked directly with gesture and refers to the visual lines that flow through your character. Increasing your awareness of this concept is the first step toward mastering it. These rhythms are what lead your eye around the form and, when executed properly, convey a sense of movement and direction, even in a static sculpture.
Proportion is a relative thing. When I stand next to Hulk Hogan, my gigantic and, if you will, super-toned upper body might make him appear small. However, we all know that relative to the general public, this is not the case. He is indeed a large man. The same philosophy about relative size can be applied to individual parts that make up a character. For example, one way to make a character appear taller is to make its head smaller. Other, subtler cues to let our viewer know the innately taller stature of our character might be to widen the shoulders while keeping their overall mass smaller. We can also add a slight downward angle to the clavicle as it goes from the sternum to its end at the top of the shoulder. These cues are all taken from real-life proportions of extremely tall people and are therefore subconscious traits that can help convey the believability that our character is indeed tall.
Remember, mastering these concepts can take a lifetime, but becoming aware of them can happen as soon as you would like, and that’s all it takes to begin the journey. (Well, that and a gnarly-looking old walking stick. Preferably one with some kind of killer animal head carved into the handle. I would suggest an Orca or some form of rogue badger. This will help get you there in style.)
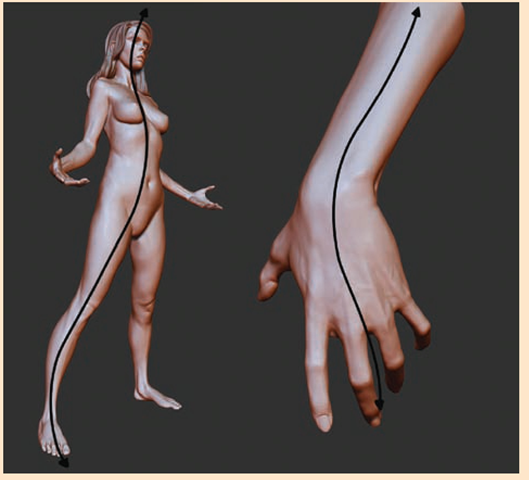
In the following example, from my sculpting the female figure tutorial on www.thegnomon workshop.com, I’ve drawn black lines over the form to represent the gesture. These long, flowing curves are what the forms were developed around and help give the sculpture character. I typically start by visualizing these curves on screen while I sculpt, then try to push and pull the forms to match them.
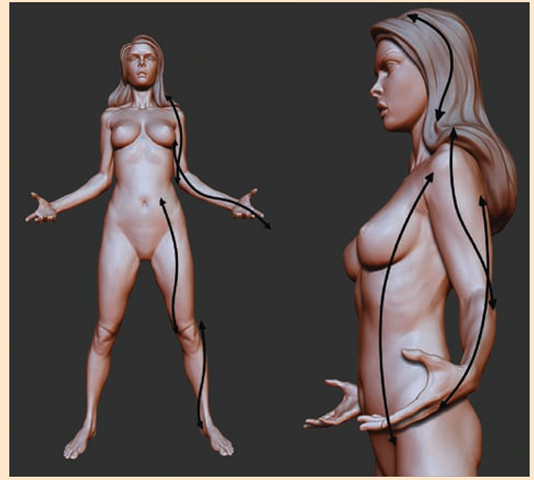
In the next example, we can see the lines of rhythm that flow throughout the sculpture. Note their interaction as they overlap and traverse the form. Even in this somewhat standard pose, the rhythms should be visible and help indicate a sense of movement.
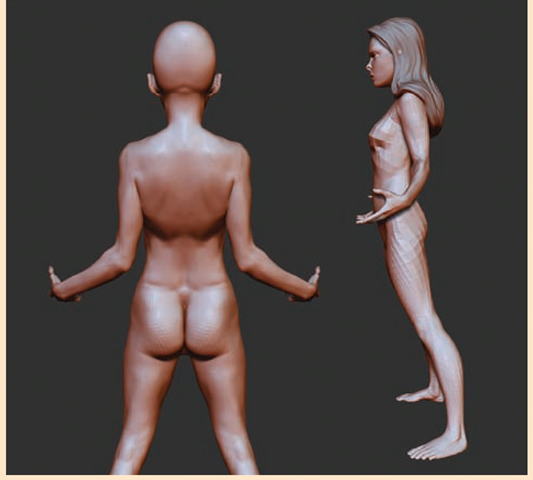
Proportion plays a key role in defining the “character” of any design. The final image shows how enlarging the head on this sculpture affects the viewer’s impression of it. The design appears more childlike and seems to have a smaller overall stature. An important part of this exercise is to also be aware that none of the finite details were changed. This shows you just how secondary and inconsequential the finite surface details can be if you don’t first establish the proper foundation.
Upon opening ZBrush, you will see the default interface. By default the Lightbox browser will open at the bottom of the screen. The Lightbox is a central location in ZBrush where you can access all the ZTools, textures, alphas, materials, and other files you may need while working. Close the Lightbox by clicking the Lightbox button or pressing the hotkey (the comma). You can change where Lightbox opens by clicking Preferences ^ Lightbox ^ Lightbox Placement.
The central window is called the document window. This is where all the sculpting and painting takes place. In ZBrush you import OBJ files as “tools” and sculpt them in the document window. OBJ files are a standard polygon model format most 3D applications will export.
Before you proceed, I recommend that you make two adjustments to the user interface settings. First, stop the Lightbox from opening automatically with ZBrush. Although the browser is useful, I find it unnecessary to have it open with the program. Choose Preferences ^ Lightbox and turn off Open At Launch. Second, disable the right-click navigation by choosing Preferences ^ Interface and turning off Right Click Navigation. This will allow you to use the right mouse or stylus button to access the quick menu. We will talk more about this shortly.
Flanking the document window are two columns that contain some quick links to other menus. The left side has fly-out icons linked to the Brush, Stroke, Alpha, Texture, and Material menus. Here you will also find a color picker for selecting colors while painting.
The right side contains a selection of icons primarily concerned with navigating the document window and the display of your active tool. It is important to note that all these options are available in the top-row menus and often the menus (as in the case of Brush, Stroke, Alpha, Texture, and Material) are abridged in the form found here. For all the options, visit the full menu at the top of the screen (the area marked “Brush controls” in Figure 1.13).
The top menu bar allows you to change the various aspects of your active sculpting tool. It contains an alphabetized list of the complete ZBrush menus. The ZBrush interface allows you to work in a circular fashion, picking menus and options as needed. Any main menu can be torn off and docked on the side of the screen by clicking the round radial button. Table 1.1 provides a breakdown of each menu and its major contents.
At any time while you are working on a model in Edit mode, right-clicking the mouse will open a pop-up menu at your cursor location. Here you can quickly access your ZIntensity, RGB Intensity, Draw Size, and Focal Shift settings.
Figure 1.13 The ZBrush interface
|
Menu |
Description |
|
Alpha |
Options to import and manipulate alphas, grayscale images primarily used as brush shapes, stencils, and texture stamps. |
|
Brush |
Contains the 3D sculpting and painting tools. |
|
Color |
Options for selecting colors as well as filling models with color or material. |
|
Document |
Options for setting document window size as well as exporting images from ZBrush. |
|
Draw |
Settings that define how the brushes affect surfaces. These include ZIntensity, RGB Intensity, ZAdd, ZSub, as well as settings that are specific to 2.5D brushes. This menu also contains the Perspective Camera setting. |
|
Edit |
Contains the undo and redo buttons. |
|
File |
Save and load ZProjects. These allow you to save ZTool, texture, material, and other settings in a single file format. |
|
Layer |
Options for the creation and management of document layers. These differ from sculpting layers and are typically only used in canvas modeling and illustration. |
|
Light |
Create and place lights to illuminate your subject. |
|
Macro |
Records ZBrush actions as a button for easy repetition. |
|
Marker |
This menu is for MultiMarkers, a legacy ZBrush function that is mostly obsolete with the advent of subtools. |
|
Material |
Surface shaders and material settings. These include both standard materials and MatCap (Material Capture) materials. |
|
Movie |
This menu allows you to record videos of your sculpting sessions as well as render rotations of your finished sculptures. This menu also allows access to the Timeline controls. |
|
Picker |
Options pertaining to how the brushes deal with the surfaces on which they are used. Flatten is one sculpting brush that will be affected by the Once Ori and Cont Ori buttons. For the most part, these options are not used in sculpting. |
|
Preferences |
Options to set up your ZBrush preferences. Everything from interface colors to memory management is handled here. |
|
Render |
Options for rendering your images inside ZBrush. This menu is only used when doing 2.5D illustration. |
|
Stencil |
A close associate of the Alpha menu. Stencil allows you to manipulate alphas you have converted to stencils to help in painting or sculpting details. |
|
Stroke |
Options governing the way in which the brush stroke is applied. These options include freehand and spray strokes. Here you will also find the LazyMouse settings. |
|
Texture |
Menu for creating, importing, and exporting texture maps with ZBrush. This is also where to save or open SpotLight files. Will allow you to add textures to SpotLight. |
|
Tool |
This is the workhorse of the ZBrush interface. In this menu you will find all options that affect the current active ZTool. Here you will find Subtools, Layers, Deformation, Masking, and Polygroup options as well as many other useful menus. This is the menu in which you are likely to spend the most time (next to Brush). The Tool menu allows you to select tools on which to sculpt as well as select the wide variety of 2.5D tools for canvas modeling and illustration. |
|
Transform |
Contains document navigation options such as Zoom and Pan and buttons to alter the model’s pivot point as well as sculpting symmetry settings and poly frame view. |
Table 1.1 : ZBrush Menus
|
Menu |
Description |
|
|
Zoom |
Shows an enlarged view of portions of the canvas. This menu is not often accessed other than to fi Zoom and AAHalf buttons to affect document display size. These buttons are usually available on screen’s right menu. |
nd the the |
|
ZPlugin |
For accessing plug-ins loaded into ZBrush. Here you will find Decimation Master, Subtool Master, other plug-ins that expand ZBrush’s functionality. |
and |
|
ZScript |
Menu for recording saving and loading ZScripts. |
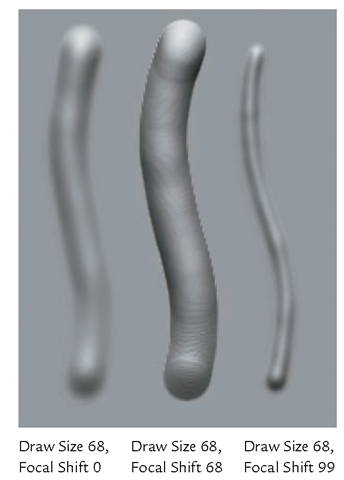
Figure 1.14 Brushes with various falloff settings
Draw Size and Focal Shift control the size of your brush. Draw Size, as is apparent, controls the overall size of the brush, whereas Focal Shift adjusts the inner ring of your brush icon. This inner circle defines the falloff of the tool or the general hardness or softness of the brush. Falloff means how quickly or gradually the effect of the tool fades at the edges of the stroke. A smaller ring is a much more gradual falloff while a bigger one is an abrupt falloff. If an alpha is selected, the Focal Shift slider acts as a modifier on the alpha softness. Figure 1.14 shows the effects of several Draw Size and Focal Shift combinations. If you want to enter a value manually to the curve, use the slider for brush control at the top shelf of the ZBrush interface.
Brushes can be set to several modes, which determine how they affect the surface. At the top of the screen are buttons for MRGB, RGB, M, ZAdd, ZSub, and ZCut. ZAdd and ZSub control whether the brush adds material or takes away with the stroke. MRGB adds material and RGB color, while RGB adds only color and M adds only material. Typically the brushes are set to ZAdd when you are sculpting. It is easy to switch to ZSub by simply holding down the Alt key while you sculpt. This will temporarily swap the modes while the key is pressed. ZCut is used in Pixol (2.5D) mode.
When a tool is loaded in the document window and you are in Edit mode, navigation is accomplished through a variety of mouse and key combinations.


