Adding Subtools
Now that the basic form of the lion is established, let’s add the ring to his mouth. Adding the ring at this stage will allow us to sculpt the forms of his mane and mouth around the ring so it appears that the two parts are interacting.
1. To add a subtool, you must append it into your current ZTool. Save your ZTool and then return to the Tool menu. Select the current tool icon and pick the Ring3D tool. Once again we are dealing with a ZBrush primitive and not a polymesh. Although an object is a primitive, we cannot sculpt but we can change the object’s parameters. In the case of the ring, we want to make it smaller. Select Tool + Initialize, and change the ring’s SRadius setting to 21 (Figure 1.26).
Figure 1.26 The Initialize menu allows you to change aspects of the ZBrush primitives before they are converted to polymeshes.
2. To make this ring ready for inclusion with the rest of the lion head, convert it to a polymesh. Click the Tool menu at the top of the screen and click the Make PolyMesh3D button. If you simply wanted to add a ring to the Lion head ZTool without making any changes to the ring, the process is simple. With the lion head selected, click Tool + Subtool + Append and select the Ring tool. ZBrush will automatically convert it to a polymesh and add it to the subtool stack.
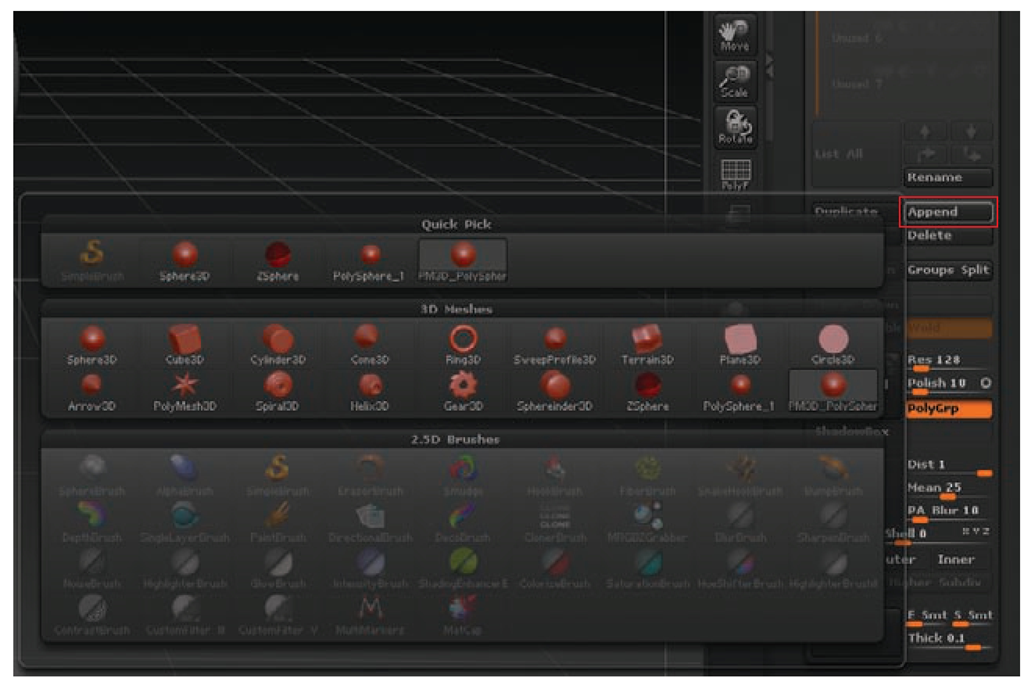
3. To add this to the lion head as a subtool so you can manipulate both models on screen at once, you must append it to the current tool. At the top of the screen click Tool + Subtool. In the Subtool menu is a button marked Append; click it and a fly-out menu will appear listing all the currently loaded ZTools. From this menu select the Lion tool. This will add the Lion ZTool as a subtool to the ring (Figure 1.27). Subtools combine multiple ZTools together into one, allowing you to sculpt and manipulate each separately while retaining their positional relationship to each other. Later in this topic we’ll use subtools for placing eyes and other accessories into a character while retaining multiple levels of subdivision on each tool.
Figure 1.27 Clicking the Append button will open a menu from which you can select the tool you want to add as a subtool.
The ring should now be centered in the lion’s head. It must be moved down into the mouth area we created for it. There are three methods of moving objects and faces in ZBrush that are useful for different tasks (described in a moment). To move the ring, we’ll use the Transpose tools (Figure 1.28).
Navigating Subtools
You can sculpt on only one subtool at a time. To set your active subtool, select it under the Subtool menu. Or you can Alt+left-click the object in the document window to activate that subtool.
To toggle subtool visibility, use the eyeball icon. You can set visibility on any subtools, active or not. To show all subtools, click the eyeball icon on the active tool to hide all but the current subtool. Ctrl+Shift-click the subtool in the Subtool list.
Figure 1.28 Using the Transpose tool
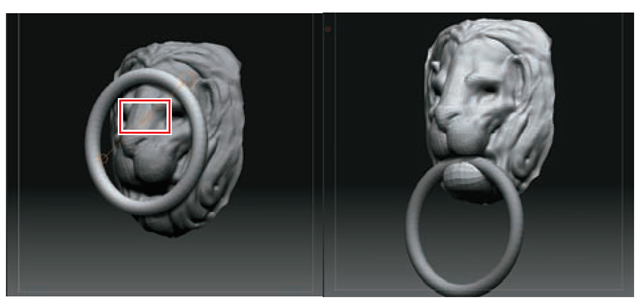
4. Enter Transpose mode by pressing W. You will now have a transpose line on the screen. Click on the 3D ring and drag to a point on the canvas to draw a new transpose line (Figure 1.29). Because we are in Move mode at the top of the screen, this will allow us to move the ring. Notice that there are two other buttons, for Scale and Rotate. If these buttons are active, the transpose line will scale or rotate the ZTool instead of moving it. The transpose ring can be repositioned by clicking on the line itself; to move an endpoint, click on one of the three circles. To use the transpose line to manipulate the currently selected subtool, click inside one of the three circles and drag with the mouse.
When you are in Transpose mode, hover your mouse over each circle. The function of the circle will be displayed in the upper-left corner of the screen. For example, in Move mode the outer circles will stretch the model while the center circle moves it relative to other subtools or the document window. Once you understand the transpose line, you can use a shortcut to enter it (or Scale mode) and instead of drawing the line, simply Alt-click and drag on the model. It will move or scale the subtool as if you were clicking in the center circle.
5. Click in the center circle and drag. You can see how the Ring3D tool can be easily moved and placed in space. If you need to move it back from your view, simply rotate the model so you are looking down on it. Place it approximately in the lion’s mouth. We’ll use the Move brush to adjust the shape of the mouth to better grip the ring (Figure 1.30).
Figure 1.29 Ring with transpose line click and drag in the center of the indicated circle to move the ring.
Figure 1.30 Moving the mouth into position with the Move brush
Moving in ZBrush
“Moving” in ZBrush can refer to moving ZTools in relation to each other, moving in relation to the canvas, or moving polygons as a group with a brush. There are three methods of moving inside ZBrush:
Transpose Designed for posing models or moving subtools in relation to one another.
Move Brush Moves polys and faces with a brush when sculpting large forms. It is used to move parts of a model to changes its shape. There are several variations on the Move brush, including Move, Move Elastic, Move Topological, and Move Parts.
Document Move Gyro Moves objects in relation to the canvas. This is rarely used except in ZBrush illustration.
Refining Your Model
Now that we have roughed in the lion head and placed a subtool, we can begin to refine the forms of the sculpture overall. In this section we’ll continue to use the sculpting brushes to make the rough shapes relate to each other and create a sense of rhythm in the forms. Before we start, let’s take a moment to look at some of the new tools and modifiers we’ll use in this section, specifically the LazyMouse Pinch brush and Brush Modifier sliders.
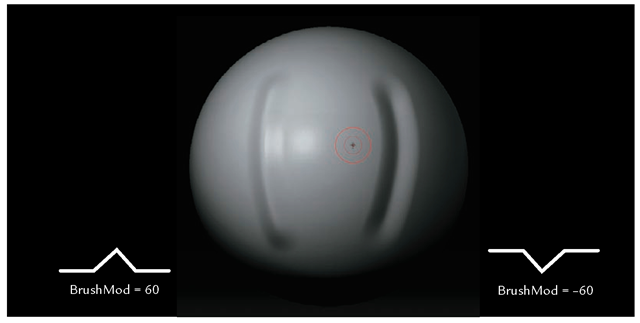
1. At this stage, let’s develop the mane. Add another subdivision level by pressing Ctrl+D. There will be a level of stylization to the planes of the hair. We want to create sweeping arcs that transition from the top of the head to the chin. To create smooth-flowing strokes like this with hard edges, use the Pinch brush. Select the Pinch brush and set your Brush Modifier slider to 60 and your ZIntensity to 15 (Figure 1.31). As you stroke along the surface, notice how it pulls the edges together and up (Figure 1.32).
Figure 1.31 The Brush Modifier slider
Figure 1.32 The cross sections show the Pinch brush stroke with different Brush Modifier settings.
Figure 1.33 The LazyMouse button on the Stroke menu
If you set the Brush slider to -60, the inverse happens: it presses in while it pinches. I keep the slider at 60 and use the Alt key to invert my stroke to press in when needed.
2. You can further control the sweep and smoothness in the strokes of the mane by using the LazyMouse option. This technique will average the stroke and help you create a sweeping line. Press the L hotkey or select Stroke + LazyMouse (Figure 1.33).
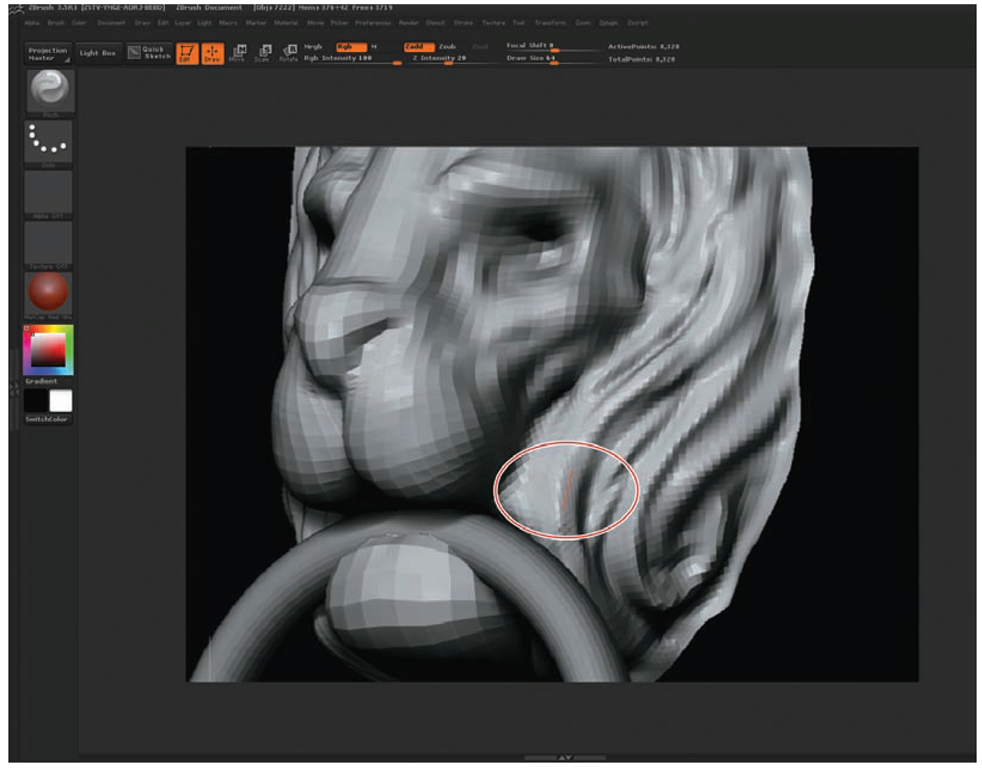
The red line that trails slightly behind your stroke is the center of the influence (Figure 1.34). This delay built into the LazyMouse stroke is what allows you to make long sweeping motions with the brush tools that would otherwise be difficult, if not impossible, with an unassisted freehand approach.
There are many options you can use in conjunction with LazyMouse to get nice sweeping curves or sharp, crisp straight lines. Please see the DVD for video of LazyMouse in action.
3. With the ring in place, return to Draw mode by pressing Q. Change the selected subtool from the ring back to the lion head (by selecting the subtool from the Tool + Subtool menu or by Ctrl+Shift-clicking the lion head in the document window). You will notice the lion head becomes a lighter shade when selected.
Figure 1.34 LazyMouse in use. Notice the red action line, which offers visual feedback on where the effect of the stroke is on the surface.
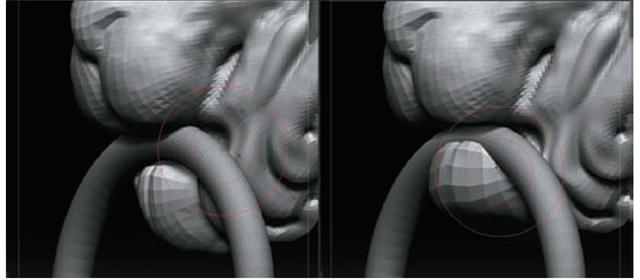
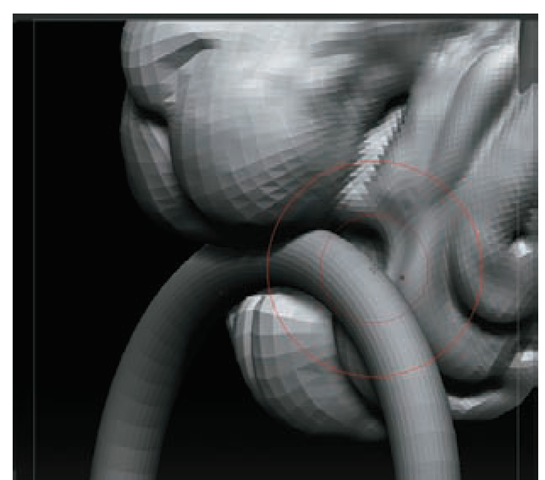
4. Select the Move brush from the brush palette and tumble to a side view. Adjust your draw size and pull the lower jaw up and around the ring (Figure 1.35). If the Move tool isn’t working strong enough, raise your ZIntensity slider to increase its power. You may also want to turn on subtool transparency with the Transp button at the right side of the screen. This allows you to see through subtools in front of your active tool but also allows your tool to sculpt through to the hidden surface.
5. Continue to pull strokes in the mane, keeping in mind the gesture of the lines and how they flow down into the ring. Keep looking for the overall graphic quality of the shapes and try to maintain a visually appealing rhythm. When using LazyMouse for a long fluid stroke, set your ZIntensity lower than necessary and use the Replay Last command to repeat your stroke, building up to the form you want by repeating. Replay Last is found on the Stroke menu, or use the number 1 key at the top of the keyboard which is the shortcut. Each time you use Replay Last, the same stroke repeats and thus builds up its effect on the surface.
Some of the deep recesses could benefit from being tightened. Doing this from the front of your sculpture can sometimes be tricky if the area you want to tighten is small or close to other details you want to remain unchanged. Often you will pinch the faces on either side and inadvertently change areas you wanted to remain unchanged. Masking into tight areas can also sometimes be a challenge. One unique solution in ZBrush is to sculpt from inside the model as well as the outside.
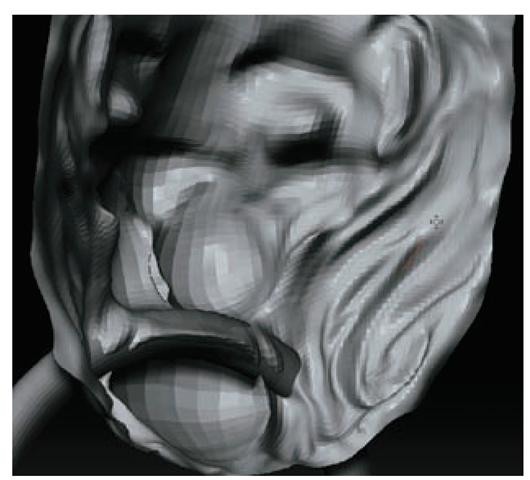
6. Select Tool + Display Properties and click the Double button to activate double-sided rendering (Figure 1.36). Now when you rotate around the back of the lion head, you can sculpt from the inside (Figure 1.37). This is very helpful in tight areas like the creases in the hair or the eyelids.
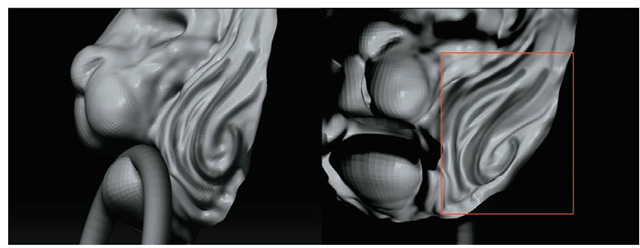
7. From the front, draw a masking line by Ctrl-clicking and dragging to mark the area you want to pinch. This is just a visual note so the same area can be seen easily from the inside. Masking displays on both sides of a face (Figure 1.38).
8. Rotate to the back and locate your masked line. Clear the mask by Ctrl-dragging on the document window or by choosing Tool + Masking + Clear and using the Pinch brush to deepen and sharpen the line. Use a Brush Modifier setting of 60 and a small Draw Size and Focal Shift of 0. I also use the Pinch brush to refine the planes in the head. I want to add a stylized planar feel to the lion’s face while still maintaining the character of a lion.
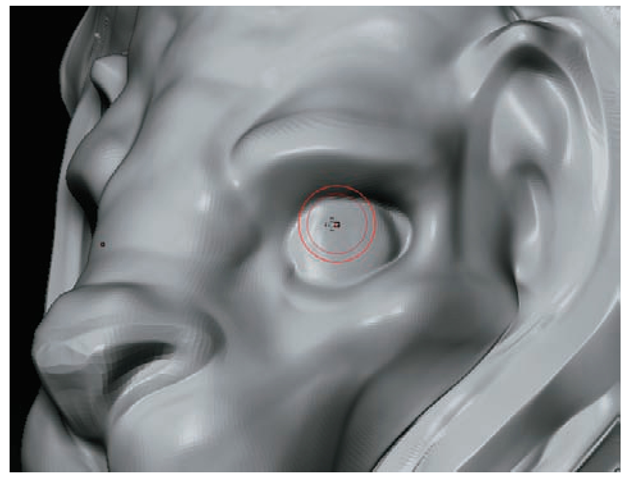
9. To sculpt eyes directly into this mesh, begin with the Inflate brush at a low intensity and build up the spherical shape of the eyeball (Figure 1.39).
Figure 1.35 The mouth and mane sculpted to flow around the ring
Figure 1.36 The Double button in the display options allows you to turn on double-sided rendering in the display.
Figure 1.37 Sculpting from the back
You can mask out areas you don’t want to affect with your strokes by pressing the Ctrl key. Your cursor turns yellow to let you know you are in Masking mode. To paint out part of a mask, use Ctrl+Alt-click. To mask large areas, Ctrl-click outside the model and drag a masking rectangle. Also experiment with the Lasso tool for making more specific and complex mask selections. Select Mask Lasso from the Brush menu. The Lasso mode alters the way masks are drawn. Instead of a single rectangle, you can draw a lasso around the desired area freehand. The masking effect will be mirrored if Symmetry is on.
Figure 1.38 With double-sided rendering on, you can sculpt from inside the model as well as outside for reaching tight areas. (The right image shows the mask stroke as seen from the back of the mesh.)
Figure 1.39 Inflating the eyeballs from the mesh
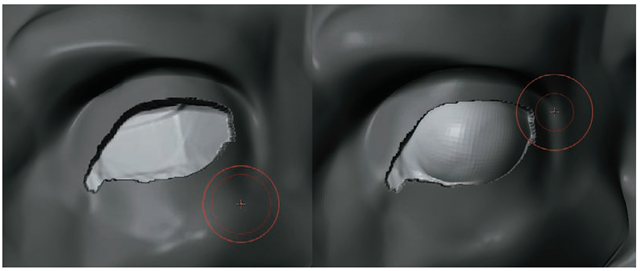
Adding the eyes is easy with masking. Select the MaskPen brush and, while holding down Ctrl, draw a mask in the shape of the eyelids over and around this basic sphere shape. Once the shape of the exposed eye is masked in, you can invert the mask by Ctrl-clicking the document window somewhere off the model (Figure 1.40).
Your eye is now unmasked while the rest of the head is masked. Use the Move brush from the side view to pull the eye in slightly. This will create the thickness of the eyelids. Using the Inflate brush, build out the sphere of the eyeball and corneal bulge.
10. Ctrl-click off the model to invert the mask so the eye surface is masked. Refine the edge of the eyelid with the Standard brush and LazyMouse, adding some thickness here.
While you sculpt, be sure to move between the subdivision levels. Always work at the lowest level that can support the form you are trying to add. If you sculpt the entire time at the highest level, it becomes very hard to make big changes to the shape without creating a lumpy surface.
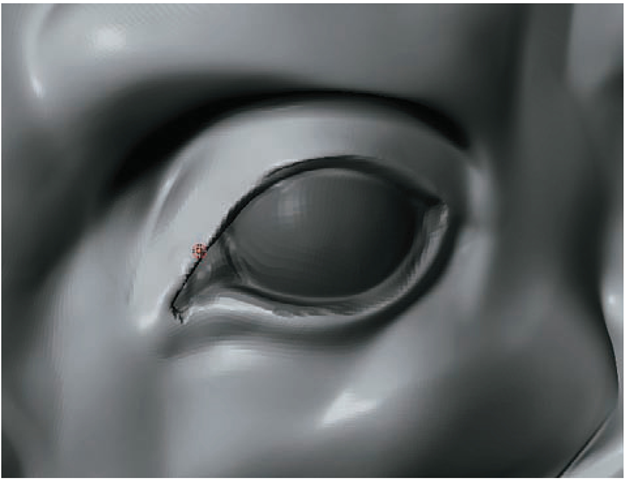
11. With the Pinch brush and LazyMouse on, pinch the outer edge of the eyelid (Figure 1.41). Be sure to reduce your draw size. At this stage, I also pinch in using the Alt key to add some subtle wrinkles around the upper eyelid and indicate the furrow at the bottom of the eye where the sphere of the eyeball dips into the skull.
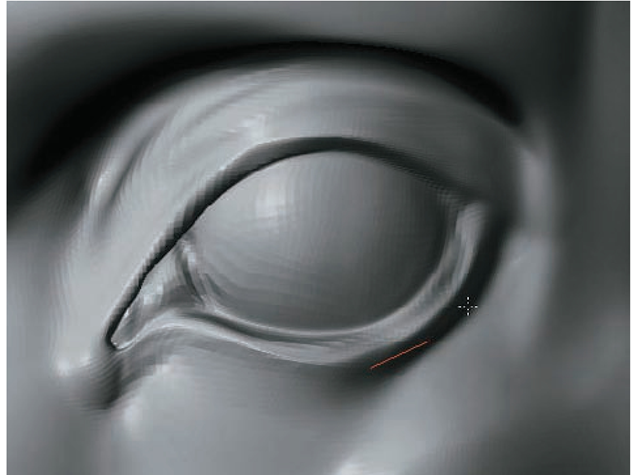
12. Pinch the inner edge closest to the eyeball (Figure 1.42). Hold down Alt to pinch in instead of out. Add the medial canthus of the eye and tear duct with the Standard brush. Mask out the little dot of skin in the corner of the eye to create the membrane. Invert the mask and inflate slightly with a low intensity.
Figure 1.40 Using masking to help sculpt an eye from the mesh
Figure 1.41 Pinch the eyelids to crease them and create sharper transitions. Notice the thickness added to the eyelids in step 10.
Figure 1.42 Pinching the inner eyelid edges

