The Brush menu contains all the real-time sculpting tools that you will use while working on an active tool in the document window. These brushes can be used on the model at multiple subdivision levels while you freely rotate in Edit mode.
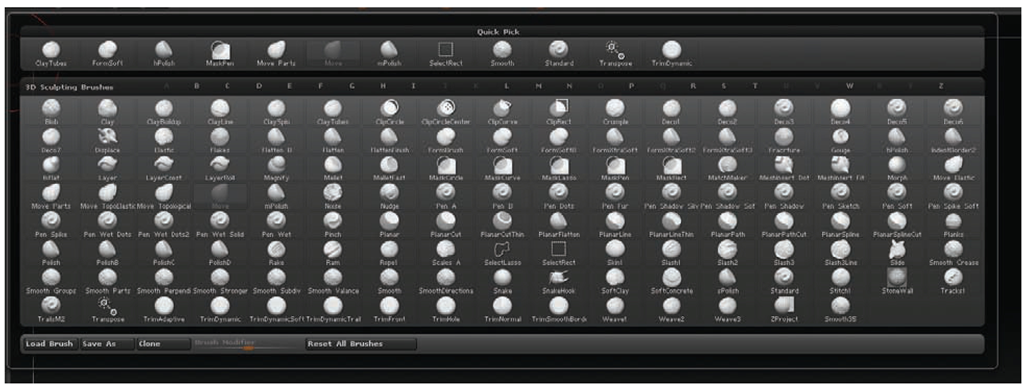
You may notice under the Tool menu there are several brushes listed, including the Simple brush.They are 2.5D painting brushes and are not to be confused with 3D sculpting brushes, which can be found in the Brush palette. In this topic, we’ll focus on the Brush palette tools, which can be used on a model that is in Edit mode. The Brush palette contains a versatile selection of brushes and brush modifiers (see Figure 2.2). It also allows artists to create and store their own custom brush variations that are loaded each time ZBrush starts. Several specialized masking options are also available, as well as control curves to facilitate altering the way the brushes interact with the surface.
At the top of the Brush window, you will find a selection of brush icons. These represent the most recently used brushes and are not representative of the full brush set. To access the complete selection of brushes, click the active brush icon. The active brush icon is the large button in the upper left of the Brush menu as well as the upper left of the standard interface. This opens the brush fly-out menu (Figure 2.3).
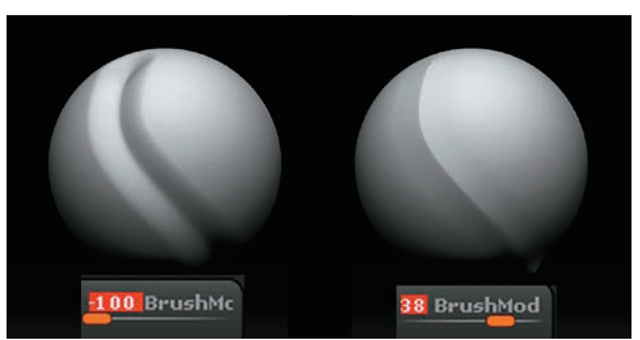
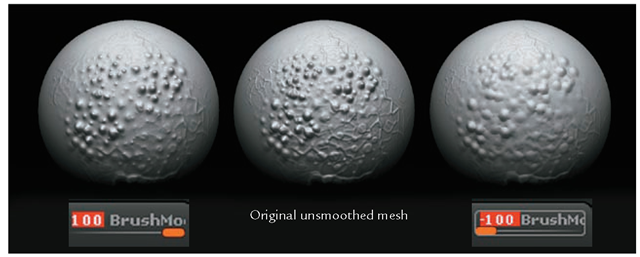
Beneath the brush icons are several sliders, curves, and icons. These represent the many different modifiers you can apply to your brush. The most important is the BrushMod slider. The BrushMod slider affects each brush differently depending on the brush selected. For instance, when Pinch is selected BrushMod determines whether the brush pinches in or out (Figure 2.4); however, when you’re using the Smooth brush, BrushMod controls the height of the smoothing effect (Figure 2.5).
Figure 2.2 The Brush window
Figure 2.3 Clicking the active brush icon expands the Brush menu fly-out.
|
Brush |
Description |
|
Standard brush |
The default ZBrush sculpting brush. Pulls faces directly out in the direction of the surface normal under the center of the brush. |
|
Move brush |
Moves faces as a whole beneath the brush falloff. |
|
Elastic brush |
Similar to Inflate but the Elastic brush retains more of the underlying surface forms. |
|
Displace brush |
This brush works similarly to the Standard brush, but keeps the details intact in such a way as to suggest that the form underneath has swelled or been displaced. |
|
Inflate brush |
Pulls faces out along their surface normal direction as opposed to one normal direction as with the Standard brush. |
|
Magnify brush |
Magnifies the faces underneath. |
Table 2.1: Some basic ZBrush sculpting brushes
|
Brush |
Description |
|
Blob brush |
This brush is particularly good at producing certain organic effects very quickly. In contrast to other brushes, the uniformity of its stroke is affected by irregularities in the surface under the stroke, which means that it typically produces short, irregular blobs (hence the name). This won’t be so apparent if it is used on smooth surfaces. The Blob slider determines whether the brush pulls the surface out or pushes it in. |
|
Pinch brush |
Pulls faces together. The BrushMod slider affects whether the faces are pulled in to a peak (100) or down in a valley (-100) or together in a flat (0). |
|
Flatten brush |
Pulls or pushes faces to a single plane depending on the BrushMod slider setting. |
|
Clay brush |
This is a general-purpose brush for sculpting with alphas. The Clay slider scales the alpha as a whole; this affects not only the intensity of the sculpt, but also the size (width and height) of the brush stroke. The standard ZIntensity control affects the magnitude of the alpha up/down displacement effect, but does not affect the size of the alpha. |
|
Morph brush |
Blends between the current mesh and a stored morph target. |
|
Layer brush |
Adds a single layer of depth. ZIntensity determines the amount the Layer brush displaces a surface outward (ifZAdd is selected) or inward (if ZSub is selected). |
|
Nudge brush |
Slides edges along the surface. |
|
SnakeHook brush |
Pulls faces out into a tapered horn-like shape. |
|
ZProject brush |
Projects depth or color onto the current mesh. |
|
Smooth brush |
Smoothes the underlying geometry. BrushMod 100 smoothes recesses; BrushMod -100 smooths high points. |
|
Mesh Insert brush |
Inserts other meshes into the current tool. |
|
Clip brushes |
Pushes all geometry to the line, circle, or rectangle that is being drawn out. |
|
Masking Brushes |
Will allow masking with a circle, curve, rectangle, lasso, or freeform. |
|
Trim brushes |
Will trim away the surface creating a hard surface along the stroke direction. |
|
Planar brushes |
Will create a plane to the surface based on the tilt and elevation of the stroke. |
|
Polish brushes |
Will smooth, flatten, and shine the surface to represent metal. |
|
Select lasso brushes |
Will select any mesh under the drawn out selection based on selection marquee. |
|
Move Part |
This will move a single geometry shell. |
|
Move Topological |
Will move the mesh geometry based on the topology. |
|
Move Elastic |
Will apply an elastic stretch to the geometry that will maintain topology. |
For more information on the brushes, visit the ZBrush wiki: www.zbrush.info/docs/ index.php/Brush_Types.
Other brushes such as Mallet, Gouge, and Stitch are available. These are specialty brushes, which are created by combining existing brushes, strokes, and alphas. These specialty brushes are based on macros from ZBrush 3.0. Experiment with these brushes on a sphere or plane to see the effect they have.
Standard vs. Inflate Brush
The difference between the Standard and Inflate brushes lies in how the faces are pulled out from the surface. The Standard brush pulls all faces beneath the brush out or in a single direction. The Inflate brush pulls faces out along the normal of the face. The surface normal is the direction that points straight out from any four points. The following image illustrates this difference.


