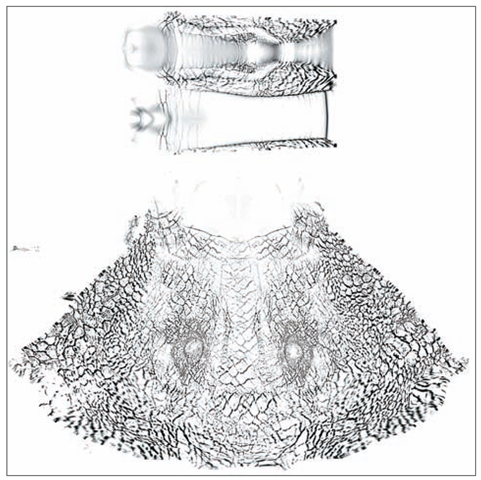
Cavity and Ambient Occlusion maps are specialty textures that can be generated in ZBrush using the masking tools. Cavity maps are essentially the blue channel of a normal map and represent dark shading in the crevices of the model. They can be useful as a multiply layer over a diffuse color map to accentuate details or as a diffuse map in Maya to help punch up the high-frequency details in a render. Figure 9.67 shows a cavity map. It is essentially a black-and-white map in which black represents the recesses and white is the high points.
Cavity mapping is intended to help mimic Ambient Occlusion, but it is not by nature an Ambient Occlusion effect. It also has several other uses. Ambient Occlusion works by casting rays out from the surface of a 3D model. If a ray hits another surface before dying out, then a grayscale value is recorded that represents how far that ray traveled before being occluded. This is how Ambient Occlusion maps generate darker shadows in tight recesses like inside ears or under the brow ridge.
Figure 9.67 A cavity map
The rays there intersect the next surface faster than, say, faces under the chin, which would record a lighter grayscale value.
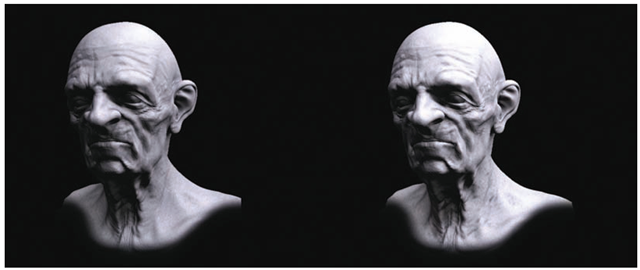
Cavity mapping, on the other hand, just shades in recesses. It doesn’t use advanced raycasting or calculate distances between surfaces. It is, however, useful as a diffuse map or a Photoshop mask or any other application where you want to isolate the high points from the low points on a surface texture. Figure 9.68 shows a cavity map and Ambient Occlusion map to help illustrate the differences.
Figure 9.68 A cavity map and an Ambient Occlusion map. The first image is a cavity map. Notice how the recesses are shaded whereas the Ambient Occlusion image shows a gradient shading into the recessed areas of the head.
Cavity maps are generated with ZBrush’s Masking menu. You can automate this process a bit more by generating the maps using the Multi Map Exporter plug-in we will discuss in the upcoming section “Creating Maps Using Multi Map Exporter.” The curve used here will also affect the maps generated with the Multi Map Exporter plug-in. Follow these steps to create a cavity map:
1. Load your ZTool and step to the highest subdivision level. Tools with more fine details tend to give better results. Make sure the mesh has UV coordinates applied.
2. Open Tool + Masking and click the Cavity Profile curve to open it. Change the curve to look like the one in Figure 9.69. Set Intensity and Blur to 10. Click Mask By Cavity to mask into the recessed areas. Figure 9.70 shows the masked head.
Figure 9.69 The Masking menu here shows the curve settings required to create a cavity map.
Figure 9.70 This character head has cavity masking applied.
3. To create a map from this masking simply open Tool + Texture Map and click New From Masking. This will generate a texture map from the current masking.
Figure 9.71 shows a cavity map used in the diffuse channel of a Maya Blinn shader. The cavity map is perfectly suited to help accentuate the rendered details by governing how light is reflected back from the surface. The dark areas reflect less light, so they appear darker; the lighter areas have the opposite effect. This effect helps accentuate the recessed areas by limiting the amount of light they reflect, giving them a darker, more shadowed appearance.
Figure 9.71 This character head was rendered in mental ray using a displacement map and a cavity map in the diffuse channel. The first image is the render without the cavity map; the second image is with the cavity map.
Creating Maps Using Multi Map Exporter
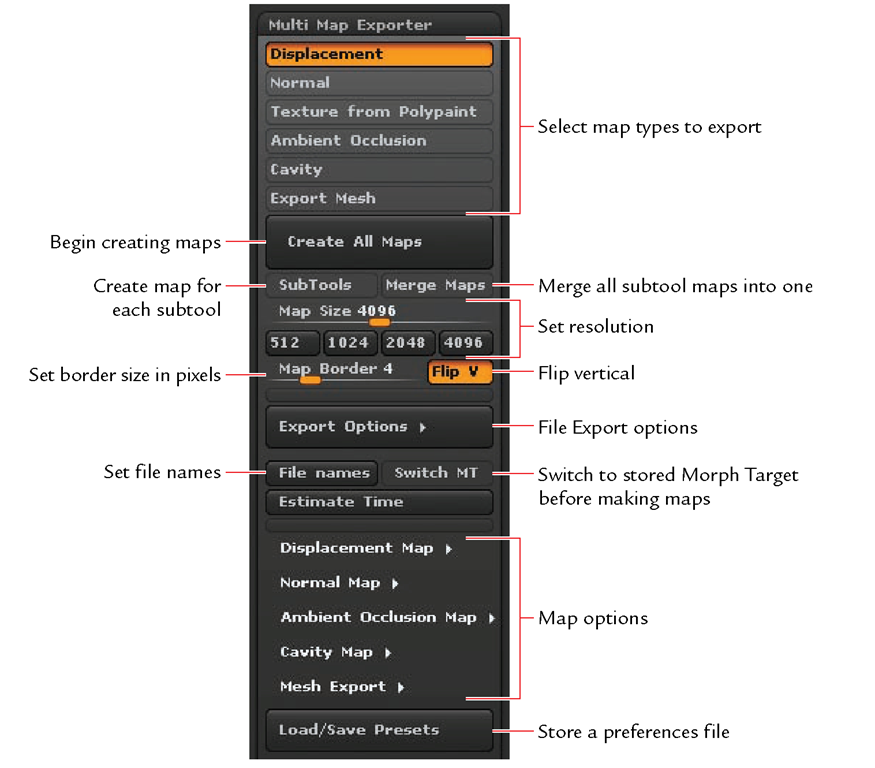
Multi Map Exporter is a plug-in freely available from Pixologic that enables the artist to generate and export multiple file types from ZBrush with a single button click. It will save and load options so your favorite settings can be saved and recalled for later use. Figure 9.72 shows the Multi Map Exporter plug-in interface. You can download the plug-in from www.pixologic.com. Simply extract the contents of the zip file into your ZBrush4/ZStartup/ZPlugs folder.
The interface can be divided into two sections. The top panel allows you to select which files will be generated by the program whereas the bottom section allows you to set map-specific settings for each file type. These menus expand and reveal several options each. You may also set your favorite settings and save a preferences file for future use. In this section we will look at the menu options and their functions as well as how to use the Multi Map Exporter plug-in.
The plug-in will create the following file types:
Displacement Maps We saw what displacement maps are and how they work earlier in this topic. The plug-in offers several options to control the type of map created. Figure 9.73 shows this menu.
The SubDiv Level slider allows you to determine which subdivision level the displacement map is generated from. This is useful because a displacement map generated from level 1 carries far more form than one generated from the higher subdivision levels (which carry mostly details). This means you can generate a displacement map from level 3 of a five-level model and use the resulting map as a bump map. Because the map was generated from a higher subdivision level, it is only calculating the difference between the highest level and the current level. If that difference is mostly fine details, a suitable bump map will be created.
Figure 9.72 The Multi Map Exporter plug-in interface
Figure 9.73 The Displacement Map options
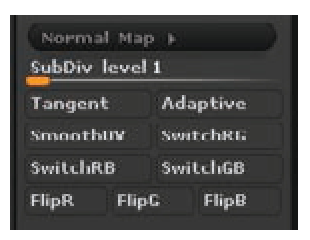
Figure 9.74 The Normal Map menu options
Normal Maps We saw what normal maps are and how they function earlier in this topic. The options here are identical to those found under the Tool + Normal Map menu with the exception of the SubDiv Level slider (Figure 9.74). Again this slider will allow you to create normal maps that carry just the finer details depending on how high up the subdivision level chain you generate it.
Textures from Polypaint Polypaint textures can be generated quickly and easily with these options. You can also generate color textures for UVs outside 0 to 1 using this plug-in. This technique is extremely helpful when you have painted in high definition. There are no menu options for polypaint textures in the plug-in menu—only the option to generate the color maps.
Ambient Occlusion You can use Ambient Occlusion maps to create attractive renders because they emulate the effect of an Ambient Occlusion render pass without having to calculate it for each frame of animation. Figure 9.75 shows an Ambient Occlusion map. The settings in the Ambient Occlusion menu will vary between ZTools, but I have good results when I set Occlusion Intensity to 2 (Figure 9.76).
The Occlusion Intensity slider controls the strength and size of the dark areas in the map. The Scan Distance slider controls the spread between the two color values of the map, and the Scale slider controls the overall intensity of the occlusion. Note the option to create a 16-bit OCC map. When this option is off, the map defaults to 8 bit. When in 8-bit mode you can alter the two colors used by the Ambient Occlusion map by clicking the Colors button. This will cause ZBrush to use the primary and secondary colors selected in the color swatches in the main interface.
Figure 9.75 An Ambient Occlusion map for a character head
Cavity The Cavity Map menu options (Figure 9.77) are nearly the same as those found under the Masking menu. The cavity map generated will use the Curve setting found under Tool + Masking. The menu allows you to alter the bit depth and colors of the resulting map just as we saw for Ambient Occlusion. You can also click the Use Curve All Subtools to use the Curve setting found under Tool + Masking when generating cavity maps for all the subtools of the current ZTool.
Export Mesh The plug-in gives you the option to automatically export the mesh with the maps (Figure 9.78). In this menu you can define Subdivision Level to Export. If you set all your maps to generate from level 2, for example, you will want to apply them to a level 2 mesh in your rendering program. Make sure you enable Quad and Mrg when exporting. Quad will export the mesh as quad faces and Mrg will merge the UV points. Finally, the Load/Save Presets button allows you to store or recall all settings from this menu. You’ll find this ability useful when working on a team where all maps need to be extracted with consistent settings.


