In this topic we’ll continue to explore the tools and techniques for sculpting in ZBrush. We’ll start by using a ZBrush primitive sphere as a base to sculpt a human skull. This allows us to lay a solid foundation for the rest of the sculpting tutorials because it illustrates both the power of the ZBrush sculpting tools and an approach to sculpting characters that takes anatomical structure and landmarks into consideration.
During this process, we’ll pay special attention to the anatomical forms and relative proportions of the skull. Once the skull is roughed in using the Rake and Clay tools, we’ll mass out the muscular tissues and build a human head.
In this topic I’ll introduce many of ZBrush’s powerful sculpting tools as well as some important aspects of human anatomy. It is important to inform your character work with real anatomy—even if it is a fantasy character. If you understand the bone and muscle that influences surface forms, your creature and character work in ZBrush will be all the more convincing.
Starting a head from a simple sphere primitive has several benefits. Sculpting character heads from spheres in ZBrush is a valuable exercise, similar to sketching on paper or with a digital ball of clay. Also, approaching a complex form in ZBrush from such a simple primitive helps to illustrate how topology in ZBrush is not a major concern, provided that the polygon count of your base model is low enough that it can be subdivided to the maximum level. The higher your subdivision levels, the more polygons you will have to push and pull into the shapes you need. Please see the accompanying DVD for a video of the head sculpture from this topic. You will also find a bonus DVD of an alien sculpture that was created from a ZBrush primitive sphere.
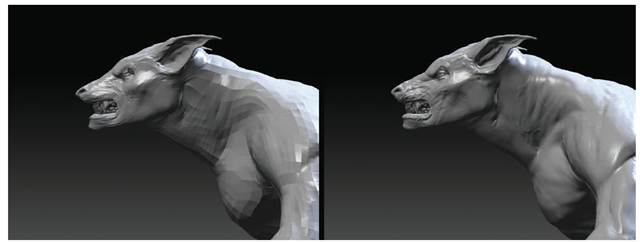
At this time I’d like to introduce you to the concept of multiresolution editing. Multiresolution editing means that changes you make at level 1 on a ZTool telegraph all the way up to the highest subdivision level; changes at the high levels are telegraphed down to level 1 (Figure 2.1).
Figure 2.1 The werewolf head on the left was altered with the Move tool at level 1. Stepping up to level 3, the changes are telegraphed through each subdivision level and affect each one.
Because of this interaction between subdivision levels, when the artist works at the lowest possible level, any forms made will translate to the higher levels.By working at lower subdivision levels, you won’t deal with enough geometry to become lost in details.This kind of approach also helps create a smooth and organic surface without the “lumpiness” seen in some ZBrush models.
Although it is desirable to work at the lowest possible subdivision level for the form you are creating, some ZBrush brushes work differently at the higher subdivision levels. The Rake and Clay brushes, for example, are more effective at the higher subdivision levels. The kind of form that these brushes build is rough, so the focus is still on building basic large shapes first and then working down to the details. This process is closer to sculpting in actual clay, as you use larger rakes and broad strokes to create base forms and then refine them with tighter and smaller strokes until the surface is smoothed and finished. This latter process is the one we’ll use for the human head sketch in this topic. I use a combination of both working on the lowest levels with some brushes and then higher levels with Clay and Rake tools, but it is important to understand each approach and its merits. Most of all, always remember to work on the biggest shapes first and work your way down to the details.


