Technique
Save Time By
Knowing what Windows XP Home can — and can’t — do
Creating copies of your essential files in case something goes wrong
Getting Windows XP to automatically create backups
Have you ever lost a hard drive? I sure have. Several times. When I had good backups, bringing my life and business back only took a day or two. Once I lost a hard drive in the middle of a topic — and my last backup was a week old. It took almost a week to recover.
Hard drives are mechanical devices. They get old. They break down. Nothing you can do will change that.
You need to figure out how much data you can afford to lose — and then you need to spend some time figuring out how to get it backed up.
Windows XP comes with a decent backup program, although XP Home users have to go out and find it. XP Professional includes automatic restore features that let you bring back an entire dead drive — even if it’s your C: drive — with surprisingly little hassle. XP Home users, however, have to jump through some extra hoops and take extra precautions with backups.
In this technique, I show you how to measure out that crucial ounce of prevention — quickly.
Personally, I use a program called Zip Backup (www.zipbackup.com) for my daily backups and Norton Ghost for occasional full-disk image copies. If you can justify the price — $29.95 for Zip Backup, with a free 30-day trial; Ghost runs $69.95 — there’s no need to jump through Windows’ hoops.
Understanding XP Home’s Backup Limitations
When Microsoft made its first announcement about Windows XP Professional and Windows XP Home, the Folks in Charge had to come up with some ways to distinguish the Professional from the Home Edition — ways that would justify the $100-or-so price differential.
They came up with a great idea: They decided to put their fancy automated backup and restore program (which Microsoft bought from a company called Veritas) into XP Professional, but leave it out of XP Home.
Oy! Did the offal hit the fan. Journalists everywhere (including me, I must confess) bemoaned the fact that XP Home users wouldn’t have a backup program, fer heaven’s sake. Home and small office users need backup just as much as everybody else.
Microsoft, much to its credit, changed its corporate mind. In the end, Windows XP Home got a backup and restore program — a stripped-down version of the Veritas program — but it was stuck on the CD at the last minute.
That’s not the end of the story. Some PC manufacturers forgot to include the backup program on their XP Home machines. It isn’t even on the System Restore Disks or hidden on the hard drive somewhere. If you fall into that boat, your best bet is to yell really loudly at your hardware manufacturer; then borrow an original Windows XP Home Edition CD from a friend.
Automated System Recovery
The Windows XP Professional version of the backup program includes Automated System Recovery (ASR). With ASR, you can reformat or replace your C: drive, boot from the Windows XP Professional CD, and completely restore your system to the point of your last backup. (It isn’t easy, but it’s possible: Search in Windows Help and Support for ASR to get the gory details.)
In Windows XP Home, the backup program doesn’t include ASR. If your C: drive dies and you buy a new one, or if you reformat your C: drive for whatever reason, you can restore all your data files — but that’s about it. Your Windows settings are gone. You can’t restore your Registry settings, so you have to reinstall all your programs. Most (if not all) of your passwords are lost, too.
The real situation is a bit dicier than that. In fact, on some Windows XP Home machines (I’m told) ASR does work. Microsoft is mum on which systems work and which don’t, but you can see all the news they see fit to print at support.microsoft.com/?kbid=302700.
Automated System Recovery is not the same as a System Restore Point (see Technique 64). System Restore can help you roll back really bad Windows changes — the bits and pieces of Windows that get gummed up can be reset to their original state. The backup and restore methods I describe in this technique refer to data files and/or entire drives, and they’re commonly used when you mess up a file beyond recognition, or an entire hard drive collapses.
What to do about backup limitations
If you use Windows XP Home Edition, you have two choices when it comes to restoring your hard drive in the event of a crash:
Resign yourself to the fact that if your C: drive crashes, you may have to reinstall all your programs, and reconstructing your system is going to be hairy.
Buy a good disk-imaging package, such as Norton Ghost(www.symantec.com/sabu/ghost/ ghost_personal/), and run it regularly.
Windows XP Professional users, on the other hand, can feel pretty (but not completely) comfortable that ASR can restore an entire hard drive.
Manually installing the backup program
If you have Windows XP Home, you have to manually install the Veritas backup/restore program:
7. Put the Windows XP Home CD in your CD drive.
Windows shows you its installation splash screen in Figure 60-1.
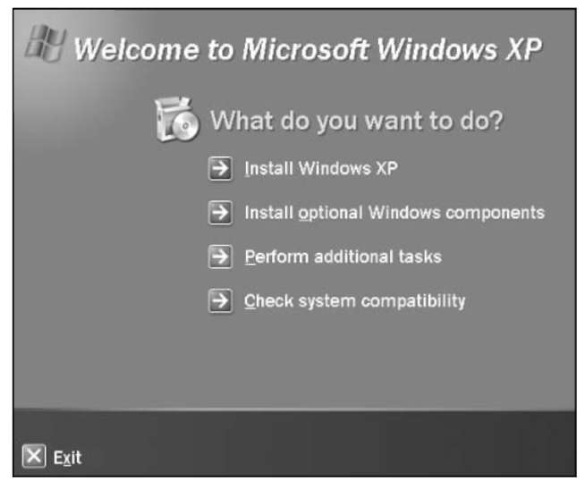
• Figure 60-1: Where do you want to go today?
2. Click the Perform Additional Tasks link.
The Windows CD gives you more options.
3, Click the Browse This CD link.
Windows Explorer kicks in, and (finally!) lets you look at the contents of the CD.
4, Double-click to VALUEADDOMSFTONTBACKUP, and then double-click the Ntbackup.msi file.
The installer takes off in a blink of an eye.
5. Exit out of the installer.
You return to Windows.
Creating a Backup
Windows XP backup backs up everything on your hard drive: data files, programs, settings, even Windows itself. It essentially creates a clone of your hard drive, optionally compresses all the files, and sticks them on a backup medium of your choice. In the best of circumstances, you have enough room on a different hard drive (perhaps a hard drive connected to your network, or a removable hard drive) to copy your cloned drive quickly. In the worst of circumstances, you may need to copy to tape. Many people only make backups of part of their hard drives — say, data files only, or the contents of their My Documents folder — and burn the backup on a CD.
Most music (MP3 or WMA), picture (JPG or GIF), and video files are already compressed. Using the compression option in Windows Backup doesn’t hurt, but it’s a waste of time and won’t save much, if any, space on the backup media. Generally, it’s better to just copy these files to a backup media. It stops the main backup file from getting too large, and separate files are easier to find and retrieve later. Music, pictures, and video are all good candidates for writing to a CD or DVD.
When you want to make a backup:
7. Choose Start All Programs Accessories System Tools Backup.
The Backup or Restore Wizard appears.
If you have XP Professional, and you want to create System Restore Disks for ASR, you must click the Advanced Mode link at this point. Then, from the Welcome tab, click Automated System Recovery Wizard. If you’re on a Big Corporate Network, check with your network administrator first to make sure you don’t mess up any settings that have been put in place for you.
2. Click Next.
The wizard asks whether you want to back up or restore (see Figure 60-2).
3. Click the Backup Files and Settings option, and then click Next.
The wizard needs to know what you want to back up, as shown in Figure 60-3. If you’re not entirely sure, a safe bet is the first choice — My Documents and Settings gets the most critical data, including your e-mail messages.
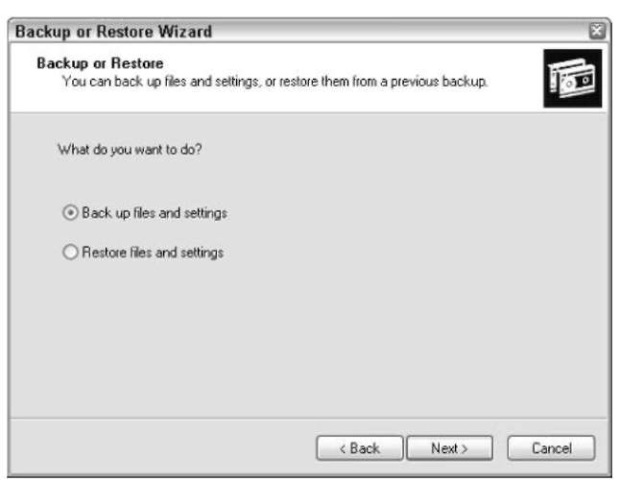
• Figure 60-2: Back up or restore?
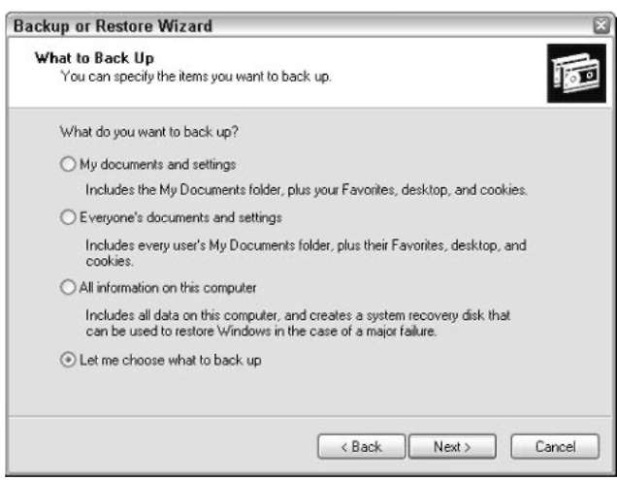
• Figure 60-3: What do you want to back up?
4, Choose what you want to back up, and then click Next.
If you pick the Let Me Choose What to Back Up option, you need to be aware of a rather obscure setting in the next wizard step. Underneath My Computer (see Figure 60^4), the System State option includes your boot files and Registry files. This option is a good one to have in the event of a catastrophic failure.
If you choose your own files, be very aware of the fact that neither Outlook nor Outlook Express stores e-mail messages in the My Documents folder.
The wizard asks for a location to place the backup.
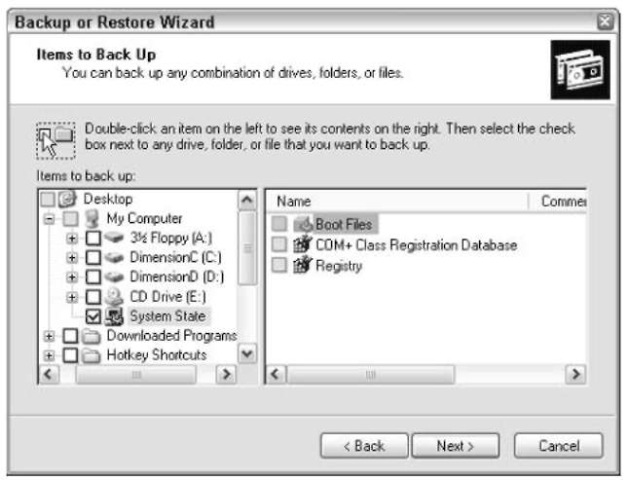
• Figure 60-4: If you decide to choose your own files, be aware of this odd choice under My Computer.
5, Click Browse, and then navigate to a location suitable for the backup (see Figure 60-5). Click Save.
The Backup or Recovery Wizard puts all the backed up data in one big, compressed .bkf file. Several, uh, design limitations of the wizard point to its roots as a tape backup program (see the sidebar, “Backup alternatives”).
If you want to keep your backups on CD, you need to put the .bkf file somewhere on a hard drive, let the wizard do its thing, and then manually copy the .bkf file to your CD-RW (or DVD-RW) drive. Unfortunately, there’s no way to break up a .bkf file, so make sure you don’t select too much data to back up at once. An example: Say you back up a My Documents and Settings folder and the resulting .bkf file is 600MB big. (That’s a big file, but if you have a lot of electronic photographs or music files — or a ton of spam in Outlook, or a lot of temporary
Internet files — it isn’t out of the question.) After you create the .bkf file, you drag it to your CD-RW drive, work your way through the CD Writing Wizard (see Technique 41), and burn the .bkf file to CD. Works like a champ: You can restore the files and they work just like the originals. But if your My Documents and Settings folder is so big that the resulting .bkf file weighs in at 900MB, that file won’t fit on a CD. You have to make two backups, each of which fit on a CD. Or you can buy a DVD writer.
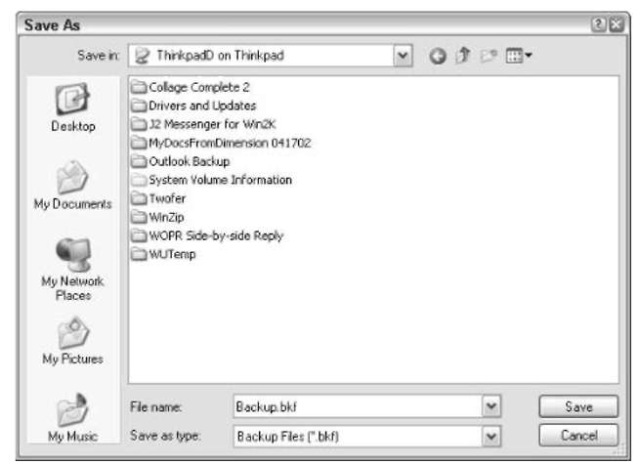
• Figure 60-5: Choose a destination for the backup.
The Backup or Restore Wizard returns, as shown in Figure 60-6.
6, Type a good name for the backup — something descriptive, so you can figure out what you were trying to back up, if worse comes to worst — and then click Next.
The Backup or Restore Wizard now has all the information it needs and shows you a summary.
7 Click Finish.
Depending on how much data you chose, this may be a good time to grab a latte.
The wizard starts backing up the data, using a sophisticated technique called shadowing — essentially taking a snapshot of files that may change in the course of the backup.
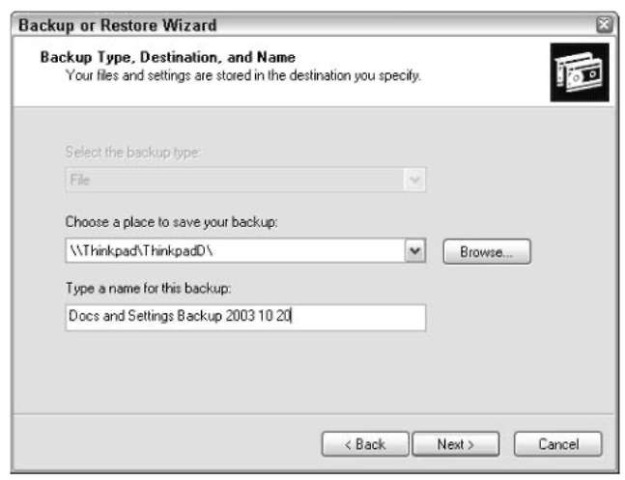
• Figure 60-6: Location and name.
The wizard keeps you posted on its progress, and when it completes the backup, you see the dialog box shown in Figure 60-7.
8, Click Close to end the wizard.
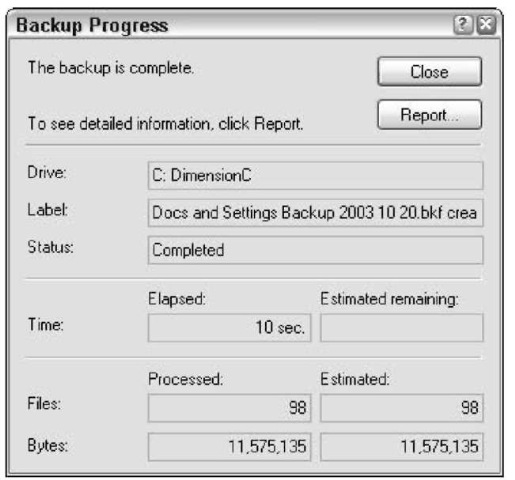
• Figure 60-7: Summary.
Backup alternatives
A few years ago, it looked like everyone would have to install a tape drive to make backups. These days, few people bother with tape drives because they’re expensive, slow, and often unreliable. Far too often, people have relied on backup tapes, only to find them useless. Unless you’re running a big server, tape drives are not worth the trouble.
So what are the alternatives? A writeable CD (or better, DVD) gives you space to back up documents, but probably not enough room to copy an entire drive onto a single disc.
If a home or small office network has room, you can place the backup from one computer on another computer(s). This is fast and easy access, but not much good if the whole building burns down (perish the thought!).
A cheap and fast alternative is a second, portable hard drive. These plug into your computer via the USB or FireWire port and appear as another hard drive. Usually, no special software or drivers are required. You simply copy files and backups to the portable hard drive. When you’re done, unplug the hard drive and take it away for safekeeping. You can buy simple sealed units with a hard drive and connection cables from any major retailer. Or get a shell with just the case and cables to use with any bare hard drive you have handy.
Scheduling Backups
You can schedule regular backups as often as you want. Before you try, though, you should read my admonitions in Technique 56. If you want your backups to proceed without incident, you need a user account with a permanent password that doesn’t change.
Windows Scheduler and Windows security squared off head-to-head, and Windows Scheduler lost. You have to jump through a bunch of hoops to get the Scheduler to work.
To schedule regular backups, follow these steps:
7. Choose Start All Programs Accessories System Tools Backup.
The Backup or Restore Wizard appears.
If you have XP Professional, and you want to create System Restore Disks for ASR, you must click the Advanced Mode link at this point. Then, from the Welcome tab, click Automated System Recovery Wizard. If you’re on a Big Corporate Network, check with your network administrator first to make sure you don’t mess up any settings that have been put in place for you.
2. Click Next.
The wizard asks whether you want to back up or restore.
3. Click the Backup Files and Settings option, and then click Next.
The wizard needs to know what you want to back up. If you’re not entirely sure, a safe bet is the first choice — My Documents and Settings gets the most critical data, including your e-mail messages.
4 Choose what you want to back up, and then click Next.
If you pick the Let Me Choose What to Back Up option, you need to be aware of a rather obscure setting in the next wizard step. Underneath My Computer, the System State box includes your boot files and Registry files. This option is a good one to have in the event of a catastrophic failure.
The wizard asks for a location to place the backup.
5. Click Browse, navigate to a location suitable for the backup, and then click Save.
The Backup or Recovery Wizard puts all of the backed up data in one big, compressed .bkf file.
The Backup or Restore Wizard returns.
6. Type a good name for the backup — something descriptive, so you can figure out what you were trying to back up, if worse comes to worst.
Click Next.
The Backup or Restore Wizard has all the information it needs.
7 Click the Advanced button.
The wizard presents you with a series of options, none of which are particularly useful for most people.
8. Click Next until you arrive at When to Back Up, as shown in Figure 60-8.
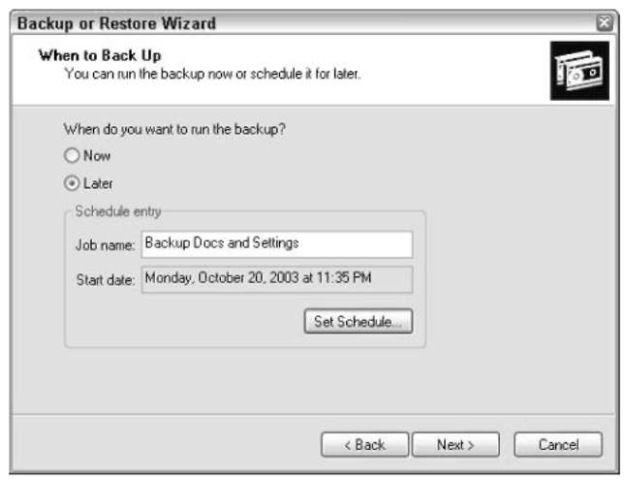
• Figure 60-8: Use this step to schedule backups.
9. Select the Later option, and then click the Set Schedule button.
You see the Schedule Job dialog box, as shown in Figure 60-9.
10, Set the scheduling options you want, and then click OK.
You return to the When to Backup dialog box, as shown in Figure 60-8.
11, Click Next.
The wizard has you enter a user account and password (see Figure 60-10). Refer to Technique 56, and make sure you use a valid Administrator account with a password that will work when the backup runs.
12, Enter an ID and password, and then click OK.
A dialog box appears.
13, Click Finish.
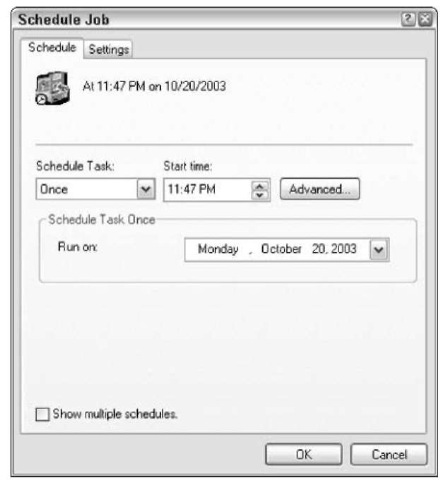
• Figure 60-9: A wide variety of scheduling options are available.
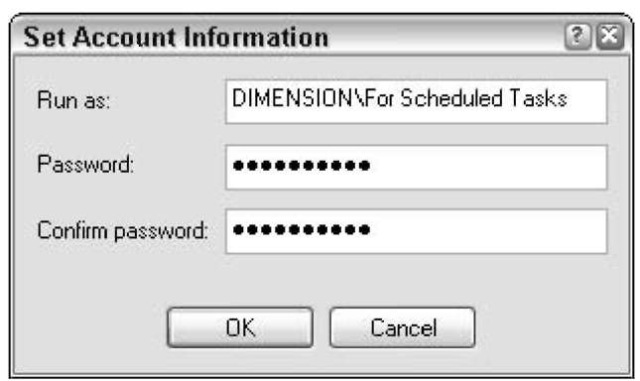
• Figure 60-10: The ID and password must work whenever the backup is scheduled to run.
Depending on how much data you chose, this may be a good time to grab a latte.
When the backup is complete, a dialog box appears (refer to Figure 60-7).
14, Click Close to end the wizard.
With a scheduled backup to a removable media (tape, CD-R, and so on), it’s up to you to ensure that a blank tape or CD is ready when the backup starts.
Restoring a Backup
Restoring a backup is considerably simpler than creating one.
If you have to restore an entire drive, make sure the new drive has the same formatting as the one you backed up. You can lose important file attributes if you restore NTFS files to an FAT drive or even an NTFS drive made with Windows NT 4.
Follow these steps:
1 Choose Start All Programs Accessories System Tools Backup.
The Backup or Restore Wizard appears.
2. Click Next.
The wizard asks whether you want to back up or restore (refer to Figure 60-2).
3. Click the Restore Files and Settings option, and then click Next.
The wizard responds with a list of all the folders that are available on the left (see Figure 60-11).
4. Choose the folders or files you wish to restore, and click Next.
The wizard responds with the Completing Backup or Restore Wizard dialog box.
5. Click Finish.
This might be a good time to fetch a cup o’ something warm. When the Restore is done, you see a summary.
6. Click Close.
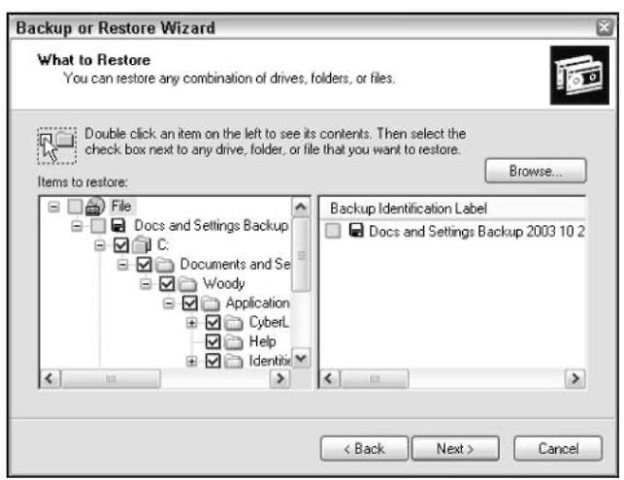
• Figure 60-11: Folders available for restore appear on the left.
Backups made with Windows 95, 98, or Me versions of Windows Backup cannot be restored with Windows XP’s Backup utility. You have to restore on a computer with the earlier version of Windows installed, and then copy the files to the Windows XP computer.
Alternatives to Windows Backup
Running Windows Backup gives you a single compressed .bkf file. You have no choice. That’s fine for tape backup (see the “Backup alternatives” sidebar), but it’s a pain in the neck if you have a large backup that you want to burn onto a CD or two or ten: CDs are limited to 600 to 700MB of data, and even DVDs max out around 4.7GB — smaller than most home offices’ hard drives.
It’s hard to generalize, but consider my (admittedly atypical) system. My Documents and Settings folder, the folder that holds all of my data, weighs in at 1.3GB. Even compressed, it won’t fit on a CD. My
Documents, on the other hand, is only 350MB — which is no problem at all for a CD. The biggest hog? A hidden folder called Local Settings, which contains my Outlook files (300MB) and temporary Internet files (400MB). The solution for me is to skip all of my temporary Internet files when creating a backup. If I do that, the resulting .bkf file is well within the size limitations for a CD.
There are alternatives to consider:
Create a backup by simply copying the files to a writeable CD or DVD using XP’s internal CD-R support. You get no compression, but finding and selecting a document is easy if you want to recover it. You don’t need to run the Backup or Restore Wizard to backup or restore. All you do is copy.
Make backups of the files into a compressed format like ZIP or RAR. As mentioned at the beginning of this technique, I’ve been using Zip Backup for years, and it’s great. You can choose the maximum size of a single compressed file and, when that limit is reached, you get a second, “follow on” file, then a third, then a fourth. This gives you backup files that can each fit onto a single CD.
Choose one of the many backup programs on the market. Most of them run rings around Windows XP’s backup. Norton Ghost is the best of the bunch, and you get an exact image of your hard drive. Veritas Backup Exec (www.veritas.com) will look familiar to Windows XP users, because the Windows XP backup system is based on an old version of Veritas. Backup NOW! is an excellent alternative (www.ntibackupnow.com), especially if you back up to CD.
