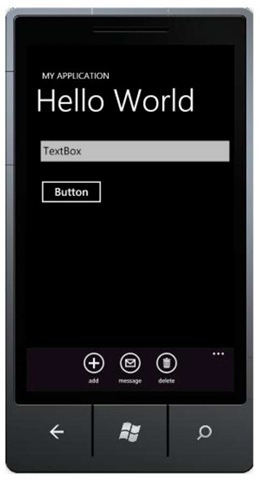
Application bar is a control system that can be used to build a toolbar on a Windows Phone application. Application bar can be considered as the main option to develop a fast and consistent navigation. There are two types of application bar that we can use, icon button based and text menu based. Both types can also be combined. Icon bars are usually used for main, frequently used activities. Application bar can be defined for the whole application (global) or only on certain pages (local).
According to best practices written in MSDN, there are a couple things to be considered:
• If a task can be represented clearly using an icon, then use icon button. Otherwise, use text menu.
• Use application bar to make sure system menus are consistent with the user experience in every applications on the device.
• The recommended opacity are 0 (not shown, content page fills the display screen), 0.5, and 1 (shows on the screen).
To use icon button, things to be considered are:
• Use images with white foreground and alpha channel transparency.
• No need to manually add a circle on the icon border, because it is automatically added.
• Use a 48 x 48 image with a main icon sized 26 x 26 placed in the center of it.
• Do not use icon button to navigate back, because the hardware has already provided it.
• Use icon buttons for important tasks in the application.
• Icon samples can be downloaded here: Microsoft Download Center
• Avoid using more than 5 icon buttons.
Global Application Bar
If you want an application with many different pages (XAML files) that has only one application bar for all or most pages, then global application bar is the perfect choice. To add a global application bar, what we have to do is add the application bar’s definition in App.xaml. Don’t forget to add a unique key in resource application bar so that it can be used in other XAML files.
Now let’s start making our first application bar.
1. You can continue from the previous projects or make a new one. In this example I will use a previously made project.
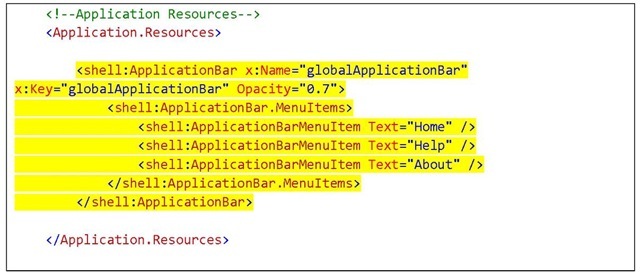
2. Open the App.xaml file, add the following code:
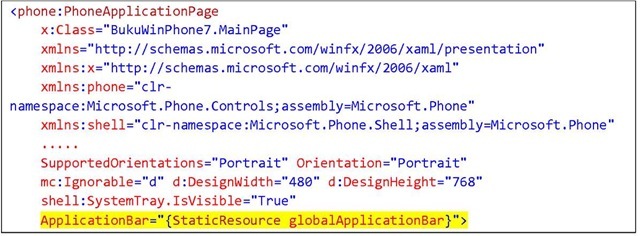
In the above example, we will add three menus on the application bar. Next, the pages which will use the application bar can refer to the previously defined key.
3. Open the pages to which the application bar will be added, and type the code below on each page:
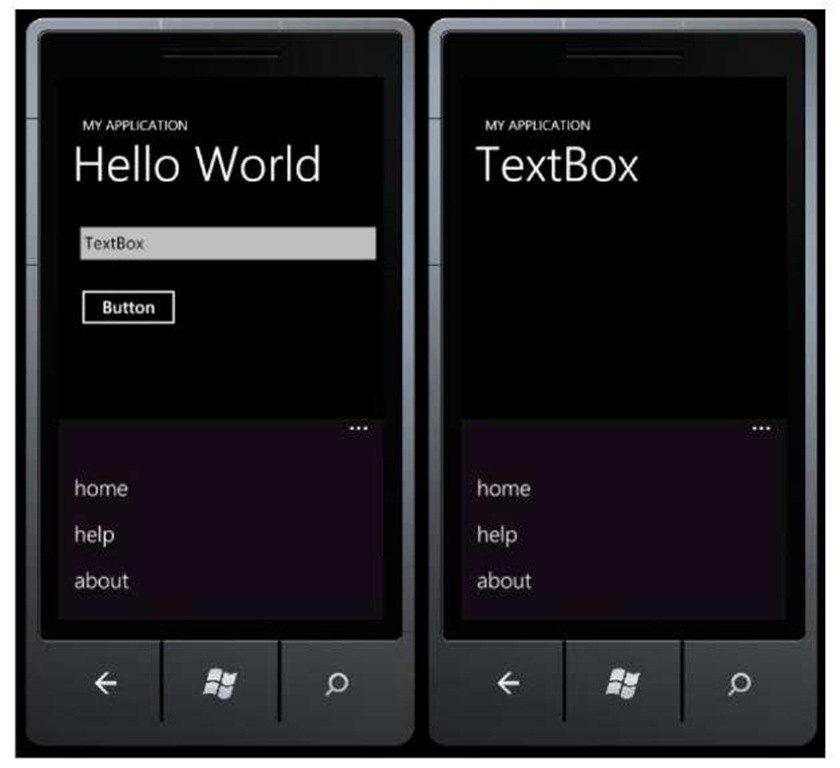
4. Press F5 for results.
For the pages in the application (in this example, MainPage.xaml and SecondPage.xaml) to which the application bar’s definition has been added, a menu list will be visible on the bottom of the main screen. The next section will explain the use of application bar in only one certain page.
Local Application Bar
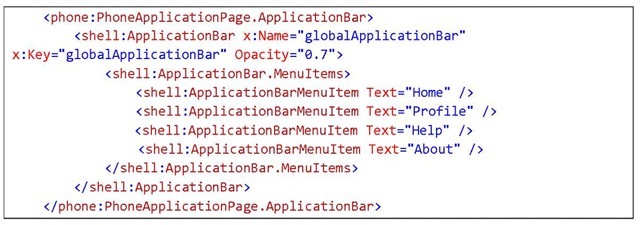
Creating a local application bar can be done in two ways: using codes or XAML. Make sure that the XAML page doesn’t already have a global application bar declaration. In this example we will use MainPage.xaml file again.
1. Open your XAML page and add the code below under the root container:
2. Press F5 for results. In this example, you can see the difference between the application bar in MainPage.xaml and the one in SecondPage.xaml.
3. We used menu item in the previous example, now let’s try using icon for our application bar. We should prepare the required icons before starting. Icons can be downloaded from Microsoft Download Center.
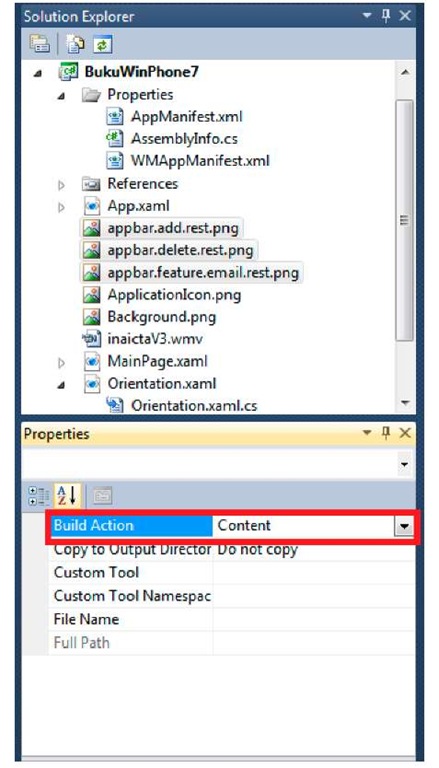
4. Add a couple of icons into the project. Right click on the project, select Add Existing Item. Set Build Action property of the images to content.
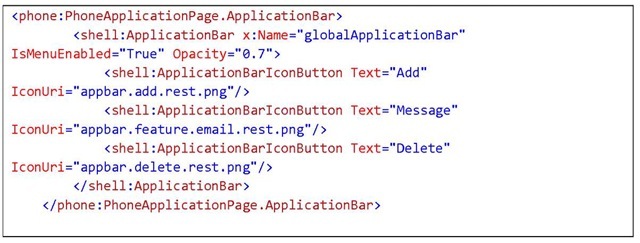
5. Change the application bar codes into the following:
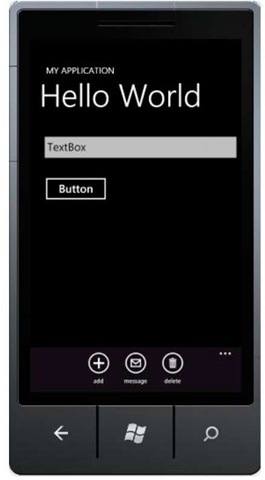
6. Press F5 and see the results. Now the application bar consisting of three buttons is ready to use.
Local Application Bar (Programmatic Approach)
In this section we will see how application bar can be created programmatically with codes instead of XAML file declaration. Follow the steps below:
1. Make sure that the page doesn’t already have either global or local application bar defined.
2. Add a reference to the following dll using Microsoft.Phone.Shell;
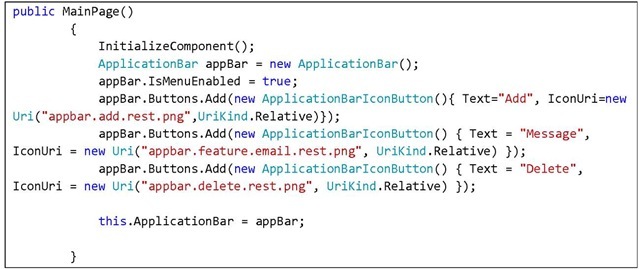
3. Add the following code in the code-behind file:
4. Press F5 for results.
Exactly the same, aren’t they?:)
Inserting Event Handler
To implement functionality into application bar items, we need to assign a click event for each item (regardless icon based or menu based). This can be done by using XAML or code. We can add a click event on XAML by declaring a function inside the item’s property.
For the exercise we’ve done in creating icon bar, we only have to add the following declaration:
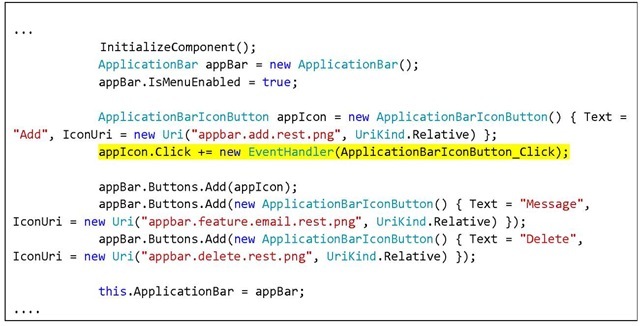
Or if you want it done programmatically, here is the code:
After the declaration, add the desired functionality inside the method (in this example it’s ApplicationBarIconButton_Click). To give an illustration, the following code will show a message box on button clicked.
Press F5 for results. When icon button on application bar is pressed, a message box will appear with the icon text as its content.

