CREATING AN ALBUM AND AN ALBUM CATEGORY
1. In the Albums section of the Organize tab, click the plus (+) button and select New Album Category (Figure 2.14).
2. Type the name of the album category in the text box, and select a parent album category if desired. Click the OK button.
3. Click the plus (+) button once again, and select New Album.
4. Select a category from the Album Category drop-down list.
5. Type the album name into the text box.
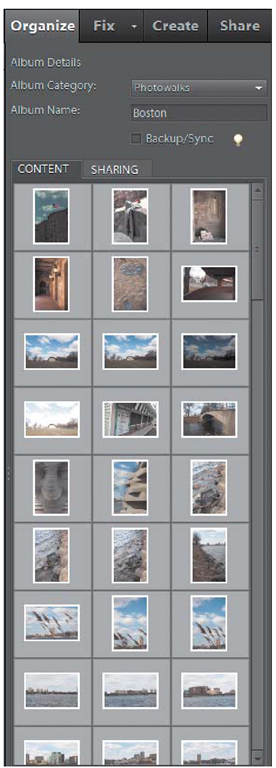
6. Drag images from the Media Browser and drop them into the content window (Figure 2.15).
7. Click the Done button when you’re finished adding images.
FIGURE 2.15
You can add images to an album by dragging them into the Content area of the album.
TIP
If a keyword is using the same name as the album you’re creating, a Duplicate Name Warning pop-up will appear. If you want to change the name of the album to something slightly different, click the Cancel button, go back to the Album Name field, and make your changes. If you’re OK with having the duplicate album and keyword tag name, click OK to continue.
There should now be a new album with the name you selected in the Album panel, and each associated image will have an album icon in the lower-right corner. If you want to see what album an image is associated with, hover the mouse pointer over the icon and an info box will pop up with the album name. It is possible to have the same image appear in multiple albums. If this is the case, each album name will display in the pop-up text.
If you want to add additional images to a particular album, all you have to do is drag them into the desired album in the Albums section of the Organize tab. You can also drag the album onto any thumbnail in the Media Browser to add that image to the album. To view all of the images in an album, click the album name and you will see only those images associated with that album in the Media Browser window. To remove an image from an album, right-click the image and then select Remove from Album from the pop-up menu.
SORTING WITH SMART ALBUMS
There may be times when you want to sort your photographs by certain criteria, such as file type, file name, or the information found in the photograph’s metadata. The Smart Album is the tool that will let you apply these search criteria to your images in order to group them into one album. So why use this particular feature? Here’s an example of why I would use it.
I write a lot of topics about cameras. In those topics, I need specific examples of photographs taken under certain conditions. For example, if I need images that were taken with a high ISO setting, I can use a Smart Album to quickly locate photographs that meet that criterion.
CREATING A SMART ALBUM
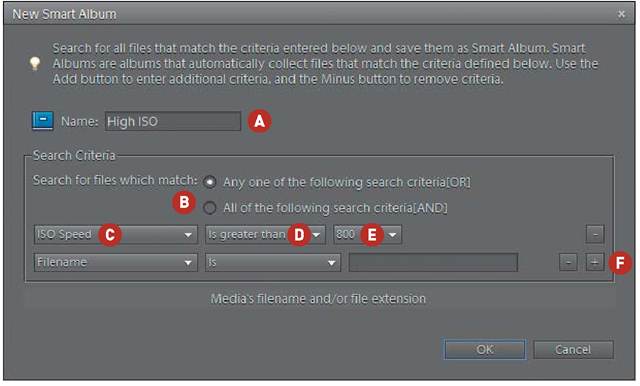
1. Click the plus (+) icon, and select New Smart Album (Figure 2.16).
FIGURE 2.16
The New Smart Album dialog.
2. Give your new Smart Album a name by typing it in the Name text box (A).
3. Now it’s time to figure out what the search criteria will be. Select the option to search for files that match "Any of the following search criteria" or the option to search for files that match "All of the following search criteria" (B).
4. Click the first drop-down, and select the criterion you want to include in your album search (I’m looking for ISO Speed) (C).
5. In the next box, select the variable for that criterion (such as is or starts with or, in my case, is greater than) (D).
6. The final variable depends on the item being searched. You may have to fill in the blank or choose from a list of options (E).
7. It’s possible to have more than one search criterion for the album. To add more criteria, click the Add (+) button on the right side of the Search Criteria section to add an additional line (F).
8. After you have defined your search criteria, click the OK button to create the new Smart Album.
If you want to remove any of the search criteria, click the Minus (-) button to the right of the criteria fields. Smart Albums have blue album icons; regular albums have light-green icons.
The great thing about Smart Albums is that they will constantly monitor your catalog for images that meet your search criteria. You may have noticed that there is a Smart Album already created for you called Last 6 Months, which monitors all of your photos and will let you display only those images that were taken in the last six months. This search is based on the actual capture date, not the date that the image was imported. If you recently imported images that were taken last year, don’t use this album to find them.
You could, however, find all the pictures you took last year by creating a new Smart Album and then having it search for a specific date range. See how cool that is?
To modify the criteria used to create a Smart Album, click the Smart Album’s name in the Albums list and then click the Options button at the top of the Media Browser window. This will bring up the Smart Album dialog, where you can tweak your search settings.
TIP
Unlike regular albums, Smart Albums don’t apply any icon to the images. That’s because they could change status depending on the search criteria used. They will, however, group the images into different batches in the Media Browser based on their import dates.
SEEING ALL OF YOUR IMAGES
Sorting images using keywords and albums is a great way of locating specific images in your catalog. By clicking either the album or the keyword, your Media Browser will display only those images associated with your selection. To quickly get back to viewing all of the images in your catalog, click the Show All button at the top of the Media Browser window.
STACKING IMAGES
Stacks are a great feature because they let you group photos and allow you to only see the top image in the stack while viewing your thumbnails. Let’s say you have a bunch of similar pictures of the Golden Gate Bridge. You can simply select all of them and then combine them into one stack of images. You see just one of them in the Media Browser, but all the others are there, waiting for you to unstack them when you are ready. It’s kind of like a deck of cards, where you only see the top card in the deck. The real advantage to doing this is that it cleans up the Media Browser so you have fewer thumbnails to look through.
CREATING A STACK
1. Start by selecting the images you want to stack. You can select as many images as you want, but you need at least two.
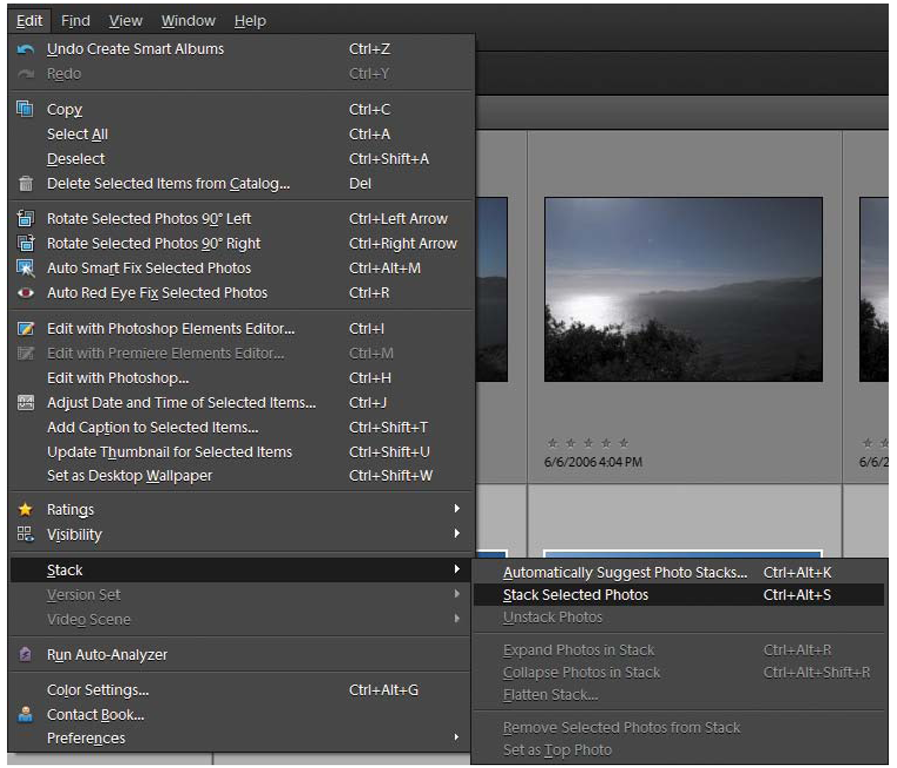
2. Choose Edit > Stack > Stack Selected Photos (or use the keyboard shortcut Control-Alt-S for Windows or Command-Option-S for Mac) (Figure 2.17).
FIGURE 2.17
The Stack command is in the Edit menu.
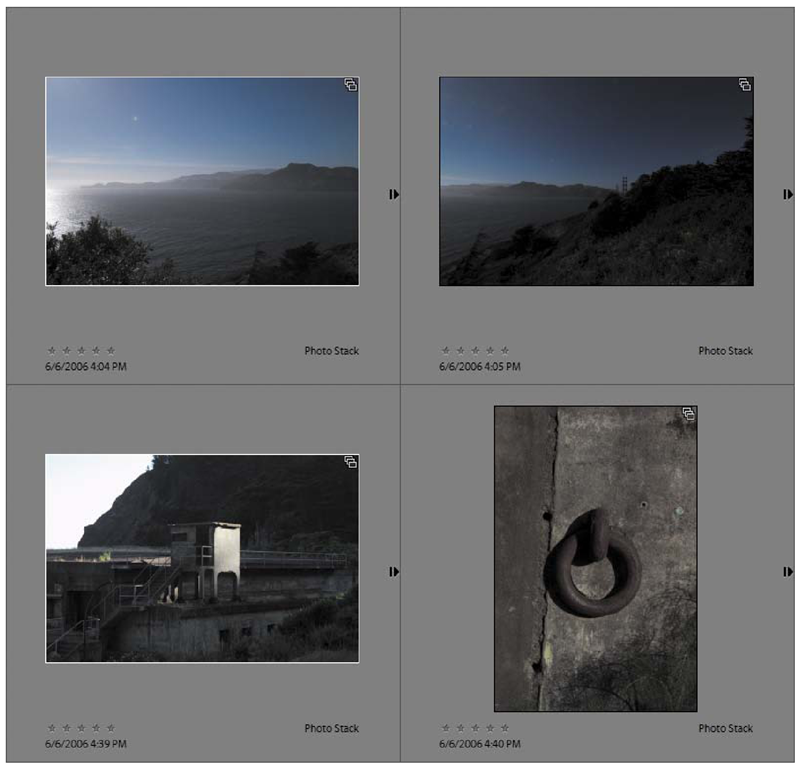
That’s all there is to it—just two small steps to clean up the clutter. When you are done, you will see a stack icon in the upper-right corner of the thumbnail that represents the stack. There is also an arrow icon on the right side of the thumbnail frame (Figure 2.18); click it to unstack the images. The arrow will reverse direction when the images are unstacked and appear on the last image in the stack. Just click it to restack the images again.
FIGURE 2.18
The right-facing arrows indicate stacked images.
Using suggested photo stacks
If you are feeling adventurous, you can select a large group of images and then let the Organizer give you stacking suggestions. I really love this feature because the image search engine does a fantastic job of grouping duplicate images. Once it has sorted them, it displays the suggested stacks in a search window, with each stack on a new line. All that is required is to click either the Stack or Unstack button for each group. Unique photos will appear in a grouping at the bottom of the window. You can also drag images from one suggested stack into another. If, for some reason, you end up with a couple of images that seem to be unrelated to the others in the suggested group, you can simply drag them into the Unique Photos section. When all of the stacking is done, click the Done button and you are returned to the Media Browser, where all of your new stacks are waiting for you.
tip
I tend to shoot a lot of bracketed images, which are the exact same scene shot at different exposures. The stacking feature is a perfect way for me to keep the exposures grouped together without having to look at all of them in the Media Browser.


