I have written quite a few topics in the From Snapshots to Great Shots series, and most of them have been about cameras. My philosophy for writing them has been to give a good foundation for taking great photographs through the application of camera technology and knowledge. It’s so important to understand the fundamentals and how to apply them when taking photographs. But is that all there is to making a good image? Well, it used to be.
There was a time when all you could control was the exposure of your film, and everything else was handed off to a photofinisher. It was their job to make sure that the film was processed correctly and that everything from that point on was done to give you a decent-looking image. Just how decent depended on who was doing the processing.
Today you can still drop off your files at the local drugstore and get photos back, but if you want to get great-looking images, you need to take control of that other side of the photography coin—the image processing. That’s why I wanted to write this topic. Because showing you how to take a great photo is just part of the equation. To get the most from your photographic efforts, you need to learn how to finish the photo by using software tools like Adobe Photoshop Elements.
There’s an old saying that goes—Give a man a fish, feed him today. Teach a man to fish and you feed him for life. Well, not really. You have to teach him not only how to catch it, but also how to clean it and cook it. Otherwise he just has a bunch of fish that he doesn’t know what to do with. That’s what we are going to do here. Now that you have caught your fish, let’s clean it and cook it and make it a truly great meal.
I have hopefully given you some clue as to what this topic is about, but if you still aren’t sure, read the Q&A.
Q:Why adobe photoshop elements?
A: It’s true that there are a lot of image processing programs on the market to choose from, but I wanted to pick a program that had all the power to handle many different image file types, including raw and JPEG. The program also needed enhancement tools that are fairly simple to use but also very powerful. I also wanted to ensure that there would be image management as well as lots of output options. The biggest feature, though, was having a price tag that wouldn’t break the bank. Photoshop Elements has all of these things and more. It has a great image management feature called the Organizer, and many of the same great tools as its big brother, Adobe Photoshop. Elements uses the Adobe Camera Raw software for complete control over raw image processing, and it has a very reasonable price tag.
Q:DOES IT MATTER IF I HAVE A MAC OR PC?
A: Nope. The program performs almost identically on either platform. When there is a difference between the keyboard shortcuts, I list the Windows shortcut first, followed by the Mac shortcut in parentheses, like this: To deselect, press Shift-Control-A (Shift-Command-A). The screen captures in this topic were made on a PC using the Windows 7 operating system, so you might see some aesthetic differences (buttons, cursors, and the like), but overall the program interface should look almost identical.
Q: YOU WROTE THIS TOPIC USING ELEMENTS 10, DOES THAT MEAN I CAN’T USE IT FOR MY EARLIER VERSION?
A: Not at all. Notice that there is no version number on the front of this topic. That’s because most of the things we are going to be doing will be general in nature and use the same tools that have been available in previous versions of Elements. I have tried to focus on the basics of image processing, so we address things like color correction, cropping, exposure adjustments, sharpening, and so on. The tools to perform these operations have changed little over the years and will still be there in future versions as well. They are the core elements of image processing, and just like f-stops and shutter speeds, they will probably change very little in the future.
Q: do you cover every feature?
A: Not even close. Adobe Photoshop Elements is jam-packed with hundreds of features, and this topic would be many hundreds of pages long if I covered all of it. My focus for this topic is to bring you the information and techniques necessary to take images from your camera and enhance them into something great. I also want you to be able to hit the ground running without getting bogged down by a lot of features.
As in my camera topics, we are going to cover the tools and features that will give you a great image processing foundation and let you start improving your photos right away.
Q: what CAN I expect to learn from this topic?
A: I like to think of image processing as a three-step process. First there is the import, where I move images from my camera to my computer. Next, it’s time to work them over, giving them the right treatment to really fulfill the vision I had when I took the photo. The third step is to do something with my images, whether it’s making prints to hang on the wall or sharing them with friends, family, or even clients. These are the processes that you will learn. They aren’t overly complicated or advanced, but you don’t have to tell anyone that.
Q: what are the assignments all about?
A: At the end of most of the topics, you will find short assignments where I give you some suggestions as to how you can apply the lessons of the topic to help reinforce everything you just learned. A lot of the information covered in the topics will be new to you, and I’m a firm believer in learning by doing. The assignments are simple exercises that will help you gain a better understanding, and also take a nice break, before moving on to the next topic.
Q: IS there anything else I should know before getting started?
A: I realize that not everyone out there is shooting raw image files. Since I am such a huge believer in shooting raw, I thought it would be good to give you some of my files to use so that you can follow along with the lessons in Adobe Camera Raw. To access the bonus content, create an account here: peachpit.com/ elements_snapshots (it’s free), then enter the topic’s ISBN and follow the topic registration instructions. After you register the topic, a link to the bonus content will be listed on your Account page next to the topic title under Registered Products.
Q: IS THAT IT?
A: I also know what fun it can be to share what you learned with others and maybe even show off a bit. To that end, I invite you to show off your before and after shots in the Elements: From Snapshots to Great Shots Flickr group.
You have worked hard learning new things, so go ahead, join the group, and show us your Great Shots. Just point your browser to www.flickr.com/groups/ elements_fromsnapshotstogreatshots, and join in on the fun. I’m looking forward to seeing your work.
From Camera to Computer
IMPORTING YOUR IMAGES
This may seem like a pretty elementary place to start, but let’s face it:
You can’t do anything to your photographs until you get them into your computer. Believe it or not, this is where things can really go wrong for a I lot of people. What do I mean by that? Well, being organized is the key I component to a fast and efficient workflow.
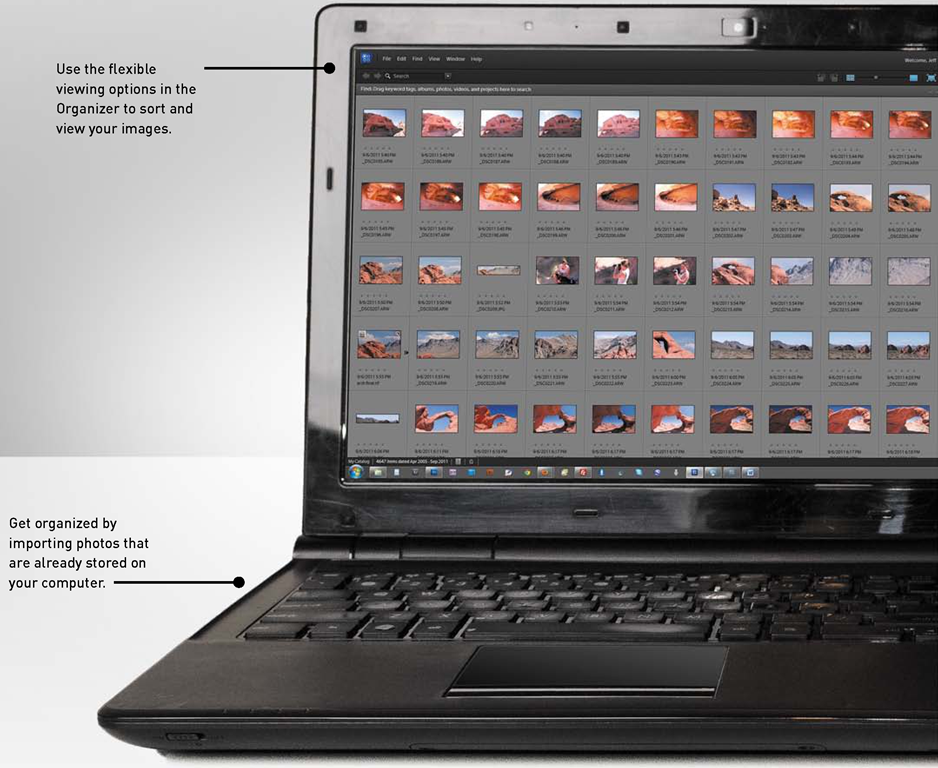
I can’t tell you how many times I have looked through someone else’s computer and found images scattered about in numerous folders. If you are lucky, they might all be in the My Pictures folder, but that’s not always the case. The best way to combat this is to get organized from the moment that you import your images into your computer. So let’s check out the Elements Organizer and start importing some photos.
Poring over the picture
Importing photos from your camera or card reader
I love taking photographs. Working with my camera and accessories to capture a moment is one of my most fulfilling experiences, but what have I really done up to that point? I have captured the image on a memory card and probably looked at it on the camera’s LCD screen. There’s not a lot else you can do with an image while it sits there in the camera, so importing it into my computer is the logical next step.
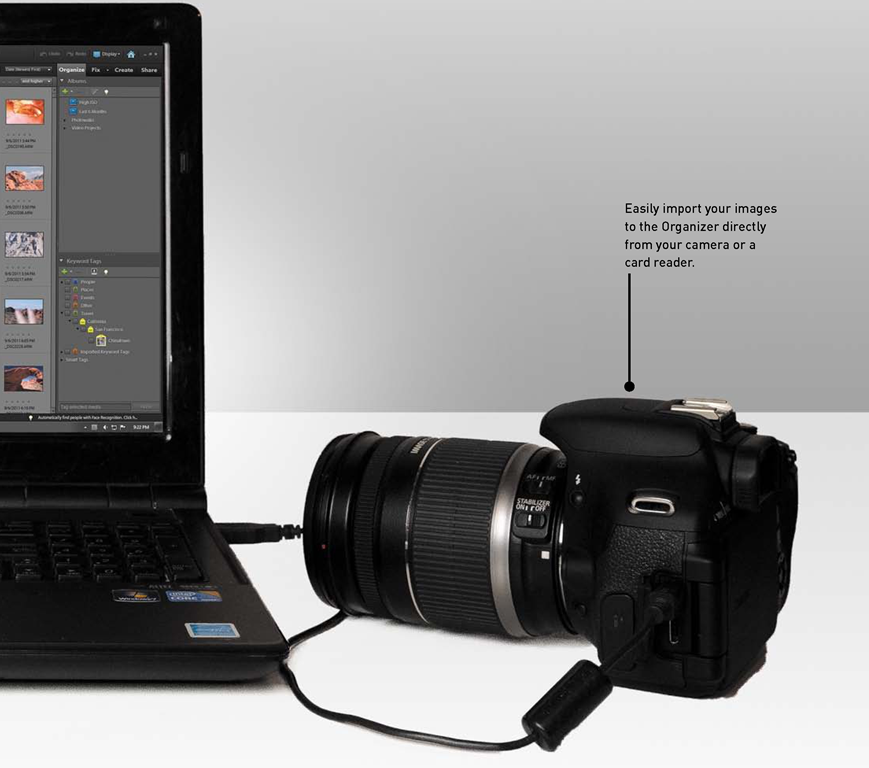
Adobe Photoshop Elements allows you to perform this process either by connecting your camera to the computer or by removing the card from the camera and using a connected card reader. Let’s start by importing pictures from our camera. To do this, you will need a USB cord, which most likely was included with your camera when you bought it.
Before attaching your camera to the computer, read your camera’s manual for any specific instructions related to this procedure.
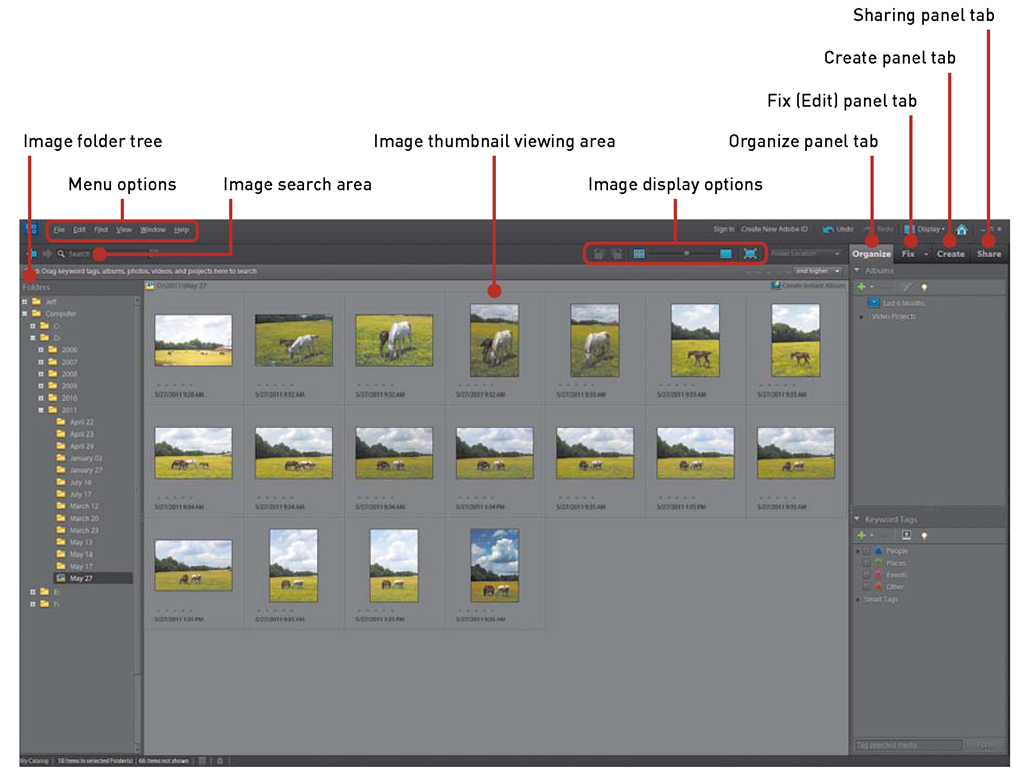
FIGURE 1.1
The Elements Organizer interface.
After the camera is attached and turned on, open the Elements Organizer (Figure 1.1) and then click the File menu. Select Get Photos and Videos > From Camera or Card Reader (the keyboard shortcut for performing this action is Control-G for Windows or Command-G for Mac).
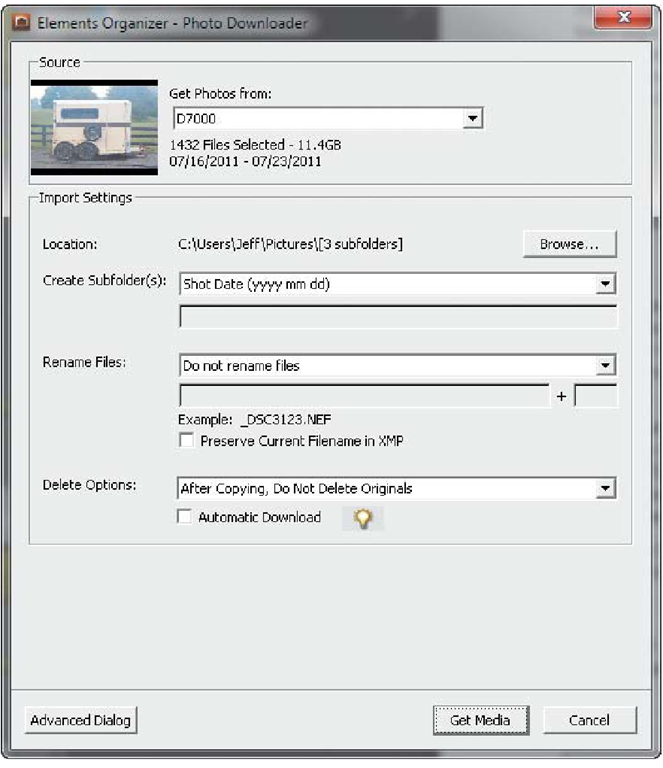
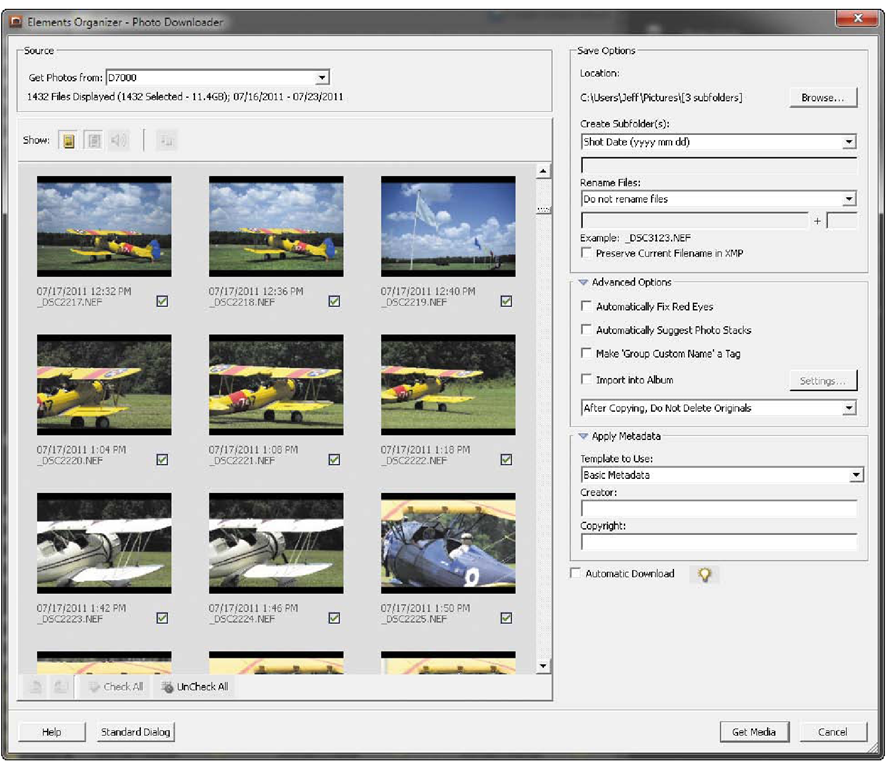
When the Photo Downloader dialog opens, you’ll have to make some decisions before moving forward (Figure 1.2). First, you need to select your source. Select your attached camera from the Get Photos from drop-down menu. Now it’s time to make some decisions about how to organize your photographs on the computer.
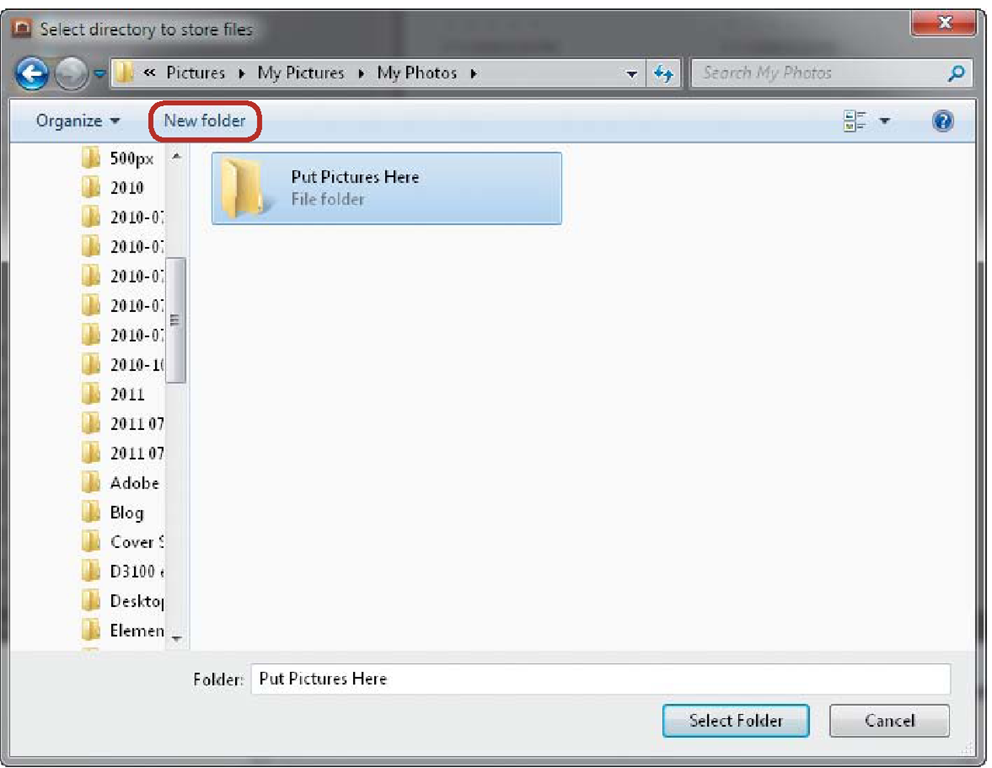
The Import Settings section of the dialog lets you determine folder locations, create some folders, rename your files, and select deleting options for images on the card or camera. The first thing you need to decide is what location you want your photographs to reside in on the hard drive. Typically this would be your Pictures folder, but you may decide to use a different location, such as a second hard drive. To select a different location for your photographs, click the Browse button, navigate to the folder or drive where you would like your photos to end up, click the New Folder button, and type in the name of your new folder. Just make sure to click the new folder to select it before pressing the Select Folder button (Figure 1.3).
FIGURE 1.2
The Photo Downloader dialog.
NOTE
To open the Organizer in Windows, click the Start button and then select Adobe Photoshop Elements from the All Programs section. When the opening splash screen appears, click Elements Organizer. If you are using a Mac, look in your Applications folder for the Adobe Photoshop Elements icon and click it to start the program.
Figure 1.3
Click the New folder button to create a custom download location.
Subfolders are a nice way of allowing you to sort images by topic or date. I prefer to sort my photographs into subfolders using the date that I took the photographs. The Organizer gives you several different date options to choose from when naming a subfolder. If none of these work for you, you may create your own custom subfolder. Simply select Custom from the drop-down menu, and then fill in the desired name in the space below.
Another option when importing is the renaming of image files. The default setting leaves the file names as they were when they were created in the camera. If you would like to change this option, simply click the down arrow and choose one of the many presets, or create your own custom naming convention.
The next option allows you to decide what to do with your images on the memory card after they have been imported. The default setting does not delete the originals but rather leaves them on the card for you to deal with later. This is the option that I prefer when importing images. It’s just a personal preference, but I like to make sure all of the images are intact and then delete them in the camera when I am ready. The other two available options will delete the images off the card after copying, or after copying and verifying.
You will notice a small check box labeled Automatic Download near the bottom of the Import Settings section. If you select this check box, the Adobe Downloader will automatically start when the computer recognizes an attached camera or card reader.
Images will be downloaded using the default settings from the preferences. I prefer to leave this turned off and to instead select my import options with each session.
You will also notice an Advanced Dialog button at the bottom of the dialog. Selecting this option expands the dialog options, giving you more information and the ability to add more data during import. The advanced options will allow you to select individual images for import, apply ownership and copyright data to the images, and perform some automatic tasks such as fixing red eyes, suggesting photo stacks, and importing into an album (Figure 1.4).
Figure 1.4
The Advanced Photo Downloader dialog.
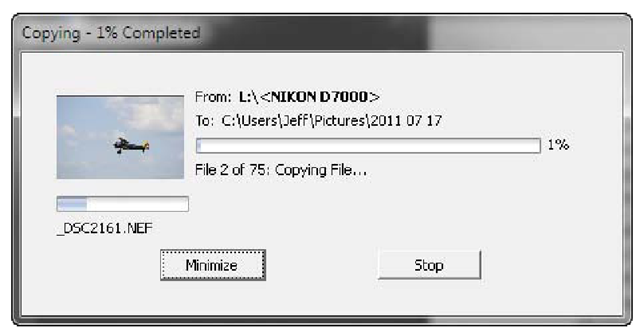
After you have set all of your options in the dialog, click the Get Media button to begin the import process (Figure 1.5).
FIGURE 1.5
Once your download has begun, a progress window will keep you updated.
FIGURE 1.6
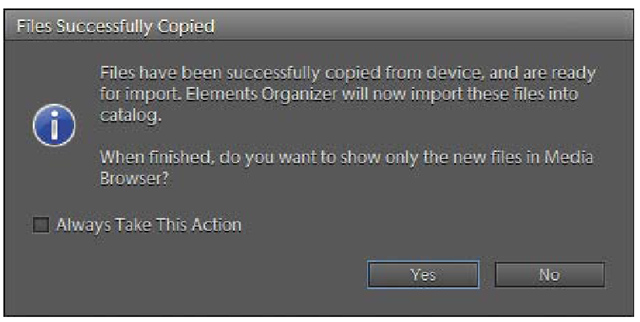
Click the Yes button to see only the images that were just downloaded.
This is not quite the end of the procedure. When all of your files have been moved, another box will pop up to let you know that you have successfully moved or copied your files and that they are now ready for import in the Elements Organizer catalog (Figure 1.6). The big question is whether you want to see only the new files in the browser or all of your images. I like to focus my attention on the newly updated images, so I select Yes. I also select the check box for making this my default setting, which means I won’t ever have to see this box again.
note
To make all of your images visible again in the Organizer window, simply press the Show All button at the top of the thumbnail window.
