In This Chapter
Understanding sound hardware
Configuring speakers
Setting up sound in Windows
Changing the volume
Playing sounds for certain events
Recording sounds
Originally, the computer’s audio was a simple bell. Ding! When the first microcomputers came out in the 1970s, they had small, tinny speakers to emulate the bell. But computer hobbyists wanted their machines to do more than just go “beep.”
Today’s PCs have complex audio abilities. You’ll find, built into the chipset on the motherboard, specialized sound circuitry, including a complete music synthesizer. The computer can talk, sing, play a symphony, and yes, even ding likt a bell. This chapter explains all about your computer’s sound system.
The Noisy PC
All PCs include sound-generation hardware on the motherboard. This hardware can process and play digitally recorded sounds, play music from a CD, generate music using the onboard synthesizer, and record sounds. That’s a lot of capability, yet it’s so common on a PC that the manufacturers seldom boast about it.
When you’re really into audio, you can add more advanced sound hardware to your PC by using an expansion card. This type of upgrade is necessary only for diehard audiophiles, people who are composing their own music, or professionals who use their PCs as the heart of an audio studio.
If your PC lacks expansion slots or you have a laptop, you can upgrade your audio by adding an external, USB sound device, such as the Sound Blaster Audigy system.
Speakers hither and thither
The PC console has always come with an awful, internal speaker. It still does, but in addition, your PC most likely came with a standard set of stereo (left-right) speakers. That’s fine for basic sound, but the PC is capable of so much more.
The next step up from the basic speaker set is to add a subwoofer. It’s a speaker box designed for low-frequency sounds, which gives oomph to the bass in music or adds emphasis to the sounds in games.
Typically, the subwoofer sits on the floor beneath your PC. It plugs directly into the PC’s sound-out jack (see Chapter 3), and the stereo speakers plug into the subwoofer.
The final step up the audio ladder is to go with surround sound, similar to the sound setup for a home theater. In that configuration, you can have multiple speakers located around the computer, depending on the implementation of surround sound hardware you’re using.
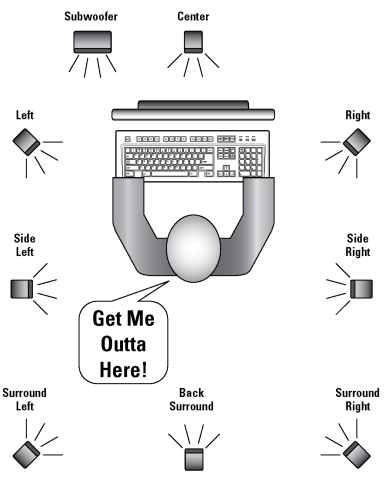
Figure 13-1 illustrates all possible locations for speakers in a surround sound setup. You’d be nuts to have all those speakers connected at one time, but it’s possible. Table 13-1 lists the options for surround sound.
| Table 13-1 | Surround Sound Speaker Options |
| Surround Sound | Speakers Used |
| Version | |
| 3.0 | Left, Right, Back Surround |
| 4.0 | Left, Right, Surround Left, Surround Right |
| 4.1 | Left, Right, Surround Left, Surround Right, Subwoofer |
| 5.1 | Left, Right, Center, Surround Left, Surround Right, Subwoofer |
| 6.1 | Left, Right, Center, Side Left, Side Right, Back Surround, |
| Subwoofer | |
| 7.1 | Left, Right, Center, Side Left, Side Right, Surround Left, |
| Surround Right, Subwoofer |

Figure 13-1:
Speaker overload.
Left and right speakers are positioned on the left and right sides of the monitor as you’re facing it.
I recommend getting speakers that have a volume control, either on the left or right speaker. Another bonus: a mute button on the speaker. Note that some high-end speaker systems have a control (wired or remote) that has the volume and mute buttons on it.
The .x part of a surround sound specification refers to the presence of a subwoofer: .0 means no subwoofer; .1 means one subwoofer; .2 means two subwoofers.
If you have an audio expansion card on your PC, be sure to plug the speakers into that card.
Refer to my topic Troubleshooting Your PC For topic if you’re having trouble hearing sounds from your PC.
In your own World with headphones
Rather than startle everyone in the room when you launch aerial artillery in a computer game, consider using headphones with your PC instead of an external sound system. A good set of headphones can truly emulate a sound environment beyond what the traditional stereo speakers offer. In fact, some high-end gaming headphones can cost more than the standard home theater surround sound system. They’re worth it.
Good headphones come with a volume control and maybe even a mute button on the same wire that connects the headphones to the PC. Better headphones come with a built-in microphone for online communications as well as game playing. This type of headphone is often referred to as a headset. Headphones (or headsets) plug into the console’s headphone jack.
Headphones plug into the computer’s speaker jacks. Use the jacks on the front of the console.
Headsets have two audio jacks: One goes into the speaker jack; the other, into the microphone jack. They’re color-coded to help you plug them into the proper holes.
Look for headphones that are comfy on your ears, with big, puffy “cans.”
I don’t recommend a nonstereo headset. It has only one earpiece, which is okay for online communications but lousy for game-playing.
Microphone options
Any cheesy microphone works on a PC. If sound quality is important to you and you’re using your PC as a digital audio studio, you have to spend money on microphones and mixers and all that. But if that’s not you, any old microphone does the trick.
Two popular types of microphones are used on a PC: condenser and dynamic. Either one works with a PC, though if your PC’s sound equipment isn’t up to snuff, I recommend getting a sound mixer to use as a preamp.
If you plan to use voice over the Internet or dictation, get a headset. See the preceding section.
Sound Control in Windows
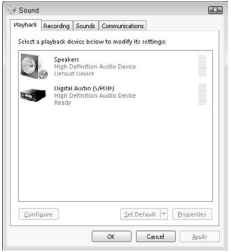
The Sound dialog box, beautifully illustrated in Figure 13-2, is the main place to visit in Windows for software control over your PC’s sound hardware. That’s where you set up and configure all the sound hardware on your PC, from the speakers to the microphone to the sounds that play as Windows does its thing.

Figure 13-2:
Sound control happens here.
To view the Sound dialog box, follow these steps:
1. Open the Control Panel.
2. Choose Hardware and Sound.
3. Click the main Sound heading.
The Sound dialog box appears.
Later sections in this chapter discuss various things you can do with the Sound dialog box.
Windows also features a second location for controlling PC audio. In the notification area on the taskbar, you find a tiny volume control. Using that control is covered later in this chapter, in the section “Adjusting the volume.”
Configuring the speakers
To adjust the PC’s speakers in Windows, follow these steps:
1. Summon the Sounds dialog box.
Refer to the steps in the preceding section.
2. If necessary, click the Playback tab in the Sounds dialog box.
3. Choose the playback device.
For example, click Speakers (refer to Figure 13-2).
4. Click the Configure button.
If the Configure button is unavailable (dimmed), there’s nothing to configure; you’re done.
5. Work through the Speaker Setup Wizard to ensure that your speakers are set up properly and that everything is working.
6. Close the Sounds dialog box when you’re done; click OK.
Configuring the microphone
To set up your PC’s microphone, follow these steps:
1. Open the Control Panel.
2. Choose Ease of Access.
3. Choose Set Up a Microphone from beneath the Speech Recognition heading.
4. Work through the Microphone Setup Wizard to properly configure the microphone attached to your PC.
Adjusting the volume
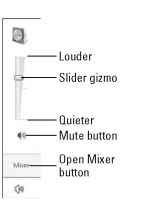
To make the PC louder or quieter or just to shut it up, you can use the Volume Control icon in the notification area. Click that icon once to display the volume control slider, as shown in Figure 13-3. Use the mouse to slide the gizmo up for louder or down for quieter, or click the Mute button to turn off the sound.
Switch between headphones and speakers
Your PC can have both speakers and headphones attached, but you can hear sounds from only one of those items at a time. To switch between them, right-click the Volume icon in the notification area and choose Playback Devices
from the pop-up menu. In the Sound dialog box, on the Playback tab, choose the device you want to use: speakers or headphones. Click the Set Default button to confirm your choice, and then click OK.

Figure 13-3:
Volume control.
You can also adjust the volume on your PC’s speakers, if they come with a volume control knob or remote control.
Choosing Mixer from the volume control pop-up (refer to Figure 13-3) displays a more complex volume setting window, where you can set the volume for various noise-producing gizmos and activities in Windows.
Windows Goes Bleep
Sounds are part of the entire Windows interface. It’s a mutual thing. The computer goes bonkers and produces a “bzzt!” sound. Then you, the human, say #$%&*! Or something similar. Truly, sound and music are what make the biological and electronic life forms dwell in harmonious friendship.
Though you can spend a lifetime configuring yourself not to say #$%&*, it takes only a few moments to configure Windows to go “bleep.” This section explains how.
See Chapter 27 for information on listening to music in Windows.
Also see Chapter 27 for information on making Windows talk — and listen.
Setting event sounds
Windows plays sounds at various times, sounds triggered by certain events that happen in your PC. To control which sounds play, or to disable some sounds from playing, follow these steps:
1. Right-click the speaker icon in the notification area.
2. Choose the Sounds command from the pop-up menu.
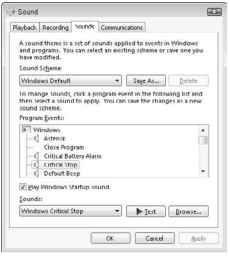
The Sounds dialog box appears with the Sounds tab front and center, as shown in Figure 13-4. The scrolling list highlights various events in Windows. The speaker icon next to an event means that a sound is associated with that event.

Figure 13-4:
Assigning sounds to events.
For example, the Critical Stop event — a bad one in Windows — is highlighted in Figure 13-4. The sound associated with that event appears on the Sounds drop-down list as Windows Critical Stop. That’s the sound file that plays when Windows stops critically.
3. Select an event to assign a sound to.
For example, select New Mail Notification, which is the sound that plays when Windows Mail picks up new e-mail.
4. Click the Test button to hear the current sound.
Not every event has a sound, so the Test button is disabled when there’s no sound to preview.
5. Choose a new sound from the Sounds menu button.
6. Click the Test button to preview the sound you selected.
7. Click the OK button when you’re done assigning sounds.
You can use any sound found on your computer for an event. To do so, choose the event (Step 5) and click the Browse button. You can then use the Browse button to search for sound files on your PC. That’s not as easy as it sounds, especially if you’re unfamiliar with how files and folders work. (In that case, see Part IV of this topic.)
To remove a sound from an event, choose (None) from the top of the Sounds drop-down list.
The best source for sounds is the Internet, where you can find Web page libraries full of sound samples. To find them, go to Google (www. google.com) and search for Windows WAV file sounds.
You can also use sounds that you record yourself, assigning them to specific events in Windows. See the next section.
Recording your own sounds
For simple sound recording, you can use the Sound Recorder program that comes with Windows. The program sports a straightforward interface, as shown in Figure 13-5.
![]()
Figure 13-5:
The Sound Recorder.
Assuming that a microphone is already connected to your PC and set up for use in Windows (see the earlier section “Configuring the microphone”), sound recording works like this:
1. Pop up the Start button menu.
2. Choose All Programs Accessories Sound Recorder. The Sound Recorder program appears (refer to Figure 13-5).
3. Click the Start Recording button.
4. Talk: “blah blah blah.”
5. Click the Stop Recording button when you’re done.
6. Use the Save As dialog box to save your audio recording to permanent storage.
7. Close the Sound Recorder window when you’re done.
You can use the Sound Recorder to capture audio from any sound-producing gizmo attached to your PC, such as a turntable or VCR. Simply connect the gizmo to the proper Line In audio jack on the console, and then follow the same steps for recording your voice.
If you need something better than the Sound Recorder program, I recommend Audacity, which is free and available on the Internet at http:// audacity.sourceforge.net.
The Windows Media Player is used to play the sounds you record. See Chapter 27 for more information.
