Elastic Gum Bougie
In those situations where intubation is difficult due to patient anatomy, often it is only possible to visualize the posterior arytenoids. Although any tube that passes anterior to the arytenoids will be passing through the larynx, it is often difficult to physically place the tube in that location. A small diameter, semi-rigid device that would be easier to place would assist with intubation. The elastic gum bougie and several similar devices meet that need.
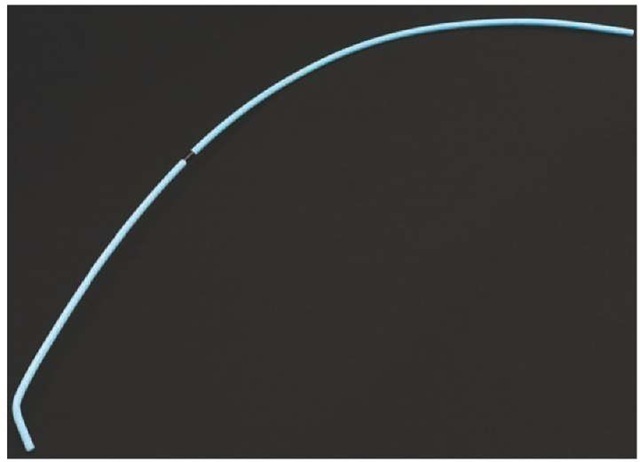
First introduced in 1949, the elastic gum bougie, or simply gum bougie, appears at first glance to simply be a very long stylet34 (Figure 23-19). However, it is somewhat larger in diameter, is made entirely of wound gum rubber, and has a hard, smooth, and round plastic tip. The device is directed through the vocal cords and into the trachea to serve as a guide for an endotracheal tube. The distal end is designed to minimize the chance of trauma to the larynx. Furthermore, the small plastic "button" at the end "clicks" as it passes over tra-cheal rings, giving the user feedback about placement. Once the device has been placed, the endotracheal tube is threaded over the proximal end and advanced into the trachea. It has been shown to improve intubation rates in difficult airway situations.35-37
There are multiple variants on the elastic gum bougie including plastic bougies,38 large-diameter feeding tubes, and endotracheal tube exchanges. This last class is of interest because some manufacturers make devices through which a patient can be ventilated. All of these devices are used similarly to the elastic gum bougie. There is no preparation of the devices other than to remove them from their packaging. If a disposable tube exchanger is packaged in a bent-in-half position, the bend should be straightened as this will improve control of the device and help thread the tube.
Figure 23-19 Elastic gum bougie.
Lighted Stylettes/Translaryngeal Illumination Intubation
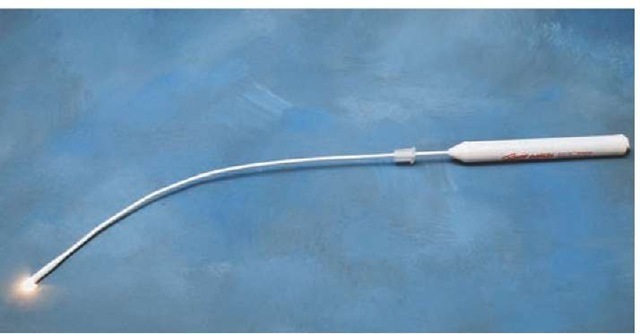
Due to the close proximity of the trachea to the anterior surface of the neck, it is possible to visualize light on the anterior neck if a bright light source is placed on the trachea. Lighted stylettes (Figure 23-20) are, essentially, malleable stylettes with a bright light source at the distal end and a power source at the proximal end. When placed in the trachea, a bright, well-circumscribed light is seen in the midline of the trachea. Placement in either pyriform fossa results in a light off the midline while esophageal placement results in a diffuse, dim glow.
There are advantages and disadvantages to the use of lighted stylettes. Although the lighted stylettes were designed for use as adjuncts to standard orotracheal intubation,39 subsequent work has demonstrated their efficacy as an alternative to laryngoscopic intubation.40,41 Lighted stylettes can be placed while the Paramedic is positioned either above a patient’s head or while the Paramedic is positioned alongside the patient. They minimize C-spine movement and are therefore excellent devices for management of trauma airways.
There are a few disadvantages to the use of lighted stylettes. If a patient has a very large neck, it may be impossible to differentiate between esophageal and tracheal placement. Bright lighting or sunlight may make visualization of the neck on the anterior neck difficult. Finally, there is some evidence that lighted stylettes may cause laryngeal injury.42
The lighted stylet should be removed from its package. Preparation for use is dependent on the manufacturer, but there are some universal preparations. The device should be turned on to test the batteries and the stylet portion should be placed in the endotracheal tube with the distal end of the stylet 1 to 2 cm inside the distal end of the endotracheal tube. The stylet is then bent into a "J" and the whole device placed aside for use.
Figure 23-20 Lighted stylet.
Surgical Airways
One of the other advantages of the trachea’s close proximity to the anterior neck is that surgical airway management can be achieved rapidly and effectively. There are three common variants on the technique. The first is the classical surgical cricothyroidotomy, a surgical procedure to gain entry to the trachea through the anterior neck. The other two techniques are the needle and percutaneous cricothyrotomy techniques. Many manufacturers produce percutaneous cricothyro-tomy kits that enable the placement of a single lumen tube either similar to a large IV catheter or to a tracheostomy tube. The preparation and use of these kits is highly specific to the manufacturer and will only be discussed in general terms. It is important to note that a surgical airway should be performed only if that patient cannot be intubated, a rescue device cannot be placed, and the patient cannot be ventilated with standard face-mask techniques. The only exception to the last requirement is if a patient can be ventilated with a face-mask technique but the situation (prolonged transport, difficult extrication, or circumstances that would make surgical airway placement difficult at a later time) requires a more secure airway.
Opening a true or classical surgical airway is a relatively simple process that involves the identification of the crico-thyroid membrane, cutting a hole through the cricothyroid membrane, and placing an endotracheal tube or cuffed tra-cheostomy through that hole. The process has been used successfully in a number of prehospital systems and provides an effective method of obtaining airway control when standard orotracheal intubation and rescue device utilization have failed.43 There are complications associated with the procedure. These include bleeding, carotid artery and jugular vein injury, thyroid injury, accidental tracheostomy, pneumotho-rax, mediastinal intubation, and esophageal perforation and intubation.44 The procedure is contraindicated in patients under the age of 12, with needle cricothyroidotomy being the procedure of choice for these patients, and in patients without recognizable anatomic landmarks. Extreme caution is needed in patients with neck injuries; if a hematoma has formed from a vascular injury, accidental decompression of the hematoma can make airway and bleeding control impossible. The hematoma may also obscure landmarks or deviate the trachea to one side, increasing the difficulty of the procedure.
Little equipment is needed for a surgical airway. A scalpel, a tracheal hook, and a 6.0 or 6.5 endotracheal tube or tracheostomy tube are all that are needed. The endotra-cheal tube should be prepared as described previously and the scalpel and hemostats should be removed from their packaging.
Needle cricothyrotomy, also known as translaryngeal cannula ventilation and/or transtracheal jet ventilation (TTJV)—ventilation of the lungs using special high-pressure devices—is a commonly taught and performed technique for emergent oxygenation.45 In this technique, a large bore IV catheter (12 to 16 gauge) is placed through the cricothyroid membrane and a high pressure (50 PSI) oxygen source delivers oxygen to the lungs. As with the other surgical techniques, translaryngeal cannula ventilation is only indicated if less invasive techniques have failed.
There are some important contraindications to this technique. The equipment and technique rely on high pressure to move a large volume of oxygen through a small device. Exhaust valves are not built into the device and therefore all exhalation must occur through the patient’s own upper airway. If the patient has a complete airway obstruction (inspiratory and expiratory), high-pressure ventilation without escape of gasses results in overpressurization injuries.
Past teaching stated that this technique provides only a method of oxygenation and that there is no ventilation (carbon dioxide exhalation). However, a number of animal studies46,47 and human studies48,49 have demonstrated normal, and even low (overventilation), carbon dioxide levels if a flow rate of 1,600 mL/sec (the flow rate through a 21 gauge catheter with a 50 PSI oxygen source) is used. Therefore, transtracheal jet ventilation with appropriate equipment is a valid method of oxygenating and ventilating a patient in whom an airway cannot otherwise be established.
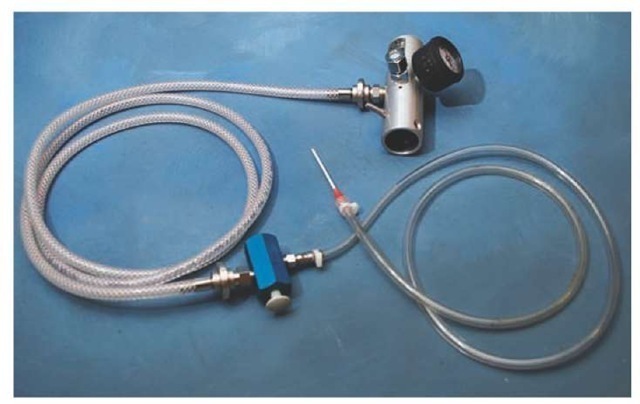
The equipment for needle cricothyrotomy consists of a large bore IV catheter (12 to 16 gauge), a 5 to 10 cc syringe, and a high pressure (50 PSI) oxygen source. Although various methods of ventilating through a needle catheter have been described, including syringe to BVM adapters44 and oxygen tubing with a small hole cut in the side to control "on" and "off",45 many commercial TTJV devices are available and are the best choice for this technique (Figure 23-21).
These devices attach to the high pressure output ports of standard oxygen regulators either by screwing onto the regulator or via a previously attached quick-connect device. To prepare for a needle cricothyrotomy, the IV catheter should be removed from its packaging and attached to the syringe. This will not work with safety catheters. If a safety catheter is being used, the syringe is not used. The TTJV device should be attached to the oxygen regulator if it is not already. The oxygen should then be turned on and the device activated to assure that the control valve works properly and does not stick.
Figure 23-21 Transtracheal jet ventilation.
There are a number of different manufacturers of percutaneous cricothyrotomy kits. Each device and technique has advantages and disadvantages, so it is important to obtain samples of each device and test them before adopting any specific device. Many have multiple parts that are easily lost in the uncontrolled prehospital environment. Others require fine motor dexterity to utilize.
It is best to choose a device that is simple to use, has a minimal number of parts that can be lost, and is easily stored and adapted to equipment already being used.
Patient Preparation
Once the decision to intubate has been made and the appropriate equipment has been prepared, the next step is to prepare the patient for intubation. Preparing the patient occurs in three ways: assessment of the patient, positioning of the patient, and, if needed, medication administration.
It is important to assess all patients before undertaking an intubation (or any airway management). There are a number of anatomic features that may suggest difficulty will be encountered during the airway management. Although the presence or absence of the characteristics will not change the need to manage the airway, they do influence decisions such as the use of medications for sedation and paralysis as well as optimal patient positioning and equipment selection. Therefore, the Paramedic should assess all patients before attempting airway management.
Several studies have looked at the problem of anticipated and unanticipated difficult airways.50-54 Several factors have been identified as predictors for difficult airway management and/or difficult tracheal intubation (Table 23-2).
Although some of these characteristics cannot be easily identified before the intubation (i.e., a floppy epiglottis), others can and have led to mnemonics and memory aids for anticipating a difficult airway. Two of the most useful are the 3-3-2 rule and the LEMON law, both developed as part of the National Emergency Airway Course.
The 3-3-2 rule is a simple method for rapidly evaluating a patient’s anatomy. In an "easy" airway, the Paramedic should be able to:
■ Place three fingers between the tip of the chin and the hyoid bone
■ Place three fingers between the upper and lower teeth at the maximal mouth opening
■ Place two fingers between the thyroid notch and the floor of the mouth
Table 23-2 Difficult Intubation Conditions
|
• Male gender |
|
• Obesity |
|
• Age between 40 to 59 |
|
• Decreased mouth opening |
|
• Shortened thyromental distance |
|
• Poor visualization of the hypopharynx |
|
• Limited neck extension |
|
• Receding chin |
|
• Abnormal dentition |
|
• Large tongue |
|
• Beards |
|
• Supraglottic mass |
|
• Floppy epiglottis |
|
• Trauma patient |
|
• Pregnant patient |
|
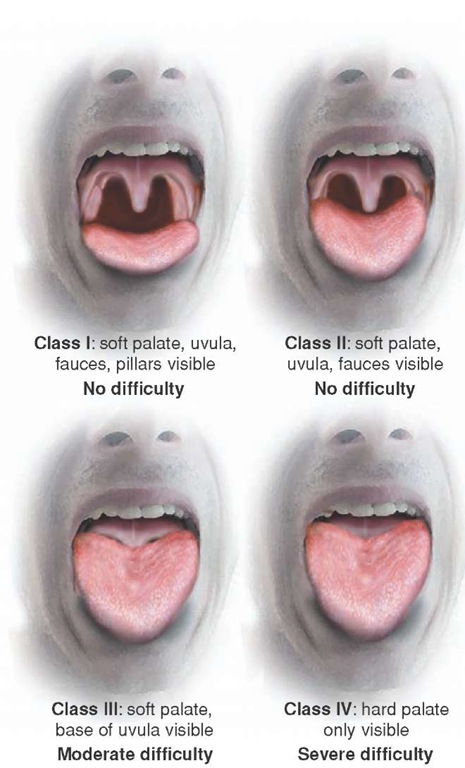
• Mallampati score > 2 (Figure 23-22) |
Figure 23-22 Mallampati classification.
The LEMON law similarly provides a rapid mnemonic for evaluating a patient. The elements of the LEMON law are to:
■ L—Look externally for anything that will hinder ventilation or intubation
■ E—Evaluate the 3-3-2 rule to assess the airway anatomy
■ M—Mallampati classification (Figure 23-22)
■ O—Obstruction, either new or chronic, should be evaluated
■ N—Neck mobility should be determined if not contraindicated (contraindicated in suspected C-spine injury)
These two rules, if applied to every patient, should help to predict a difficult airway and help the Paramedic to prepare accordingly. Of these guidelines, the Mallampati score is the most difficult to determine in the field. The score is most accurate when the patient is assessed in a seated position, opens her mouth, and sticks out her tongue. This is not practical for most patients requiring prehospital airway management.
Positioning the patient is one of the most critical steps in improving the rates of successful first intubation attempts. Although every intubation attempt should be a best attempt, in the emergent setting of prehospital intubations the first attempt is often made from the position in which a patient is found. Unfortunately, each attempt at intubation increases edema and bleeding in the airway, making subsequent attempts more difficult. Therefore, although the temptation exists to "just get a tube in," the reality is that without forethought, a difficult airway can be made into an impossible-to-intubate-or-ventilate airway.
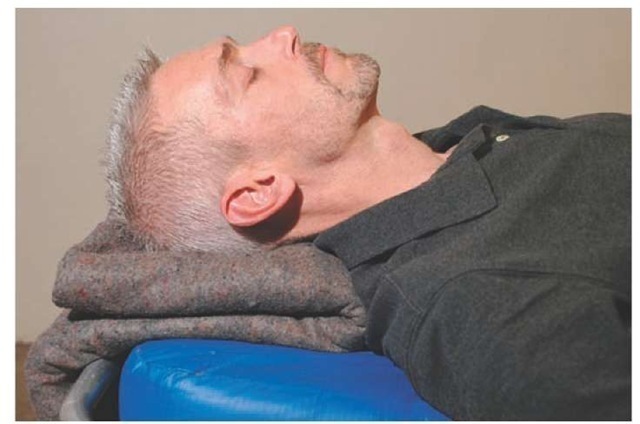
Although intrinsic issues such as suspected cervical spine trauma may preclude optimal patient positioning, in most other cases some simple interventions can properly position a patient for intubation. The ideal position, described by Chevalier Jackson in 1913, is the "sniffing" position56 (Figure 23-23).
Figure 23-23 Sniffing position.
Bannister and MacBeth, in 1944, clarified the position as one in which the oral axis, the pharyngeal axis, and the laryngeal axis are all aligned through flexion of the neck to 30 degrees and extension of the head on the atlanto-occipital joint.57
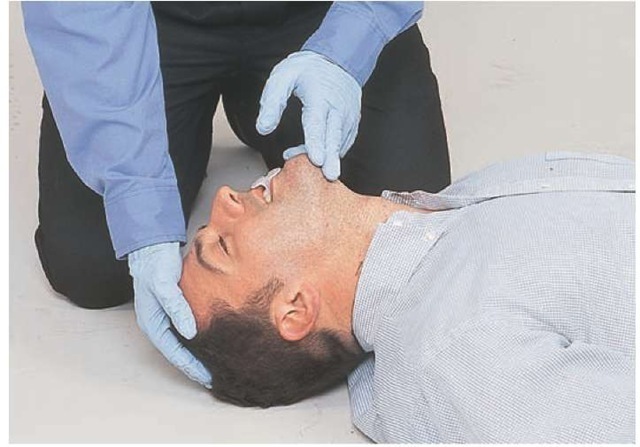
Although there is some research to suggest that simple head extension, which is obtained in a "head-tilt, chin-lift" maneuver (Figure 23-24), may be as effective as the sniffing position in providing a good laryngoscopic view,58 this has not been validated.59 Therefore, for anatomical and theoretical reasons, the sniffing position is considered to be the position of choice for patient positioning during intubation.60
At the time of intubation, most patients will already be in the "head-tilt, chin-lift position" commonly used for face-mask ventilation. This position places the head in extension along the atlanto-occipital joints, bringing the pharyngeal and laryngeal axes—but not the oral axis—into alignment. By lifting the head anteriorly approximately 7 cm, the neck is flexed to 30 degrees and the oral, pharyngeal, and laryngeal axes are brought into alignment. This alignment allows for the best view during intubation.
It is important to note that it may be difficult to obtain neck flexion in obese patients or patients with very short necks. Sitting these patients upright can "create" a neck and change a difficult intubation into a relatively easy intubation. This position can be obtained by sitting the patient upright on a chair, packing multiple blankets underneath his shoulders and back, or positioning the stretcher at a 50 to 70 degree angle and placing a folded blanket or towel behind the head.
The head elevated laryngoscopic position (HELP) is a patient position that places the head in extension along the atlanto-occipital joints, bringing the pharyngeal, laryn-geal, and oral axes into alignment using an elevation pillow. It can also be used in patients who are unable to lay flat (i.e., CHF patients or morbidly obese patients) or to help clear secretions. In addition, patients in the HELP position require less force for glottic visualization.61 The use of this position is contraindicated in suspected cervical spine or back injuries.
Figure 23-24 Head-tilt, chin-lift position.
In trauma patients, the issue of positioning becomes more difficult. Clearly, neck flexion and head extension are contraindicated. However, anterior displacement of the jaw via a modified jaw thrust partially mimics head extension.Finally, having an assistant open the cervical collar and provide in-line stabilization from the inferior direction will allow greater mobility of the jaw. All of these techniques substitute for ideal positioning in the trauma patient.
The final step in patient preparation is the appropriate use of sedatives and paralytic agents.
