Site Preparation and Disinfection
Properly preparing the patient prior to placement of the peripheral catheter will help to ensure success. The patient should be assisted to a comfortable position (such as semi-Fowler’s, if possible) and an informed consent obtained for the IV insertion using the AIR mnemonic. The patient’s arm should be removed from his shirt sleeve, or, if practical, the patient should be instructed to put on a gown. A moment of preparation prevents having to "string" the IV solution and administration set through the patient’s clothing in order to put on a hospital gown upon arrival at the emergency department and risk accidentally dislodging the IV access in the process.
Next, the Paramedic should apply the tourniquet. After applying the tourniquet, the Paramedic should carefully consider potential sites for IV access and select a primary site as well as a secondary site. Then, with the necessary supplies assembled, including a padded arm splint if the IV access is going to be near a joint, the Paramedic is ready to prepare the area. The following procedure is recommended; however, different systems have different approaches to IV site preparation, so local/regional procedures should be followed.
After opening an isopropyl alcohol-soaked gauze (i.e., a prep pad), the Paramedic liberally swabs the area, removing gross surface contaminates and skin oils. The prep pad is placed exactly where the IV access will be attempted and moved outward in ever-widening circles. The purpose of this first wash is to remove sweat, dirt, and oils that could undermine the dressing. Therefore, the area cleansed should be liberal, approximately the same area to be covered by the dressing, bandage, and tape.
It is difficult to get tape to adhere to the grossly diaphoretic patient. One tactic is to apply tincture of benzoin to help the dressing remain fast. After placing a small quantity of tincture of benzoin on a gauze pad, the Paramedic swabs the area around the perimeter of the IV insertion site. It is important to not swab the insertion site directly, as benzoin is not an astringent. After the benzoin has dried, the tape/dressing can be applied.
PROFESSIONAL PARAMEDIC
Some jurisdictions allow Paramedics to draw a blood alcohol sample for law enforcement officers (LEO), provided there is patient consent. In this situation, the Paramedic should use povidone only to prepare the venipuncture site to avoid claims of contamination of the sample with the isopropyl alcohol used in the wipes. The Paramedic should document the use of povidone only on his chart.
A germicidal wash follows, such as povidone-iodine-based solutions (Betadine®), and is applied in the same fashion as the previous wash, starting at the intended insertion site and sweeping outward in expanding and ever-widening circles. Regardless of whether the Paramedic is using a prep pad or a swab for the germicidal wash, the wipe should never re-cross an already washed area. The Paramedic is attempting to create a mini-sterile field. The area of the circular sterile field should minimally be twice the length of the IV needle—one length under the IV needle as it approaches the insertion site and another length for the distance under the skin where the IV needle will be lodged. The germicidal solution should be allowed to dry. This will allow for the maximum germicidal effect.
Paramedics can gently palpate the site before the site preparation, to help identify a viable vein. However, the Paramedic should not re-palpate the intended IV access site once the site preparation has begun. Placing a gloved finger on a sterile field contaminates the field, forcing the Paramedic to re-cleanse the area.
STREET SMART
If the patient is sensitive, or allergic, to povidone-iodine-based solutions, then the Paramedic should only use an isopropyl alcohol-soaked gauze to cleanse the site. When practical, alcohol-soaked gauze should be placed on the site and allowed to remain in place until the Paramedic is ready to insert the IV needle.
PROFESSIONAL PARAMEDIC
Many hospital IV teams use a chlorhexidine + isopropyl alcohol-soaked swab for IV access preparation. These are more expensive than plain alcohol and povidone-iodine but may offer improved bacteriocidal effects. The professional Paramedic will monitor the literature in order to promote evidence-based practice for his/her agency.
Using a new alcohol prep pad for this final step, the Paramedic sets the alcohol prep pad on the insertion site and swipes distally, removing some of the dried povidone-iodine solution from the skin; if an alternative germicidal solution was used then this step is unnecessary. The vein should now be visible underneath the skin. The entire process of site selection and preparation should take approximately one minute.
Venipuncture
After careful consideration, the Paramedic would select the preferred IV device, remove it from the packaging, and uncap the IV needle. The IV needle and catheter should be examined for any burrs which could cause the patient pain. Under no circumstances should the catheter be slid up and down the needle. Sliding the catheter over the needle in this fashion risks shearing the end of the catheter and creating a catheter embolism. However, it is not uncommon to rotate the catheter around the shaft of the needle to ensure its easy removal from the needle. Satisfied that the IV needle and catheter are acceptable, the Paramedic would grasp the IV needle between the thumb and forefinger and approach the selected site.
Some Paramedics use the nondominant hand to grasp the skin below the IV site, applying gentle stabilization to the vein with the thumb. This helps to prevent the vein from moving under the skin (i.e., rolling). Rolling veins are more common in the elderly who have less subcutaneous fat and collagen to help stabilize the vein. Other Paramedics prefer to use the nondominant hand to stabilize the limb, encircling the limb with the Paramedic’s own hand below the site. If the patient should suddenly try to pull the limb away, once the IV needle has been inserted, the Paramedic can help hold the limb in place while trying to calm the patient. This approach is particularly useful in children.
With the IV needle poised above the intended venous access point, the Paramedic can take one of two approaches for venous cannulation, the process of threading a catheter into a vein. The first approach is a direct in-line approach in which the IV needle immediately enters the vein. The alternative approach is the indirect approach.
With the indirect approach, the Paramedic inserts the IV needle under the skin and next to the vein. Once the needle is under the skin and next to the vein, the Paramedic changes the line of approach and enters the vein. The indirect approach is useful in people with thicker skin as well as children who are likely to flinch. After the needle has pierced the skin, the Paramedic can pause, allowing the patient to recover from the pain before proceeding. The indirect approach also helps decrease the incidence of "overdrive," an accidental through and through venous puncture. The indirect approach is sometimes preferred by less-experienced Paramedics who are trying to gain practice experience.
With the direct approach, the IV needle is placed immediately atop the vein. With the bevel of the IV needle facing up, the IV needle is inserted at an approximately 45-degree angle. When the IV needle is in contact with the vein, the Paramedic may feel a slight resistance to forward motion. When this resistance is overcome, some Paramedics refer to this as the "pop." This indicates the needle is in the lumen of the vein and a blood flash should be observed distal to the needle hub. Absence of blood in the needle and catheter (the flash) implies that the IV is not in the vein.
With the IV needle assumed to be in the lumen of the vein, the Paramedic should decrease the angle of approach to parallel the vein and then advance the IV needle approximately % to / inch to ensure that the IV needle and catheter are clearly inside the vein. By failing to perform this maneuver, the Paramedic risks losing the IV access. The purpose of this maneuver is not just to ensure that the IV needle is inside the vein, but also that the IV catheter (which is approximately 1/4 inch behind the tip of the needle) is also inside the vein.
STREET SMART
Even the short length of the bevel of an IV needle can be too long for a small vein. To reduce the chance of puncturing the posterior wall of the vein, some Paramedics advocate rotating the IV needle so that the bevel is down, decreasing the area of exposure and the chance for error. This technique may be helpful, particularly in venous access in the elderly.
Once the IV needle and catheter are within the lumen, the catheter is threaded off the needle and into the vein. It is important to realize that the needle is not withdrawn from the vein, but rather the catheter is threaded into the vein. The needle remains in place to help maintain the patency of the incision.
If the nondominant hand is available and not holding stabilization, it can be used to advance the catheter into the vein. Otherwise, the first two fingers can grasp the hub of the catheter, in a pincer-like maneuver, and advance the catheter. With the complete length of the IV catheter in place, the needle can be withdrawn slightly. Leaving the IV needle inside the IV hub blocks the catheter’s lumen and prevents bleeding through the catheter until the Paramedic can tamponade the vein.
In anticipation of either attaching the IV administration set adaptor or a blood sampling device, the Paramedic should manually tamponade the vein. To tamponade a vein, the Paramedic applies pressure above the end of the catheter in the vein, which should be just above the sterile field. Some Paramedics also elect to place a small gauze pad under the hub to catch any bleeding at this time.
When the needle is completely withdrawn, it must be immediately rendered safe. Some IV needles are self-sheaving whereas others are not. Regardless of the presence of any engineered safety devices, all IV needles should be immediately placed in a sharps container.
The entire time for insertion should be approximately two minutes, from the time the tourniquet was applied to the time the tourniquet was released. Proper preparation of supplies, pre-assembled as necessary, helps to improve overall efficiency.
Cannulation of the External Jugular Vein
The insertion of an IV into an external jugular vein (EJV) requires a few modifications in technique, but the procedure is largely the same as for inserting any peripheral IV. To distend the vein, the patient should be placed supine, preferably with legs slightly elevated about 6 to 12 inches off the floor in modified Trendelenburg position. Standing or sitting at the patient’s head and facing the patient, the Paramedic would then place the thumb and forefinger of the nondominant hand on the EJV. The thumb should tamponade the blood flow, causing the vein to distend, and the forefinger should stabilize the EJV in the supraclavicular space. From this stance, the Paramedic would place the IV needle directly over the prepared EJV site. The angle of insertion for an EJV cannulation is more parallel to the skin, approximately 30 degrees, than the angle of insertion for other peripheral IVs. The IV needle is then advanced until a flash is witnessed.
The insertion of an IV needle into the external jugular vein creates a neck wound. The concern with neck wounds is that room air can be drawn into the wound, creating an air embolism. To minimize this risk, the Paramedic should wait until the patient exhales before attaching the IV administration set adap-tor.35, 36 Once the EJV IV is in place, precautions should be taken to protect the site. The patient’s head should remain in a neutral in-line position. Some Paramedics apply a cervical collar or use a cervical immobilization device to help protect the site.
Blood Samples
Obtaining, or drawing, blood samples from an IV site is easy and could potentially prevent an additional needlestick, saving the patient from avoidable pain and other healthcare providers from a potential needle exposure. The most commonly used blood drawing system is the vacuum-tube system. To use this system, the Paramedic preassembles the vacuum tube collection device and sets it aside for use after the IV access is obtained.
With the catheter in place, the Paramedic would withdraw the needle and attach the needleless adaptor to the hub of the IV catheter. With the adaptor in place, the Paramedic inserts a blood tube into the barrel. Grasping the flange of the device stabilizes the assembly. The blood tube is now pushed down, by the thumb, over the covered needle inside the barrel. The needle pierces the rubber stopper and the vacuum draws blood into the tube.
This process is repeated until all of the blood tubes are filled. Then the device is removed and replaced with the adaptor of the administration set. More information regarding types and uses of blood sampling tubes is found later in this topic.
STREET SMART
Pediatric veins tend to collapse under the vacuum produced by adult vacuum tube systems. For pediatric patients, the blood should be drawn using either a pediatric vacuum tube system or a small syringe. The syringe offers the advantage of low pressure, permitting the Paramedic to gently aspirate a blood sample. Once the syringe is full, then the rubber stopper is removed from the tube and the blood ejected into the tube.
Continuous or Intermittent Infusion
Once IV access has been obtained, the Paramedic has the choice between instituting a continuous infusion or an intermittent infusion. To establish a continuous infusion, the Paramedic would take the adaptor from the intravenous administration set, remove the protective cap, withdraw the needle completely from the catheter while maintaining tam-ponade, and attach the adaptor to the hub. Once the intravenous administration set is attached, the Paramedic would then release the roller clamp and allow the fluid to flow freely for a moment.
If the fluid does not run, it may be a sign of a misplaced or dislodged IV catheter. To troubleshoot the problem, the Paramedic should check to see if the tourniquet has been removed. One of the more common reasons that the fluid is not running freely is that the tourniquet may have inadvertently been left in place (e.g., covered by a falling sleeve) and out of the Paramedic’s sight. Next, the Paramedic would start at the solution and methodically examine down the length of the administration set for possible mechanical obstructions to flow. A gentle squeeze of the drip chamber should indicate if there is a passage between the solution and the spike. Continuing down the length of the tubing, the Paramedic would check all clamps and control devices to ensure that they are open. Inspection of the tubing may reveal that a tiny obstruction, such as a plug from the IV solution bag, has lodged in the filter, or that the tubing is kinked. Barring any obstructions in the administration set, which should have run freely before it was attached, the Paramedic would next observe the insertion site.
The difficulty may lie with the catheter itself. Sometimes a catheter will become lodged against the posterior wall of a vein or against a valve. To unblock the catheter, it merely has to be withdrawn slightly and the flow reattempted. If all these measures fail, then it can be assumed that the IV catheter is not in the vein and the IV catheter should be withdrawn.
If the fluid is running freely, then the Paramedic would observe the insertion site for any swelling, a sign of infiltration. If swelling is observed, then it can be assumed that either the catheter slipped out of the insertion site or that the needle, when inserted, was driven through the posterior wall of the vein, creating a hole in the vein. Regardless, the IV site is no longer usable, the IV is "blown," and the catheter must be removed. A description of how to remove an IV catheter follows shortly.
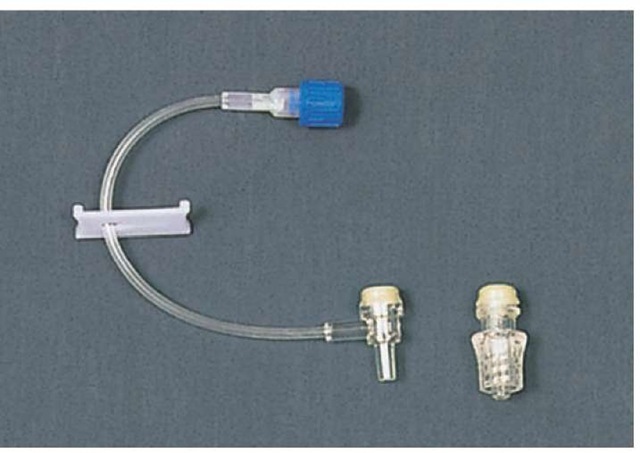
Alternatively, if intermittent infusion is indicated then the IV catheter can be "capped" with a plug-like device that appears and functions like the medication port on the administration set. In the past, an intermittent infusion device was filled with heparin, and described as a heparin well. Research has indicated that the use of heparin to prevent thrombus formation at the distal catheter tip was unnecessary. Simply filling the intermittent infusion device with saline would seal, or lock, the device and prevent thrombus formation. Subsequently, saline locks have been used almost exclusively (Figure 27-19).
Figure 27-19 Saline lock.
Securing the Intravenous Catheter
With either the administration set attached or the saline lock in place, the entire apparatus needs to be protected from accidental displacement. Many Paramedics elect to secure the IV hub in place with tape, even if a commercial IV dressing is to be used later. There are various kinds of tape available and each has its advantages.
Standard 1/2-inch "silk" tape, adhesive applied to a woven nylon backing, is ideal in most circumstances. If 1/2-inch tape is not available, then larger sizes, such as 1 inch, can be divided into two 1/2-inch strips.
The adhesive of standard tape may be too strong for fragile skin (e.g., on the elderly patient or the neonate). Removing standard tape from their skin can cause a skin tear. For those patient populations, a paper-backed tape may be more appropriate. While paper tape is gentler on the skin, it does not adhere as well. The IV dressing should be constantly monitored.
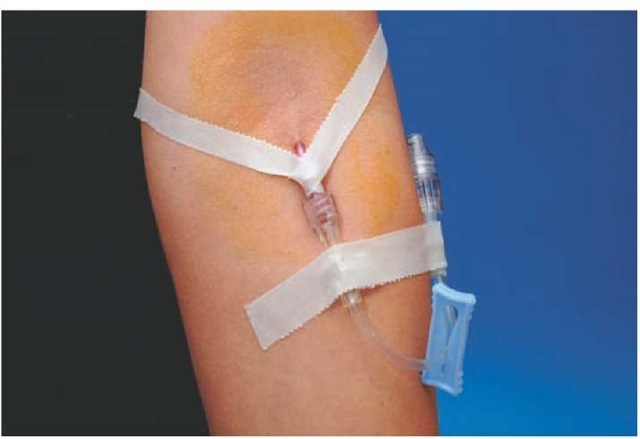
With two approximately 6-inch lengths of tape prepared, the Paramedic may elect to use one of two methods to secure the hub. The first method, called the chevron method, involves slipping the inverted tape, sticky side up, under the hub until it adheres to the hub, then crossing it over the hub. When completed and in place, the tails of the tape extend at an approximately 90-degree angle from the site, forming a V shape. When the tape chevron is in place, the tape should not be directly in contact with the catheter or cover the insertion site (Figure 27-20). In some cases, it is advantageous to place two chevrons, each opposite the other. Once the chevron is secured, another length of tape can be placed directly over the hub.
An alternative to the chevron method is called a "squared out" method. Like the chevron method, a length of tape is slid under the hub of the needle. But instead of immediately turning the ends, an approximately 1-inch span of tape is left exposed under the hub and the ends turned out at a 90-degree angle. With the first tape in place, another strip of tape is placed directly across the first piece and the hub of the catheter. The hub of the catheter, now encircled by tape, is secure as long as the tape adheres to the skin.
Figure 27-20 Tape chevron.
To protect the insertion site, which is a puncture wound, either a dry sterile dressing (DSD), such as a gauze pad, or a self-adhesive bandage may be applied. Many Paramedics apply a small quantity of antibiotic ointment to the insertion site before applying the dressing. Commercially available antibiotic creams (e.g., Neosporin®) applied at the insertion site create a physical barrier to bacteria and prevent capillary action from wicking contaminated oils from the skin into the wound.
STREET SMART
If a povidone-iodine-based solution was not used to wash the site prior to IV insertion, then the application of a dab of antibiotic cream to the site can help decrease the incidence of infection. Only a small amount is necessary. Too much antibiotic cream can undermine the dressing, causing it to fall off.
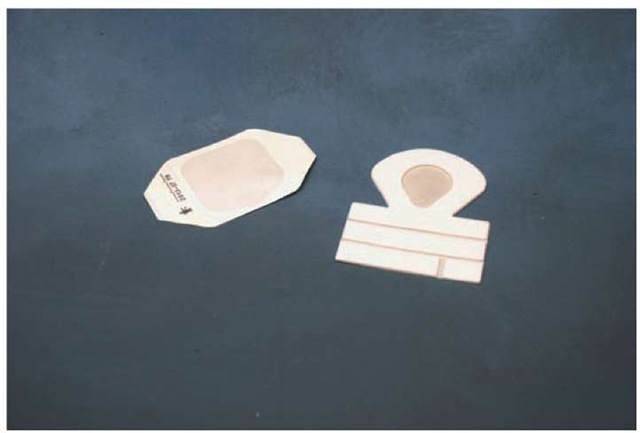
Many Paramedics choose to use commercially available transparent membrane dressings (Figure 27-21). These transparent membrane dressings have several advantages which make them attractive for field use. Since they are prepackaged in individual sterile packets, transparent membrane dressings are convenient to use. Once a transparent dressing is applied, the moisture under the dressing can pass through the semipermeable membrane while microorganisms, such as bacteria, cannot pass under the dressing and into the wound. Furthermore, transparent membrane dressings allow the Paramedic the opportunity to continuously monitor the insertion site for signs of inflammation and infiltration without breaking down the dressing. This is an advantage when injecting medications.
Figure 27-21 Transparent membrane dressing.
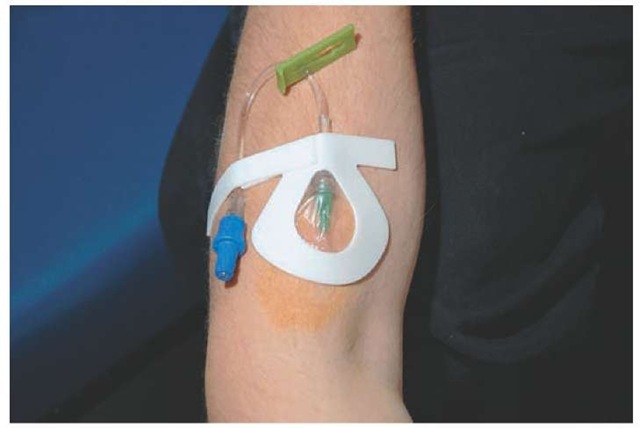
Figure 27-22 Omega loop.
The final step in securing an intravenous infusion is to tape the intravenous administration set tubing to the patient. Initially, a strip of tape is laid across the adaptor and against the skin. Then a loop of tubing is taped across the first strip of tape. This creates a stress loop, called an omega loop, which will absorb any tension on the tubing and potentially prevent the IV catheter from being displaced (Figure 27-22).


