By : James W Zubrick
Email: j.zubrick@hvcc.edu
THE WATER ASPIRATOR: A VACUUM SOURCE
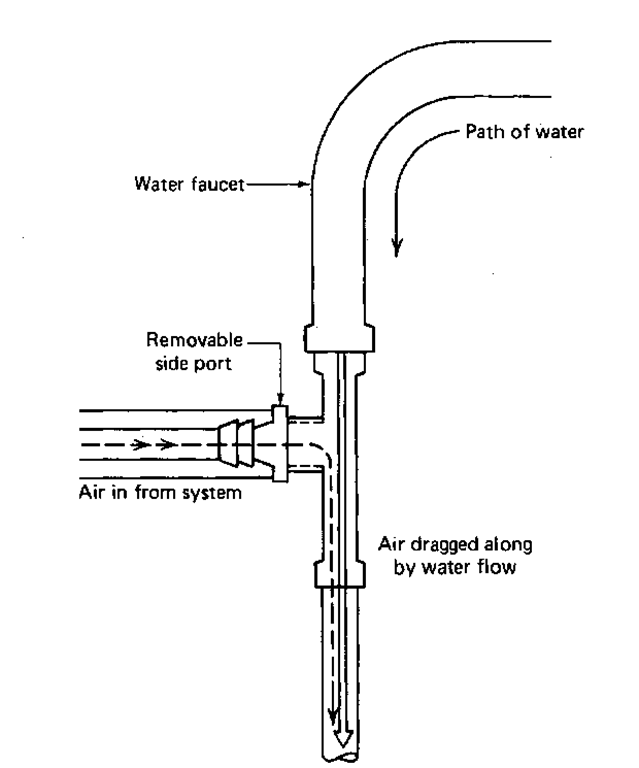
Sometimes you’ll need a vacuum for special work like vacuum distillation and vacuum filtration as with the Buchner funnel. An inexpensive source of vacuum is the water aspirator (Fig. 47).
When you turn the water on, the water flow draws air in from the side port on the aspirator. The faster the water goes through, the faster the air is drawn in. Pretty neat, huh? I’ve shown a plastic aspirator, but many of the older metal varieties are still around.
Fig. 47 A water aspirator.
You may have to pretest some aspirators before you find one that will work well. It’ll depend upon the water pressure in the pipes, too. Even the number of people using aspirators on the same water line can affect the performance of these devices. You can test them by going to an aspirator and turning the faucet on full blast. It does help to have a sink under the aspirator. If water leaks out the side port, tell your instructor and, find another aspirator. Wet your finger and place it over the hole in the side port to feel if there is any vacuum. If there is no vacuum, tell your instructor and find another aspirator. Some of these old, wheezing aspirators have a very weak vacuum. You must decide for yourself if the suction is “strong enough.” There should be a splash guard or rubber tubing leading the water stream directly into the sink. This will keep the water from going all over the room. If you check and don’t find such protection, see your instructor. All you have to do with a fully tested and satisfactory aspirator is hook it up to the water trap.
THE WATER TRAP
Every year I run a chem lab and when someone is doing a vacuum filtration, suddenly I’ll hear a scream and a moan of anguish, as water backs up into someone’s filtration system. Usually there’s not much damage, since the filtrate in the suction flask is generally thrown out. For vacuum distillations, however, this suck-back is disaster. It happens whenever there’s a pressure drop on the water line big enough to cause the flow to decrease so that there is a greater vacuum in the system than in the aspirator. Water, being water, flows into the system. Disaster.
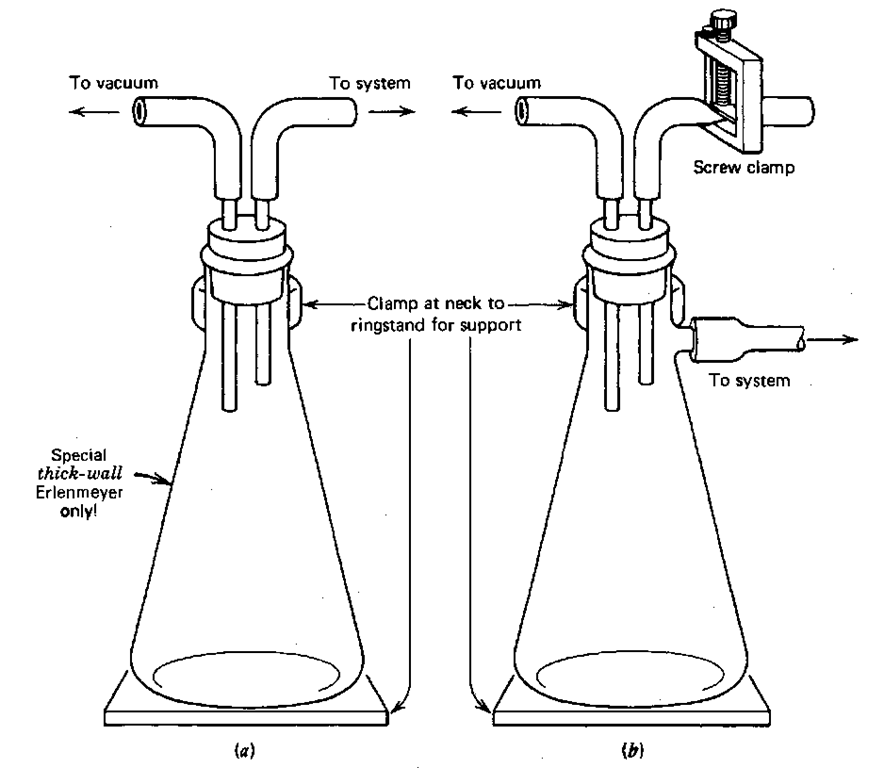
So, for your own protection, make up a water trap from some stoppers, rubber tubing, a thick-walled Erlenmeyer or filter flask, and a screw clamp (Fig. 48). Do not use garden variety Erlenmeyers; they may implode without warning. Two versions are shown. I think the setup using the filter flask is more flexible. The screw clamp allows you to let air into your setup at a controlled rate. You might clamp the water trap to a ringstand when you use it. The connecting hoses have been known to flip unsecured flasks, two out of three times.
WORKING WITH A MIXED-SOLVENT SYSTEM —THE GOOD PART
If, after sufficient agony, you cannot find a single solvent to recrystallize your product from, you may just give up and try a mixed-solvent system. Yes, it does mean you mix more than one solvent, and recrystallize using the mixture. It should only be so easy. Sometimes, you are told what the mixture is and the correct proportions. Then it is easy.
For an example, I could use “solvent 1″ and “solvent 2,” but that’s clumsy. So I’ll use a rethe ethanol – water system and point out the interesting stuff as I go along.
The Ethanol-Water System
If you look up the solubility of water in ethanol (or ethanol in water) you find an oo. This means they mix in all proportions. Any amount of one dissolves completely in the other—no matter what. Any volumes, any weights. You name it. The special word for this property is miscibility. Miscible solvent systems are the kinds you should use a mixed solvents. They keep you out of trouble. You’ll be adding amounts of water to the ethanol, and ethanol to the water. If the two weren’t miscible, they might begin to separate and form two layers as you changed the proportions. Then you’d have REAL trouble. So, go ahead. You can work with mixtures of solvents that aren’t miscible. But don’t say you haven’t been warned. The ethanol-water mixture is so useful because
1. At high temperatures, it behaves like alcohol!
2. At low temperatures, it behaves like water!
Fig. 48 A couple of water traps hanging around.
From this, you should get the idea that it would be good to use a mixed solvent to recrystallize compounds that are soluble in alcohol yet insoluble in water. You see, each solvent alone cannot be used. If the material is soluble in the alcohol, not many crystals come back from alcohol alone. If the material is insoluble in water, you cannot even begin to dissolve it. So, you have a mixed solvent, with the best properties of both solvents. To actually perform a mixed-solvent re crystallization you
1. Dissolve the compound in the smallest amount of hot ethanol.
2. Add hot water until the solution turns cloudy. This cloudiness is tiny crystals of compound coming out of solution. Heat this solution to dissolve the crystals. If they do not dissolve completely, add a very little hot ethanol to force them back into solution.
3. Cool, and collect the crystals on a Buchner funnel.
Any solvent pair that behaves the same way can be used. The addition of hot solvents to one another can be tricky. It can be extremely dangerous if the boiling points of the solvents are very different. For the water-methanol mixed solvent, if 95°C water hits hot methanol (B.P. 65.0°C), watch out!
There are other miscible, mixed-solvent pairs, pet. ether and diehyl ether, methanol and water, and ligroin and diethyl ether among them.
A MIXED-SOLVENT SYSTEM —THE BAD PART
Every silver lining has a cloud. More often than not, compounds “recrystallized” from a mixed-solvent system don’t form crystals. Your compound may form an oil instead.
Oiling out is what it’s called; more work is what it means. Compounds usually oil out if the boiling point of the recrystallization solvent is higher than the melting point of the compound, though that’s not the only time. In any case, if the oil solidifies, the impurities are trapped in the now solid “oil,” and you’ll have to purify the solid again.
Don’t think you won’t ever get oiling out if you stick to single, unmixed solvents. It’s just that with two solvents, there’s a greater chance you’ll hit upon a composition that will cause this.
Temporarily, you can
1. Add more solvent. If it’s a mixed-solvent system, try adding more of the solvent the solid is NOT soluble in. Or add more of the OTHER solvent. No contradiction. The point is to change the composition. Single solvent or mixed solvent, changing the composition is one way out of this mess.
2. Redissolve the oil by heating, then shake up the solution as it cools and begins to oil out. When these smaller droplets finally freeze out, they may form crystals that are relatively pure. They may not. You’ll probably have to clean them up again. Just don’t use the same recrystallization solvent.
Sometimes, once a solid oils out, it doesn’t want to solidify at all, and you might not have all day. Try removing a sample of the oil with an eyedropper or disposable pipette. Then get a glass surface (watch glass) and add a few drops of a solvent that the compound is known to be insoluble in (usually water). Then use the rounded end of a glass rod to triturate the oil with the solvent. Trituration can be described loosely as the beating of an oil into a crystalline solid. Then you can put these crystals back into the rest of the oil. Possibly they’ll act as seed crystals and get the rest of the oil to solidify. Again, you’ll still have to clean up your compound.
SALTING-OUT
Sometimes you’ll have to recrystallize your organic compound from water. No big deal. But sometimes your organic compound is more than ever so slightly insoluble in water, and not all the compound will come back. Solution? Salt solution! A pinch of salt in the water raises the ionic strength. There are now charged ions in the water. Some of the water that solvated your compound goes to be with the salt ions. Your organic compound does not particularly like charged ions anyway, so more of your organic compound comes out of the solution.
You can dissolve about 36 g of common salt in 100 ml of cold water. That’s the upper limit for salt. You can estimate how much salt you’ll need to practically saturate the water with salt. Be careful though—if you use too much salt, you may find yourself collecting salt crystals along with your product (see also the application of salting-out when you have to do an extraction; “Extraction Hints”).
WORLD FAMOUS FAN-FOLDED FLUTED FILTER PAPER
Some training in origami is de rigueur for chemists. It seems that the regular filter paper fold is inefficient, since very little of the paper is exposed. The idea here is to flute or corrugate the paper, increasing the surface area in contact with your filtrate. You’ll have to do this several times to get good at it.
Right here let’s review the difference between fold and crease. Folding is folding; creasing is folding, then stomping on it, running fingers and fingernails over a fold over and over and over. Creasing so weakens the paper, especially near the point, that it may break at an inappropriate time in the filtration.
1. Fold the paper in half, then in half again, then in half again (Fig. 49). Press on this wedge of paper to get the fold lines to stay, but don’t crease. Do this in one direction only. Either always fold toward you or away from you, but not both.
Fig. 49 Folding filter paper into eighths.
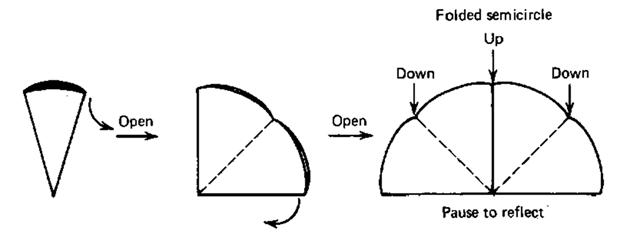
Fig. 50 Unfolding to a sort of bent semicircle.
2. Unfold this cone twice so it looks like a semicircle (Fig. 50), and put it down on a flat surface. Look at it and think for not less than two full minutes the first time you do this.
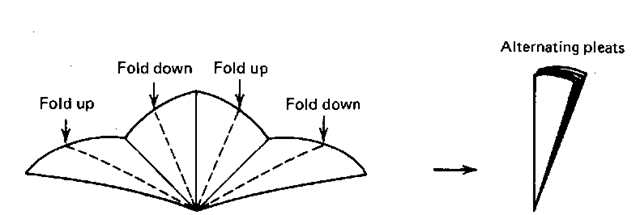
3. OK. Now try a “fan fold.” You alternately fold, first in one direction then the other, every individual eighth section of the semicircle (Fig. 51).
4. Open the fan and play with it until you get a fairly fluted filter cone (Fig. 52).
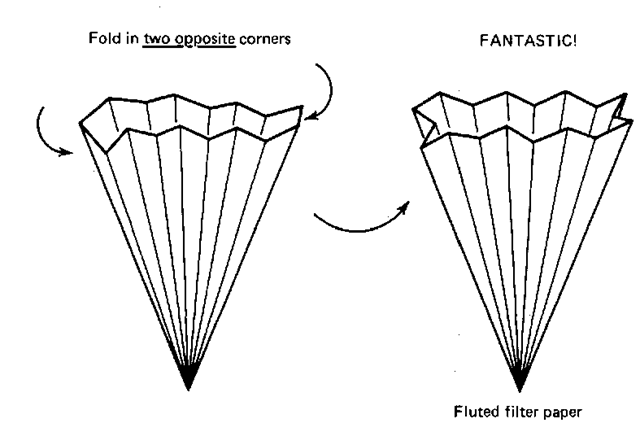
5. It’ll be a bit difficult, but try to find the two opposing sections that are NOT folded correctly. Fold them inward (Fig. 52), and you’ll have a fantastic fan-folded fluted filter paper of your very own.
Fig. 51 Refolding to a fan.
Fig. 52 Finishing the final fluted fan.
P.S. For those with more money than patience, pre folded fan-folded fluted filter paper is available from suppliers.
