By : James W Zubrick
Email: j.zubrick@hvcc.edu
CLASS 3: FRACTIONAL DISTILLATION
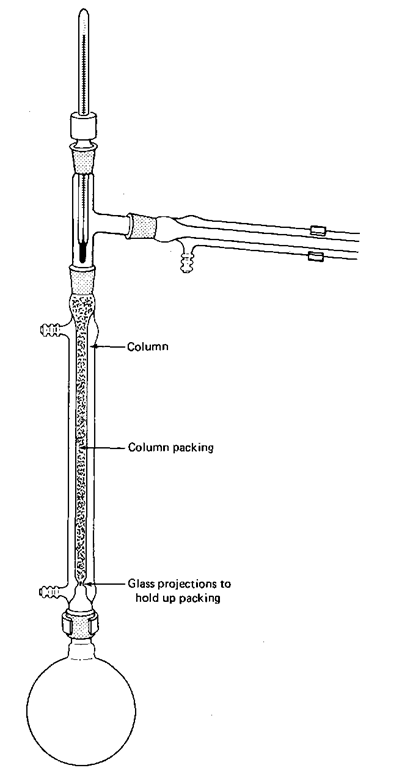
For separation of liquids, soluble in each other, that boil less than 25 °C from each other, use fractional distillation. This is like simple distillation with the changes shown (Fig. 80).
Fractional distillation is used when the components to be separated boil within 25° C of each other. Each component is called a fraction. Clever where they get the name, eh? This temperature difference is not gospel. And don’t expect terrific separations either. Let’s just leave it at close boiling points. How close? That’s hard to answer. Is an orange? That’s easier to answer. If the experiment tells you to “fractionally distill,” at least you’ll be able to set it up right.
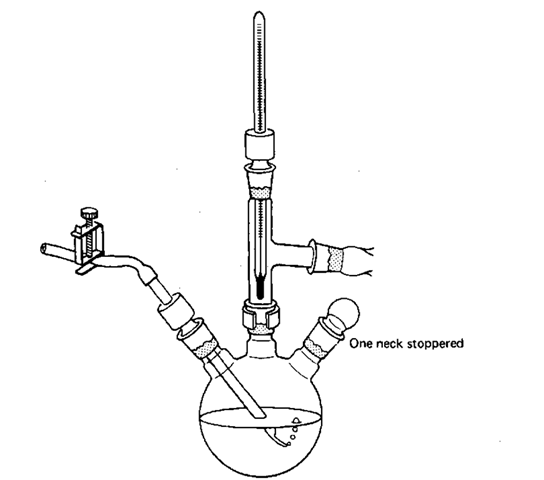
Fig. 79 Same multipurpose setup with a three-neck flask.
How this works
If one distillation is good, two is better. And fifty? Better still. So you have lots and lots of little, tiny distillations occuring on the surfaces of the column packing, which can be glass beads, glass helices, ceramic pieces, metal chips, or even stainless-steel wool.
Fig. 80 The fractional distillation setup.
As you heat your mixture it boils, and the vapor that comes off this liquid is richer in the lower boiling component. The vapor moves out of the flask and condenses, say, on the first centimeter of column packing. Now, the composition of the liquid still in the flask has changed a bit—it is richer in the higher boiling component. As more of this liquid boils, more hot vapor comes up, mixes with the first fraction, and produces a new vapor of different composition — richer yet in the more volatile (lower-boiling) component. And guess what? This new vapor condenses in the second centimeter of column packing. And again, and again, and again.
Now all these are equilibrium steps. It takes some time for the fractions to move up the column, get comfortable with their surroundings, meet the neighbors…. And if you never let any of the liquid- vapor mixture out of the column, a condition called total reflux, you might get a single pure component at the top; namely, the lower-boiling, more volatile component all by itself! This is an ideal separation.
Fat lot of good that does you when you have to hand in a sample. So, you turn up the heat, let some of the vapor condense, and take off this top fraction. This raises hell in the column. Nonequilibrium conditions abound—mixing. Arrrgh! No more completely pure compound. And the faster you distill, the faster you let material come over, the higher your throughput—the worse this gets. Soon you’re at total takeoff and there is no time for an equilibrium to get established. And if you’re doing that, you shouldn’t even bother using a column.
You must strike a compromise. Fractionally distill as slowly as you can, keeping in mind that eventually the lab does end. Slow down your fractional distillations; I’ve found that 5-10 drops per minute coming over into the receiving flask is usually suggested. It will take a bit of practice before you can judge the best rate for the best separation. See your instructor for advice.
Fractional Distillation Notes
1. Read ALL the notes on class 1.
2. Make sure you have not confused the column with the condenser. The column is wider and has glass projections inside, at the bottom, to hold up the packing.
3. Don’t break off the projections!
4. Do not run water through the jacket of the column!
5. Sometimes, the column is used without the column packing. This is all right, too.
6. If it is necessary, and it usually is, push a wad of heavy metal wool down the column, close to the support projections, to support the packing chips. Sometimes the packing is entirely this stainless steel wool. You can see that it is self-supporting.
7. Add the column packing. Shake the column lightly to make sure none of the packing will fall out later into your distillation.
8. With all the surface area of the packing, a lot of liquid is held up on it. This phenomenon is called column holdup, since it refers to the material retained in the column. Make sure you have enough compound to start with, or it will all be lost on the packing.
9. A chaser solvent or pusher solvent is sometimes used to help blast your compound off the surface of the packing material. It should have a tremendously high boiling point relative to what you were fractionating. After you’ve collected most of one fraction, some of this material is left on the column. So, you throw this chaser solvent into the distillation flask, fire it up, and start to distill the chaser solvent. As the chaser solvent comes up the column, it heats the packing material, your compound is blasted off the column packing and more of your compound comes over. Stop collecting when the temperature starts to rise—that’s the chaser solvent coming over now. As an example, you might expect p-xylene (B.P. 138.4°C) to be a really good chaser, or pusher, for compounds that boil less than, say, 100°C.
But you have to watch out for the deadly azeotropes.
AZEOTROPES
Once in a while, you throw together two liquids and find that you cannot separate part of them. And I don’t mean because of poor equipment, or poor technique, or other poor excuses. You may have an azeotrope, a mixture with a constant boiling point.
One of the best known examples is the ethyl alcohol-water azeotrope. This 96% alcohol – 4% water solution will boil to dryness, at a constant temperature. It’s slightly scary, since you learn that a liquid is a pure compound if it boils at a constant temperature. And you thought you had it made.
There are two types of azeotrope. If the azeotrope boils off first, it’s a minimum boiling azeotrope. After it’s all gone, if there is any other component left, only then will that component distill.
If any of the components come off first, and then the azeotrope, you have a maximum boiling azeotrope.
Quiz question:
Fifty milliliters of a liquid boils at 74.8° C from the beginning of the distillation to the end. Since there is no wide boiling range, can we assume that the liquid is pure?
No. It may be a constant boiling mixture called an azeotrope.
You should be able to see that you have to be really careful in selecting those chaser, or pusher solvents mentioned. Sure, water (B.P. 100° C) is hot enough to chase ethyl alcohol (B.P. 78.3°C) from any column packing. Unfortunately, water and ethyl alcohol form an azeotrope and the technique won’t work. (Please see “Theory of Distillation,” Chapter 28.)
CLASS 4: STEAM DISTILLATION
Mixtures of tars and oils must not dissolve well in water (well, not much, anyway), so we can steam distill them. The process is pretty close to simple distillation, but you should have a way of getting fresh hot water into the setup without stopping the distillation.
Why steam distill? If the stuff you’re going to distill is only slightly soluble in water and may decompose at its boiling point and the bumping will be terrible with a vacuum distillation, it is better to steam distill. Heating the compound in the presence of steam makes the compound boil at a lower temperature. This has to do with partial pressures of water and organic oils and such.
There are two ways of generating steam:
External Steam Distillation
In an external steam distillation, you lead steam from a steam line, through a water trap, and thus into the system. The steam usually comes from a steam tap on the benchtop. This is classic. This is complicated. This is dangerous.
1. Set up your external steam distillation apparatus in its entirety. Have everything ready to go. Have the substance you want to distill already in the distilling flask. This includes having the material you want to distill in the distilling flask, the steam trap already attached, condensers up and ready, a large receiving flask, and so on. All you should have to do is attach a single hose from the steam tap to your steam trap and start the steam.
2. Have your instructor check your setup before you start! I cannot shout this loudly enough on this sheet of paper. Interrupting an external steam distillation, just because you forgot your head this morning, is a real trial.
3. Connect a length of rubber tubing to your bench steam outlet and lead the rubber tubing into a drain.
4. Now, watch out! Slowly, carefully, open the steam stopcock. Often you’ll hear clanging, bonking, and thumping, and a mixture of rust, oil, and dirt-laden water will come spitting out. Then some steam bursts come out. Finally, a stream of steam. Congratulations. You have just bled the steam line. Now close the steam stopcock, wait for the rubber tubing to cool a bit, and then …
5. Carefully (Caution — may be HOT!) attach the rubber tubing from the steam stopcock to the inlet of your steam trap.
6. Open the steam trap drain, then carefully reopen the bench steam stopcock. Let any water drain out of the trap then carefully close the drain clamp. Be CAREFUL.
7. You now have steam going through your distillation setup, and as soon as product starts to come over, you’ll be doing an external steam distillation. Periodically open the steam trap drain (Caution — HOT!) and let the condensed steam out.
8. Apparently, you can distill as fast as you can let the steam into your setup, as long as all the steam condenses and doesn’t go out into the room.
Sometimes you need to hook two condensers together, making a very long supercondenser, when you steam distill. Check with your instructor.
9. When you’re finished (see “Steam Distillation Notes” following), turn off the steam, let the apparatus cool, and dismantle everything.
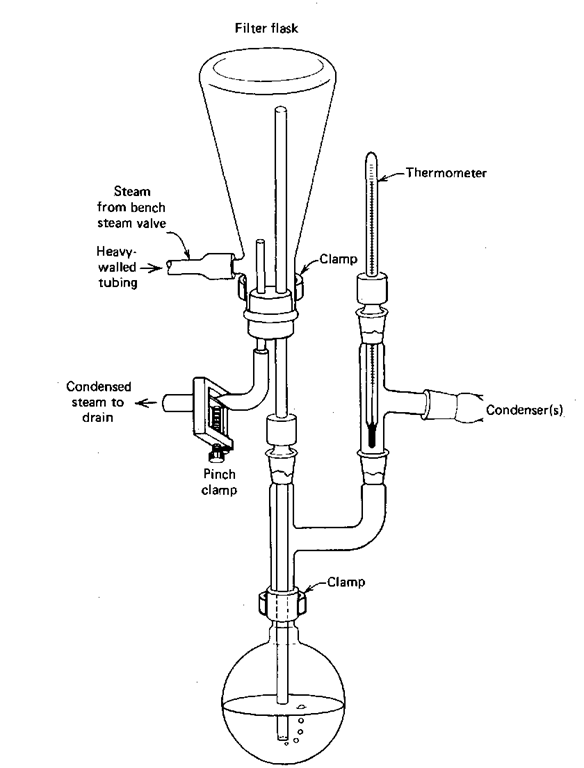
There are many types of steam traps you can use with your distillation setup. I’ve shown one (Fig. 81), but this is not the only one, and you may use something different. The point is to note the steam inlet and the trap drain, and how to use them.
Internal Steam Distillation
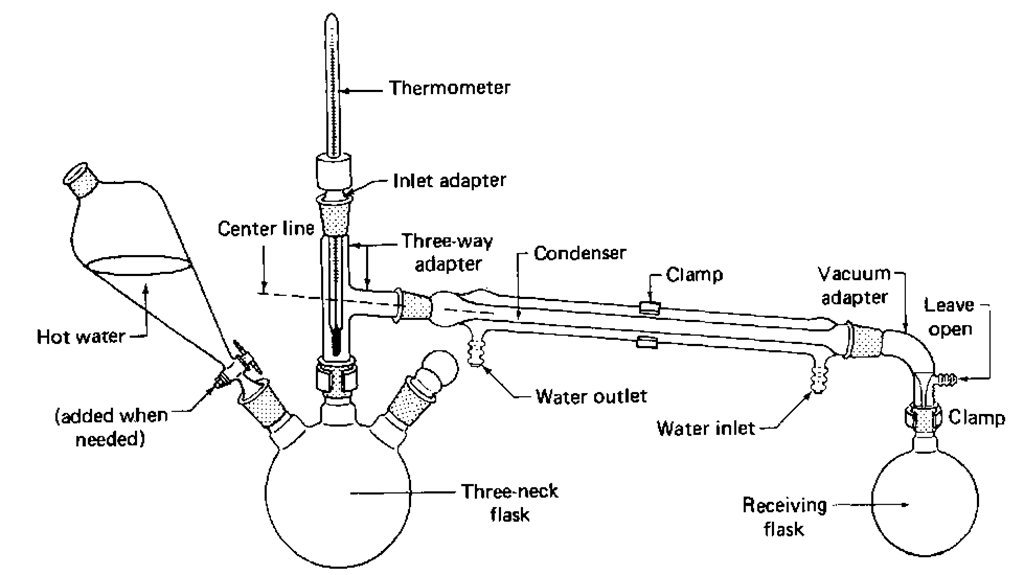
1. You can add hot water to the flask (Fig. 82) that will generate steam and thus provide an internal source of steam. This method is used almost exclusively in an undergraduate orgnaic lab for the simple reason that it is so simple.
2. Add to the distilling flask at least 3 times as much water (maybe more) as sample. Do not fill the flask much more than half full (three quarters, maybe). You’ve got to be careful. Very careful.
3. Periodically add more hot water as needed. When the water boils and turns to steam, it also leaves the flask, carrying product.
Steam Distillation Notes
1. Read ALL the notes on class 1 distillations.
2. Collect some of the distillate, the stuff that comes over, in a small test tube. Examine the sample. If you see two layers, or the solution is cloudy, you’re not done. Your product is still coming over. Keep distilling and keep adding hot water to generate more steam. If you don’t see any layers, don’t assume you’re done. If the sample is slightly soluble in the water, the two layers or cloudiness might not show up. Try salting-out. This has been mentioned before in connection with extraction and recrystallization as well (see “Salting-Out” and “Extraction Hints”). Add some salt to the solution you’ve collected in the test tube, shake the tube to dissolve the salt, and if you’re lucky, more of your product may be squeezed out of the aqueous layer, forming a separate layer. If that happens, keep steam distilling until the product does not come out when you treat a test solution with salt.
CLASS 4: STEAM DISTILLATION
Fig. 81 One example of an external steam trap.
Fig. 82 An internal steam distillation setup.
3. There should be two layers of liquid in the receiving flask at the end of the distillation. One is mostly water. The other is mostly product. To find out which is which, add a small quantity of water to the flask. The water will go into the water layer. (Makes sense.) Be very careful with this test, however; it is sometimes very hard to tell where the water has gone.
4. If you have to get more of your organic layer out of the water, you can do a back-extraction with an immiscible solvent (see “The Road to Recovery—Back-Extraction”).


