In This Topic
- Caring for your orchids in their new home
- Staking your orchids when they bloom
- Showing off your orchids in your home
- Making beautiful orchid flower arrangements
- Getting the most mileage out of your orchid flowers
The main purpose for growing orchids is to enjoy their unmatched beauty in your home. In this topic, I walk you through tips that will make your experiences with orchids more successful and pleasurable.
Caring for Orchids in Their New Home
Bringing an orchid plant into its new home can be traumatic for both the plant and you! You have to get to know each other. Most orchids you buy will have come from a very high-light, high-humidity environment of a commercial greenhouse. You bring them into your home environment, which is usually less bright with lower humidity, so the plant has to make some adjustments. Doing this with the least amount of distress is your goal, and in this section, I help you get there.
I give you the details of routine orchid care, but here I want to give you some tips that will make the short-term transition easier for both of you.
If the plant is in bloom
Here are some tips that will make the flowers on your new orchid last longer:
- Place the plant somewhere in your house that’s bright, but where it won’t get direct sunlight, except possibly in the morning. Too much harsh sunlight can bleach out the flowers.
- Keep the plant on the cool side — not above about 75°F (about 24°C). Flowers stay fresher longer this way.
- Be sure to keep the plant well watered. Even though the orchid plant stops growing much when it’s in bloom, the leaves and flowers still need water.
- Don’t let any bees or flies in the room where your orchids are blooming. If the bees or flies pollinate them, the flowers will collapse afterward.
- Don’t put the plant close to ripe fruit. Fruit gives off ethylene gas, which can cause flowers to collapse prematurely.
- Keep your orchid plants away from strong fumes like paint thinners or other pollutants. These can cause the blossoms to fade.
- Don’t spray the flowers with water or place the blooming plant in a room that is highly humid with no air movement.
This can cause spotting on the flowers from fungal diseases.
If the plant is not in bloom
Before you add your new, not-yet-blooming orchid to your collection, follow these tips:
Look under the leaves and at the younger growth to make sure there are no bugs.
- To be on the safe side, isolate this new plant from your collection for at least three weeks. This will allow time for hidden insect eggs to hatch out.
- As a further precaution, spray the plant thoroughly with an insecticidal soap. Use a paper towel to wipe off the excess spray. This will not only kill any soft-bodied insects but will also clean the leaves.
- Consider repotting the orchid into your own potting mix.
That way you’ll be assured that the potting mix is fresh and you’ll know its watering requirements.
Staking and Grooming Your Blooming Orchids
Orchids deserve to look their best when they’re putting on their show. Proper staking and grooming can make a big difference in how orchid flowers appear.
Figuring out how to stake
Flowers and spikes of orchids can be heavy and, if they aren’t staked properly, they’ll open at an awkward and disconcerting angle. This can be a distraction, because the most interesting and alluring perspective to view orchids is usually the head-on view.
Staking techniques vary somewhat with the type of orchid. The two major types are the spray orchids, like phalaenopsis and oncidiums, or those with single flowers or just a few on one spike, like cattleyas and most paphiopedilums.
For spray-type orchids
Be sure to start this process before these orchids are actually in flower. This will ensure that the flowers are oriented correctly when they open. Here are the steps I recommend:
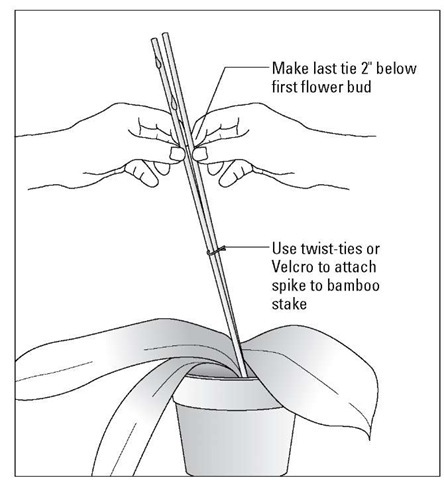
1. As soon as the flower spike is about 12 inches (30 cm) long, insert a vertical bamboo stake (you can get a green one, so it blends in better) close to where the spike originates at the base of the plant (see Figure 4-1).
2. As you insert the stake, twist it to work it around roots to minimize damage to them.
3. Attach the first tie on the lower part of the spike close to the first node (the bump in the flower stem).
Use twist-ties or Velcro, not sharp string or wire, which could damage the stem.
4. Attach another tie a few inches higher on the flower spike.
5. Put additional ties every few inches as the flower spike grows.
6. Place the last tie a few inches below where the first flower buds are forming.
This allows the spike to form a natural arch with the first flower open at the highest point and the others gracefully following suit right below that one.
Figure 4-1: Staking flower spikes of spray-type orchids like phalaenopsis or oncidiums.
Flower spikes always grow in the direction of the strongest light. After the flower spike reaches about 12 inches (30 cm) tall and the buds are starting to form, never change the plant’s orientation to the light source. If you do, the spike will try to reorient itself and you’ll end up with a twisted, distorted spike with flowers opening in all directions.
When the flowers are fully open, they’ll stay that way, so you can then move the plant anywhere you want.
For single- or few-flowered orchids
Staking these orchids is simpler. When the bud or buds start to swell on the flower spike, insert a vertical bamboo stake close to where the spike originates at the base of the plant.
Be sure to do this before the flower has opened so that the bud will orient itself to gravity. If the flower spike is at an angle, the flower will adjust itself to open perpendicular to the angle the flower stem is pointing. If you tie the spike up after it has opened, it will keep its original orientation and will look awkward.
In the last few years, orchid growers have discovered one of the best ways to attach upright flowering stems to bamboo or wood stakes: spring-operated baby hair clips! They’re available in all colors, are inexpensive, and frequently are formed in whimsical shapes of butterflies or dragonflies, which fit well with the orchid look. Plus, they work well!
Helping your orchids look their best
After growing the plants for months on the windowsill, under lights, or in a greenhouse, they can look a little rough around the edges. The leaves are probably dusty and/or blemished with chemical deposits, older leaves may be wilted or dead, and some of the tips of the leaves may be brown.
When the plants are in flower and you want to show them off to their best in your home or get them ready to exhibit in an orchid show, here are a few suggestions to keep in mind:
Clean their leaves. A simple way to polish the leaves is with milk. Dampen a paper towel with milk and rub off the blemishes. This will give a very attractive sheen that is harmless to the plant.
Carefully remove any dead or severely damaged leaves.
If you’re planning to bring your orchid to a show, be sure that you tape to the pot the name of your orchid plus your own name so that you don’t lose the plant. Also, make a list of what plants you’ve entered so you have a record.
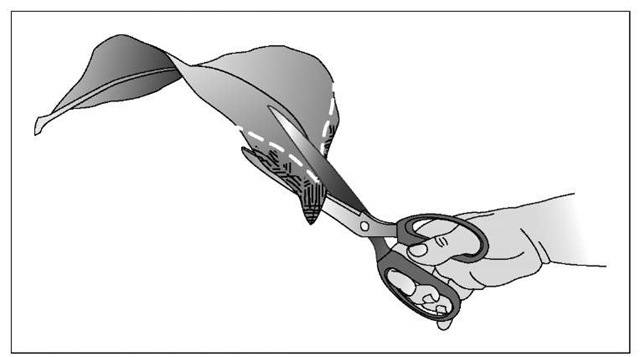
Trim off the brown tips of leaves with very sharp scissors.
The sharper they are, the cleaner the cut and the less leaf-tissue damage will result. When trimming, follow the natural shape of the leaf, as shown in Figure 4-2.
Figure 4-2: Trim off brown tips of leaves following the natural curvature of the leaf.
Displaying orchid plants in your home
When you’re showing off your prized blooming plants in your home, here a few tips to keep in mind:
- Be sure to protect your furniture by placing the orchid plant pots on waterproof pads, like cork platters.
- If you place your plants on saucers, be sure they’re waterproof. Terra cotta platters are porous and moisture will seep through and can cause serious damage to unprotected wood furniture.
- Place felt or rubber protectors under cachepots, platters, or saucers so your furniture won’t be scratched.
- Place the blooming plants where they get bright light but not hot, late-afternoon light, so the flowers will last longer.
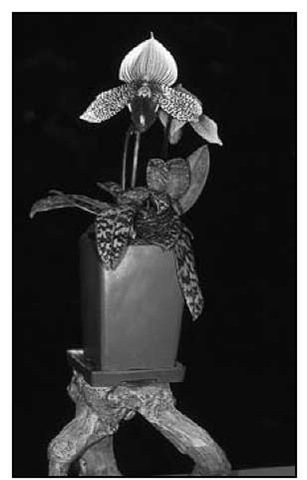
- If the growing pot is encrusted or ugly, insert it into a larger ornamental pot or basket. Choose simple green, white, or neutral colors that don’t compete with the orchid flowers.
- Place a layer of sheet moss or Spanish moss on the surface of the pot. This is a nice touch for covering up the sometimes unattractive potting material.
I Display the orchid on a pedestal or higher elevation so you can view it at eye level (see Figure 4-3). Few orchids are as attractive when they’re viewed from above.
I Think about how you will light your orchids to display them best. Many people are only able to view their orchids during the work week in the evening, so artificial lighting plays an important part in viewing them. Track lights work great. Use halogen or other bulbs that produce white light or as close to sunlight as possible so the orchid flowers will be rendered accurately. Regular incandescent light produces a yellow/red light that will make reds glow but that really dulls blues and greens.
I Group orchids with other tropical foliage plants. These provide an attractive backdrop for the orchid flowers.
Figure 4-3: Placing plants on pedestals and inserting their growing pot inside a more ornamental one draws attention to the best attributes of the orchids — their flowers.
Arranging orchid flowers
Nothing is more elegant than orchids in a flower arrangement. They’ve always represented the pinnacle of good taste and sophistication. The key to using them for such purposes is to keep it simple and not to let the elegance of the orchids get overwhelmed by too many other elements.
A super-simple homemade orchid flower preservative
Here’s an easy recipe for making your cut orchids last longer. Combine one 12-ounce can of a lemon-flavored soda drink (like Sprite or 7-Up), an equal quantity of water, and 1 teaspoon of household bleach. The sugar in the soft drink serves as food for the flower, the citric acid lowers the pH (increases the acidity), and the bleach kills the bacteria in the water that can plug up the water-conducting network in the flower stem.
Understanding the three basic flower-design elements
When it comes to flower arranging, flowers and greens comes in three basic shapes — line, mass, and filler. All of these play a key part in the construction of an attractive flower arrangement:
- Line flowers are tall and are used to give your arrangement height and width. Various branched orchids with buds (for example, oncidiums and cymbidiums) are used to create this effect.
- Mass flowers give your bouquet weight or mass and are generally round or full-faced. They’re usually the focal point of color and interest in a bouquet. Examples are cattleyas and their relatives, as well as paphiopedilums and angraecums.
- Filler flowers have stems with many little flowers and usually have fine textured foliage. Examples are miniature oncidiums.
Here are some tips on how to make simple, yet elegant, arrangements:
- Line flowers, by themselves, can make a striking arrangement in a tall, cylindrical vase. Select a vase or container that is in proportion to the flowers. The vase should be about one-half to one-third the size of the total arrangement. For instance, 3-foot-tall spikes of cymbidiums or oncidiums need a vase 12 to 18 inches tall.
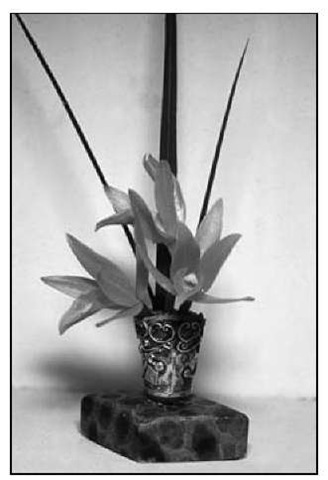
- You can arrange mass flowers by themselves in a low, wide vase or container (see Figure 4-4).
- A small arrangement of filler flowers by themselves can add a light, elegant touch to any room. Many of these filler flowers are well suited for drying.
- Some flowers can be used as more than one element. For example, phalaenopsis sprays, especially the multifloral types, can be used as line elements, while large single flowers can be used as mass flowers.
Figure 4-4: This miniature arrangement contains only three small cattleya flowers for the mass and three pointed leaves for the line element.
Supporting the orchid flower stems
Having some method of supporting the stems of orchids in an arrangement, so you can arrange them to face the direction you prefer, is usually a good idea. Here are several methods and materials you can use:
- For a clear vase, add marbles or rocks.
- Crossing the top opening of the vase in a tic-tac-toe pattern of florist’s tape works well.
- Frogs (pincushions on which the orchid stems are impaled) work well in shallower containers.
- Florist foam is most popular with professional arrangers because it’s easy to use, effective, and retains water well so that the flowers last. It’s usually used in low containers.
Don’t cut the orchid flowers until they’re fully open. Otherwise, they may never have their proper shape or complete color.
Making your orchid arrangement last longer
To make your cut flowers last longer, follow these suggestions:
I For cymbidiums, wait about ten days to two weeks after they’ve flowered before cutting; for cattleyas, wait several days. Cut the orchids only when they’ve fully opened.
I Before you put the orchids into a vase, their stems should be recut at an angle under water. To keep them fresh, recut them every several days.
I Condition the orchids first, before arranging them. Place their stems in warm (180°F/82°C), fresh water and let them sit somewhere cool (around 50°F/10°C) overnight.
I Make sure all leaves that will be submerged under water in the vase are removed.
I To use orchids’ short stems (like cattleyas) in taller arrangements, insert the flower stem into orchid tubes (water-holding test tubes, available at your local florist) and then tape the tubes to a wood stake for more height.
I Add a commercial or homemade solution of floral preservative (see the nearby sidebar) to the warm water containing the flowers. Change this water and solution every three to four days.
I Place the arrangement out of the direct rays of sunlight and in a cool room.
I Double the life of your orchid flowers by placing the arrangement in the refrigerator at night or when you’re away from home.


