In This Topic
- Knowing which tools you need
- Taking your toolkit to the next level
Every hobby has its tools. And just as you need the right saws and sanders if you’re building a cabinet, you need the right tools for growing orchids. The amount of tools you need will depend on how serious you are about orchids and haw many of them you have to care for. In this topic, I fill you in on the tools I use.
Cutting and Pruning Tools
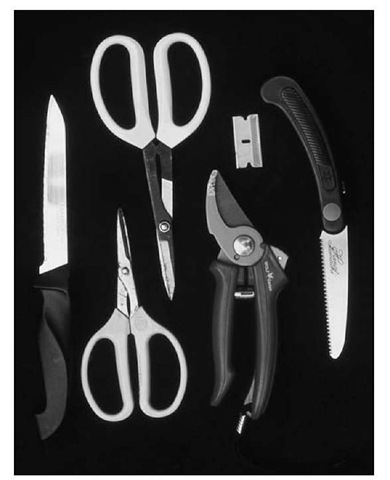
You’ll probably use your cutting and pruning tools more than any others. Orchids always have a leaf that needs to be trimmed or a dead or diseased stem that needs to be cut off. These tools are also used in the repotting process. Figure 3-1 shows the kinds of tools covered in the following sections.
Pruners
You’ll need different types of pruning tools, depending on the thickness of the plant part you’re removing.
Hand pruners
You’ll use hand pruners to cut thick creeping stems. There are basically two types of hand pruners. An anvil type of hand pruner has a flat cutting blade and can mash the stem tissue (which isn’t what you want). I much prefer the other type of hand pruner — the bypass type, which has a curved blade (refer to Figure 3-1). It makes cleaner and closer cuts.
Scissors
All scissors are not created equal. I prefer those that are designed for bonsai or flower arranging (like the scissors shown in Figure 3-1). They’re extremely sharp and have large, comfortable vinyl hand grips. Some are made of high-carbon steel that hold an edge for a long time. Others are constructed of stainless steel and offer the advantage of not rusting. The smaller scissors are really handy for finesse work, like removing spent flower spikes as close as possible to the foliage and trimming delicate leaves. The heavier ones are ideal for cutting thick stems.
Figure 3-1: Cutting tools — from left to right: thin knife, two pairs of scissors, bypass hand pruners, single-edge razor blade, and folding pruning saw.
Knives and blades
Knives and blades can come in very handy, but choosing the right type is important. In the following sections, I guide you through the types available.
Knives
Knives are used most often to circle the inside of the pot to remove the plant when its roots are packed into its container, especially with clay pots. (You can usually cut plastic pots with sharp scissors along the length of the pot to remove the plant.) A very-thin-bladed knife, like the type used for filleting fish (refer to Figure 3-1), is very handy because it’s easier to maneuver in tight spaces.
Razor blades
To be on the safe side, always use the single-edge type of razor blade (refer to Figure 3-1). They’re perfect for making very precise cuts when trimming edges of leaves or cutting apart divisions of plants. Another great feature of these is that they’re so inexpensive that you can throw them away after you’re done. Disposing of used razor blades also prevents spreading disease to other plants and saves you the hassle of sterilizing them.
Hand pruning saw
Using a hand pruning saw is bringing out the big gun. This tool is most useful to cut very thick creeping stems when dividing plants. You can also use them to score the roots when they’re very tightly packed together or to cut away a very thick plastic pot when you’re transplanting or repotting an orchid.
You can find various different types of these saws, but the ones that are compact and folding are most handy. I find a small bladed and fine-toothed type often used for cutting bamboo especially useful (refer to Figure 3-1).
Potting Tools and Supplies
The tools and supplies in this section make the potting process easier. For specific potting techniques and guidelines.
Potting tools
Potting is a combination of force and finesse. These tools make the process easier and more effective.
Hammers
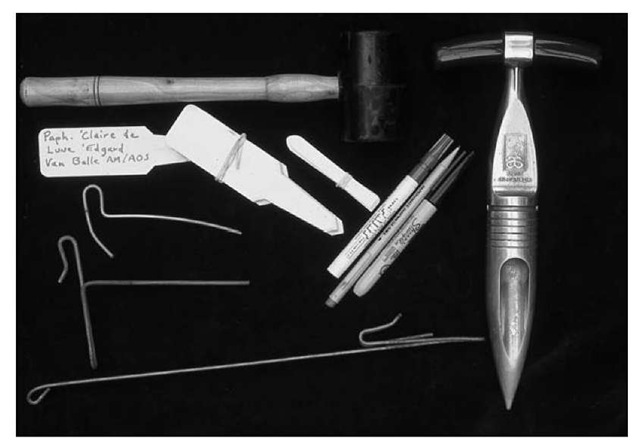
Regular steel-clawed hammers can be useful for breaking clay pots containing overgrown plants that can’t be removed any other way. But for most purposes, a rubber mallet (see Figure 3-2) comes in more handy. It’s used frequently to pound in stakes or clamps that hold newly transplanted or divided orchids in their pots.
Dibbles and planting sticks
Getting the potting material to settle in around the roots of the orchids is important because large air spaces can cause the orchid roots to dry out or not form properly. Dibbles (refer to Figure 3-2) and planting sticks are used to push the potting material into these air spaces.
Torches for sterilizing tools
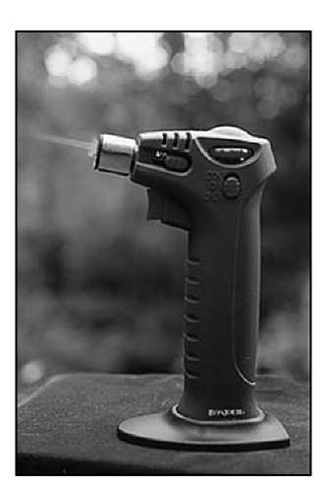
Dirty cutting and potting tools can spread diseases. Preventing disease by sterilizing any tools that come in direct contact with orchid root and leaf tissue is always a good idea. You can use chemical solutions to do this (for instance, a 1:10 ratio of household bleach to water), but chemicals are very corrosive and some are toxic. A very simple way to sterilize metal tools is to flame them with a propane or butane torch (see Figure 3-3). Both are available in small handheld sizes.
Potting supplies
The orchid tag that comes with the orchid or the one you make yourself contains very important information that you want to protect. Knowing the correct name of the orchid is crucial information when you’re looking up cultural information. Also, many times the tag includes the orchid’s parents’ names, which can also provide helpful cultural clues. If you want to enter your orchid in a show, it may be disqualified without proper labeling.
Figure 3-2: Potting tools — clockwise from top-left: rubber mallet, dibble, potting clamps, labels, marking pens.
Figure 3-3: This compact, lightweight, self-striking butane torch is a breeze to use.
So the important message is: Keep a legible label in the pots of all your orchids. Maintaining a separate list of your orchids is also a good idea. To make it easier, assign numbers to each of your plants and place this number on the label. This serves as a safety net in case the label is damaged or lost.
Labels
Many types of labels are available, in all different sizes and colors. Which size or color you choose is a personal choice — the material they’re made of is a more important consideration. Table 3-1 lists some pros and cons of each kind of label.
|
Table 3-1 |
1 Pros and Cons of Various Types of Labels |
|
|
Type |
Pros Cons |
Comments |
|
Metal (copper) |
Lasts many years More expensive Not as readily available |
Good for very-long-term use Is usually thin enough to mark by indenting with a pencil |
|
Metal (zinc) |
Lasts many years More expensive Not as readily available |
Good for very-long-term use Can be marked on with #2 lead pencil or engraved |
|
Table 3-1 |
|||
|
Type |
Pros |
Cons |
Comments |
|
Plastic |
Inexpensive Available in largest range of sizes and colors |
Becomes brittle (especially if exposed to sunlight) and then breaks very easily |
Recommended for short-term use only (less than a few years) Will accept a broad range of markers |
|
Vinyl |
Does not get nearly as brittle as plastic |
More expensive than plastic Not as readily available |
Probably the best overall choice Will accept a broad range of markers |
|
Wood |
Inexpensive Readily available |
Rots quickly |
Because it lasts such a short time in damp orchid potting material, it isn’t recommended |
Label markers
Using the right marker can mean the difference between being able to read the name of the orchid three years after you bought it and not. Table 3-2 lists some advantages and disadvantages of each type.
|
Table 3-2 |
The Pros and Cons of Various |
||
|
|
Types of Label Markers |
||
|
Type |
Pros |
Cons |
Comments |
|
Engraver |
Lasts forever |
Slow to use |
Handy for long- |
|
|
|
|
term labels that |
|
|
Most effective on |
Difficult to write |
are exposed to |
|
|
metal labels, |
small letters |
the elements and |
|
|
especially zinc |
|
chemical sprays |
|
|
|
More expensive |
|
|
|
|
Hard to read after |
|
|
|
|
a few years |
|
|
Paint pen |
Comes in a variety |
Takes longer to dry |
My favorite |
|
|
of colors and |
than permanent markers |
|
|
|
thicknesses |
|
Available at craft |
|
|
|
Must be more careful |
and art-supply |
|
|
Won’t fade as |
in using them not |
stores |
|
|
badly as permanent |
to smear the paint |
|
|
|
markers |
before it dries |
|
|
Type |
Pros |
Cons |
Comments |
|
Pencil |
An old-fashioned, |
Not as easy to read |
Use #2 lead for best |
|
|
but still very effective |
as some other |
legibility |
|
|
marker on |
markers |
|
|
|
plastic and vinyl |
|
|
|
|
|
Can smear |
|
|
Permanent |
Easy to find and use |
Will bleach out |
Reasonably good to |
|
marker |
|
in sun |
use but after two or |
|
|
Available in many |
|
three years may |
|
|
colors and |
Can also be |
have to be traced |
|
|
thicknesses |
affected by |
over to remain |
|
|
|
pesticides |
legible |
|
|
Makes dark, visible |
|
|
|
|
letters |
|
Some brands have |
|
|
|
|
more resistance to |
|
|
|
|
sunlight than others |
Clips and stakes
Numerous types of stakes and clamps are used to hold the orchid in its pot when it has been transplanted and its roots are inadequate, by themselves, to anchor the plant. Figure 3-2 shows some samples of metal stakes. Bamboo stakes are also available.
Watering Accessories
Mastering the art of watering is one of the critical keys to success in orchid culture. These accessories deliver water, and in some cases fertilizer, gently and effectively.
Water breakers
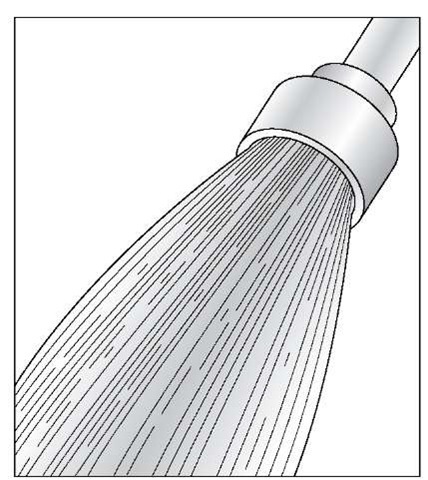
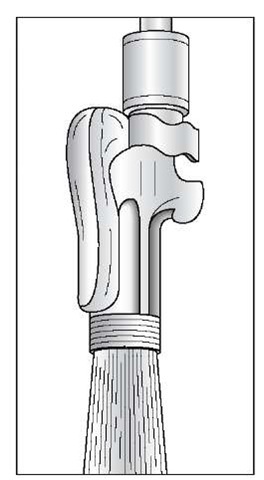
Water breakers are attached to the end of a hose to diffuse the water and prevent it from washing out the orchid potting material (see Figure 3-4). They deliver a large volume of water, but in a very gentle way — and they work really well.
You can find water breakers that deliver different volumes and water patterns such as mist, fine shower, jet, or flood. Some watering heads can be dialed to whichever of these forms you want — very handy.
You’re usually better off choosing the water breaker that delivers the finest steam of water possible. This will be most useful for the broadest range of watering applications.
Figure 3-4: A common type of water breaker.
Water-flow regulators
Water-flow regulators are attached to the hose before the water breaker to regulate the volume of water. The simplest ones are manual on/off valves. I find the thumb or squeeze valves are easiest to use more precisely and determine the volume of water you want to deliver to your orchids (see Figure 3-5).
Figure 3-5: Thumb valves make watering easier.
Hoses
Buy the best-quality hose you can find. The better ones will not kink and will last much longer.
If hoses tend to get in the way, consider the newer “coil” hoses. They take up much less space and can be attached to a sink spigot. Again, buy the best grade you can find — the cheaper ones tend to kink very easily.
Watering cans
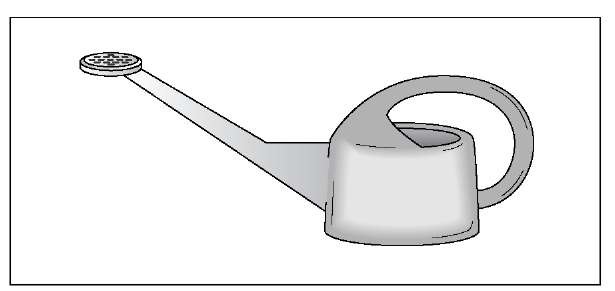
Many of the sprinkling or watering cans on the market are close to worthless for using on orchids. They deliver too much water too fast and are awkward to use in tight indoor spaces. The best type to use, for most situations, is one that holds X to 1 gallon (2 to 4 liters), has a long spout (so you can reach orchids in the back row), and has a removable water breaker (sometimes called a rose) on the end of its spout that delivers a very fine stream of water (see Figure 3-6). The watering can may be made of metal or plastic, but the water breaker should be made of metal, preferably a nonrusting one, like copper.
Figure 3-6: The most useful watering can is one with a long spout.
Sprayers and misters
You can use sprayers and misters for misting the orchids to temporarily increase the humidity, to clean the leaves, or for applying pesticides. If you’re going to use any chemicals in them, the plastic sprayers are less prone to being affected by these corrosive materials so they’re a better choice than metal ones.
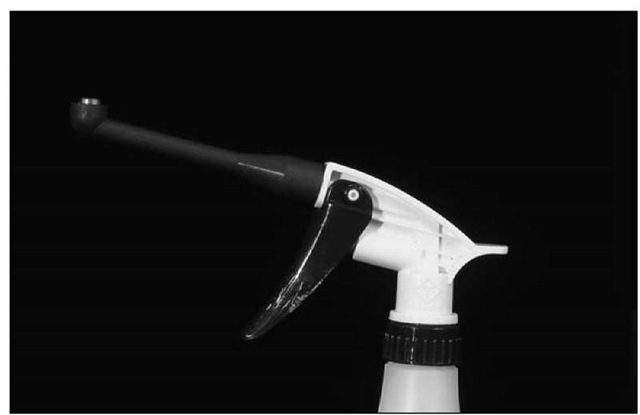
One type of hand sprayer that I’ve found particularly effective for applying insecticides is a teat sprayer because its spray head points up instead of straight forward like standard sprayers. These are actually used to wash off cow udders (hence, the name), so they’re sold at farm-supply stores. But for orchid growers, they serve admirably to apply these chemicals to the undersides of leaves, where the bugs usually hang out (see Figure 3-7).
Figure 3-7: A teat sprayer has a nozzle that points up so you can reach under the leaves.
Fertilizer injectors
Commercial growers use a device called a fertilizer injector that “injects” into the water a small amount of water-soluble fertilizer each time the plant is watered. In this way, the orchids are constantly fed a very diluted amount of fertilizer instead of larger amounts every two weeks or so, as is frequently done. These units tend to be on the expensive side and may be a luxury item, unless you have quite a large number of orchids to fertilize.
A much cheaper way around this is to use a simple siphon mixer. Several brands are on the market, but they all work basically the same. You attach the siphon mixer to the spigot before the hose. A flexible hollow rubber tube is inserted into a concentrated solution of fertilizer. When the spigot is turned, a suction action created by the water flowing through the hose draws this concentrate through the tubing so it flows into the water in the hose and is diluted while it’s being applied to the orchid plants.
To get the most benefit from a siphon mixer, here are a few tips:
Use a completely soluble fertilizer so it won’t plug up the unit.
- Use a water breaker that functions with a low volume of water. The water flow coming out the end of the hose will be significantly reduced when the siphon mixer is attached.
- Be sure the unit you have also has a backflow preventer.
That way, when you turn off the water breaker, but not the spigot, the back pressure won’t cause the concentrated fertilizer solution to flush back into your house water or back into your fertilizer concentrate.
- To be on the safe side, use the siphon mixer only for applying fertilizers, not pesticides.
- Be careful to dilute the fertilizer to the correct concentration.
These usually inject the fertilizer on a 1:16 fertilizer-to-water ratio, but always read the directions that come with the unit.
Deionization and reverse osmosis units
Deionization and reverse osmosis units are used to purify your well or tap water to reduce or eliminate concentrations of salts that can be harmful to some particularly sensitive orchids. The units aren’t cheap and can be cumbersome and bothersome to use. So, before you consider getting one, make sure you need it.
Here are some things to consider before you buy:
If your orchids and other houseplants have been growing, then don’t worry about using a deionization or reverse osmosis unit. Most households can get by with the water they have.
If you’ve had water problems or just want to be on the safe side, check with your public water provider to see what the average total dissolved solids (TDS) is in your water. If you have your own well, you’ll need to have a test done at a private water lab.
• If you have 60 parts per million (ppm) or less of TDS and less than 5 ppm of sodium, you’re home free. Your water is of good quality for orchids.
• If your water tests at 60 to 120 ppm and you have up to 10 ppm of sodium, all except the most sensitive orchids should be okay, but you’re on the edge with water quality.
• If you have readings higher than 120 ppm for TDS or 10 ppm of sodium, you may have more orchid-growing success if you use better-quality water. To do this, you could collect rainwater (you can buy special rain barrels for this purpose that hook up to your downspout), or consider buying a reverse osmosis or deionization unit.
If you’re on the higher end of the TDS level, be particularly careful not to overfertilize.
Humidifiers, Heaters, and Ventilation Equipment
Your home environment is designed to make you, not necessarily your plants, comfortable. Fortunately, many of your living requirements are the same as the living requirements for most of the orchids in this topic. In some cases, though, you’ll need to modify your orchids’ growing space to better suit them.
Humidifiers
To humidify an entire room, there are at least three possible approaches, covered in the following sections.
Evaporative-pad humidifiers
With these units, fans blow across a moisture-laden pad that sits in a reservoir of water. Evaporative-pad humidifiers are my first choice for home humidification because
- I They’re reasonably priced and readily available.
- I They don’t spray the room with droplets of water that can carry mineral deposits and bacteria.
- I They circulate air at the same time.
- I They only increase the humidity to about 50 to 60 percent (most have an adjustable humidistat, which measures humidity). This is a level that is beneficial to plants, but not sufficient to cause moisture damage to the house.
- I They require no plumbing and very little maintenance — just change the moisture pads one or two times a season.
Cool-mist humidifiers
Cool-mist humidifiers can be effective for small areas, but with constant use, they can cause deposits of minerals on leaves and be a bacteria carrier.
Greenhouse-type foggers or humidifiers
If you have a greenhouse or a very large growing area that really needs a lot of humidity, a greenhouse-type fogger or humidifier is for you. These units can be pricey. They’re plumbed into a constant water supply that is controlled by a float (much like a toilet bowl). The humidity level can be regulated by a separately purchased humidistat.
Ventilation
Adequate air circulation is very important in orchid culture. Fortunately, many convenient and inexpensive pieces of equipment do this job admirably. Here are some of the best choices:
Ceiling fans: These are readily available and do a super job of moving large volumes of air in a figure-8 pattern at a low velocity. Most of them have reversible motors, so they can either be set to pull the cooler air from the floor (usually the summer setting) or push hot air down from the ceiling (usually the winter setting).
Oscillating and standard fans: You can find these in all blade sizes, and most have variable speeds. All will do the job, but you’re better off getting one with a larger blade size and running it at low speed. This will move more air but not at as high a velocity, so the plants won’t become dehydrated by a strong air current. Also, for oscillating types, splurge on a better-grade model that has metal or heavy-duty gears; otherwise, they’ll strip in short order, and you’ll then have a stationary fan.
Muffin fans: These are very small, handy fans (3 to 6 inches/ 8 to 15 cm) that are used to cool electronic equipment like computers. They’re great for bringing a gentle, quiet breeze to a small corner of your growing area. You can find them at electronic or computer-supply stores or in catalogs.
Heating
If you’re like most people, you’ll rely on your home heating system to provide most of the heat for your orchids. You can supplement that with small electric heaters or water-resistant heating mats commonly used to start seeds. If you’re growing under lights, you can enclose your growing area in plastic film to help retain heat produced by the lights and ballasts.
Thermometers and hygrometers
I have to admit, and my wife will quickly concur, that I’m a nut about temperature and humidity monitoring. I’ve got remote sensors all over my home that tell me maximum and minimum temperature and humidity levels each day.Temperature differentials are important to know about if you’re interested in getting your orchids to bloom. Thanks to modern digital thermometers and hygrometers that are simple to use and not expensive, you can keep track of temperature and humidity with little effort.
