Now that we’ve been introduced to the Design Center, it’s time to make use of it to import or define the metadata about our source database objects. Metadata is data that describes our data. We are going to tell the Warehouse Builder what our source database objects look like and where they are located, so that it can build the code necessary to retrieve the data from them when we design and run mappings to populate our data warehouse. The metadata is represented in the Warehouse Builder as objects corresponding to the type of the source object. So if we’re representing tables in a database, we will have tables defined in the Warehouse Builder.
We have a couple of options for defining the source database objects. We can manually input the definitions into Design Center Projects tab ourselves, or we can choose to have the Warehouse Builder automatically import the descriptions of our data for us. As we like having the computer do the work for us whenever possible, we will choose the second option whenever we can.
We need to be clear about the difference between importing or defining the metadata for our sources and loading the actual data as it can be confusing. At this stage, we are just importing or defining the definitions of our objects. (Metadata, or data about data, is information that tells us what the data looks like, column names, data types, and so on.) Later when we implement our targets and actually create a mapping between the source and the target and deploy it, we will be loading the actual data.
Creating a project
The very first thing we have to do in Design Center is make sure we have a project defined that will hold all of our work. In the last image, we saw a depiction of the Design Center as it appears when we first log on. Launch the Design Center now if you haven’t already and we’ll start working with it.
We can choose to use the default My Project project that was created for us, or create another new one. We are just going to use this default project as the Warehouse Builder was nice enough to create it for us. But, oh, that name is so boring. Let’s give it a new name that is more appropriate for our company project. So right-click on the project name in the Projects tab and select Rename from the resulting pop-up menu. Alternatively, we can select the project name, then click on the Edit menu entry, and then on Rename. In either case, the name will be highlighted and turned to italics and we’ll be able to use the keyboard to type a new name. We’ll name the project ACME_DW_PROJECT.
If we wanted to create a new project, we would select New… either from the pop-up menu or from the Design drop-down menu. We can have any number of projects defined, but can work on only one at a time. There’s a high possibility that we might be building more than one data warehouse at a time, and we could have a separate project defined for each.
Creating a module
Creating a project is the first step. But before we can define or import a source data definition, we must create a module to hold it. A module is an object in the Design Center that acts as a storage location for the various definitions and helps us logically group them. There are Files modules that contain file definitions and Databases modules that contain the database definitions. These Databases modules are organized as Oracle modules and Non-Oracle modules. Those are the main modules we’re going to be concerned with here. We have to create an Oracle module for the ACME_WS_ORDERS database for the website orders, and a non-Oracle module for the ACME_POS SQL Server database. We’ll create the Oracle module first because it is the simplest. After that, we’ll create the module for the SQL Server database, which will involve a few more steps because Oracle has to communicate with the SQL Server database.
Creating an Oracle Database module
To create an Oracle Database module, right-click on the Databases | Oracle node in the sProjects tab of Warehouse Builder and select New Oracle Module… from the pop-up menu. The first screen that will appear is the Welcome screen, so just click on the Next button to continue. Then we have the following two steps:
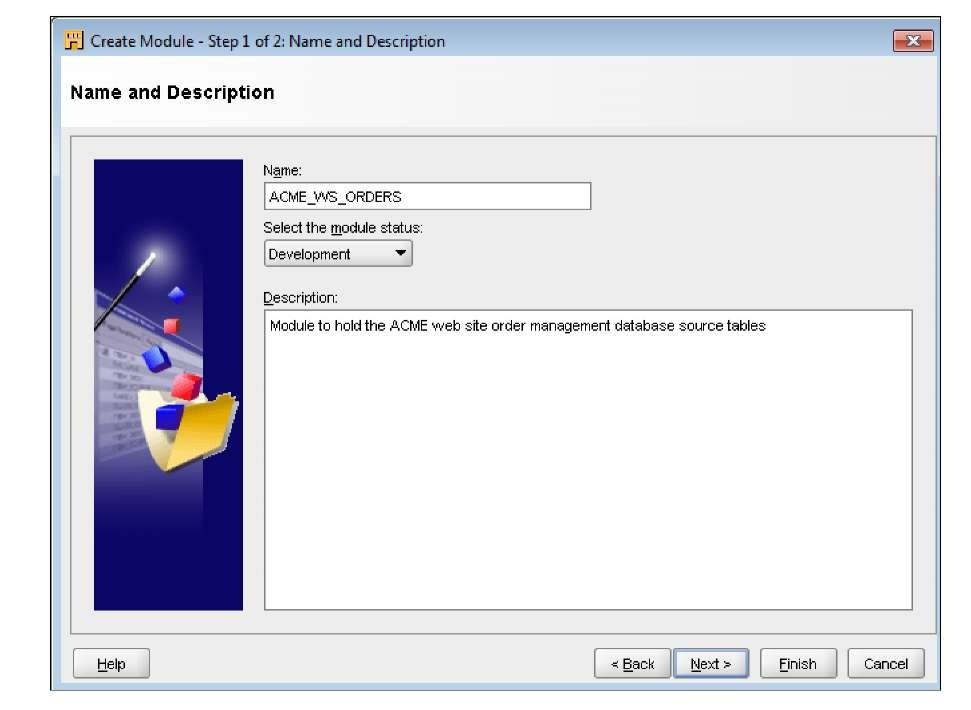
1. In this step we give our new module a name, a status, and a description that is optional. We do the following in this step:
° On the next window after the Welcome screen, type in a name for the module
The name should reflect the name of the source database for consistency and ease of matching the module to the source database later. We’re going to name our module ACME_WS_ORDERS, which is the name of ACME’s Website Orders Oracle database as we discovered earlier when doing our analysis of the existing systems.
° The module status is a way of associating our module with a particular phase of the process, and we’ll leave it at Development
° For the description, just enter any text that helps describe the source
With each new release of the Warehouse Builder, support for non-Oracle sources and targets is improved. Release 11gR2 now incorporates Code Templates which continues that trend. As a result, there is no option to specify whether this module we’re creating is a source or a target. Previous releases had an additional option here for Oracle database modules to specify the type of module as a Data Source or a Warehouse Target and for non-Oracle databases only Data Source.
Our screen should now look similar to the following:
Click on the Next button to proceed to defining the connection.
2. In this step, we define the connection information for Warehouse Builder so that it knows how to connect to the source. We do that in the next screen using the following steps:
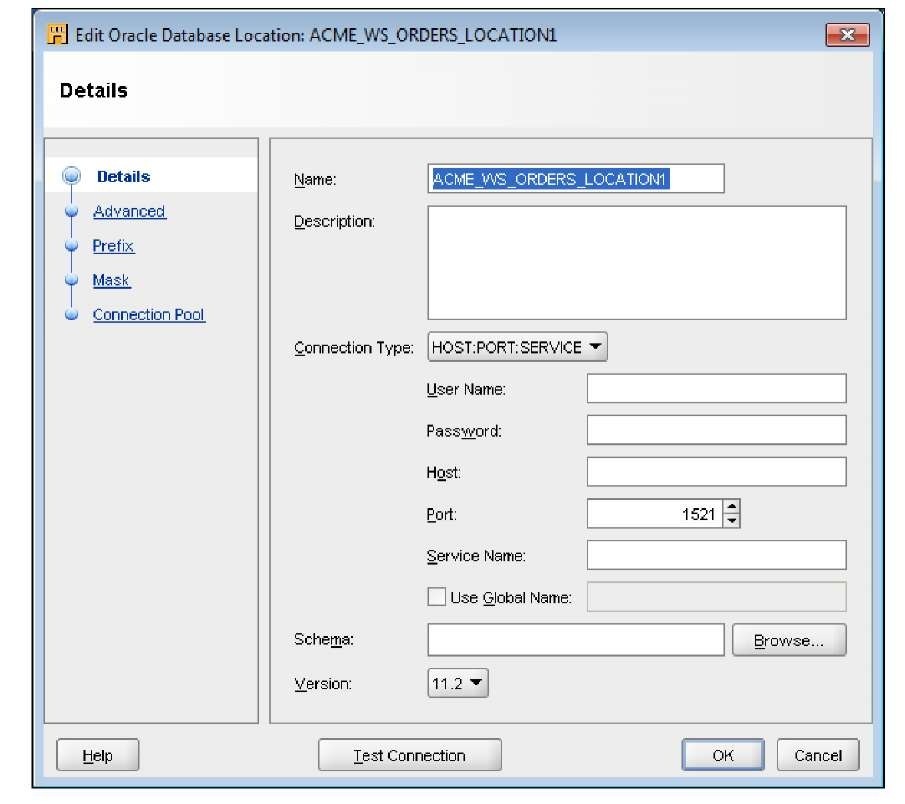
° The screen starts by suggesting a connection name based on the name we gave the module. Click on the Edit button beside the Name field to fill in the details. This will display the following screen:
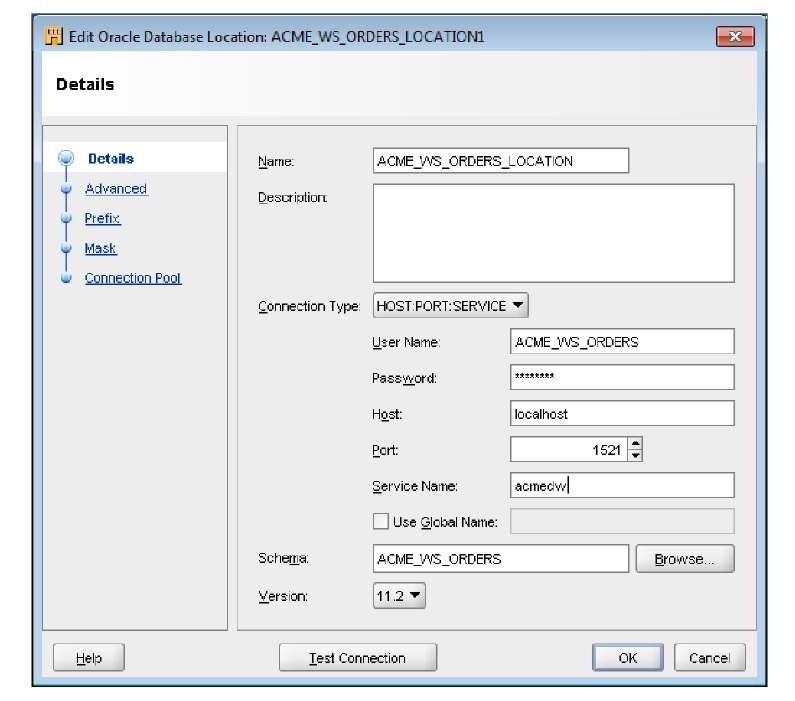
° The name it suggested for us is ACME_WS_ORDERS_ LOCATION1. That’s a fine name, except that 1 is on the end, so let’s just remove it.
° For the connection details, we’re going to enter User Name, acme_ws_ orders, and the Password that was given to us by the DBA for the website orders system. When we type in the username and move to the next field, the schema field will be automatically populated with the username.
If you are using the scripts downloaded from our website, the default password used is acme1234 for the acme_ws_orders user.
° Enter the Host where the Oracle database resides and contains the acme_ws_orders schema, which is localhost as we’re running everything on one system.
° The Port that the listener is listening on is 1521 so leave it as the default. Enter acmedw as the Service Name for the Oracle database. The schema we’ll be connecting to has been automatically filled in for us
° One final step is to make sure the version of the Oracle database is set correctly. The Version we’re working with is 11.2, the most recent and the default.
We should now have a screen that looks similar to the following:
° Press the Test Connection button and if everything is OK, we’ll see a popup with a Successful! message. We’ll just click OK to close the popup. If not successful, it will display the error(s) in that popup for us so that we can debug the problem.
If we do get any errors, it’s a good idea to become intimately familiar with the error manual in the Oracle documentation, which can be found at http://download.oracle.com/docs/cd/E118 82_01/ server.112/e17766/toc.htm. The errors will usually start with the three characters ORA, followed by a hyphen and then the error number. We can use all this to look up an error in the error manual to get more information. Google, Yahoo, or any Internet search engine can also be our friend here as (unfortunately) some of the errors, even after we look them up in the error manual, are not exact about the cause of the problem. Usually, searching for the error message string on the Internet can turn up others who have encountered the same issue and explanations of what to do about it.
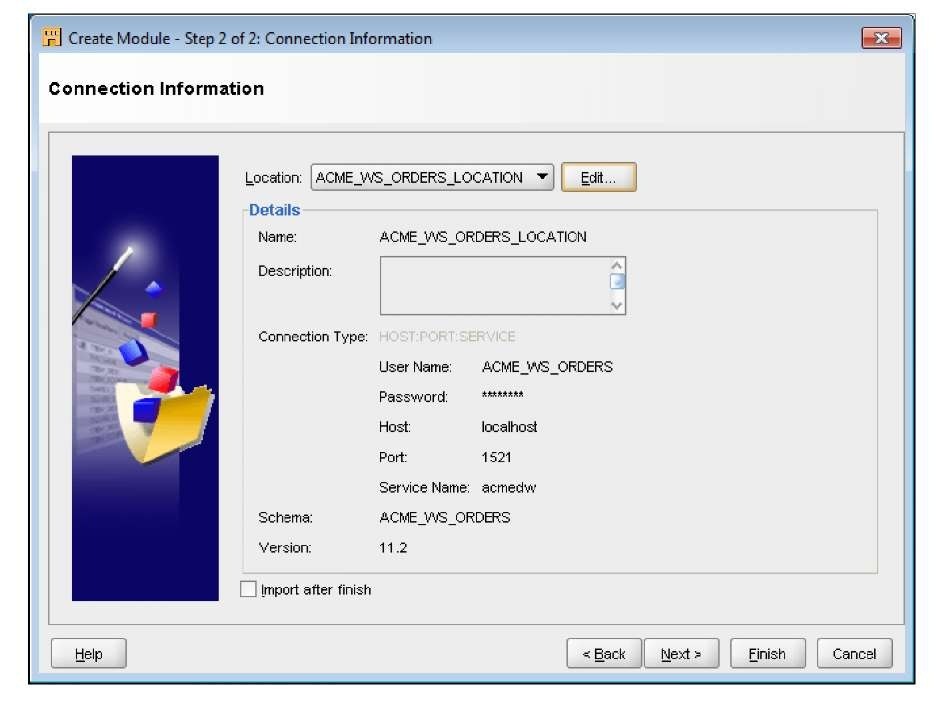
° The navigation window on the left on this dialog is new as of this release. The additional options are not needed for a basic Oracle connection that we’re making now but are applicable to new connections like JDBC that were not available previously. We’ll cover JDBC connections when we discuss Code Templates in topic 10. For now however, we’re done with this dialog so click on the OK button to proceed, even if an error was reported when we clicked on the Test Connection button. Now we will be back at the Step 2 window where all the connection results will be filled in and it will be ready to create the module as shown here:
° The Import after finish checkbox can be used to proceed right to the import step but we’re not going to check that box because we’re going to move on and create a module for the SQL Server database before we import any database object metadata. So, with the box unchecked click on the Finish button
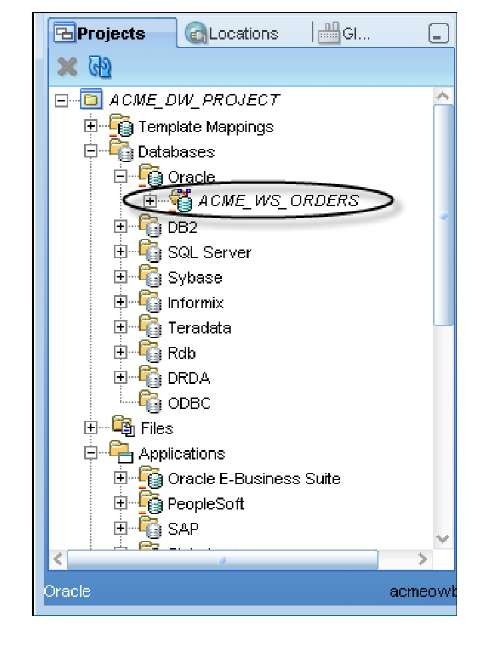
We are now back at the main Warehouse Builder interface and we can see that it has added our new module under the Databases | Oracle node in the Projects tab as shown below.
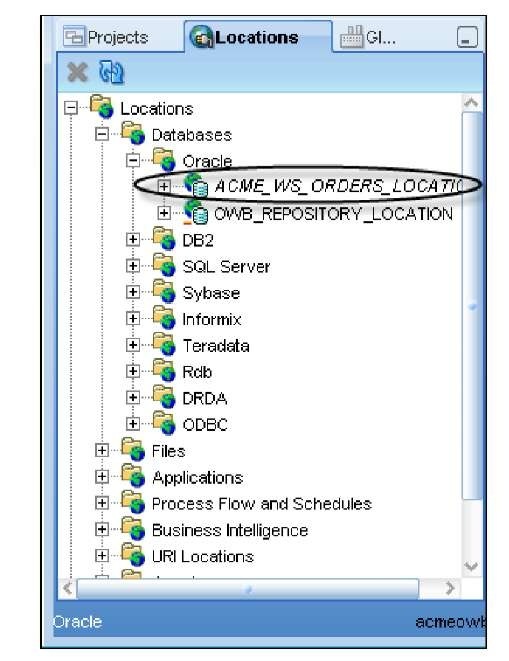
If we expand the Locations | Databases | Oracle module in the Locations tab, we’ll see our location ACME_WS_ORDERS_LOCATION listed as shown in the following image. We just defined this location as a part of the process of creating the module.
Even if we had an error during the previous process of creating this connection, we would still see these entries created. If we could fix whatever caused the error, we’d then have a valid working connection without having to go back through the wizard to create it again.
Creating a SQL Server database module
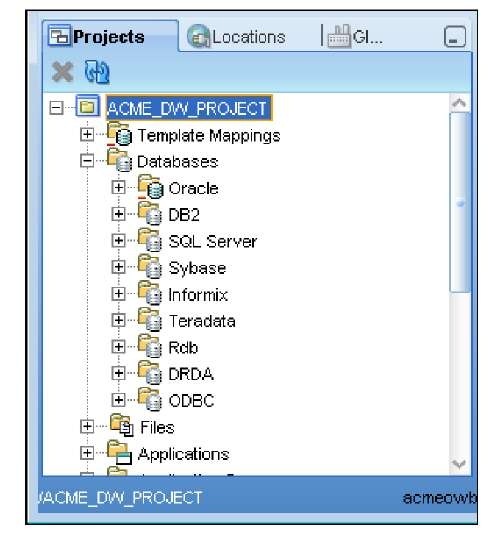
Now that we have our module created for the Oracle database, let’s create one for the SQL Server POS transactional database: ACME_POS. First, let’s talk in brief about the external database connections in Oracle. If we expand the Databases node in the Projects tab, we’ll see the list of supported databases. This is slightly different from the previous 11gR1 release of the Warehouse Builder in that all the databases are now at the same level in the tree. That is a reflection of the improved support in this release for non-Oracle databases. In the following image, a number of databases are listed, including one that says just ODBC:
Creating other Database Platforms
In this latest release of the Warehouse Builder, we now have the ability to create other database platforms that aren’t listed above in the default set of other databases supported, such as MySQL for example. We will not need that capability for this topic but if you want to read more about it, topic 11 of the Oracle Warehouse Builder Sources and Targets Guide has a complete write up of the new capability. You can access it online at the following URL:
http://download.oracle.com/docs/cd/E11882_01/owb.112/ e10582/platform_extensions.htm#CHDHEGEX
The POS transactional database is a Microsoft SQL Server database and we’ll notice that it is one of the databases listed by name. We might think this is where we’re going to create our source module for this import, but no.
The Warehouse Builder makes use of a couple of options for making connections to other databases. One of the options is Oracle Heterogeneous Services. This is a feature that makes a non-Oracle database appear as a remote Oracle database server. There are two components to make this work—the heterogeneous service that comes by default with the Oracle database and a separate agent that runs independently of the database. In addition to that option, there is now the option to use JDBC (Java Database Connectivity) to connect to a remote non-Oracle database.
For the Heterogeneous Services option the agent facilitates the communication with the external non-Oracle database and can take one of these two forms:
• An Oracle Database Gateway agent that is tailored specifically to the database being accessed
• A generic connectivity agent that is included with the Oracle Database and which can be used for any external database
The Oracle Database Gateway agents must be purchased and installed separately from the Oracle Database, and then configured to support the communication with the external database. They are provided for heavy-duty applications that do a large amount of external communication with other non-Oracle databases. The generic connectivity agent comes free with the Oracle Database. It is a low-end solution that makes use of ODBC or OLE-DB drivers for accessing the external database. ODBC (Open Database Connectivity) is a standard interface for accessing database systems and is platform and database independent. OLE-DB (Object Linking and Embedding-Database) is a Microsoft-provided programming interface that extends the capability provided by ODBC to add support for other types of non-relational data stores that do not implement SQL such as spreadsheets.
There is a significant difference between the Oracle Database gateways and the generic connectivity agent. The generic connectivity agent is restricted to the features of ODBC or OLE-DB and is very generic as a result. The database gateways are specifically tailored to the non-Oracle database and support a much wider range of database access features for the database being connected to. As a result, one aspect to consider is how extensive our access to the other database will be from our Oracle database and what database features we’ll need to use. The generic connectivity agent is limited in some of the features it allows when accessing another non-Oracle databases compared to the gateways, and this factor may depend on whether we need these features or not. For working through the exercises in this topic, the Warehouse Builder will work just fine with either option, a specific gateway or the generic connectivity option. We will use the generic option since our sample warehouse we’re building is not that complicated.
Refer to the documentation to make a decision about which would be an appropriate choice of the agent in your case. The Heterogeneous Connectivity Administrator’s Guide can be found at the following URL: http://download.oracle.com/ docs/cd/E118 82_01/server.112/e11050/toc.htm. The Gateway for ODBC User’s Guide documentation can be found here: http://download.oracle.com/docs/cd/B2 8 3 59_01/ gateways.111/e10 311/toc.htm.
There is the second option, using JDBC that we will also cover later in topic 10 when we discuss the new Code Templates available now in the Warehouse Builder as of release 11gR2. If JDBC is used, the only mappings that can access the sources or targets using it are Code Template mappings, not the regular PL/Sql based original mappings in the Warehouse Builder. That is why we’ll cover them separately later.
The particular method we choose will determine which of the nodes under the Databases node will be used to create our SQL Server database module.
The individually named database nodes are used if we’re using a transparent gateway agent tailored for that database or are using JDBC. The ODBC node is the one we use for any database connections using the generic connectivity agent.
Now that we’ve decided to use the generic connectivity solution, we need to create an ODBC module in Warehouse Builder to hold our definitions of source data for the POS transactional database. As this is a non-Oracle database we’re using for the source, the module will be created under the Databases | ODBC node in the Warehouse Builder and not under the Databases | Oracle node as it is not an Oracle database. Expanding the Databases as shown in the previous image, we see that there is an ODBC node available. It is under this node that we will create our module for the source definitions for the POS transactional database.
However, there is one problem—because this is a non-Oracle database we’re connecting to, we have to provide information to our Oracle database so that it knows how to connect. Warehouse Builder uses the underlying Oracle database Heterogeneous Services to make the connection. So this information must be configured before we define our module and location in the Warehouse Builder. In the following section, we will go through the steps to define our connection to the SQL Server database named ACME_POS. We’re going to depart briefly from Warehouse Builder-specific topics here, but only because this is necessary for us to continue in the Warehouse Builder.
If you are following along with each of these steps and want to create the ACME_POS database, you can run the scripts that have been provided in SQL Server to create the database and tables. They are available for download from the Packt website at http://www.packtpub.com/ files/code/344 9_Code.zip. Microsoft SQL Server 2008 Express was used for this topic to generate the scripts because it is available free of charge. It is available from Microsoft’s website at http://www. microsoft.com/express. It is available without charge and provides all the SQL Server functionality we’ll need for this topic.
