This topic covers the following:
■ Installing the tools necessary for Flash development
■ Setting those tools up so they best work with each other
■ Creating a simple sample project with those tools
■ Exploring some alternative workflows
In previous topics, we described some of the tools available for open source Flash development. It’s time for you to install those tools and configure them to work together.
Many tools for open source Flash development exist. By combining different combinations of those tools, you can make hundreds of different development workflows, and different workflows will work better or worse for different developers. I will briefly describe two alternative workflows here. One will use ASDT and Eclipse, and the other will use FlashDevelop.
Before reading on, it may be helpful to download the accompanying material for this topic from the friends of ED website (http://www.friendsofed.com). Once you’ve done that, extract the contents. It contains samples that will be referenced throughout the rest of this topic.
ActionScript 3 development
Developing applications at the most basic level involves editing source code files, combining the files into a project, and then compiling your project. To edit ActionScript, you will learn how to install and use FlashDevelop and ASDT. Depending on your choice of ActionScript 2 or ActionScript 3 development, you will use either MTASC or the Flex SDK as your compiler. Beyond the pure basics of development, installing standard libraries of code and debugging tools are also covered in the following workflows.
There are some great options for a developer wanting to use open source tools to do ActionScript 3 development. Some of those tools, such as the Flex SDK or the Java JDK, come from large, established companies. Still others, such as FlashDevelop and MTASC, come from small independent groups of developers.
Introducing the Flex SDK
Adobe has made a significant leap into the open source world by completely open sourcing its entire Flex SDK. This includes the ActionScript and MXML compilers, a debugger, and the ActionScript libraries that make up the core Flex framework.
The Flex SDK is made available under the open source Mozilla Public License (MPL) and is available for download from Adobe’s website free of charge. This gives you a very liberal license to use it to create your own open source or commercial applications.
Flex is a term developers usually associate with a specific way of writing applications using the Flex framework. If you’re looking to create non-Flex applications, don’t let the name Flex SDK scare you. By using this SDK, it’s possible both to create Flex-based applications and to create Flash applications not based on that framework.
Adobe publishes a product called Flex Builder, which is a fully integrated Eclipse and ActionScript 3 development environment with many of the tools you need to create Flex-based applications. The Flex SDK is included in that product, but you can also get it separately for free as I’ll show how to do later in this topic.
When communicating with others, it’s important to remember that oftentimes people may use the term Flex to refer to Flex Builder and not just the SDK.
Installing the Java JDK
It may seem odd that the first step in the installation of a Flash development environment is to install the Java Development Kit (JDK), but the reason for this is that the Flex compilers and debuggers are written in Java. Because of this, you must have a Java Runtime Environment (JRE) installed for Flex, but since other components later in the topic require the full JDK, we’ll go over the installation of that. Some other tools that require Java include Ant and the Red5 server.
Many systems have a version of Java installed by default, so before attempting to install, you should check to see whether a Java JDK is already installed and, if so, what version it is. Open a command prompt, and enter the command java -version to check your installed version. If you receive a “command not found” error, you most likely don’t currently have Java installed. If you do have Java installed, make sure you have version 1.5 or higher.
There are two types of Java downloads. The JRE contains all the files necessary to run Java-based applications. Unless you’re planning on developing Java-based software, that’s sufficient for this and the next topic. If you’re planning on trying Red5,you’ll have to install the full JDK, which allows you to write Java-based applications.
If you don’t have a JRE installed or if you have a version previous to 1.5, you will need to install a fresh copy. We recommend getting the latest version of the full JDK (JDK 6 Update 5 as of the writing of this topic).
Installing the JDK on Windows or Linux
Follow these steps to install the JDK on Windows or Linux:
1. Open a web browser to http://java.sun.com/javase/downloads/index.jsp.
2. Click the Download button next to the option for the JDK.
3. Choose the appropriate installation package for your system, and download it. Under
Windows, you have the option for an offline install or an online install. Ifyou will be connected to the Internet for the entire time while you install the software, choosing the online version can often save you time since it will download only the components you want to install.
4. Install the file you downloaded. On Windows, run the executable, and follow the directions. On
Linux, use your system’s package manager utility to install the software.
Installing the JDK on OS X
OS X comes with a Java JDK installed by default. If you have an outdated version, you can upgrade using the standard OS X software update mechanism. First, connect to the Internet. Then select the Software Update option from your Apple menu. A dialog box listing all the available updates will appear. Find the Java 1.6 option, make sure the check mark next to it is enabled, and click the Install button at the bottom of the window. OS X will download and install the update for you.
Installing the Flex SDK
You can download the Flex SDK for your platform from Adobe’s website. Point your web browser at http://opensource.adobe.com/wiki/display/flexsdk/Downloads, and follow the FreeAdobe Flex 3 SDK link.
The Flex SDK comes packaged as a single ZIP file containing the necessary files for all the platforms it supports. Download this file, and uncompress it to a location on your hard drive. The examples in this and the next topic place it in a directory called flex3sdk inside a directory named FlashTools in the root of your drive for Windows, or in your user directory for OS X and Linux (C:\FlashTools\ flex3sdk on Windows or ~/FlashTools/flex3sdk on OS X/Linux).
After extracting the archive, add the bin directory to your system search path. If you’re using Windows and the recommended paths, this would be C:\FlashTools\flex3sdk\bin, whereas if you’re using Linux or OS X, the path would be ~/FlashTools/flex3sdk/bin. The next sections show how to modify your system’s PATH variable if you’re unsure how.
Configuring your system’s search path
Your system’s PATH variable tells your computer where to search for executable programs. Ifyou are on Windows, follow these steps to modify your PATH variable:
1. Right-click the My Computer icon, and select Properties.
2. Click the Advanced tab.
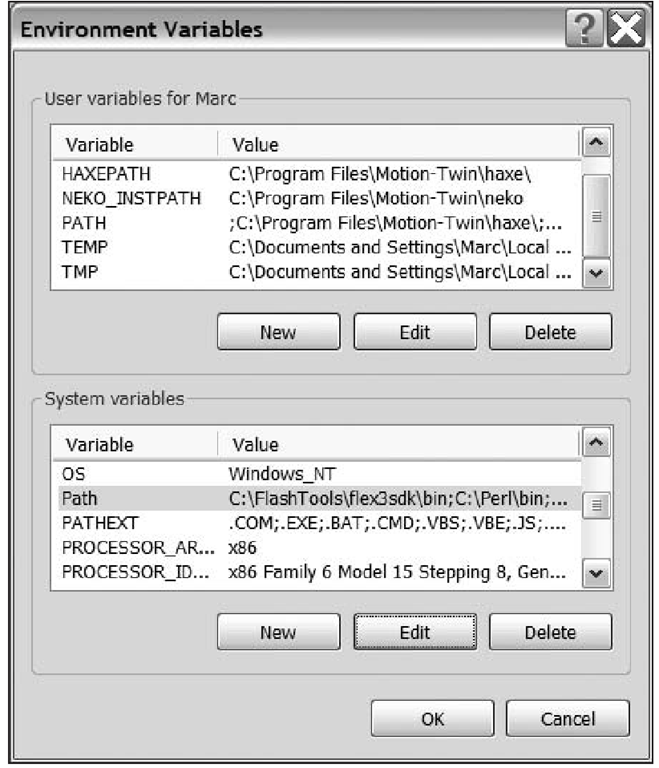
3. Click the Environmental Variables button; you should see a window similar to Figure 3-1.
4. Find the entry for Path in the System Variables section, and select it.
5. Click the Edit button, and a window to edit the value will appear.
6. Prepend the value with the path to your Flex SDK compiler followed by a semicolon. If you used the recommended path, you would enter C:\FlashTools\flex3sdk\bin; at the beginning of the path.
7. Click OK. Verify the path looks like Figure 3-1.
Figure 3-1. The Environment Variables dialog box on Windows XP. Notice the PATH variable has been modified to include the flex3sdk directory.
Modifying your PATH variable on OS X or Linux can vary greatly depending on what shell you use. The default shell on OS X and many Linux distributions is Bash. If you are using Bash, you can edit a file in your home directory called .bashrc. In that file, add a line similar to the following:
This tells Bash to append the directory called ~/FlashTools/flex3sdk/bin to the end of the PATH variable. If you are using a shell other than Bash, please consult the documentation that comes with that shell.
Testing your installation
After installing the Flex SDK, you can test that everything is working correctly by opening a command prompt (terminal on OS X) and issuing the compc command. You should receive output similar to the following:
Ifyou get a “command not found” or some other error, review the installation instructions, and make sure you set your PATH variable correctly.
Installing FlashDevelop
For this section, I’ll be using FlashDevelop as the IDE to show how to edit and compile ActionScript code. FlashDevelop is Windows-only since it requires the Microsoft .NET 2.0 runtime. If you’re using OS X or Linux, you should take a look at FDT, which is mentioned in the “ActionScript 2 Development” section of this topic since it is also capable of creating ActionScript 3 applications.
To install FlashDevelop, first download and install the .NET runtime from the Microsoft website (http://www.microsoft.com). To find the download link, perform a search for Microsoft .NET Framework Version 2.0 Redistributable.
After you have installed the .NET runtime, you’re ready to install FlashDevelop. To find the latest download, go to the FlashDevelop website (http://www.flashdevelop.org), and click the Releases link. FlashDevelop regularly releases versions, so it’s up to you to choose whether you want to get the latest, possibly buggy, beta version or go with a slightly older but more stable officially released version. After downloading, a standard installation wizard will guide you through the rest of the process.
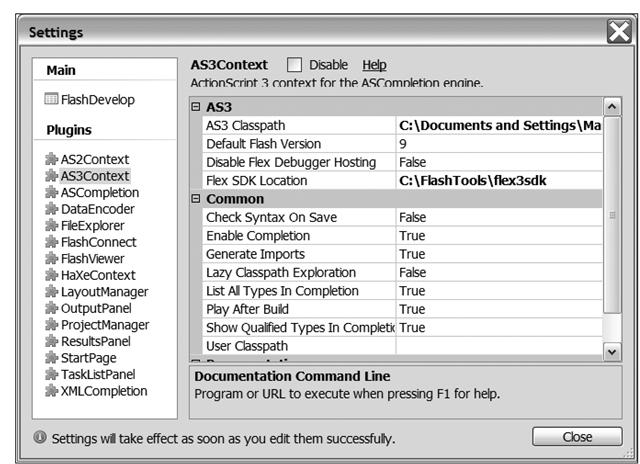
Once you’ve installed the Flex SDK and FlashDevelop, you’ll need to configure a few settings. Launch FlashDevelop. Select the Tools > Program Settings menu option, and a dialog box such as Figure 3-2 will appear.
Figure 3-2. The Settings dialog box of FlashDevelop
In this dialog box, find the Flex SDK Location entry under AS3Context, and set the directory where you unpacked your Flex SDK. With that done, you’re ready to start using FlashDevelop to create ActionScript 3 projects.
Creating a sample application
In this section, I will show how to create a simple sample application; you will learn how to set up and compile a project from FlashDevelop.
To begin, select the Project > New Project menu option, which will cause the New Project dialog box to be displayed (see Figure 3-3). Select Empty Project under the ActionScript 3 heading, which will create a standard Flash ActionScript 3 project. Ifyou were developing a Flex or an AIR application, you would see options for those environments as well.So, let’s give this a name of RecipeViewer by typing that into the Name field. To keep things organized, also enter a directory name of RecipeViewer, and then click the OK button.
Once you have a new project created, you select the Project panel on the right side of your screen. Right-click in that panel, and select Add > New Class. This will open a dialog box asking for a name for the new class. Enter RecipeViewer.as in that dialog box, and click the OK button. A new ActionScript file will be created.
Figure 3-3. The FlashDevelop New Project dialog box
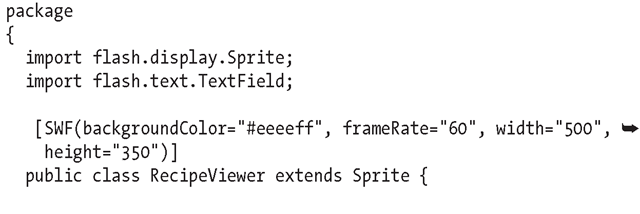
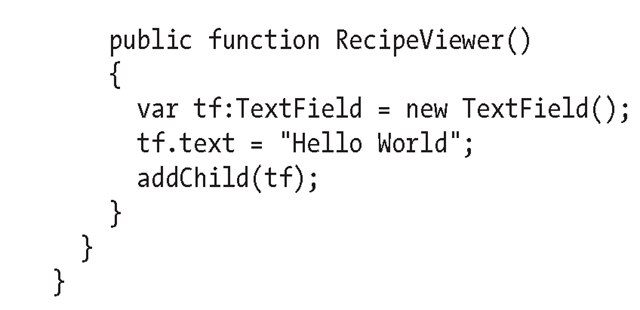
Modify the generated class in the following ways:
1. Add a SWF metatag before the class to specify the properties of the resulting Flash application.
2. Add extends Sprite to the class definition. This will let the class act as the default object in an ActionScript 3 Flash application.
3. Add code in the constructor to create a TextField, assign some text to it, and add it to the display list.
The resulting class should resemble the following:
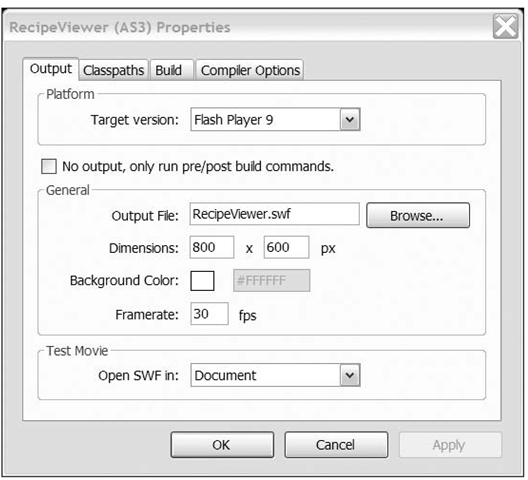
You now have all the code necessary for your simple test application. To run it, you must first right-click the file in the Project panel and select Always Compile. Ifthe file isn’t appearing in your list, select the Show Hidden Items toolbar option. Afteryou do that, select the Project > Properties menu option, and a dialog box like Figure 3-4 will appear.
Figure 3-4. The project properties panel in FlashDevelop
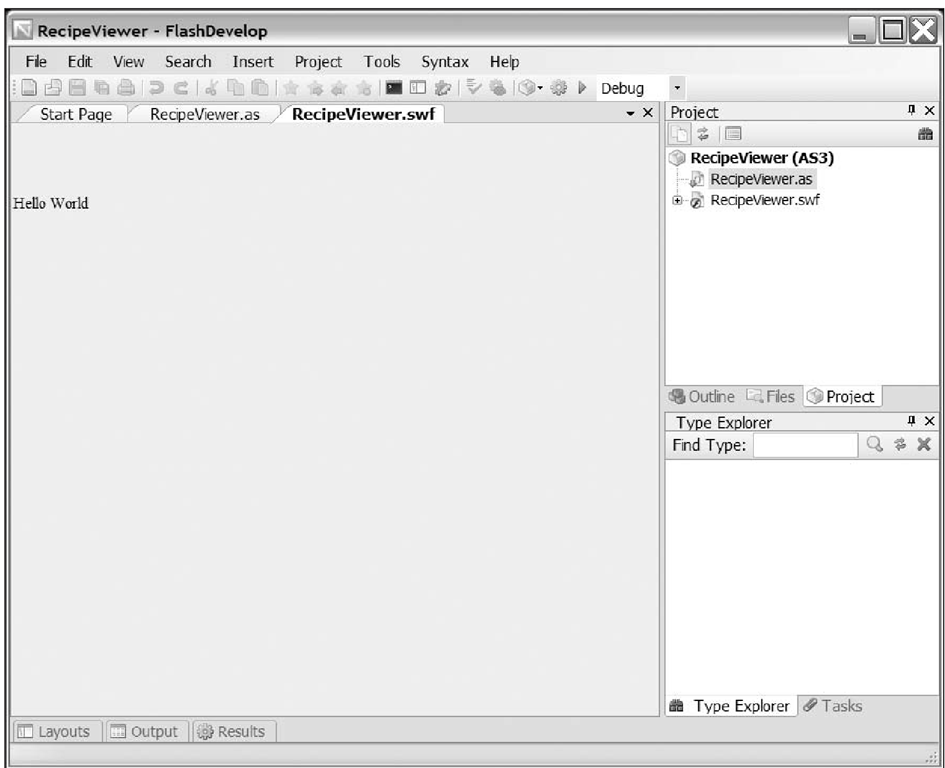
Type a file name for the resulting compiled application in the Output File field, and click the OK button. Pressing F5 or clicking the blue triangle play icon in the toolbar will cause your application to be compiled, and the resulting output will be displayed in FlashDevelop (see Figure 3-5).
Now that you can create and run an ActionScript 3 project, you’re ready for other topics in this topic, such as creating an Ant build script, using some ActionScript 3-based libraries such as Papervision3D, or writing client-server applications using a technology such as Red5.
Figure 3-5. The final sample application running in FlashDevelop
