Skeletal Traction
In skeletal traction, a physician surgically inserts metal pins or wires into the client’s bones so that traction is applied directly to them. Skeletal traction can use up to 30 lb of weight and can be applied for continuous periods as long as 4 months. Adults with serious fractures typically use skeletal traction, although it can also be used for children. There are two main types of skeletal tractions: balanced suspension traction and skull tongs traction.
Clients with skeletal traction are allowed to move slightly in bed while maintaining the correct position. Skeletal traction can be successful and cost effective in the home setting. To prevent infection, pin insertion sites require the same care as any incision. Immediately report any signs of infection, and teach clients and family caregivers about these signs. Infection in the incision site can spread to the bone, causing the serious complication of osteomyelitis, a bone infection discussed later in this topic. Other complications of skeletal traction include skin damage owing to the shearing forces of skin against bed linens, skin breakdown, and the numerous hazards of immobility. As with skin traction, CMS checks are part of routine nursing care.
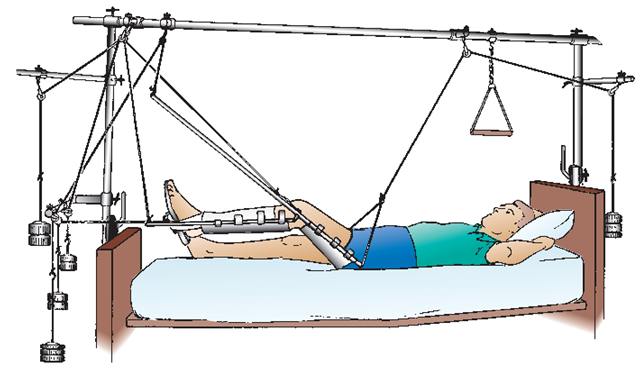
Balanced Suspension Traction. Balanced suspension traction is a type of skeletal traction that is used to stabilize fractures of the femur (Fig. 77-5). A wire (e.g., Kirschner’s wire) and a pin (e.g., Steinmann pin) are inserted through the femur. The femur is then supported or balanced on a Thomas splint with a Pearson attachment. The Thomas splint is a ring that supports the thigh. The Pearson attachment is a canvas sling that supports the calf portion of the affected leg. Traction is applied via parallel rods using ropes, pulleys, and weights. Padding the areas touching the skin, prevention of skin breakdown, and pin care are of special importance.
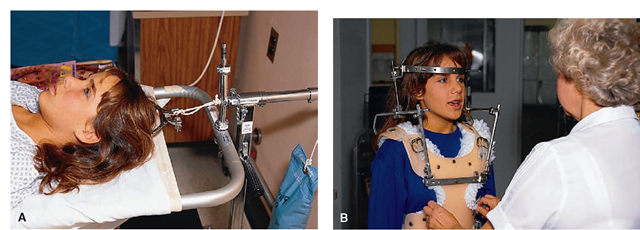
Skull Tongs Traction. Skull tongs are also used for cervical injuries or fractures. Gardner-Wells tongs are commonly used today because they are considered less likely to pull out of place than are Crutchfield tongs. Holes are drilled into the sides of the skull, and the tongs are inserted into these holes (Fig. 77-6A). Traction is applied to the tongs to stabilize the cervical spinal cord. The client stays in bed and must remain immobile until the injury heals, surgery is performed, or a halo device is applied. For the client with skull tongs, keep in mind the following:
• Provide client and family teaching and support. Rationale: If the client has sustained a sudden injury, he or she will be frightened and, in addition, may be newly paralyzed. Thus, remain with the client during the entire procedure.
• Explain the procedure to the client. After the client receives local anesthesia, the physician drills shallow holes into the sides of the client’s skull. Be aware that the physician will either shave the area around the tong insertion sites or instruct the nurse to shave a specific area. Warn the client that he or she may experience some pain during the drilling, although most clients feel pressure rather than severe pain. The noise from drilling is loud and may be frightening to the client.
BOX 77-2.
Types of Skin Traction
Buck’s Traction
One or both legs are wrapped with an elastic roller bandage or tape. Traction is applied with a weight attached to a spreader bar below the foot. A foam boot may also be used. The traction pull is toward the pulley at the bottom of the bed. Buck’s traction may be used temporarily to manage a hip, lower spine, or simple fracture, often before surgical repair (see Figure 77-4A).
Bryant’s Traction
Bryant’s traction is a variation of Buck’s traction often used for a child 2 years old and younger with unstable hip or femur fractures (see Figure 77-4B).
Cervical Halter Traction
Cervical halter traction is used for neck pain, neck strain, and whiplash.The pull of cervical skin traction should be felt as an upward pull on the back of the neck. A slight change in the level of the head of the bed is often the key to correct application of this type of traction. Because this is a form of skin traction, it cannot be used for prolonged periods. This type of traction is often used by the client at home with the client sitting in a chair (see Figure 77-4C).
Dunlop’s (Side-Arm) Traction
Generally used as temporary skin traction for stabilization of fracture before surgery, Dunlop’s skin traction is used for fractures of the upper arm and for shoulder dislocations. The client is supine with the arm positioned with weights at an angle of 90 degrees. Skin breakdown, especially over the elbow, and problems with neurovascular functions are common. Circulation, motion, and sensation (CMS) checks of the fingers and forearm are very important.
Russell’s Traction (Balanced Traction)
Downward pull, as in Buck’s traction, may be applied to the leg, but an additional overhead pulley system is incorporated into the traction apparatus, with the leg supported by a sling. The pull is up (toward the ceiling) and toward the foot of the bed. It is commonly used to reduce or realign femur fractures or to treat knee injuries. Because of the need for a greater weight and pull system, the use of Russell’s traction in adults is usually skeletal, not skin, traction. The nurse must be aware of possible damage behind the knee in the popliteal space due to the sling, which can cause pressure, swelling, and damage to nerves and blood vessels. CMS checks must be done as long as the client is in traction.
Pelvic Traction and Pelvic Sling Traction
Used in pelvic fractures to support separated bones, this traction may be applied by either a belt or a sling. The pelvic belt causes downward pull on the pelvis, whereas the pelvic sling supports the pelvis off the bed. With a pelvic belt, the upper rim of the belt should rest at the top of the iliac crest and not around the abdomen. This type of traction is used in treating a herniated intervertebral disk or a muscle spasm of the back. It is usually applied intermittently (on 2 hours, off 2 hours) while the client is awake. Weights on the traction are increased gradually As the name implies, a client in pelvic sling traction has the pelvic area elevated off the bed in a sling attached to weights. It may be used for an individual who has a fracture of the pelvis that has separated the pelvic bones.
• Once the physician inserts the tongs, pay attention to the insertion sites. Check the institution’s policies for routine care. Immediately report any signs of infection. Rationale: The tongs are in close proximity to the brain, and any infection could be fatal. Headache is a serious sign that could indicate encephalitis or osteomyelitis. Report a client’s headache immediately.
• If possible, place the client in an antidecubitus bed.
• Routinely check the client’s level of consciousness (LOC) and pupils (eye signs).
• Restlessness and boredom are common problems
FIGURE 77-5 · The client in a balanced suspension traction with a Thomas leg splint. The client uses the trapeze to help move vertically. It is important that the line of pull on the traction is maintained. Note that the weights hang freely at the head and foot of the bed.
FIGURE 77-6 · Methods of cervical skeletal traction. (A) Crutchfield tongs. (B) Halo device.
• Insertion site care, skin care, ROM exercises, and good nutrition are priority nursing considerations.
Halo Device. The halo device (Fig. 77-6B) is a form of external fixation device. A halo device consists of skeletal traction used for cervical fractures that is applied to the skull and allows the client to ambulate and perform self-care activities. The four pins holding the halo device in place penetrate the skull only a fraction of an inch. The tightness of the screws influences the amount of traction.
Nursing Alert The halo device comes with a wrench. Always tape the wrench to the halo device so that the device can be quickly removed in an emergency
Nurses may assist healthcare providers with applying halo devices. Explain to clients what will be done. Provide the healthcare provider with the halo, vest, special wrench and positioning plate, regular wrench, and Xylocaine. Follow Standard Precautions as well as sterile technique when indicated.
• Be prepared to place a client in a special bed or chair before the application of the halo device. Use caution not to change the alignment of the head or neck. Support the client’s head and neck on movement and during application. After the device is applied, help the client to sit up slowly. Rationale: The client may become dizzy or faint. Support the client in a sitting position while the physician adjusts the halo’s vertical bars.
• Give good skin care around the device and at the pin sites. Using a sterile cotton-tipped applicator, apply sterile hydrogen peroxide to the pins; rinse with sterile normal saline. Even though the insertion sites are small, watch for evidence of infection. Wear gloves.
• Administer analgesics, as ordered. Typically, the client may experience some mild discomfort. Immediately report pain that is not relieved by medications.
Nursing Alert Severe headache is a specific danger sign for the client wearing a halo device.
• Monitor the client for possible complaints of difficulty in swallowing, inability to open the mouth all the way, or persistent neck pain; report such findings immediately because they are signs that the vertical connecting bar is too long.
• Note if the client complains of not being able to see straight ahead, a sign that the apparatus is not straight. If any complications occur, a physician must readjust the apparatus.
• Provide emotional support. Always encourage clients to be as independent as possible. Inform them about community resources and support groups.
Clients will wear the halo device for about 10 to 12 weeks, during which time they or their families will become responsible for care. Teaching is vital (see In Practice: Educating the Client 77-3). Carefully document all teaching.
Caring for Clients in Traction
In Practice: Nursing Care Guidelines 77-3 highlights the basic principles for care of clients in traction.
IN PRACTICE” EDUCATING THE CLIENT 77-3
WEARING A HALO DEVICE
• Report the following danger signs immediately: severe headache, difficulty swallowing, inability to open mouth completely persistent neck pain.
• If the halo device loosens, do not try to tighten it. Report the situation to your healthcare provider
• Wash the skin under and around the vest. Conduct pin care as directed.
• Report the following signs of infection: fever drainage, redness, and warmth.
• Report any complaints from the client of not being able to see straight ahead.
• Never use the halo frame for lifting or turning.
IN PRACTICE :NURSING CARE GUIDELINES 77-3
CARING FOR CLIENTS IN TRACTION
• Follow the physician’s order for the exact amount of weight to use. Rationale: The ordered specific weight is designed as a main component of the traction and countertraction.
• Be sure the weights hang free; they must never rest on the bed or the floor Take care not to bump into the weights. Rationale: Releasing the pull defeats the purpose of traction.
• When adding weights or attaching traction, release the weights gradually onto the rope. Rationale: Suddenly adding weights causes an uncomfortable jerk and may disrupt alignment of the fracture.
• Never remove weights without an order Rationale: Traction usually is ordered to be continuous.
• If the footpiece is touching the pulleys at the bottom of the bed, report it at once. The client should be moved up in bed when this happens. Rationale: The footpiece touching the pulleys would negate the effects of traction.
• Inspect pulleys and ropes regularly. Rationale: The ropes can slip out of their grooves or become untied.
• Be certain to understand the physician’s orders completely regarding the client’s body positioning, that is, the degree to which the head of the bed may be elevated and to which side the client with a fracture may turn. Rationale: Prevent complications and maximize effects of the treatment.
• Do not use a pillow under an extremity in traction, unless specifically ordered by the physician. Rationale: Placement of the pillow might counteract the effects of the traction.
• Encourage the client to exercise the feet periodically and to keep the ankles in neutral position. Rationale: Make every effort to prevent footdrop, a deformity caused by nerve damage because the foot has been allowed to remain in an abnormal position.
• Maintain the client’s body alignment. Be sure to obtain specific guidelines from the physician before allowing the client to change position. Rationale: The ends of the bones must remain in good alignment to heal properly.
• Reposition frequently as needed. Rationale: The weight of the traction may tend to pull the client out of alignment.
• Guide the weights if the client is allowed to use a trapeze to slide up in bed. Rationale: This ensures that the weights hang freely and are not impeded when the client moves.
• Follow the physician’s orders for range-of-motion (ROM) exercises. If ROM is not ordered for the client, find out what kind of exercise or positioning is needed. Rationale: ROM exercises can minimize loss of muscle tissue caused by immobility, but the healthcare provider may not want certain muscle groups to have exercise until the bones are stabilized.
• Provide diversional activities. Rationale: Boredom and restlessness are common problems.
• Use the fracture bedpan. Rationale: This type of bedpan is easier to slip under the client’s hips than the large conventional pan.
• Maintain skin integrity. Be sure that the rubber strips, elastic roller bandage, or tape does not irritate the client’s skin. Clean, dry thoroughly, and gently massage the skin daily Rationale: The hazards of immobility related to being in traction can lead to skin breakdown in otherwise healthy areas. Traction and external fixation devices can become sources of skin irritants because of perspiration, shearing forces, or pressure.
• Apply lotion to the client’s elbows. Frequent skin care is required. Rationale: These measures prevent skin breakdown. If the elbows become irritated, apply elbow protectors.
• If the client has skeletal traction, give pin site care, as ordered. Wear gloves when caring for the client with skeletal traction. Rationale: Osteomyelitis, a serious bone infection, is very difficult to treat successfully once it has occurred and often results in severe, chronic pain. Prevention of bone infection is a nursing priority.
External Fixation
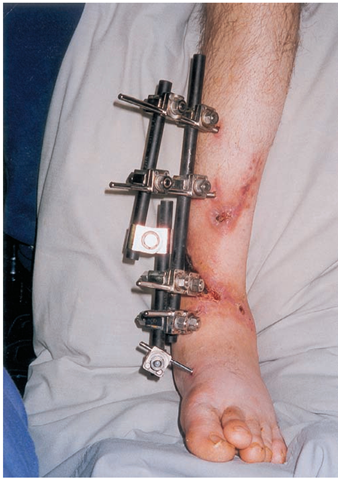
The external fixator is a device used to manage complex fractures that are associated either with soft tissue damage or open wounds in the fracture area. Rationale: Wounds associated with the injury can be observed closely for signs of infection because casting material is not covering them. A physician inserts multiple pins that protrude through the client’s skin into the bone fragments. The external fixation device is a metal frame on the outside of the body that holds the pins in place and maintains immobilization (Fig. 77-7). The healthcare provider adjusts the frame to maintain traction and to keep the fracture in proper alignment. This alignment must continue until the bone heals. Another advantage of external fixation devices is that they allow the client to be more mobile than if confined to a bed in traction, thus minimizing some hazards of immobility.
Nursing care is consistent with traditional care of a fracture and also includes care of the pin sites. The physician will order the type and frequency of pin care required. In general, use a sterile cotton-tipped applicator to apply sterile hydrogen peroxide. Rinse with sterile normal saline. If dressings are present, be sure to change them using sterile technique. Avoid the formation of scar tissue around the pin sites; thus, whenever giving pin care, put traction on the skin by slightly and gently pulling the skin away from the pin site. Wear sterile gloves.
Be alert for possible rejection—an adverse reaction to the nails, screws, or plates used. It can occur even though such materials are made of a special metal alloy that, in most cases, is non-irritating. The device itself needs to be cleaned with soap and water. Do not allow water to seep into the pin insertion sites.
Nursing Alert Never move a limb by grasping the frame of the external fixation device because you could disrupt the positioning of the healing fracture site.
Open Reduction and Internal Fixation
Surgery, called an open reduction and internal fixation (ORIF), is usually necessary if a client has a compound (open) fracture or if multiple bone fragments are present.
FIGURE 77-7 • Pins are inserted directly into the bones in this external fixation device used to realign broken bony parts.
With an open reduction, the surgeon makes an incision so that the injured or damaged area can be seen. After the wound is debrided (dead and damaged tissue removed) and irrigated with antibiotics, peroxide, normal saline, or other solutions, the surgeon looks at the bone fragments and determines exactly how to rejoin them. The fractured ends of the bone are placed in alignment (i.e., the fracture is “reduced”), which promotes bone healing. With internal fixation, the surgeon places a pin, wire, screw, plate, nail, or rod into or onto the bone to keep it reduced (properly aligned), immobilized, or both.
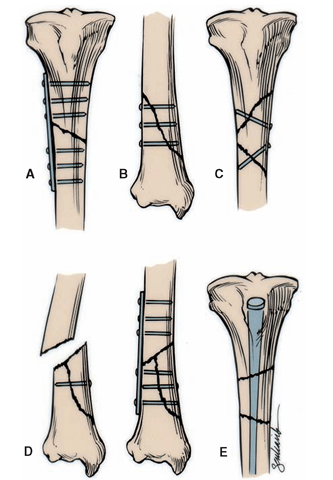
The ORIF is the treatment of choice for certain fractures in which casting is generally impossible (e.g., hip fracture) or if multiple fragments are impossible to realign. Internal fixation eliminates the need for traction. In addition, the client’s recovery is usually quicker (Fig. 77-8).
Internal fixation can be performed using various devices. It is used most frequently for fractures of the leg’s long bones, in which case the spike is called an intramedullary nail. Usually internal fixation is done if the client has more than one transverse fracture or if the client’s history includes fractures that do not align or heal easily with casting.
The surgeon may apply a metal plate with screws to the outside of the bone; such a device often must remain in place permanently. This procedure is usually performed when a bone is fractured in several places. Screws are sometimes inserted to hold the bone fragments in place without using a plate. Wires may be used to hold fragments of bone together.
FIGURE 77-8 · Types of internal fixation. (A) Plate and screws secure a transverse fracture. (B) Screws secure a long oblique fracture. (C) Screws secure a long butterfly fragment of bone. (D) Plates and screws secure a short butterfly fragment. (E) A medullary nail secures a segmental fracture of the femur
Although the client with internal fixation may have no visible form of immobilization, a fracture still exists that requires careful handling. Sometimes, internal fixation is combined with another form of immobilization, such as splinting or casting.
Nursing Alert Cients who have internal fixation devices must avoid future MRI studies because of the implanted metal.


