Clay, Sand, and Three-Dimensional Objects
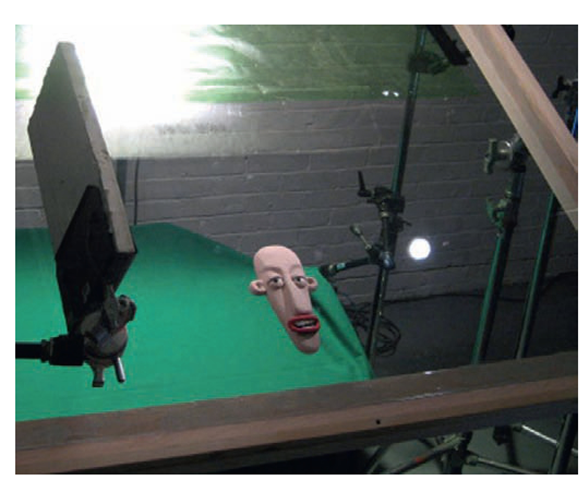
Downshooting refers only to the shooting setup. The objects or materials that can be animated are quite varied. This is limited only by the imagination of the animator or designer. Several mediums have been used successfully, and we touch on only a few. My own experience with downshooting primarily focuses on clay figurative subject matter. This is when characters are drawn and sculpted in plasticine (an oil-based clay that never hardens) in relief. This approach to clay animation has a stylized graphic quality that looks like a mixture between two- and three-dimensional animation. The great advantage to this technique is that no armatures or support structures are required to hold up the puppets. They lie on the glass and can move around anywhere in space without the constant struggle with gravity that is a part of most three-dimensional stop motion. It is necessary to fabricate replacement models if the figures need to turn in three-dimensional space.
FIG 7.7 a relief plasticine sculpture shot on a downshooter by Wonky Films.
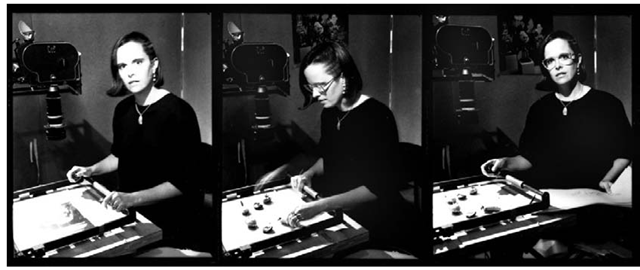
Academy Award winner Joan Gratz works with clay and oil on glass. She paints the plasticine with tools and her hands on the glass, and the images carry great detail and texture constantly metamorphosizing from one image to the next. She explains:
"One of the virtues of painting with plasticine clay is that it has tangible dimension and unlimited textures. It has that handmade quality because it is. Because I am painting and making changes to the same canvas, the images seamlessly flow into each other"
FIG 7.8 An image sequence from the Academy Award-winning Joan Gratz "clay-painting" film.
Sand is a very flexible medium to animate on glass. This can be lighted from the bottom or top or both, depending on the effect desired. Many animators use sand to block out bottom lighting. The sand is brushed and stroked with tools or by hand on the glass surface. The thinner the layer of sand, the more light can penetrate the sand, giving edges a feathered look. The more dense the sand, the more opaque and black the image appears. Caroline Leaf describes her approach to sand animation:
"It is very important to me to show the texture of the material I am working with. For sand animation, the lighting is adjusted so that a suggestion of the pile of sand within and forming the silhouette of the drawn figure is visible. I want the audience to know sand, but sandiness doesn’t dominate the storytelling. Likewise with wet paint, I make sure that my finger-pushing movements show so that everyone knows that it’s paint."
It is important to use darker sand if you are trying to achieve a silhouette effect. Some white sands pick up the slightest bit of light, which can reveal the effect. On the other hand, you may want to see some of the sand and show its texture, as Caroline Leaf suggests. It is important to test these effects before committing to an approach. The shooting surface needs to be more horizontal when shooting sand because it sits unattached to the glass and can easily drift down the table due to our old friend, gravity. Plasticine has a bit more adhesion to the glass and the shooting surface can be tilted up to a 45° angle. The great advantage of this is that it is easier on the animator’s body. Craning over a horizontal table all day long to see and manipulate the artwork can be much more demanding than sitting and seeing the artwork because it is tilted up for better viewing and access.
Shooting objects under a downshooter has its own challenges. The objects that can be used are limitless. I have seen coffee beans, candy, Barbie dolls, hair, coconut shells, pencils, and so forth. The only restriction is the size of the object and whether the object needs additional support beyond the surface of the glass. These various objects have more flexibility with lighting, as mentioned earlier. It is important to light for the dimension and form of these objects. The higher off the glass the object is, the more possibility there is of a reflection falling from that object back onto the glass. One solution is to polarize the lights and the camera lens. These filters and gels can be found at any decent photography or film store. The polarized filters reduce the reflection but do not always totally eliminate the problem. Polarizing lights and lenses also increase the contrast of the image, which is not always desirable. The background plane also plays a role in how much attention you pay to reflections and smudges on the glass. When you shoot a green screen backdrop, dirt and reflections are less of an issue, because you eventually eliminate them in the keying process. The only potential problem with these smudges and fingerprints can come when they intersect the contour of the object to be keyed. We discuss the role of backgrounds shortly.
Cutouts
The most popular largest technique in downshooting is cutouts. This area could warrant a topic on its own because of its deep history and varied applications. The cutouts can be original illustrated artwork, photographic in nature, figurative, or abstract. The technique is fairly direct and inexpensive, so early on in filmmaking, designers, directors, and animators explored the form. We mentioned Lotte Reiniger, whose 1926 The Adventures of Prince Achmed was the first cutout feature animated film ever made. Countless other cutout animated films were made in many countries around the world. This technique was utilized because it was direct and inexpensive in approach. This includes the 1983 film Twice upon a Time by American directors John Korty and Charles Swenson.
Most cutouts are animated on a traditional animation stand or a custom downshooting stand, but we will discuss some other approaches as well.
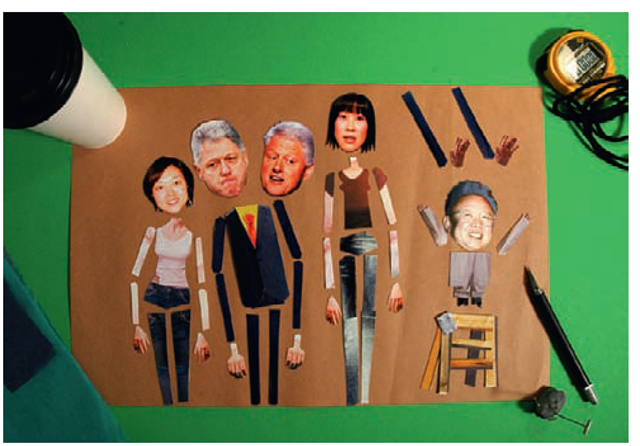
The majority of cutout films tend to be on the figurative side, with a certain narrative involved. This is because images can be drawn or cut out of magazines and pieced together in a collage technique. Reiniger used cutouts with a backlit approach, creating very detailed silhouettes. But more contemporary artists, like Terry Gilliam from Monty Python’s Flying Circus and Evan Spiridellis, one of the founders of the successful Internet entertainment company JibJab, use top-lighted original artwork and photographic images. Figurative images are cut apart appendage by appendage (legs, arms, heads, etc.) and reassembled under the camera with the ability to be manipulated frame by frame. Finally, Yuri Norstein’s Hedgehog in the Fog is an example of an elaborate and beautifully executed use of this technique.
FIG 7.9 Cutout body parts from "2009 Year in Review" from JibJab.
Animating these small pieces of card, plastic, or paper can be delicate work under the camera. There are so many free-floating parts that can be bumped or accidentally moved. Various techniques are practiced to gain a little control in this form of animation. The two issues are stabilization of the cutouts on the shooting (glass) surface and the movement of appendages like arms and legs and their consistent relationship to each other. The issue of cutout stability on the glass shooting surface can be addressed by the weight of the paper, plastic, or card being used. The heavier the drawn or clipped image, the more it stays put on the glass. Tacking down the heavier paper with tape or wax can make a huge difference. Lotte Reiniger used thin lead sheets with her silhouette cutouts. I am not suggesting this approach, but thinner paper can be mounted on Bristol card or lightweight board, which helps the image from being easily brushed aside. Artists even use double-stick tape or small pieces of sticky wax under the cutout. The glass releases the adhesion of the tape or wax quite easily but residue may remain on the glass. The animator has to be vigilant about these cutout footprints, cleaning them up during the shooting process when necessary. Many cutout artists use a tacky material called Blu-Tack that leaves less residue.
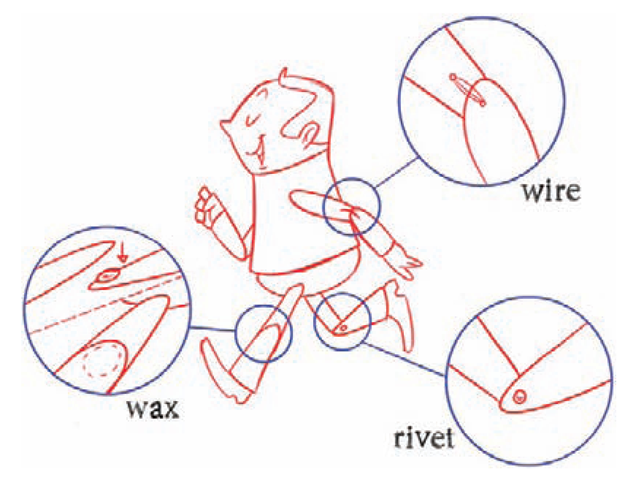
The second challenge with cutouts, especially cutouts that are figurative in nature, is the consistent relationship of one cutout to the next. For example, if you create a cutout character that walks, the relationship of the legs to the hip have to be jointed or pivoted from the same point for each movement or frame. Hinging these elements together is the solution for this kind of relationship. There are many different approaches to hinging cutouts. The most effective approach is to purchase a hand rivet set. The rivets are slightly visible and so must be integrated into the design of the animation. Another approach that is a bit less intrusive is to use small holes in the cutouts and hold the cutouts together with very thin wire strung between the holes. The last technique is the use of sticky microcrystalline wax between the cutouts. This technique requires a little more scrutiny on the animator’s part, because the pivot point can drift over several moves, but this technique is quick and less visually intrusive. Blu-Tack can be used in place of the wax. Many times, cutout artists tack down only larger cutout sections of the body like the torso and leave the arms untacked so they can be easily moved. Usually, the head and arms move a fair amount compared to the torso, so this approach makes the animation go faster, although it does require a delicate touch. This last tack-down technique of hinging has the added benefit of allowing the animator to incorporate the classic "squash-and-stretch" animation technique to the character. Since the cutout puppet has no fixed positions for hinging, the animator can compress and stretch the placement of the various parts, making the animation a little more dynamic.
FIG 7.10 three versions of cutout hinging (rivets, wire, and wax).
There are many more techniques for gaining control and hinging cutouts. It all depends on your ability to work at the animation stand, how patient you are, and your style of work and animation. As Evan Spiridellis puts it,
"For cut paper animation, we don’t use any hinges. It’s a bit more frustrating and time consuming to work this way but it allows a lot more flexibility in the poses and keeps the animators from tightening up. If we are working with paper puppets we’ll use anything we can twist into a circle as a hinge. Sometimes it’s wire, sometimes it’s a paperclip. It’s typically whatever is lying closest on the desk"
A final piece of advice from director and animator Terry Gilliam regarding cutouts:
"The most important equipment was a sharp scalpel" and "Make sure you blacken the edges" of the cutouts.
Cutouts can be shot vertically as opposed to in a downshooting mode.
Pictures can be mounted on glass or mounted sliders that hold the cardboard-backed cutouts upright. The camera is mounted on a tripod in this case.
The lighting arrangement is a little more flexible, and tracking the cutouts becomes very manageable. Jim Blashfield, a comtemporary independent artist and American Animation Master from Portland, Oregon, was a pioneer in this area. Here he describes his approach to a music video he directed, And She Was, for Dave Byrne and the Talking Heads in 1986. The music video was produced for Jim Blashfield by Melissa Marsland.
"All scenes were animated to the frame-by-frame log we had made of the song. That log was the backbone to the video, whether scenes were preplanned or improvised. Also central were the boxes of color Xeroxes that resulted from our guerrilla photo shoots all over Portland. We drove around looking for garage sales, secondhand stores, interesting neighborhoody things, and photographing them on site, along with personal items that seemed to fit in: a mailbox that looked just the right way, etc. For one overhead scene, Don [Merkt] sent Melissa [Marsland] off to snatch a couple of pairs of my underwear from our house, the patterns of which appeared floating across the scene. We chose ordinary things that either we thought would be amusing, or/and which seemed to have embedded metaphorical power, or which we otherwise thought should be honored for their long and unappreciated contribution to our lives. Spatula, reclining chair, purse, party hat—icons from the less appreciated heights of our culture. We also carefully photographed our pixilated moving leg sequences, and others, one frame at a time, onto color slides, and these were cut out by a herd of our friends with Xacto knives, and put into the boxes in folders. The live action of David singing was 16 mm footage which we shot in Dallas in our very minimal live-action shoot— camera balanced on some videotape boxes in David’s office in the back of an old house they were renting—which we then turned into paper prints at the Portland State Library microfiche department.
We rented two 35 mm Mitchell animation cameras, which we mounted on homemade animation stands made from 4 x 4 lumber, plastic gutters, threaded rods, conveniently sized 8 x 10 glass plucked from picture frames from a local store and hinged with duct tape, etc. Looking around for someone who shared our aesthetic to go off and shoot slide sequences of the other band members, who were scattered around elsewhere, we found that our friend (like us, usually underemployed) Gus Van Sant was willing to hop on a plane and returned a few days later with more slides for the Xerox machine. Many others, most of whom went on to work in our next videos, participated in the making of this video. We had 28 days from the day we got the go ahead until it appeared on MTV. We had no idea of the huge impact it would have. There was no significant postproduction in And She Was—maybe an hour to clean up something or other. It was all shot under the camera, images stacked up in layers, one frame at a time. All the lateral ‘pan’ effects were done either on threaded rod with runners attached or on repurposed slide rules, as I had done with Suspicious Circumstance’.’
FIG 7.11 (Clockwise from top left) Jim Blashfield directs the single frame animation of the protagonist’s levitating legs in Talking Heads’ And She Was music video; a trophy, soon to be surrounded by party hats and bowling balls, awaits frame-by-frame rotation on one of the many improvised animation rigs used in the production of And She Was; a cutter, X-Acto knife in hand, separates one of hundreds of color Xerox images from its background for later registration and re-animation onto 35 mm movie film; producer Melissa Marsland advances the hinged wings of the "flying 2 x 4" as it is animated onto color slide film for later Xeroxing.
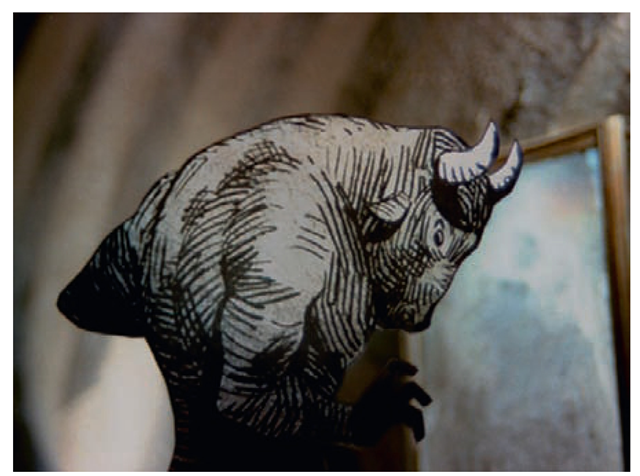
Another independent director and animator from the Boston area, Daniel Sousa, also works in this vertical multiplane frame-by-frame technique. His 1998 film Minotaur is an example of this approach. Here is how Dan describes his process:
"Most of the character animation was originally hand-drawn on a light table, cut out, and mounted on rigid cardboard. This was done so that each replacement could stand up vertically within a three-dimensional set. The set was then lit with fiber-optic lights and shot in stop-motion, using a 16 mm Bolex camera. Some of the animation was done as hinged cutout puppets on glass, using a multiplane rig."
FIG 7.12 a still from Daniel Sousa’s 1998 film Minotaur.
Backgrounds
The final subject to cover is the background or bottom shooting planes on a downshooter. There have been downshooters and traditional animation stands with many more than two shooting planes. The same issue of shadows cast on one plane from the object on the shooting plane above it still exists. This means that multiplane downshooters need to be pretty tall and are often cumbersome to operate. Depth of field becomes an issue with multiple planes. As a result, the lights need to be brighter, so a deep depth of field can be achieved on a lens like f-22. Most stands use two planes with dimensional objects stacked on top of each other on the top shooting plane. Many times, three-dimensional objects, like candy, coffee beans, or a sculpture, are shot on top of a green screen or chroma background, which allows the object to be pulled off that background inpostproduction. The object may be composited onto another image later with proper planning. The downshooter is ideal for green screen work because
• The image on the top plane usually gets very little green spill light from the layer below. (This is the light that reflects back up onto the model from below and tints the edges of that model, making it hard to pull a clean chroma matte in postproduction.)
• There are no shadows on the lower level from the object. (This is because your lights have been set to prevent shadows from top plane objects from falling on the lower plane background.)
• The lower level is lighted evenly, which is perfect for pulling the matte in postproduction. (Evenly lit chroma-key green background layers are easier to matte out in postproduction)
Practical backgrounds on the lower shooting plane of color, illustration, light, or any other form are equally effective with the downshooter.
When I shot The Insideout Boy for Nickelodeon and the Penny Cartoon for the CBS television series Pee Wee’s Playhouse, the figures were made out of plasticine on the top plane but the backgrounds on the lower plane were either cutout paper or pastel drawings. The lighting can be altered below to create any kind of atmosphere, but cutouts and slightly elevated objects or paper on the background have immediate shadows that are cast directly down on that plane under the artwork. Cutout artwork on the background layer should be glued down to avoid shadows. The shadows distract from the crisp, graphic, refined edges of the artwork and diminish the quality of the overall picture, so they must be addressed. If you want to have animated backgrounds, then consider drawing them or shooting the background animation on a second sheet of glass with color on a level below that. Joanna Priestly, another successful independent artist and animator from Portland, Oregon, describes her setup:
"I shot Surface Dive on my homemade, multiplane animation stand to add depth to the compositions. I had the replacement sculptures on the top level, a huge variety of clear glass pieces on the middle level, and large, animated pastel drawings on the bottom level."
Many practitioners of these art forms are working across the globe. Independent filmmakers often still utilize these techniques because they are affordable, conceptually appropriate to their style, and stand out in today’s computer-driven industry. Programs like After Effects and Flash have been mastered to elicit a very refined cutout style with more control and efficiency. The "photo puppetry," drawn two-dimensional computer and composite approach of these programs have dominated this form of animation for over a decade in the commercial world, but there are still many "holdouts" who like to dabble in the "old school" approach to cutouts, like Evan Spiridellis and his team at JibJab.
FIG 7.13 Joanna priestly shooting Candyjam with pieces of candy placed on a glass plate over a drawing.
FIG 7.14 A shot of animator Kevin Elam at JibJab on their custom downshooter.
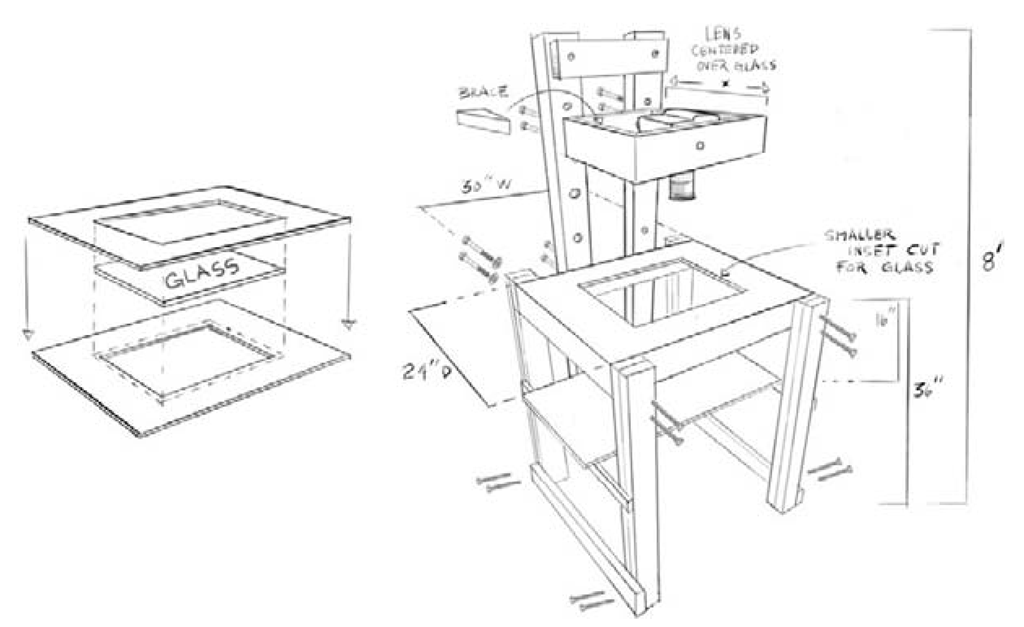
As you can see, there are many different ways to build or cobble together a downshooter stand, and many artists put together their own version of this piece of equipment. Many years ago, when I was working for Art Clokey, the creator of Gumby, my partner and I took on a job in the evenings. The "clay-on-glass" technique was required, and I had to put together a stand for this night-owl production. Figure 7.15 shows the final stand I put together. It is very rudimentary in construction but solid and still operating 24 years later.
FIG 7.15 A diagram of a rudimentary 2" x 4" downshooter stand.
It was inexpensive to build because I used 2" x 4" pine lumber, 5" long x 5λ" diameter carriage bolts, two 30" x 24" plywood quarter sheets, and a piece of glass. The bolts allow you to take this stand apart, so it can be moved or adjusted. At the time, I was shooting with a 16 mm Bolex camera, but these days the camera mount holds a Canon dslr with a zoom lens. There are better designs for a downshooter stand, and there are adjustments that can be made to this stand to improve it (like mounting a simple track on the back column that would hold a camera and allow for tracking zooms), but this simple stand will suit most of your needs in the downshooting realm. Good luck with your downshooting. It can be a lot of fun!
