This final exercise combines several elements explored in the topic. It has a camera move, human pixilation, downshooting elements, and some composite work. One more challenge that I incorporate in this exercise is the requirement to shoot outside. Not only do you shoot outside, but it will be important to shoot each frame at an even interval so that any shadow and light play throughout the composition moves in an even fashion. The inspiration for this exercise comes from the great designer and animator Tex Avery.
The camera approaches a young man sitting on a bench outside. The subject looks left and right (in pixilation) and suddenly stops turning and looks directly at someone offscreen. The camera cuts to a close-up of a girl batting her eyes at the young man. The film cuts back to a close-up of the young man. He blinks his eyes and vibrating paper hearts grow out of his eyes. His ears blow steam (cotton) and then the young man starts to get up, heading frame left. The couple glide together and spin around each other and glide away from camera into the sunset leaving a trail of hearts (if you can time this right).
I recommend that you shoot the pixilation of the couple first, then go into the studio and create and shoot the hearts and cotton steam on a downshooter with a green screen. For the exterior pixilation work, you need a dslr camera on a tripod with a 24-mm lens. The wider lens gives the shot a sense of drama. This is another situation where it would be nice to have a laptop with a program like Dragon Stop Motion or Stop Motion Pro for capturing the frames and for frame comparison and registration. Having an assistant that carries the laptop makes your life easier. If you cannot get a hold of a laptop, then you have to shoot on a flash card and use practical means of registration, like you did in Exercise 1. This means lining up your subject through the viewfinder. Remember that some cameras have a grid-focusing screen for the viewfinder, if this helps you register your subject. This is not a necessary component to help you locate your subject within the frame.
FIG 7.A The setup for the man on the bench and the camera on a tripod.
Line up your young man on the bench with your camera and shoot a 30-frame hold. Pick up your camera and tripod, and ever so slightly move it forward toward the man on the bench. You are easing in on the move toward your subject. Increase your moves forward while trying to keep your subject centered in the frame. You should shoot at 30 fps, because camera moves are always best shot in single frames. This will take some of the strobing out of the move and make it smoother. Remember to ease out your camera move as you approach your subject, keeping him lined up in the center of the frame. It might be best to frame your subject for composition before you start shooting, then move your camera back to find the beginning position. This way you know exactly where you are going before you start.
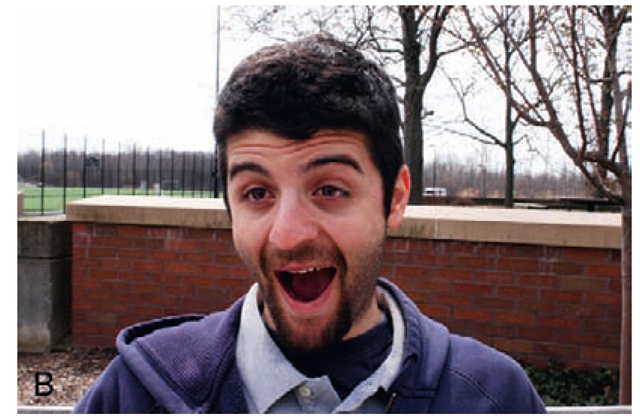
FIG 7.B The composition of the close-up of the young man on the bench.
Have your young man look frame left then frame right. Do not rush this movement, allowing about 2 seconds for each direction. You can shoot two frames for every movement at this point. Finally, have your subject look slightly to the left of center frame and try to animate him in a "double take."This incorporates a head bob and some blinking. On a second blink, hold his eyes open for 20 frames. This is where you composite the hearts in later. Then, have him blink again (wiping away the hearts). Continue to hold this position for an additional 2 seconds. This is the place that you composite in the cotton steam in postproduction.
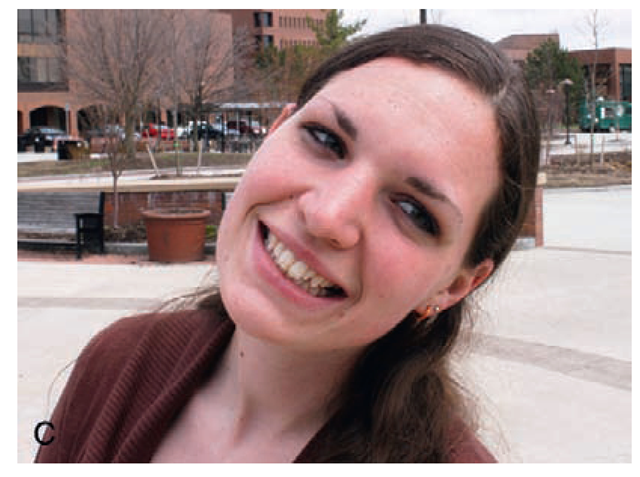
Fig 7.c The close-up shot of the girl.
Then, get a close-up shot of the girl. The girl should be on screen for about 3 seconds. She can look rather coy and blink several times. Remember to keep the action exaggerated for dramatic effect.
Cut back to the same close-up of the young man. He should smile and start to get up from the bench. This should be animated at the end of the first shot and can be edited later on. The next shot is a wide shot of the boy approaching the girl. He can slide on one foot (after all, he is in love). Frame-by-frame walking takes too long and breaks the flow of the piece. They should embrace and start to spin in a circle. This can be done at an accelerated pace to add a little dynamic to the scene. You could try having the couple lift their feet off the ground by jumping during the camera exposure when they are in the accelerated spin. This spin is an area to be creative and have fun.
Fig 7.D An example of the wide shot of the couple and the spin.
Finally, the couple should quickly stop the spin, holding hands side by side. Each person lifts one foot and glides away from the camera and toward the sunset (if you have planned your shoot at the right time of day and in the right weather conditions—a sunny day). A trail of hearts is left behind as the couple recede in the distance. These can be the same hearts that you used for the young man’s eyes. It is important to remember that each exposure should be shot at an even interval of time, so the shadows and light move evenly throughout each shot. You can achieve this by putting your camera on a time-lapse setting and using a remote cable with a time-lapse option or using a connected laptop with capture software. I guess that an interval of about 30 seconds would give you enough time to arrange everything between shots.
FIG 7.E The final composition of the couple gliding away.
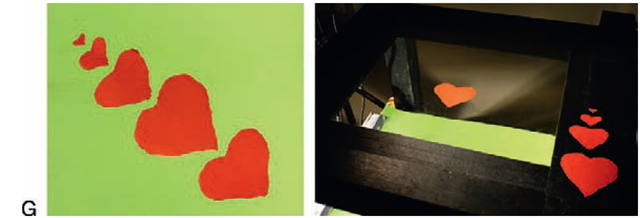
Now it is time to head to the downshooting stand. If you do not have a stand, then all you need is a piece of glass and a sheet of green screen material. You must find a way to mount the glass at a distance from the green screen board and light both evenly. You should have a series of five hearts that grow from nothing. These can be cut out from red paper. The fourth heart is your main heart. The fifth heart is bigger than your main, number 4 heart, and you get a slight stretch-and-squash effect by using this sequence. So your shooting sequence is heart 1, 2, 3, 5, 4.
FIG 7.F Hearts and steam in the final product.
Shoot the hearts once on the stand from nothing to heart 1, 2, 3, 5, 4. Hold heart number 4 and slightly move it to give it a subtle vibration for 20 frames.
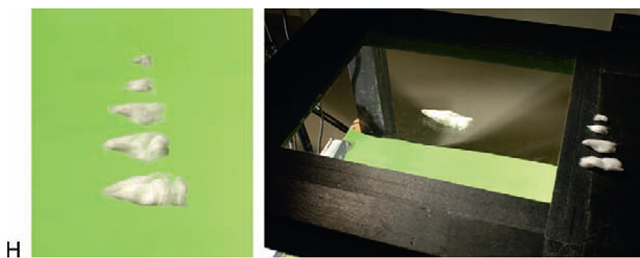
The next step is to take some cotton (cotton balls from the drug store will work) and fabricate a series of five growing cone-shaped cotton steam shoots.
FIG 7.G A series of hearts to be used in the young man’s eyes and over the final shot of the couple gliding away.
This series gets shot once, starting with cotton 1, 2, 3, 4, and finally cotton 5. Hold on cotton 5 for 20 frames, slightly moving it frame by frame so it vibrates. Try to keep the cotton from having too many see-through areas so it does not become too difficult to pull off the green screen in postproduction. You should consider using a despill filter in After Effects when you pull the cotton off the green screen background. You can also change the cotton color option to black and white to get rid of any green spill on the cotton edges.
Now you are ready to go into composite and edit. The first step is to remove the hearts and the cotton steam shoots from the green screen backgrounds. For the sake of brevity, I refer you to Chapter 10 in the exercise with the flying saucer in After Effects that Jeff Sias described. You need to get the hearts and the cotton shoots onto an alpha channel, so they can be matched up and scaled to the pixilation footage. Placing the hearts in the young man’s eyes requires some placement transforming (moving the heart around in the close-up shot of the young man), scaling, and possibly some color correction or opacity adjustments. Once the young man opens his eyes, then start growing hearts. When he closes his eyes, you can reduce the heart series, quickly making sure that the heart looks like it stays behind the eyelid. Then, as the young man continues to look offscreen in that first shot, start the cotton steam effect and let it cycle in the vibration mode. Reverse the cotton growth, then cut to the close-up of the girl. You might reduce the opacity of the cotton layer to help make it look a little more like steam.
FIG 7.H Two shots of the cotton replacements used as a steam effect coming out of the young man’s ears.
Once this is complete, you need to go to the final shot of the couple gliding away. This is where a trail of hearts is left behind them as they exit from the camera. These hearts can be the same cycle that you used in the eyes repeated randomly around the frame. They can be scaled and duplicated five or six times. Each heart can grow on and either reverse the growth at the end or dissolve off. This can be done in After Effects or even Photoshop on a frame-by-frame basis. Think about an appropriate sound track. It could add great value to the exercise.
If the camera move at the beginning is too rough for your taste, then you may apply some stabilizing tracking by slightly blowing up the frames and finding some tracking points to lock onto to smooth out the track-in. Once this is complete, the shots need to be exported from After Effects and brought into Final Cut or a comparable editing program. Make your edits (cutting on the action of the young man getting up from the bench). You might consider a fade-up in the beginning and a fade-out at the end. There are many variations that you can make to this exercise. It is just a kicking-off spot for you to consider when trying to mix and match techniques in a unified film. Have fun with Love at First Sight!


