In This Chapter
Exploring picture playback functions
Deciphering the picture information displays
Deleting bad pictures and protecting great ones
Using the monitor as viewfinder in Live View mode
Recording and editing digital movies
Without question, my favorite thing about digital photography is being able to view my pictures on the camera monitor the instant after I shoot them. No more guessing whether I captured the image I wanted or I need to try again, as in the film era. And no more wasting money on developing and printing pictures that stink.
Of course, with the D300s, you can use the monitor not only to review your photos, but also to preview them. That is, if you turn on Live View shooting, you can use the monitor instead of the viewfinder to compose your shots. And not just for still pictures: You can record short digital movies, too, complete with sound.

Because all these functions involve some of the same buttons, bells, and whistles, I cover them together in this chapter. In addition, this chapter explains how to hide or delete pictures that you don’t like and protect the ones you
love from accidental erasure. (Be sure to also visit Chapter 9, which covers some additional ways to view your images, including how to create slide shows and display your photos and movies on a television screen.)
Customizing Basic Playback Options
You can control many aspects of picture playback on the D300s. Later sections show you how to choose what type of data appears with your pictures, how to display multiple images at a time, and how to magnify an image for a close-up look. But first, the next few sections explain options that affect overall playback performance, including how long your pictures appear onscreen, how they’re oriented on the monitor, and what functions you can perform with the Multi Selector.
Adjusting playback timing
You can adjust the length of time the camera displays your images on the monitor as follows:
Adjust the timing of automatic playback shutoff. After you press the Playback button to begin reviewing your pictures, the monitor turns off automatically if 10 seconds go by without any further button presses. I find that playback time maddeningly brief when I’m trying to study a picture. Fortunately, you can adjust the shutoff timing through the Monitor Off Delay option, found in the Timers/AE Lock section of the Custom Setting menu and shown on the left in Figure 4-1. Choose Playback, as shown on the right, to access the timing options, which range from four seconds to 10 minutes. (If you’re powering the camera with the optional AC adapter, the monitor shutdown occurs at the 10-minute mark regardless of any settings you select from the Monitor Off Delay menu.)
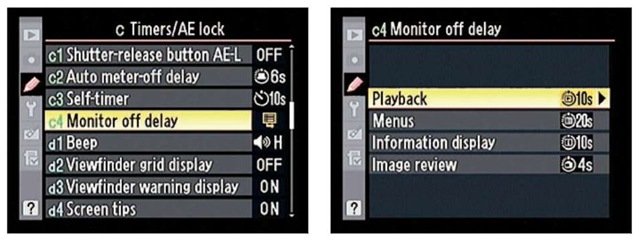
Figure 4-1: You can control how long pictures are displayed before automatic monitor shutdown occurs.
Enable instant review. You can tell the camera to display each image for a quick review immediately after you shoot it. Because any monitor use is a strain on battery power, this feature is disabled by default; you enable it through the Image Review option on the Playback menu, shown in Figure 4-2.
Adjust the length of the instant-review period. By default, the instant-review period lasts four seconds, but you can adjust this timing through the Monitor
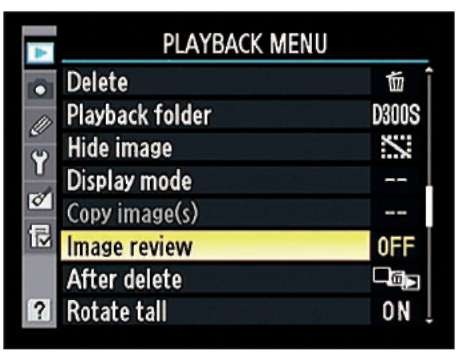
Figure 4-2: Head for the Playback menu to enable or disable instant review.
Off Delay option shown in Figure 4-1 as well. Just choose Image Review instead of Playback when you get to the right screen in the figure. Again, settings range from four seconds to ten minutes.
Enabling automatic picture rotation
When you take a picture, the camera can record the image orientation — whether you held the camera normally, creating a horizontally oriented image, or turned the camera on its side to shoot a vertically oriented photo. This bit of data is simply added into the picture file.
During playback, the camera can then read the data and automatically rotate the image so that it appears in the upright position, as shown on the left in Figure 4-3. The image is also automatically rotated when you view it in Nikon ViewNX, Capture NX 2, and some other photo programs that can interpret the data.
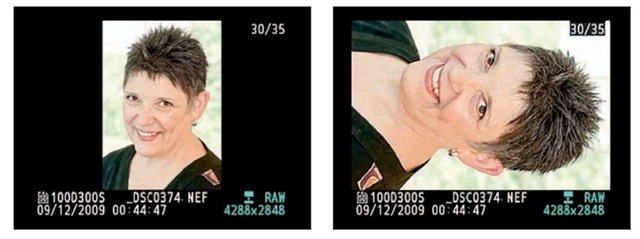
Figure 4-3: You can display vertically oriented pictures in their upright position (left) or sideways (right).
Official photo lingo uses the term portrait orientation to refer to vertically oriented pictures and landscape orientation to refer to horizontally oriented pictures.
On the D300s, you set up your rotation wishes through the following two menu options, both shown in Figure 4-4:
Auto Image Rotation: This option, on the Setup menu, determines whether the orientation data is included in the picture file. The default setting is On; select Off to leave the data out.
Rotate Tall: Found on the Playback menu, this option controls whether the camera pays attention to the orientation data. The default setting is Off. Select On, as shown in the figure, if you want the camera to rotate the image during playback.
Note that regardless of these settings, your pictures aren’t rotated during the instant review period. Also, be aware that shooting with the lens pointing directly up or down sometimes confuses the camera, causing it to record the wrong data in the file.
Customizing the Multi Selector’s role during playback
At the camera’s default settings, the Multi Selector performs these functions after you press the Playback button to view your pictures:
Pressing right or left scrolls from one picture to the next.
Pressing up or down changes the Information display mode, which controls what shooting data appears with the image.
Pressing the center button toggles the display from showing a single image to thumbnail views of multiple photos.
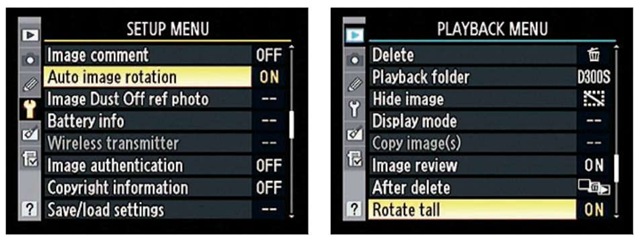
Figure 4-4: Visit the Setup and Playback menus to enable or disable image rotation.
The rest of this chapter assumes that you stick with these defaults. But you do have the option of customizing the Multi Selector’s role through the Custom Setting menu. Choose Controls, as shown on the left in Figure 4-5, and then press OK to display the right screen. You can then customize the playback functions as follows:
Swap the right/left and up/down functions. Want to scroll through pictures by pressing up and down instead of left and right? You can accomplish this by setting the Photo Info/Playback option, highlighted on the right in Figure 4-5, to On. You then change the Information display mode by pressing right/left.
Change the function of the center button. To choose the role of the center button, use the Multi Selector Center Button option (the Custom Setting menu item two steps above the Photo Info/Playback option). After you choose that menu item and press OK, you see the left screen in Figure 4-6. Highlight Playback Mode and press OK to get to the right screen, where you can assign the button function.
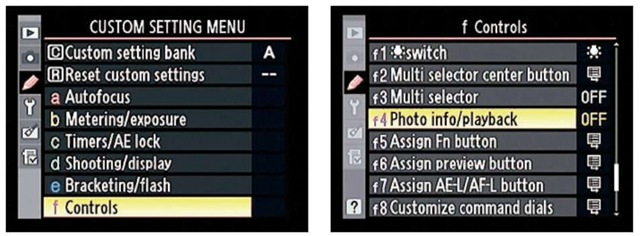
Figure 4-5: Use the Photo Info/Playback option to control the functions of the left/right and up/down buttons.

Figure 4-6: This option sets the playback purpose of the center button.
Here’s what pressing the button does at each setting:
• Thumbnail On/Off: Toggles between thumbnails display to single-picture display (the default setting).
• View Histograms: Temporarily overlays a histogram over your image. See the upcoming section “RGB Histogram mode” for a look at this feature, which is my preferred use of the button.
• Zoom On/Off: Displays a magnified view of the photo that is automatically centered on the focus point you used when taking the shot. You also can magnify a photo by pressing the Zoom In button, as explained in the later section “Zooming in for a closer view.” But if you want to use the Multi Selector button for this purpose, highlight Zoom On/Off and then press the Multi Selector right to display a screen where you set the magnification level (low, medium, or high) of the zoomed view.
• Choose Slot and Folder: Displays a screen where you can select a memory card and folder to view. Again, you can accomplish the same thing in other ways; see the next section as well as see “Viewing multiple images at a time” for details.
You also can change the role that the center button plays during shooting; Chapter 10 has details on those options.
Viewing Images in Playback Mode
To review your photos, take these steps:
1. Select the image folder you want to view.
Your D300s organizes pictures automatically into folders that are assigned generic names: 100D300s, 101D300s, and so on. You can see the name of the current folder by looking at the Active Folder option on the Shooting menu. (The default folder name appears as just 100 on the menu.) You also can create custom folders through a process outlined in Chapter 10.
To choose the folder you want to view, open the Playback menu and select the Playback Folder option, as shown on the left in Figure 4-7, to access these three options:
• D300s (default setting): Displays all pictures shot with your camera, regardless of their folder location. If you’re using two memory cards, pictures on both cards are displayed.
• All: Displays all pictures in all folders, even those taken with other cameras (as long as they are in a format the camera can display — JPEG, TIFF, or NEF). Again, pictures from both memory cards are displayed.
• Current: Displays images contained in the active folder only. The camera looks to the Active Folder option on the Shooting menu to determine which folder’s photos to display.
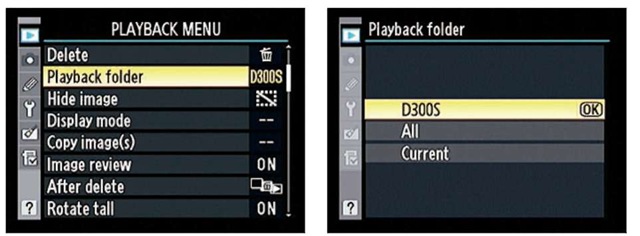
Figure 4-7: Specify which folder you want to view through this option.
2. Press the Playback button, labeled in Figure 4-8.
The monitor displays the last picture you took, along with some picture data, such as the frame number of the photo and the memory card that holds the photo, as shown in the figure. To find out how to interpret the picture information and specify what data you want to see, see the upcoming section “Viewing Picture Data.”
3. To scroll through your pictures, press the Multi Selector right or left.
This assumes the default settings are used for the playback functions of the Multi Selector, as explained in the preceding section.
4. To return to picture-taking mode, press the Playback button again or press the shutter button halfway and then release it.
These steps assume that the camera is currently set to display a single photo at a time, as shown in Figure 4-8. You can also display multiple images at a time, as explained next.
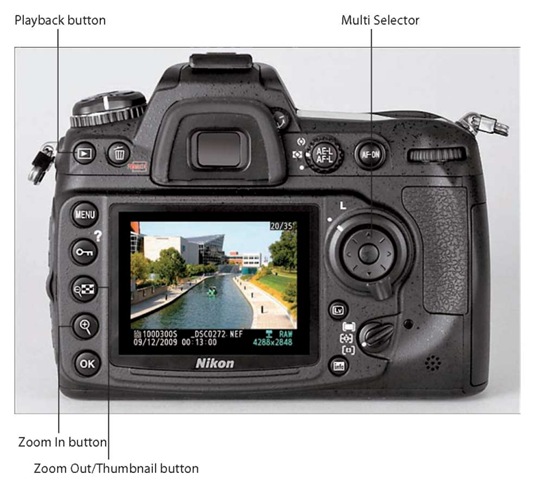
Figure 4-8: Use these controls to navigate through your photos.
Viewing multiple images at a time
Along with viewing images one at a time, you can choose to display 4, 9, or 72 thumbnails, as shown in Figure 4-9. Use these techniques to change to thumbnails view and navigate your photos:
Display thumbnails. Press the Zoom Out button once to cycle from single-picture view to 4-thumbnail view, press again to shift to 9-picture view, and press once more to bring up those itty-bitty thumbnails featured in 72-image view.
Display fewer thumbnails. Press the Zoom In button. Again, your first press takes you from 72 thumbnails to 9, your second press to 4 thumbnails, and your third press returns you to single-image view.
Jump from any thumbnail display to full-frame view. Press the OK button.

Figure 4-9: You can view 4, 9, or 72 thumbnails at once.
Toggle between thumbnails view and full-frame view. By default, the center button of the Multi Selector performs this function. However, you can set the button to perform another function during picture playback, as explained in the earlier section “Customizing the Multi Selector’s role during playback.”
Scroll the display. Press the Multi Selector up and down to scroll to the next or previous screen of thumbnails. Again, this assumes the default setup for the Multi Selector’s playback functions.
If you’re using dual memory cards, you can tell which card contains the picture you’re viewing in the thumbnails display by looking at the card icons, labeled in Figure 4-9. The icon for the current card is yellow. Note that the location of the icons depends on how many thumbnails you’re viewing. In the 72-thumbnail view, they’re in the lower-left corner.
Select an image. To perform certain playback functions, such as deleting a photo or protecting it, you first need to select an image. A yellow box surrounds the currently selected image, as shown in Figure 4-9. To select a different image, use the Multi Selector to move the highlight box over the image.
Jump to the first picture in a folder. After you bring up the 72-thumbnail display, you can press the Zoom Out button one more time to display the screen shown in Figure 4-10. From there, you can select a memory card, press OK, and then select a specific folder. Press OK once more, and the first picture contained in that folder becomes selected automatically.
You have the option of using the center button of the Multi Selector to bring up the card/ folder selection screen if you don’t want to use it to toggle
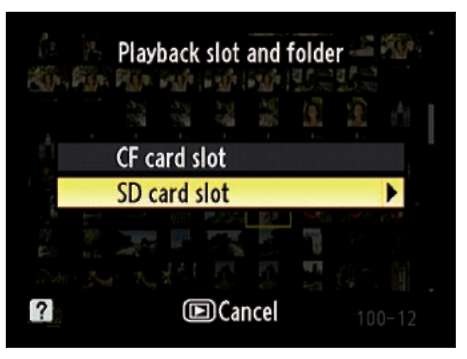
Figure 4-10: From the 72-thumbnail display, press the Zoom Out button to access this screen, which enables you to jump to a different card slot or folder.
between full frame and thumbnails view. Again, see the aforementioned section about customizing the Multi Selector for help.
Either way, the folders that appear when you display the card/folder selection screen shown in Figure 4-10 depend on the setting of the Playback Folder option on the Playback menu. See Step 1 in the preceding section for details. And check out Chapter 10 to find out how to set up custom folders.
Zooming in for a closer view
After displaying a photo in single-frame view, you can magnify it to get a close-up look at important details, such as whether someone’s eyes are closed in a portrait. Here’s the scoop:
Zoom in. Press the Zoom In button. You can magnify the image to a maximum of 13 to 27 times its original display size, depending on the resolution (pixel count) of the photo. Just keep pressing the button until you reach the magnification you want. Notice the symbol on the button: the magnifying glass with the plus sign, indicating zoom in.
As detailed in the section “Customizing the Multi Selector’s role during playback,” you can set the center button to immediately zoom your view to one of three preset magnification levels. The advantage of this option is that the display is automatically centered on the focus point you used when taking the picture, whereas pressing the Zoom In button zooms to the center of the frame. If you do use the center button to zoom, know that after you press the button to get to your selected magnification level, you can zoom in further by using the Zoom In button.
Zoom out. To zoom out to a reduced magnification, press the Zoom Out button. This button also sports the magnifying glass symbol, but this time with a minus sign to indicate that it reduces the display size. That
little grid-like thingy next to the magnifying glass reminds you that the button also comes into play when you want to go from full-frame view to one of the thumbnail views.
View another part of the magnified picture. When an image is magnified, a little navigation thumbnail showing the entire image appears briefly in the lower-right corner of the monitor For example, Figure 4-11 shows a zoomed view of the scene shown earlier, in Figure 4-8. The yellow outline in this picture-in-picture
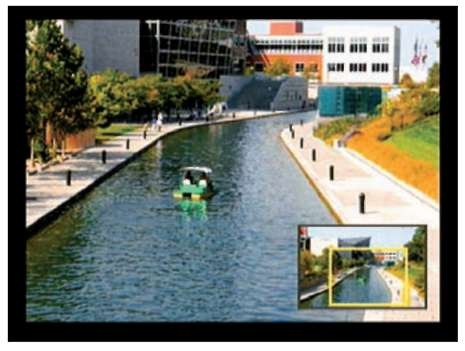
Figure 4-11: Use the Multi Selector to move the yellow outline over the area you want to inspect.
image indicates the area that’s currently consuming the rest of the monitor space. Use the Multi Selector to scroll the yellow box and display a different portion of the image. After a few seconds, the navigation thumbnail disappears; just press the Multi Selector in any direction to redisplay it.
Inspect faces. When you magnify portraits, the picture-in-picture thumbnail displays a white border around each face, as shown in Figure 4-12. Rotate the sub-command dial to examine each face at the magnified view. Unfortunately, the camera sometimes fails to detect faces, especially if the subject isn’t looking directly at the camera. But when it works correctly, this is a pretty great tool for checking for closed eyes, red-eye, and, of course, spinach in the teeth.

Figure 4-12: Rotate the sub-command dial to jump between faces in a portrait.
View more images at the same magnification. Here’s another neat trick: While the display is zoomed, you can rotate the main command dial to display the same area of the next photo at the same magnification. So if you shot the same subject several times, you can easily check how the same details appear in each one.
Return to full-frame view. When you’re ready to return to the normal magnification level, you don’t need to keep pressing the Zoom Out button until you’re all the way zoomed out. Instead, just press the OK button. The center button of the Multi Selector also returns you to the standard, full-frame view, regardless of what function you assign the button for playback.
Viewing Picture Data
In single-image picture view, you can choose from different photo information modes, each of which presents a different set of shooting data along with the image.
Upcoming sections provide you with a decoder ring to the details you see in each display mode. First, though, a little setup work is in order, as detailed next.
Enabling hidden data-display options
By default, three of the five picture-data display modes are disabled, as is an option that enables you to view the focus point you used when taking the picture. You can access these hidden options through the Display Mode option on the Playback menu, as shown in Figure 4-13.
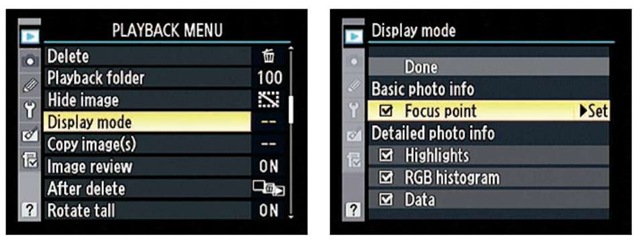
Figure 4-13: These display options are disabled by default.
The options work as follows:
Focus Point: When this option is turned on, a little red rectangle appears to mark the focus point, as shown in Figure 4-14. You also see the same brackets that represent the autofocus area in the viewfinder. These focus indicators appear only when you use the Information display mode shown in the figure — File Information mode, covered in the next section. They aren’t displayed if you focused manually or used the
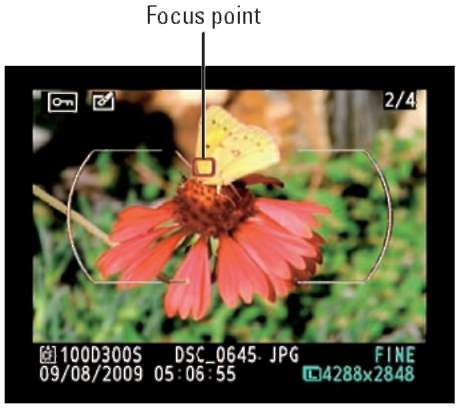
Figure 4-14: You can view the focus point you used when taking the photo.
Auto Area AF-area mode setting. I find the focus marks distracting, but make your own call.
Highlights/RGB Histogram/Data: These options control the three display modes that are hidden by default, all covered later in this chapter.
A check mark in the box next to the option means that the feature is turned on. In Figure 4-13, for example, all four options are enabled. To toggle the check mark on and off, highlight the option and then press the Multi Selector right.
After turning on the options you want to use, be sure to highlight Done (at the top of the screen) and press OK again. Otherwise, the settings you selected don’t stick.
The next sections explain exactly what details you can glean from each display mode. I present them here in the order they appear if you cycle through the modes by pressing the Multi Selector down. You can spin through the modes in the other direction by pressing the Multi Selector up.
File Information mode
In the File Information display mode, the monitor displays the data shown in Figure 4-15. Here’s the key to what information appears, starting at the top of the screen and working down:
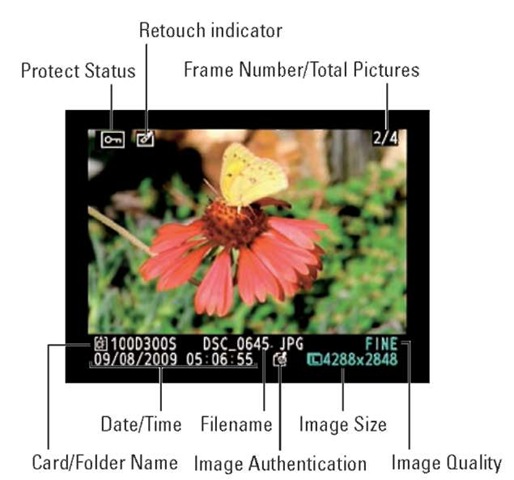
Figure 4-15: In File Information mode, you can view these bits of data.
Protect Status: A little key icon indicates that you used the camera’s file-protection feature to prevent the image from being erased when you use the camera’s Delete function. See “Protecting Photos,” later in this chapter, to find out more. (Note: Formatting your memory card, a topic discussed in Chapter 1, does erase even protected pictures.) This area appears empty if you didn’t apply protection.
Retouch Indicator: This icon appears if you used any of the Retouch menu options to alter the image. (I cover most Retouch features in Chapter 11.) Again, no icon means that you didn’t retouch the photo.
Frame Number/Total Pictures: The first value here indicates the frame number of the currently displayed photo; the second tells you the total number of pictures on the memory card. In Figure 4-15, for example, the image is number 2 out of 4.
Focus point: If you enable the Focus Point feature, as outlined in the preceding section, you see the red focus-point indicator and the autofocus area brackets, as shown in Figure 4-14. But note that for pictures that you took using continuous-servo autofocus, you see the point only if you set the AF-area mode to Single Point or Dynamic Area. (Chapter 6 explains all this autofocus stuff.) And for pictures taken with manual focusing, the focus point doesn’t appear during playback at all.
Card and Folder Name: Here you can see which card and folder contains the photo. Folders are named automatically by the camera unless you create custom folders, an advanced trick you can explore in Chapter 10. The first camera-created folder is named 100D300s. Each folder can contain up to 9999 images; when you exceed that limit, the camera creates a new folder and assigns the next folder number: 101D300s, 102D300s, and so on.
Filename: The camera also automatically names your files. Filenames end with a three-letter code that represents the file format, which is either JPG (for JPEG), TIF (for TIFF), or NEF (for Camera RAW) for still photos. Chapter 3 discusses these formats. If you record a movie (a project you can explore near the end of this chapter), the file extension is AVI, which represents a digital-movie file format. If you create a dust-off reference image file, an advanced feature designed for use with Nikon Capture NX 2, the camera instead uses the extension NDF. (Because this software must be purchased separately, I don’t cover it or the dust-off function in this topic.)
The first four characters of filenames also vary. Here’s what the possible codes indicate:
• DSC_: This code means you captured the photo at the default Color Space setting, sRGB. You can investigate this option in Chapter 6.
• _DSC: If you change the Color Space setting to Adobe RGB, the underscore character comes first. (The exception is dust-off reference photos, which don’t use the underscore.)
Each image is also assigned a four-digit file number, starting with 0001. When you reach image 9999, the file numbering restarts at 0001, and the new images go into a new folder to prevent any possibility of overwriting the existing image files. For more information about file numbering, see the Chapter 1 section that discusses the File Number Sequence option.
Date and Time: Just below the folder and filename info, you see the date and time that you took the picture. Of course, the accuracy of this data depends on whether you set the camera’s date and time values correctly, which you do via the Setup menu. Chapter 1 has details.
Image Authentication: If you enable this feature, available on the Setup menu, you see the little stamp icon shown in Figure 4-15. Because this option relates to an optional Nikon software package, I don’t cover it in this topic.
Image Quality: Here you can see which Image Quality setting you used when taking the picture. Image Quality determines the file format. Again, Chapter 3 has details, but the short story is this: Fine, Normal, and Basic are the three JPEG recording options, with Fine representing the highest JPEG quality. The word RAW indicates that the picture was recorded in the Nikon Camera RAW format, NEF. And for TIFF files, you see the letters RGB (which stand for red, green, blue, the primary color components of a digital image).
Image Size: This value tells you the image resolution, or pixel count. See Chapter 3 to find out about resolution.
Highlights display mode
One of the most difficult photo problems to correct in a photo editing program is known as blown highlights in some circles and clipped highlights in others. In plain English, both terms mean that highlights — the brightest areas of the image — are so overexposed that areas that should include a variety of light shades are instead totally white. For example, in a cloud image, pixels that should be light to very light gray become white due to overexposure, resulting in a loss of detail in those clouds.
In Highlights display mode, areas that the camera thinks may be overexposed blink in the camera monitor. To fully understand all the features of this mode, though, you need to know a little about digital imaging science.
As mentioned earlier, digital images are called RGB images because they are created out of three primary colors of light: red, green, and blue. In Highlights mode, you can display the exposure warning for all three color components — sometimes called color channels — combined or view the data for each individual channel.
When you look at the brightness data for a single channel, though, greatly overexposed areas don’t translate to white in photos — rather, they result in a solid blob of some other color. I don’t have space in this topic to provide a full lesson in RGB color theory, but the short story is that when you mix together red, green, and blue light, and each component is at maximum brightness, you get white. Zero brightness in all three channels gives you black. But if you have maximum red and no blue or green, you have fully saturated red. If you mix together two channels at maximum brightness, you also get full saturation. For example, maximum red and blue produce fully saturated magenta. And wherever colors are fully saturated, you can lose picture detail. For example, a rose petal that should have a range of tones from light to dark red may instead be bright red throughout.
The moral of the story is that when you view your photo in single-channel display, large areas of blinking highlights in one or two channels indicate that you may be losing color details. Blinking highlights that appear in the same spot in all three channels indicate blown highlights — again, because when you have maximum red, green, and blue, you get white. Either way, you may want to adjust your exposure settings and try again.
Okay, with today’s science lesson out of the way, Figure 4-16 shows you how the screen looks when you view a picture in Highlights display mode. Remember, if you want to use this mode, follow the instructions in the “Enabling hidden data-display options” section, earlier in this chapter, to enable it.
In the lower-left corner of the display, the letters that appear yellow tell you whether you’re looking at a single channel (R, G, or B) or the three-channel, composite display (RGB). The latter is selected in the figure. To cycle between the settings, press the Zoom Out button as you press the Multi Selector right or left.
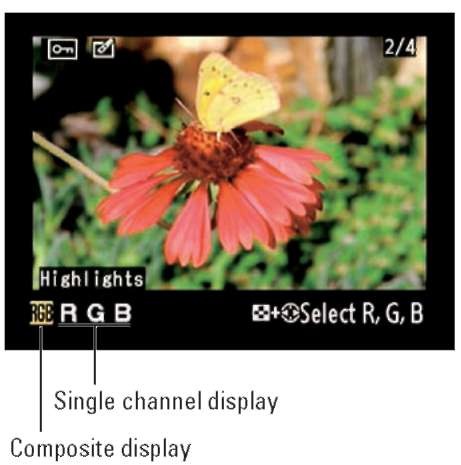
Figure 4-16: In Highlights mode, blinking areas indicate blown highlights.
Along with the blinking highlight warning, Highlights display mode presents the standard bits of information in this mode: the Protect Status, Retouch Indicator, and File Number/Total Pictures values, all explained in the preceding section. The label Highlights also appears to let you know the current display mode, as shown in Figure 4-16.
RGB Histogram mode
Press the Multi Selector down to shift from Highlights mode to this mode, which displays your image in the manner shown in Figure 4-17. (Remember: You can view your picture in this mode only if you enable it via the Display Mode option on the Playback menu.)
This mode is sort of like Highlights mode on steroids. As with Highlights mode, you can display the blinking warning in the image thumbnail and view the warning for either the composite image (RGB) or each individual channel. Again, press the Zoom Out button and press the Multi Selector right to cycle between the single-channel and multichannel views.
Underneath the image thumbnail, you see just a few pieces of data. As with File Information mode, you see the Protect Status and Retouch Indicator icons if you used those features. Beneath that, you see the White Balance settings used for the shot. (White balance is a color feature you can explore in Chapter 6.) The first value tells you the setting (Auto, in the figure), and the two number values tell you whether you fine-tuned that setting along the amber to blue axis (first value) or green to magenta axis (second value). Zeros, as in the figure, indicate no fine-tuning.
In addition, you get those chart-like thingies, called histograms. You actually get two types of histograms: The top one is a Brightness histogram and reflects the composite, three-channel image data. The three others represent the data for the single red, green, and blue channels. This trio is sometimes called an RGB Histogram, thus the display mode name.
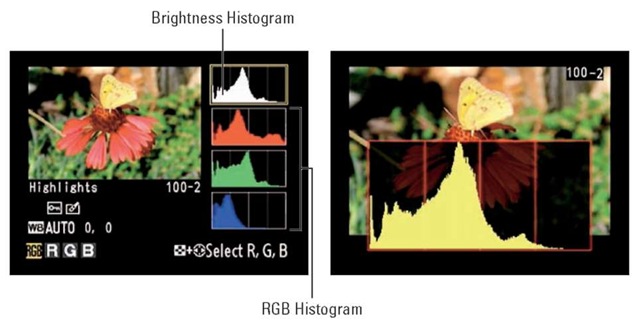
Figure 4-17: Histogram mode presents exposure and color information in chart-like fashion.
The next two sections explain what you can discern from the histograms. But first, here are two cool tricks to remember:
If you press the Zoom In button while in this display mode, you can zoom the thumbnail to a magnified view. The histograms then update to reflect only the magnified area of the photo. To return to the regular view and once again see the whole-image histogram, press OK.
You can set the center button of the Multi Selector to temporarily display a brightness histogram over your photo, as shown on the right in Figure 4-17. You can access this feature in any of the display modes — File Information, Highlights, whatever. Additionally, you can bring up the histogram even in thumbnails playback view. When you let up on the button, you return to the normal screen for the display mode you’re using. For details on setting the button to this function, check out the section “Customizing the Multi Selector’s role in playback mode,” earlier in this chapter.
Reading a Brightness histogram
You can get an idea of image exposure by viewing your photo on the camera monitor and by looking at the “blinkies” in Highlight mode. But the Brightness histogram provides a way to gauge exposure that’s a little more detailed.
A Brightness histogram indicates the distribution of shadows, highlights, and midtones (areas of medium brightness) in your image. Figure 4-18 shows you a sample histogram.
The horizontal axis of the histogram represents the possible picture brightness values — the maximum tonal range, in photography-speak — from the darkest shadows on the left to the brightest highlights on the right. And the vertical axis shows you how many pixels fall at a particular brightness value. A spike indicates a heavy concentration of pixels. For example, in Figure 4-18, the histogram shows a large supply of pixels clustered in the range just below medium brightness, but very few at the higher end of the range.
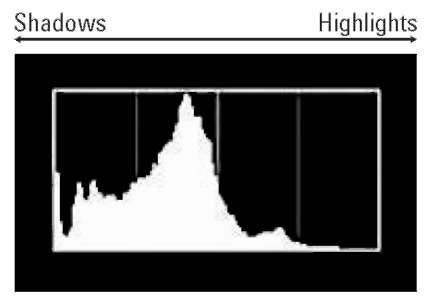
Figure 4-18: The Brightness histogram indicates tonal range, from shadows on the left to highlights on the right.
Keep in mind that there is no one “perfect” histogram that you should try to achieve. Instead, interpret the histogram with respect to the distribution of shadows, highlights, and midtones that comprise your subject. You wouldn’t expect to see lots of shadows, for example, in a photo of a polar bear walking on a snowy landscape. Pay attention, however, if you see a very high concentration of pixels at the far right or left end of the histogram, which can indicate a seriously overexposed or underexposed image, respectively. To find out how to resolve exposure problems, visit Chapter 5.
Understanding RGB histograms
When you view your images in RGB Histogram display mode, you see two histograms: the Brightness histogram, covered in the preceding section, and an RGB histogram. Figure 4-19 offers a sample RGB histogram for your consideration.
As explained in the earlier section about Highlights mode, digital images are made up of red, green, and blue light. With the RGB histograms, you can view the brightness values for each of those color channels. Again, overexposure in one or two channels can produce oversaturated colors and thus a loss of picture detail. So if most of the pixels for one or two channels are clustered toward the right end of the histogram, you may have a problem. Take a look at the image thumbnail and note where the blinking highlights (indicating overexposure) occur, and then assess your subject and lighting to determine whether you need to make adjustments and retake the photo.
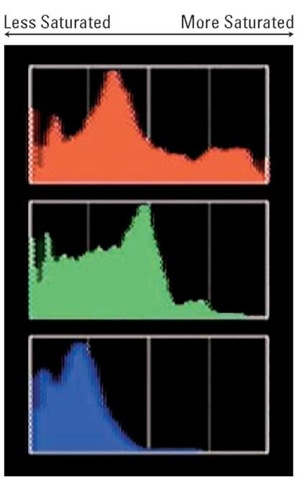
Figure 4-19: The RGB histogram can indicate problems with color saturation.
A savvy RGB histogram reader also can spot color-balance issues by looking at the pixel values. But frankly, color-balance problems are fairly easy to notice just by looking at the image itself on the camera monitor. And understanding how to translate the histogram data for this purpose requires more knowledge about RGB color theory than I have room to present in this topic.
For information about manipulating color, see Chapter 6.
Shooting Data display mode
Before you can access this mode, you must enable it via the Display Mode option on the Playback menu. See the earlier section, “Enabling hidden data-display options,” for details. After turning on the option, press the Multi Selector down to shift from Highlights mode to Shooting Data mode.
In this mode, you can view up to four screens of information, which you toggle between by pressing the Multi Selector up and down. Figure 4-20 shows you these screens, referred to in the Nikon manual as Shooting Data Page 1, 2, 3, and 4. The fourth screen appears only if you include copyright data with your picture, a feature you can explore in Chapter 10.
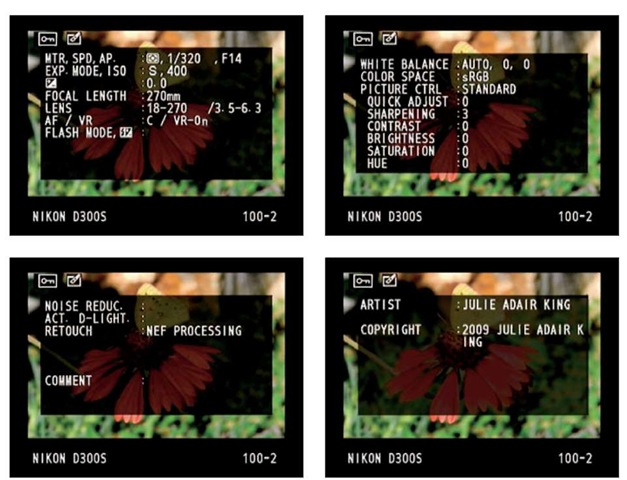
Figure 4-20: You can view the camera settings used to capture the image in Shooting Data display mode.
Most of the data here won’t make any sense to you until you explore Chapters 5 and 6, which explain the exposure, color, and other advanced settings available on your camera. But I want to call your attention to a couple of factoids now:
The top-left corner of the monitor shows the Protect Status and Retouch Indicator icons, if you used the protect or retouch features. Otherwise, the area is empty. (See the earlier section “File Information mode” for details about these particular features.)
The current folder and frame number appear in the lower-right corner of the display.
The Comment item, which is the final item on the third screen, contains a value if you use the Image Comment feature on the Setup menu. I cover this option in Chapter 10.
‘ If the ISO value on Shooting Data Page 1 (the first screen in Figure 4-18) appears in red, the camera is letting you know that it overrode the ISO Sensitivity setting that you selected in order to produce a good exposure. This shift occurs only if you enable automatic ISO adjustment; see Chapter 5 for details.
GPS Data mode
This display mode is available only if the image you’re viewing was shot with the optional Nikon GPS (global positioning system) unit attached.
If you use the GPS unit, this display mode shows you the latitude, longitude, and other GPS information recorded with the image file. You also see the date and time of the shot along with the folder and frame number, the Protect Status icon, and the Retouch Indicator icon, all explained in the earlier section “File Information mode.”
Overview Data mode
Overview Data mode is the second of the two default photo-information modes. (Meaning, you don’t have to enable it via the Display Mode option on the Playback menu to use it.) In this mode, the playback screen contains a small image thumbnail along with scads of shooting data — although not quite as much as Shooting Data mode — plus a Brightness histogram. Figure 4-21 offers a look.
The earlier section “Reading a Brightness histogram” tells you what to make of that part of the screen. Just
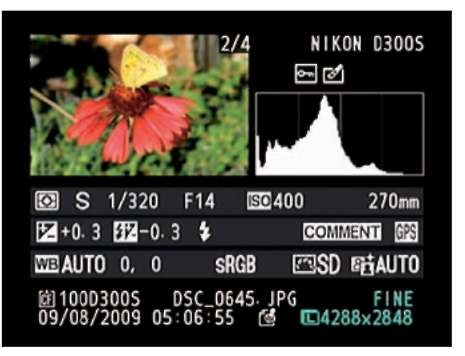
Figure 4-21: In Overview Data mode, you can view your picture along with the major camera settings you used to take the picture.
above the histogram, you see the Protect Status and Retouch Indicator, while the Frame Number/Total Pictures data appears at the upper-right corner of the image thumbnail. For details on that data, see the earlier section “File Information mode.” (As always, the Protect status and Retouch Indicator icons appear only if you used those two features; otherwise, the area is empty.)
To sort out the maze of other information, the following list breaks things down into the five rows that appear under the image thumbnail and histogram. In the accompanying figures as well as in Figure 4-21, I include all possible data simply for the purpose of illustration; if any of the items don’t appear on your screen, it simply means that the relevant feature wasn’t enabled when you captured the shot.
‘ Row 1: This row shows the exposure-related settings labeled in Figure 4-22, along with the focal length of the lens you used to take the shot. As in Shooting Data mode, the
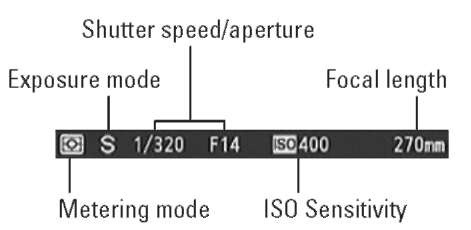
Figure 4-22: Here you can inspect major exposure settings along with the lens focal length.
ISO value appears red if you had auto ISO override enabled and the camera adjusted the ISO for you. Chapter 5 details the exposure settings; Chapter 6 introduces you to focal length.
Row 2: This row contains a few additional exposure settings, labeled in Figure 4-23. On the right end of the row, the Comment and GPS labels appear if you took advantage of those options when recording the shot. (You must switch to the Shooting Data mode or GPS mode, respectively, to view the actual comment and GPS data.)
Row 3: The first three items on this row, labeled in Figure 4-24, relate to color options explored in Chapter 6. Again, the first value shows you the White Balance setting; the second, the amount of blue-to-amber fine-tuning adjustment; and the third, the amount of green-to-magenta adjustment. The
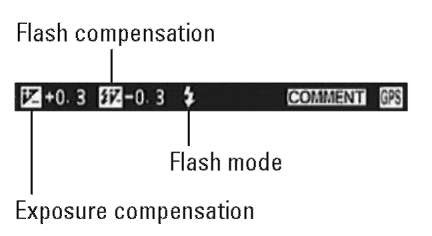
Figure 4-23: This row contains additional exposure information.

Figure 4-24: Look at this row for details about advanced color settings.
last item indicates the Active D-Lighting setting, another exposure option discussed in Chapter 5.
* Rows 4 and 5: The final two rows of data (refer to Figure 4-21) show the same information you get in File Information mode, explained earlier in this chapter.
Deleting Photos
You can erase pictures from a memory card when it’s in your camera in three ways. The next sections give you the lowdown. (Or is it the down low? I can’t seem to keep up.)
Regardless of which delete technique you want to use, remember that you can’t delete photos that you protected or hid by using the Protect or Hide Image features. Later sections in this chapter explain both features and show you how to unprotect and unhide images so that you can delete them.
Deleting images one at a time
The Delete button is key to erasing single images. But the process varies a little depending on which playback display mode you’re using, as follows:
In single-image view, you can erase the current image by pressing the Delete button.
In thumbnail view (displaying 4, 9, or 72 thumbnails), use the Multi
Selector to highlight the picture you want to erase and then press the Delete button.
After you press Delete, you see a message asking whether you really want to erase the picture. If you do, press the Delete button again. Or, to cancel out of the process, press the Playback button.
If you really want to get down into your camera’s customization option weeds — and I do believe this is about as weedy as it gets — you can control which picture the camera displays
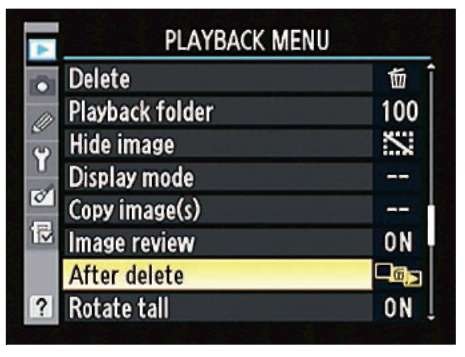
Figure 4-25: You can specify which picture appears next after you delete the current one.
next after you delete the current picture. The option in question lives on the Playback menu and is called After Delete, as shown in Figure 4-25. Select the option and press OK to access your three choices: Show Next displays the picture after the one you just deleted (the default option); Show Previous displays the one that fell before the one you deleted, and Continue As Before tells the camera to keep going in the same direction you were heading before deleting. For example, if you were scrolling forward through your pictures, the camera continues playback in that direction. Wow, now that’s control.
If you accidentally erase a picture, don’t panic — you may be able to restore it by using data-restoration software such as Media Recover ($30, www.mediar-ecover.com) or Lexar Image Rescue (also about $30, www.lexar.com). SanDisk also currently offers a recovery program with some of its high-performance memory cards. But in order to have a chance, you must not take any more pictures or perform any other operations on your camera while the current memory card is in it. If you do, you may overwrite the erased picture data for good and eliminate the possibility of recovering the image.
Deleting all photos
Erasing all pictures on a memory card is a five-step process:
1. Open the Playback menu and select Delete, as shown on the left in Figure 4-26.
2. Press OK.
You see the right screen in Figure 4-26.
3. Highlight All and press the Multi Selector right.

Figure 4-26: You can quickly delete all photos from a memory card.
4. On the next screen, highlight the memory card that contains the pictures you want to dump and press the Multi Selector right again.
You then see a screen that asks you to verify that you want to delete all your images.
5. Highlight Yes and press OK.
This step deletes only pictures in the folder that is currently selected via the Playback Folder option on the Playback menu. See the section “Viewing Images in Playback Mode,” earlier in this chapter, for information.
Also remember that deleting photos in this way does not erase any pictures that you protected using the Protect feature or hid from display by using the Hide Image option, both described later in this chapter.
Deleting a batch of selected photos
To erase multiple photos — but not all — display the Playback menu, highlight Delete, and press OK. You see the Delete screen shown on the left in Figure 4-27. Choose Selected and press OK to display the right screen in the figure.
Now use these techniques to navigate your thumbnails and mark the ones you want to erase:
Mark a photo for deletion. Use the Multi Selector to place the yellow highlight box over the first photo you want to delete and then press the Multi Selector’s center button. A little trash can icon, the universal symbol for delete, appears in the upper-right corner of the thumbnail, as shown in the figure. If you change your mind, press the center button again to remove the Delete tag from the image.
Temporarily magnify the selected photo. For a closer look at the selected image, press and hold the Zoom In button. When you release the button, the display returns to normal thumbnail view.
Jump to a specific memory card or folder. If you have two memory cards installed, The card icon that appears yellow in the upper-right corner of the screen is the currently selected card. You can use the same technique available during playback to jump between cards and folders: Press the Zoom Out button to get the screen where you can select a card, highlight the card, and then press OK to display the list of folders on the card. Highlight a folder and press OK to return to the screen where you tag pictures for deletion. The first photo in your chosen folder is automatically selected. Remember that the folders that appear when you use this option depend on the setting you choose for the Playback Folder option, as covered in the earlier section “Viewing Images in Playback Mode.”
Erase all marked photos. Press OK to display a confirmation screen asking for permission to destroy the images; select Yes and press OK. The camera trashes the photos and returns you to the Playback menu.
As with the Delete All option, you can’t delete protected hidden photos using this technique. For more about protecting and hiding photos, see the next two sections.
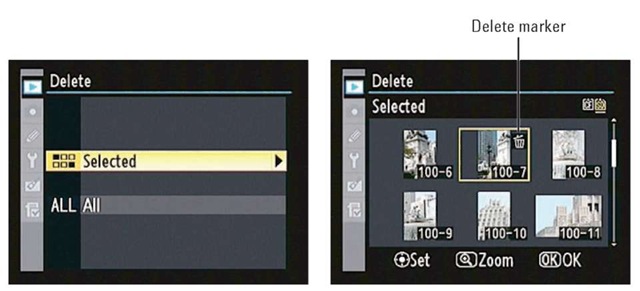
Figure 4-27: Press the center button of the Multi Selector to tag the selected photo for deletion.
Hiding Photos during Playback
Suppose that you took 100 pictures — 50 at a business meeting and 50 at the wild after-meeting party. You want to show your boss the photos where you and your co-workers look like responsible adults, but you’d rather not share the ones showing you and your assistant dancing on the conference table. You can always delete the party photos; the preceding section shows you how. But if you want to keep them — you never know when a good blackmail picture will come in handy — you can simply hide the incriminating images during playback.
The key to this trick is the Hide Image option on the Playback menu. After highlighting the option, as shown on the left in Figure 4-28, press OK to display the right screen in the figure. Choose Select/Set and press the Multi Selector right to get to the screen shown in Figure 4-29.

Figure 4-28: The Hide Image function lets you prevent photos from appearing during normal picture playback.
From here, things work the same as they do for marking a picture for deletion, covered in the preceding section.
Highlight the picture you want to hide and then press the center button of the Multi Selector to tag the photo with the little hide marker, labeled in Figure 4-29. Press again to remove the marker.
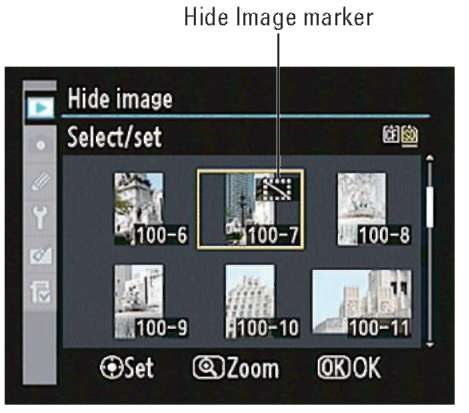
Figure 4-29: Press the center button of the Multi Selector to toggle the hide marker on and off.
You also can use the same techniques as outlined in the preceding section to jump between memory cards and folders and get a larger view of the selected photo. After you tag all the images you want to hide, press OK to return to the Playback menu. Your pictures are now hidden.
To redisplay hidden pictures, just reverse the process, removing the hide marker from photos you want to view again. Or, to redisplay all hidden pictures quickly, choose Deselect All from the first Hide Image screen (the right screen in Figure 4-28). Then press the Multi Selector right to display a screen that asks you to confirm your decision. Highlight Yes and press OK to make it so.
A couple of fine points about this feature: First, your hidden images remain viewable from within the Hide Image screens. (So make sure your boss doesn’t have time alone with your camera.) Second, if you want to delete hidden photos, you first need to remove the Hide Image tags. Or you can format your memory card, which wipes out all photos, hidden or not. See Chapter 1 for details on card formatting.
Protecting Photos
You can safeguard pictures from accidental erasure by giving them protected status. After you take this step, the camera doesn’t allow you to erase a picture by using either the Delete button or the Delete option on the Playback menu.
Formatting your memory card, however, does erase even protected pictures. In addition, when you protect a picture, it shows up as a read-only file when you transfer it to your computer. Files that have that read-only status can’t be altered until you unlock them in your photo software. In Nikon View NX, you can do this by clicking the image thumbnail and then choosing File Protect Files Unprotect.
Protecting a picture is easy:
1. Display or select the picture you want to protect.
• In single-image view, just display the photo.
• In 4/9/72 thumbnail mode, use the Multi Selector as needed to place the yellow highlight box over the photo.
2. Press the Protect button.
See the key symbol on the button? That’s your reminder that you use the button to lock a picture. The same symbol appears on protected photos during playback, as shown in Figure 4-30. (The placement of the lock symbol depends on your Information display mode, a topic you can explore earlier in this chapter.) In the figure, the symbol’s in the upper-left corner.
3. To remove protection, display or select the image and press the Protect button again.

Figure 4-30: Press the Protect button to prevent accidental deletion of the selected image.
Exploring Live View Shooting
If you’ve used a compact, point-and-shoot digital camera, you may be used to composing your pictures on the camera monitor rather than by looking through the viewfinder. In fact, many compact cameras no longer even offer a viewfinder, which is a real shame, in my opinion. When you use the monitor to frame the image, you must hold the camera away from your body, a posture that increases the likelihood of blurry images caused by camera shake. When you use the viewfinder, you can brace the camera against your face, creating a steadier shooting stance.
Due to some design complexities that I won’t bore you with, many digital SLR cameras do not enable you to preview shots on the monitor. Your D300s, however, does offer that feature, known as Live View in dSLR nomenclature. The D300s also uses Live View when you record movies.
You need to know a few points about Live View as it’s provided on your camera:
Manual focusing is recommended. You can autofocus, assuming that you’re using a lens that supports that feature when paired with the D300s. (See Chapter 1 for more about that issue.) But even if your lens does offer autofocusing, manual focusing usually offers faster, more precise results.
Continuous autofocusing isn’t possible. In normal shooting, you can set the camera to the continuous-servo autofocus mode to continually adjust focus automatically up to the moment you take the shot. (See Chapter 6 for details.) Continuous autofocusing is not available in Live View mode, unfortunately. If you need to adjust focus before taking a shot or during movie recording, you just have to set focus a second time.
Using Live View for an extended period can harm your pictures and the camera. When you work in Live View mode, the camera’s innards heat up more than usual, and that extra heat can create the right electronic conditions for noise, a defect that gives your pictures a speckled look. (Chapter 5 offers more information.)
Perhaps more critically, the increased temperatures can damage the camera itself. For that reason, Live View is automatically disabled after one hour of shooting — or earlier, if a critical heat level is detected. When the camera is 30 seconds or less from shutting down your Live View session, you see a little LV symbol, with a numerical value (such as 18s) to let you know how many seconds you have to wrap things up. This warning appears in the upper-left corner of the screen. In extremely warm environments, you may not be able to use Live View mode for very long before the system shuts down.
Aiming the lens at the sun or other bright lights also can damage the camera. Of course, you can cause problems doing this even during normal shooting, but the possibilities increase when you use Live View. You not only can harm the camera’s internal components but also the monitor.
Live View also presents two additional disadvantages which, in this case, are the same as for a point-and-shoot camera. First, any time you use the monitor, you put extra strain on the battery. Second, the monitor can wash out in bright sunlight, making it difficult to compose outdoor shots.
This list of caveats doesn’t mean that I’m telling you not to use Live View. But for normal photography — that is, still shooting rather than movie recording — you shouldn’t envision Live View as a full-time alternative to using the viewfinder. Rather, think of it as a special-purpose tool that can help in situations where framing with the viewfinder is cumbersome.
I find Live View most helpful for still-life, tabletop photography, especially in cases that require a lot of careful arrangement of the scene. For example, I have a shooting table that’s about waist high. Normally, I put my camera on a tripod, come up with an initial layout of the objects I want to photograph, set
up my lights, and then check the scene through the viewfinder. Then there’s a period of refining the object placement, the lighting, and so on. If I’m shooting from a high angle, requiring the camera to be positioned above the table and pointing downward, I have to stand on my tiptoes or get a stepladder to check things out through the viewfinder between each compositional or lighting change. At lower angles, where the camera is tabletop height or below, I have to either bend over or kneel to look through the viewfinder, causing no end of later aches and pains to back and knees. With Live View, I can alleviate much of that bothersome routine (and pain) because I can usually see how things look in the monitor no matter what the camera position.
With that lengthy preamble out of the way, the next several sections explain some Live View setup options. Following that, you can find step-by-step instructions for taking pictures in Live View mode and recording movies.
Choosing your Live View shooting mode
Before turning on the Live View display, pay a visit to the Shooting menu and call up the Live View Mode option, as shown in Figure 4-31. You can choose from Tripod Mode and Handheld Mode. As their names suggest, one is designed for times when you have the camera mounted on a tripod and the other is for handheld work.
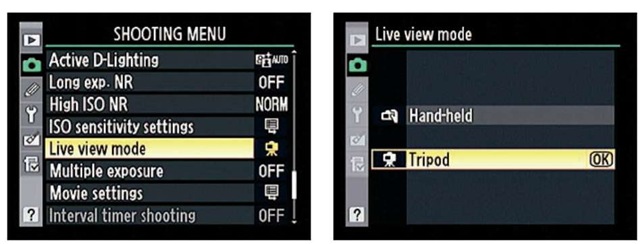
Figure 4-31: The main difference between the two Live View modes has to do with autofocusing.
The major difference between the two modes, though, has to do with auto-focusing, although your choice does have some implications with regard to exposure for movie making as well. Here’s the deal:
Autofocusing: In Handheld mode, the camera uses an autofocusing technology called phase-detection autofocus, which is the same autofocusing technology as it does for normal, non-Live View photography. In Tripod mode, a different technology, called contrast-detection, is used.
It’s not important to understand the two technologies — although, if you’re interested, you can find lots of online discussions about the two. What is important to note is how the two technologies impact Live View autofocusing operation, as follows:
• Focusing area: In Tripod mode, you can set focus on any point in the entire frame, even on points outside the normal autofocus-area brackets (those brackets that indicate the spread of the camera’s 51 possible autofocus points when you look through the viewfinder). In Handheld mode, you’re limited to the normal autofocus area.
• Focus adjustments during movie recording: If you opt for autofo-cusing, you can reset focus as needed during movie recording in Tripod mode. In Handheld mode, you can’t adjust focus once recording begins.
• Monitor shut-off during focusing: In Handheld mode, the monitor turns off briefly in order to allow the camera to use the aforementioned normal autofocusing system. In Tripod mode, the monitor remains on during focusing.
• Focusing speed and accuracy: Tripod mode autofocusing can take a little longer, and low-contrast subjects can challenge the camera. And keep the mode name in mind: The focusing system used in Tripod mode really does not work well for handheld shots or for moving subjects.
On the other hand, autofocus can be a little more precise in Tripod mode because you can set the focus point anywhere in the frame. In addition, you can zoom the onscreen view up to a 13 times magnification to check focus in Tripod Mode, whereas Handheld mode limits you to a three-times magnification.
Exposure adjustment during movie recording: In Handheld mode, the camera handles exposure automatically as you’re recording a movie. In Tripod mode, you can set the camera to the M or A exposure mode and then select a specific aperture, using any setting up to f/16. The camera then uses that aperture during recording. This option comes in handy if you want to maintain a specific depth of field throughout the recording.
Confusing enough for you? Well, let me simplify things by repeating my earlier advice that if at all possible, use manual focus. Not only are you likely to get faster, more accurate focusing, but you also don’t have to worry about all the autofocusing intricacies just described. The mode decision then favors Tripod mode because of the stronger magnification that’s available to check focus. As for movie recording, choose the mode that best matches your desire to control aperture and exposure.
The way you take the picture, record your movie, and check focusing depends on your selected Live View mode, so upcoming sections walk you through the details.
Whichever mode you want to use, you can customize the Live View display as outlined next.
Customizing the Live View display
When you press the Live View button, the scene in front of the lens appears on the monitor, as shown in Figure 4-32, and you no longer can see anything through the viewfinder.
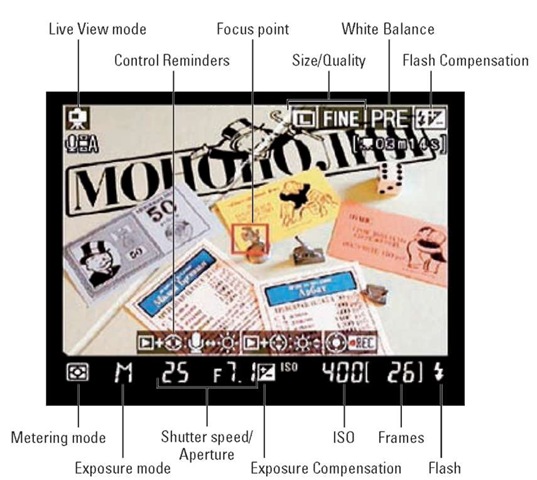
Figure 4-32: The settings labeled here relate to still photography; the rest, to movie recording.
Just as you can change what information appears onscreen during picture playback, you can change the data that shows up during Live View shooting. Press the Info button to cycle through the four styles, which are:
* Information On: In this mode, your screen displays the boatload of data shown in Figure 4-32. A few notes about this display:
• Some symbols, such as those representing Exposure Compensation and Flash Compensation values, appear only if you enable those features. (Chapter 5 details these settings.)
• In Handheld mode, you see the autofocus-area brackets as well as the focus point. (Not shown in Figure 4-32.)
The strip of cryptic symbols labeled Control Reminders in the figure is there to remind you what buttons to push to perform certain functions. For example, the far-right symbol represents the Multi Selector. The center button in the symbol is highlighted to show that you press it to begin recording a movie. More about what the rest of the icons mean momentarily.
Information Off: Press the Info button to cycle to this display option, which hides all the indicators that are displayed over your image. You still see the settings along the bottom of the frame and the focusing frame (and autofocus area brackets, if you’re shooting in Handheld mode).
* Framing Grid: This mode displays a grid over the image. In Tripod mode, the grid appears as shown on the left in Figure 4-33; in Handheld mode, the grid lines appear only around the perimeter of the autofo-cus area brackets (as they do when you enable the viewfinder grid, an option covered in Chapter 1). The grid is helpful when you need to precisely align objects in your photo. But note that if you zoom the display to check focusing, as outlined in the next section, the grid disappears until you return to normal magnification.
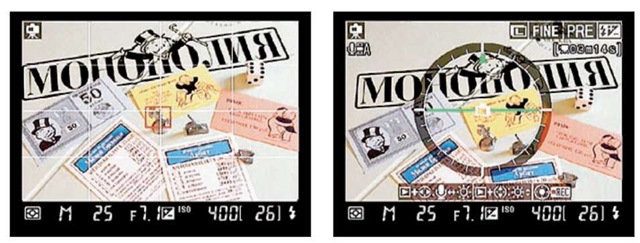
Figure 4-33: Press the Info button to change the display mode.
Virtual Horizon: You also can display the Virtual Horizon indicator, as shown on the right in Figure 4-33. This tool works the same way as the one you can enable through the Custom Setting menu, introduced in Chapter 1. When the camera is level to the horizon, the little green triangle appears, as shown in the figure.
In addition to these options, you can adjust the monitor brightness without exiting Live View mode. Just press and hold the Playback button to display the little brightness scale on the right side of the screen, as highlighted in Figure 4-34. While holding the button, you can press the Multi Selector right and left to toggle between that brightness strip and the microphone icon in the upper-left corner of the screen. When the brightness strip is highlighted, press the Multi Selector up and down to adjust the brightness. (When the microphone is highlighted, you can adjust the sound-recording options, covered later in this chapter.)
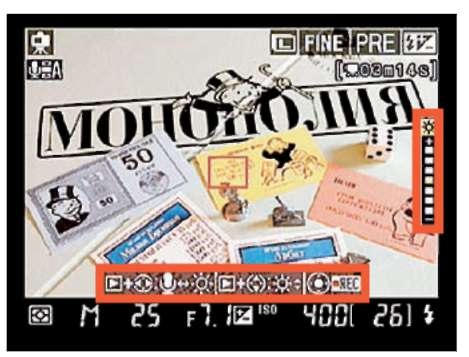
Figure 4-34: Press the Playback button, press right to activate the brightness strip, and then press up or down to adjust monitor brightness.
The strip of reminder icons along the bottom of the screen (highlighted in the figure) is there to jog your memory of what buttons accomplish this function.
If you connect your camera to an HDMI (High-Definition Multimedia Interface) device, you no longer see the live scene on your camera monitor. Instead, the view is displayed on your video device. In that scenario, the arrangement of the information on the screen may appear slightly different than in the examples in this chapter.
Taking still pictures in Tripod mode
After setting your camera to Tripod mode (through the Live View Mode option on the Shooting menu), follow these steps to take a picture:
1. To switch to the Live View display, press the Live View button.
You hear a clicking sound as the camera’s internal mirror — the part that makes it possible to see your subject in the viewfinder — flips up. The viewfinder goes dark, and your subject appears on the monitor.
2. Frame the shot.
3. Set the focus mode to auto or manual focusing.
This part of the process works just as it does for normal photography: Set the Focus mode selector on the front of the camera to M for manual focusing; choose S for autofocusing. (Again, you can set the Focus mode selector to C, but doing so does no good because in Live View mode, the camera can’t provide continuous autofocus.)
Also be sure to set the focus mode on your lens to auto or manual, if it offers that control.
Nikon recommends that you use an AF-S lens for best autofocusing results in Tripod mode. See Chapter 1 for more about lens types.
4. Use the Multi Selector to move the focus point (labeled in Figure 4-35)
over your subject.
This step is optional for manual focusing, but it does make checking your focus through the process used in Step 6 a little easier.
5. Focus.
• To autofocus, press the
AF-ON button. When the
camera has established focus, you hear a beep, and the focus frame turns green. You can then release the button. You can’t set focus by pressing the shutter button halfway as you do for normal, through-the-viewfinder shooting.
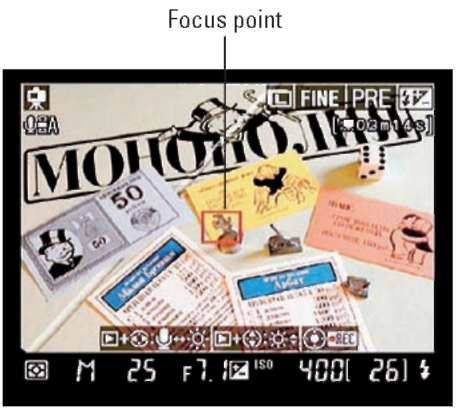
Figure 4-35: To autofocus, position the focus frame over your subject and then press the AF-ON button.
To focus manually, twist the focusing ring on the lens. Note that the focusing frame does not turn green even if your focus is correct.
6. Press the Zoom In button to magnify the view and check focus.
The zoomed display is centered on the focusing frame (which is why positioning the frame in Step 4 is helpful even for manual focusing). Each press of the button zooms the display further, up to 13 times magnification.
In the lower-right corner of the screen, the smaller box inside the larger rectangle indicates the area of the frame that’s currently being magnified, as shown in Figure 4-36. To scroll the display and check another part of the image, press the Multi Selector.
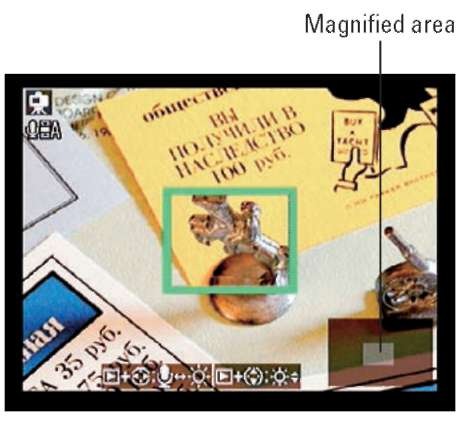
Figure 4-36: Press the Zoom In button to magnify the area under the focusing frame.
To reduce the magnification, press the Zoom Out button. Press OK to return to full-frame view.
If you’re focusing manually, you can tweak focus in the magnified view — just keep turning the focusing ring until things look good. Likewise, you can press the AF-ON button to reset focus if you’re autofocusing. But if you want to reposition the focus frame before autofocusing a second time, you need to press OK to return to the normal magnification first.
7. Adjust other picture-taking settings as needed.
You adjust exposure, color, and other picture-taking settings for Live View shooting the same way as you do for through-the-viewfinder photography. For example, to adjust white balance, press the WB button and rotate the main command dial; to change the exposure mode, press the Mode button and rotate the main command dial. (Refer to Figure 4-32 to see what settings you can monitor on the screen.) However, if you want to adjust the metering mode or any settings that are available only through menus, you have to exit Live View mode. Just press the Menu button, adjust the setting, and then press the Live View button again. Your focus should be maintained, assuming that you don’t move the camera while changing settings.
The aperture, shutter speed, and ISO settings displayed at the bottom of the screen represent the ones that were in force when you shifted to Live View mode. If you’re using the P, A, or S exposure modes, in which the camera selects aperture, shutter speed, or both, the camera will meter the exposure again when you take the shot and adjust those settings if needed. Likewise, ISO may be adjusted if you enable auto ISO override. For help with all these exposure issues, see Chapter 5.
8. Depress the shutter button fully to take the shot.
The monitor turns off briefly and then the Live View preview returns, and you’re ready to take the next shot.
9. To exit the Live View preview, press the Lv button.
You can then return to framing your images through the viewfinder.
If your Tripod mode shots appear blurry and you’re sure that focus is correct, try enabling the Exposure Delay Mode option on the Custom Setting menu. At this setting, the camera waits about one second after you press and release the shutter button to record the image, which can help ensure that the slight movement of the camera’s internal mirror doesn’t blur the image.
One other fine-print notation regarding Tripod mode: On occasion, the auto-focus frame may turn green even if focus isn’t actually accurate. So always take the step of magnifying the display to double-check focusing results.
Taking pictures in Handheld mode
Shooting pictures in Handheld mode works a little differently than Tripod mode. As with Handheld mode, start by setting the camera’s Focus mode selector to M for manual focusing and S for autofocusing. Also set the lens focus mode switch, if your lens offers one. Be sure to select your exposure metering mode as well, because you can’t adjust that setting after you switch to Live View mode. (Chapter 5 covers the metering mode options.) Then proceed like so:
1. Press the Live View button.
Again, the mirror flips up, the viewfinder goes dark, and your subject appears on the monitor. This time, you see the same auto-focus area brackets that normally appear in the viewfinder, along with a red focus point, as shown in Figure 4-37.
2. Frame the shot so that your subject appears within the autofocus area brackets.
3. Use the Multi Selector to move the focus point over your subject.
4. Focus.
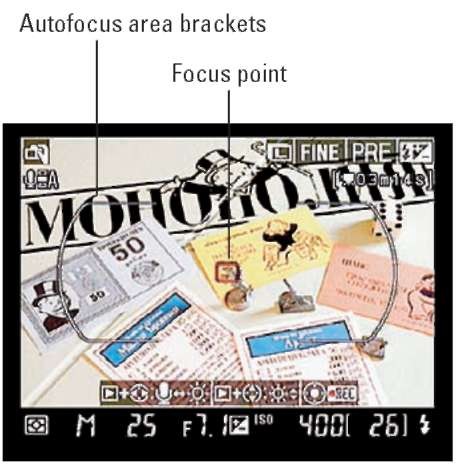
Figure 4-37: Use the Multi Selector to move the focus point over your subject.
• To autofocus, press the AF-ON button or use the normal autofocusing technique of pressing the shutter button halfway. Note that if you use the AF-ON button, though, vibration reduction isn’t engaged. So if your lens offers vibration reduction and that feature is important, use the shutter button to set focus.
As soon as you press either button, the monitor shuts off and the camera begins focusing. When you hear a beep, focus has been achieved, and you can release the button. The monitor then turns back on. Note that the focus point remains red instead of turning green as in Tripod mode.
Focus is locked at this point, even if you set the Focus mode to C (continuous-servo autofocus). You don’t need to keep the shutter button pressed halfway as you do to lock focus during normal photography.
• To focus manually, twist the focusing ring on the lens.
5. Press the Zoom In button to magnify the view and refine focus, if needed.
In this Live View mode, you can zoom to a three-times magnification only. Press the Multi Selector to scroll the display and check another part of the image.
To reduce the magnification, press the Zoom Out button. Press OK to return to full-frame view.
If needed, repeat Step 4 to refine focus. For autofocusing, you must return to full-frame view first if you want to select a different autofocus point.
6. Adjust exposure, color, and other picture settings in the usual way.
Remember that you must exit Live View mode if you want to change the metering mode. Press the Live View button, move the metering mode switch, and press again to return to Live View shooting. If you need to adjust a menu setting, press Menu to temporarily exit Live View mode. Adjust the setting and then return to Live View mode.
7. Depress the shutter button fully to take the shot.
At the point you take the shot, the camera meters the final exposure and may adjust exposure settings automatically, depending on what exposure mode and ISO options you’re using. Chapter 5 discusses exposure. The monitor turns off briefly after you press the shutter button, and then the Live View preview reappears.
8. If you’re done with Live View shooting, press the Live View button.
The monitor shuts off, and the viewfinder comes back to life.
Recording movies
Your D300s offers the ability to record digital movies. Although recording live action with a D300s involves a few limitations and difficulties that you don’t experience with a real video camera, it’s a fun option to have onboard nonetheless.
Before I give you the specifics, here’s the broad overview of D300s movie making:
Live View mode: You have the same two shooting mode options as for still Live View photography: Tripod mode and Handheld mode. See the earlier section “Choosing your Live View shooting mode” for details.
Movie quality: The Movie Quality setting, which you set via the Movie Settings option on the Shooting menu, as shown in Figure 4-38, determines the frame size and aspect ratio of the movie. You can set the quality to 320 x 216 pixels, for a 3:2 aspect ratio (the same aspect ratio as your D300s still images); 640 x 424, also a 3:2 aspect ratio; and 1280 x 720, which gives you a 16:9 aspect ratio, which is found on many new TV sets and computer monitors.
The higher the pixel count, the larger you can display the movie on a TV or monitor before you see the quality of the playback deteriorate. But a higher Quality setting also produces a larger file, eating up more of your memory card, and it reduces the maximum length of the movie you can record, as outlined next.
Maximum movie length/file size: If you select the highest movie resolution (1280 x 720 pixels), your movie can have a maximum length of five minutes and a maximum file size of 2GB. At the two lower-resolution settings, you’re still restricted to 2GB file sizes, but the movies can run as long as 20 minutes. Of course, you must have 2GB of empty memory card space to store the movie.
Frame rate: The frame rate determines the smoothness of the playback. At all three Quality settings, the frame rate is 24 frames per second, or fps. By contrast, the standard frame rate for television-quality video is 30 frames per second, so expect your movies to play a little less smoothly than your favorite sitcoms.
Sound recording: You can record sound or shoot a silent movie; make the call via the Movie Settings option on the Shooting menu (shown in Figure 4-38). See the next section for details on your choices and an explanation of how to connect an external microphone.
Color: You can set the White Balance option as usual. Movies also use the currently selected Picture Control and Color Space (sRGB or Adobe RGB). For details about all these color options, see Chapter 6.
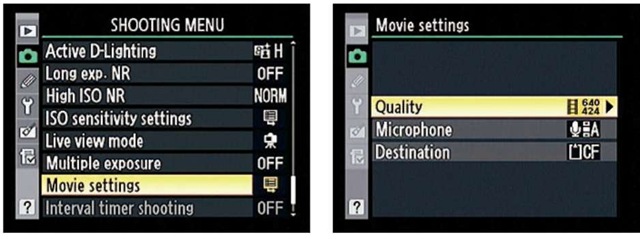
Figure 4-38: Specify movie quality and sound recording options via the Shooting menu.
File storage: If you have two memory cards installed in the camera, use the Destination option on the Movie Settings menu (refer to Figure 4-38) to select which card you want to use to store the file. After you select the option, press the Multi Selector right to see the screen shown in Figure 4-39. For each card, you see the length of the movie that will fit on each card at the current movie-quality settings. (You also can view the capacity of the current card after you switch to Live View mode.) To select the card, highlight it and press OK.
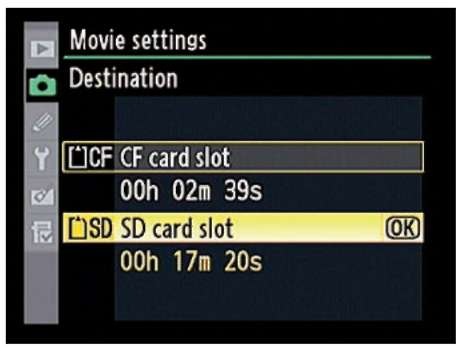
Figure 4-39: If you have two memory cards installed, use this option to select the card where the movie will be stored.
Video format: Movies are created in the AVI format, which means you can play them on your computer using most movie-playback programs. If you want to view your movies on a TV, you can connect the camera to the TV, as explained in Chapter 9. Or if you have the necessary computer software, you can convert the AVI file to a format that a standard DVD player can recognize and then burn the converted file to a DVD disk. You also can edit your movie in a program that can work with AVI files.
So far, so good. None of the aforementioned details is terribly unusual or complicated. Where things get a little tricky for the would-be filmmaker are in the areas of focus and exposure:
Focusing: As with regular Live View photography, you can use autofocus-ing to establish initial focus on your subject before you begin recording. But after recording begins, the autofocus system lays down and plays dead if you use the Handheld Live View mode. In Tripod mode, you can reset focus, but you’re likely to record at least a few frames during which focus goes in and out as the system looks for its new focusing target.
Either way, autofocusing during movie recording is problematic. So unless you’re recording a static subject — say, a guitar player sitting on a stool or a speaker at a lectern — opt for manual focusing. You can then adjust focus manually any time during the recording.
If you plan to also zoom in and out, give yourself some time to practice before the big event. It’s a bit of a challenge to zoom and focus at the same time, especially while holding the camera in front of you so that you can see the monitor. (A tripod makes the maneuver slightly easier.)
Exposure: The camera automatically selects Matrix metering mode, which sets exposure based on the light throughout the entire scene. You can’t use the other two metering modes. In addition, the camera adjusts ISO (light sensitivity) automatically for you.
In Handheld mode, the camera also handles the aperture and shutter speed settings automatically, In Tripod mode, however, you can set the camera to the M or A exposure modes and then dial in an aperture setting (to affect depth of field) before you begin recording. In either Tripod or Handheld mode, you can adjust exposure in the P, S, and A exposure modes by using Exposure Compensation, but only to EV +3.0 or -3.0 (rather than the usual range of -5.0 to +5.0 available for still photography). During recording, you can press the AE-L/AF-L button to lock exposure.
Customizing sound recording
The D300s improves on the movie-recording capabilities of most other still cameras that offer movie mode by enabling you to record sound either through the internal microphone or by attaching an external mike.
The advantages of an external microphone are twofold. First, you can buy a mike that offers stereo recording and better overall sound quality than the internal one. Additionally, by positioning the mike away from the camera, you avoid including sounds made by the camera in the recording.
You can attach any microphone that has a standard, 3.5mm mini-pin plug. The mike jack is located under the cover on the left side of the camera, as shown on the left in Figure 4-40.
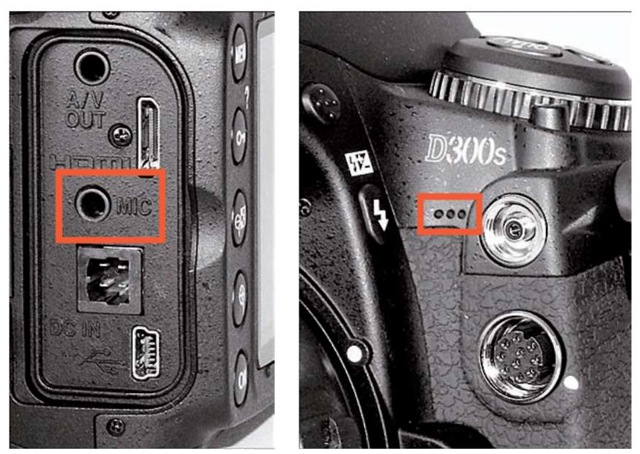
Figure 4-40: You can connect an external mike or use the built-in one.
If you instead choose to use the internal microphone, note its position: It’s the little three-holed area above the D300s logo, on the front of the camera, as shown on the right in the figure. Make sure that you don’t inadvertently cover up the microphone with your finger. And keep in mind that anything you say will be picked up by the mike along with any other audio present in the scene.
Whether you use the internal mike or attach another one, set the recording options through the Movie Settings option on the Shooting menu, as shown in Figure 4-41. Highlight Microphone and press OK to display the options shown on the second screen in the figure.
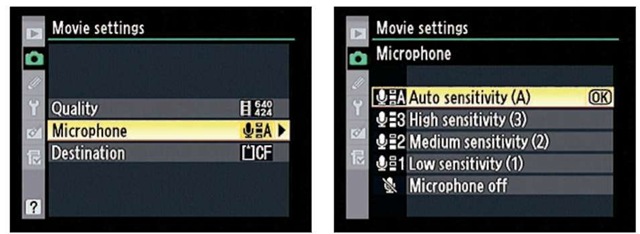
Figure 4-41: Set the microphone sensitivity or disable sound here.
You have the following options:
To disable sound: Choose Microphone Off to record a movie without any sound at all.
To enable sound: All the other settings enable sound. You can select a specific sensitivity setting to control how loud a sound has to be in order to be picked up by the mike. For a very quiet speaker sitting across the room, for example, you may want to increase the sensitivity. Or, if you don’t want to pick up faraway noises, decrease the sensitivity so only sounds close to the mike get recorded. At the Auto level, the camera adjusts the sound level automatically.
You also can adjust the microphone sensitivity after switching to Live View mode by using the trick mentioned earlier, in the section about adjusting monitor brightness: Press and hold the Playback button and then press the Multi Selector left to highlight the little microphone symbol in the upper-right corner of the screen. (Peek ahead at Figure 4-42, in the next section, for a look.) Then press up or down to cycle through the various sensitivity settings. Release the Playback button when you’re done.
Shooting your movie
To try out movie recording, first set your camera as outlined in all the preceding sections. Then take these steps:
1. Press the Lv button to switch to Live View mode.
2. Compose your shot.
3. Set focus.
Which method you can use depends on whether you use Tripod mode or Handheld mode. You can find details in the preceding sections on still photography in Live View mode, but here’s the quick recap:
• In either mode, manual focusing typically works best. Be sure to set your lens and the camera to manual focusing and then just twist the lens focusing ring to adjust focus.
• In Handheld mode, frame your subject so that it’s under the autofocus point — you can use the Multi Selector to position the point — and then press the AF-ON button or press the shutter button halfway to focus. The monitor will shut off briefly; when you hear the beep signaling that focus has been set, release the button. You can’t adjust autofocus after you begin recording; if you try, recording stops automatically. Also remember that Vibration Reduction, if your lens offers it, engages only if you press the shutter button to set focus.
• In Tripod mode, use the Multi Selector to position the focus point over your subject and then press the AF-ON button to set focus. The monitor remains on while focus is being set. You can press the button again during recording to adjust focusing if needed, but be aware that you may be able to hear the sound of the focusing motor in the recording and see the camera “hunt” for the new focusing target.
After focusing, you can press the Zoom In button to magnify the display and check focus, just as when you take still pictures in Live View mode. Press OK to return to the non-magnified view.
4. Adjust exposure if desired.
Depending on the Live View mode you use, you can adjust exposure through the aperture setting (f-stop), by applying exposure compensation,
or applying autoexposure lock. Chapter 5 details all these settings; here’s how they work during movie recording:
• Select an aperture (f-stop). In Tripod mode, you can set the exposure mode to M or A and then select an aperture setting as high as f/16. (Rotate the sub-command dial to set the f-stop.) However, if the scene on the monitor appears too dark, open up the aperture by choosing a lower f-stop value. In Handheld mode, you can’t select an aperture.
• Apply Exposure Compensation. In either mode, you can tweak exposure by applying Exposure Compensation within a range of +/- EV 3.0. But you must set the exposure mode to A, S, or P to use that feature; it doesn’t work with manual exposure. Rotate the command dial while pressing the Exposure Compensation button to adjust the setting.
• Lock the current exposure settings. Press the AE-L/AF-L button at any time during recording to keep the current exposure settings. Otherwise, exposure is continually adjusted as needed to deal with any changes in the lighting conditions.
5. Press the center button of the Multi Selector to begin recording.
A red Rec symbol begins flashing at the top of the monitor. If your monitor is set to the default Live View display mode, you also see the recording symbols shown in Figure 4-42. These symbols, which are also visible before you start recording, indicate the following:
• Time remaining: This value shows you how many minutes and seconds of video will fit on your current memory card. (The length is dependent on the movie-quality settings you choose and the amount of space on your memory card.) As you record, the value updates continually.
• Microphone setting: This symbol shows the current microphone sensitivity setting. (The symbols match those that you see when you adjust the setting through the Movie Settings option on the Shooting menu. (Refer to Figure 4-41.) For example, the symbol shown in Figure 4-42 reflects the Auto Sensitivity setting.
Remember that you can adjust the microphone sensitivity without returning to the menu: See the tip at the end of the preceding section for how-tos.
6. To stop recording, press the center button of the Multi Selector.
7. Press the Lv button to exit Live View mode and return to normal shooting.

Figure 4-42: The red Rec symbol flashes while recording is in progress.
Playing a movie
To play your movie, exit Live View mode and then press the Playback button. In single-image playback mode, you can spot a movie file by looking for the little movie-camera icon in the top-left corner of the screen, as shown in Figure 4-43. Press the center button of the Multi Selector to start playback.
In thumbnails view, you see little film-strip dots along the edges of movie files. Use the Multi Selector to highlight the movie file and then press the center button of the Multi Selector twice to start playback — once to shift to single-image view and again to start movie playback.
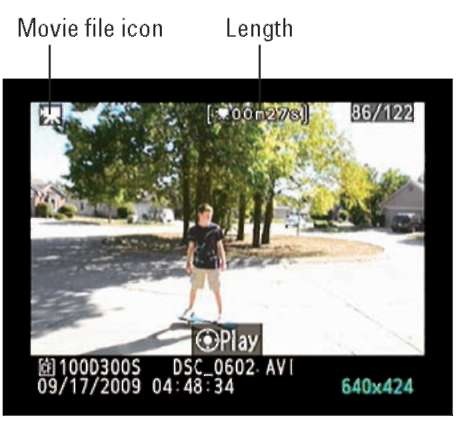
Figure 4-43: Press the center button of the Multi Selector to begin playing a movie.
You can control playback as follows:
Increase sound volume. Press the Zoom In button.
Decrease volume. Press the Zoom Out button.
Pause playback. Press the Multi Selector down. While playback is paused, press the Multi Selector right or left to advance or go back one frame.
Resume playback. Press the center button again.
Fast-forward or rewind. While the movie is playing, press the Multi Selector right to fast-forward and left to rewind. Each press increases the speed of the playback, up to 16 times normal. Keep holding the button down to skip to the end or beginning of the movie.
Stop playback. Press the Multi Selector up.
Chapter 9 explains how to connect your camera to a television so you can play your movies on the big screen.
Editing movies
You can do some limited movie editing through the camera’s Retouch menu. I emphasize: limited editing. You can trim frames from the start of a movie and clip off frames from the end, and that’s it. If that interests you, give it a go:
1. Display your movie in full-frame view and then press OK.
You see the Edit Movie option appear, as shown in Figure 4-44. This is the sole Retouch menu option related to movies.
2. Press the Multi Selector right to display the screen shown on the right in Figure 4-44.
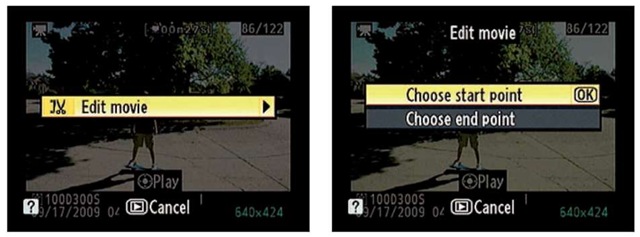
Figure 4-44: You can trim frames from the start and end of your movie through the Retouch menu.
3. To trim frames from the start of the movie, select the Choose Start Point option; to trim the end of the film, select the Choose End Point option.
4. Press OK.
5. Play the movie to the first frame you want to use and then pause playback.
Use the playback techniques referenced in the preceding section to control playback.
6. With the playback paused, press the Multi Selector up.
You see a screen asking permission for the cuts to be made.
7. Highlight Yes and press OK.
All frames prior to the current one head for the cutting room floor. Don’t worry, though, your frames aren’t permanently lost because the edited movie is saved as a new file.
8. To trim additional footage, repeat the process but start by displaying the edited movie file in Step 1.
Edited files are indicated by a little scissors icon that appears to the right of the movie file symbol, as shown in Figure 4-45.

Figure 4-45: The scissors tell you that you’re looking at an edited movie file.
