In This Chapter
Enjoying the ease of P (programmed autoexposure) mode
Getting comfortable with the basic picture-taking process
Selecting a shutter-release mode
Enabling flash
Dipping your toe in creative waters with flexible programmed auto
One look at the D300s tells you that it’s a complex piece of equipment,laden with options that provide precise control over focus, color, exposure, and every other aspect of your pictures. What may not be so obvious is that with the proper camera setup, your D300s can, in fact, offer point-and-shoot simplicity.
Of course, you likely bought this topic for help with your camera’s advanced options, and that’s what the rest of this topic covers. But so that you can take great shots while you’re learning, this chapter shows you how to operate your camera in the easiest, most automatic way possible. It’s not quite as simple as using the Full Auto modes found on beginner cameras, but it’s close — “Almost Auto,” if you will.
The first part of the chapter shows you how to set up your camera to take advantage of this stress-free approach to D300s photography. Then you’re introduced to a basic recipe that guides you through the process of framing, focusing, and snapping your first pictures. Following that, you can find out how to tweak the basic recipe by adding flash, changing the shutter-release mode, and manipulating exposure settings to take a little more creative control over your photos.

Preparing for Automatic Shooting
The “almost automatic” photography technique that I describe in this chapter is based on a specific camera setup. Most of the settings you need to use are the camera defaults — that is, the ones that were in force when you first opened your camera box. Nikon chose these settings because they produce good results in most situations, so it makes sense to rely on them until you have a chance to investigate exactly how each camera option affects your pictures.
Of course, if you’re like me, you’ve probably fiddled with some of the settings since you got your camera — flipped a switch here, rotated a dial there, and so on. So the following steps show you how to get back to square one and make a few other tweaks that get you set up for easy-breezy shooting.
Don’t be put off by the length of the steps, by the way: First, it takes a lot more time to explain everything in text than it does to actually accomplish the task at hand. Second, because all the settings remain intact unless you later change them, you need to go through the steps only once — you don’t have to repeat them before each picture.
Also note that the steps assume that you haven’t yet created any custom menu banks, an advanced topic you can explore in Chapter 10. If you have created banks, be aware that restoring the defaults in Steps 2 and 3 affects the active bank.
1. Set the exposure mode to P (programmed autoexposure).
In this mode, the camera calculates the correct exposure for you; you don’t need to know anything about f-stops, shutter speeds, and other exposure settings to get a good exposure. If you do know about those settings, though, you still have some control over them even in P mode; see the last section in this chapter for details.
To set the exposure mode, press the Mode button and rotate the main command dial until you see the letter P in the upper-left corner of the Control panel, as shown in Figure 2-1. The P also appears in the view-finder and Information display, also shown in the figure.
Note: If you use a non-CPU lens, you can’t use the P mode; you are limited to A (aperture-priority autoexposure) or M (manual). See Chapter 5 for help using both modes; see Chapter 1 for more about non-CPU lenses.
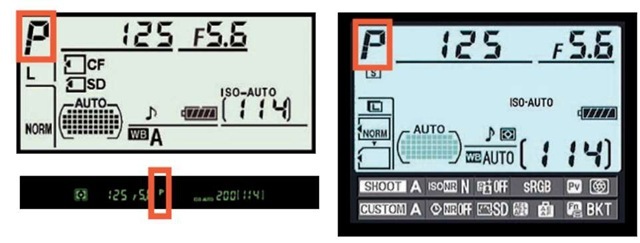
Figure 2-1: The P mode enables you to enjoy the simplicity of fully automatic exposure.
2. Restore all Custom Setting menu and Shooting menu options.
To restore the Custom Setting menu options, open that menu and highlight Reset Custom Settings, as shown on the left in Figure 2-2. Press OK, highlight Yes, and press OK again. Note, however, that this step also resets many basic camera setup options, such as the volume of the beep signal, in addition to those that affect actual photography. Chapter 1 details those options if you want to revisit them.
To restore the Shooting menu defaults, follow the same steps but choose Reset Shooting Menu, as shown on the right in Figure 2-2, from the top of the Shooting menu.
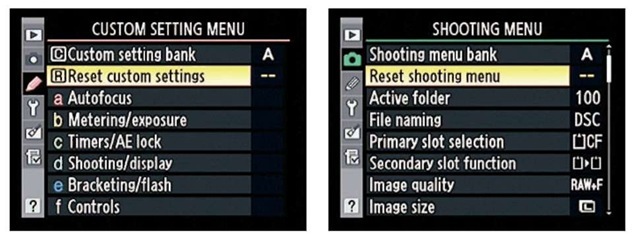
Figure 2-2: Choose these options to quickly restore all Shooting menu and Custom Setting menu options to the default settings.
3. Perform a two-button reset to restore a few additional picture-taking settings.
To perform this type of reset, press the Qual and Exposure Compensation buttons together for more than two seconds. The Control panel shuts off briefly while the reset is occurring; when the panel reappears, release the buttons.
4. Reopen the Shooting menu, select ISO Sensitivity Settings and turn the ISO Sensitivity Auto Control option on, as shown in Figure 2-3.
ISO Sensitivity determines your camera’s sensitivity to light. Enabling the ISO Sensitivity Auto Control option gives the camera permission to adjust the light sensitivity if needed to produce a good exposure. Leave all the other settings at their defaults, shown on the right in the figure. And see Chapter 5 for the whole story on this option and ISO in general.

Figure 2-3: Enable ISO Sensitivity Auto Control to give the camera permission to increase ISO (light sensitivity) if needed to properly expose the photo.
When you enable the feature, the ISO Auto label appears in the displays. (Refer to Figure 2-1.) If the camera’s about to adjust ISO for you, the label blinks.
5. Set the Metering mode selector to the Matrix setting, as shown on the left in Figure 2-4.
This option determines which part of the frame the camera considers when calculating the correct exposure. The setting shown in Figure 2-2 represents the matrix mode — which is a fancy way of saying that the camera bases exposure on the entire frame. See Chapter 5 to find out more.
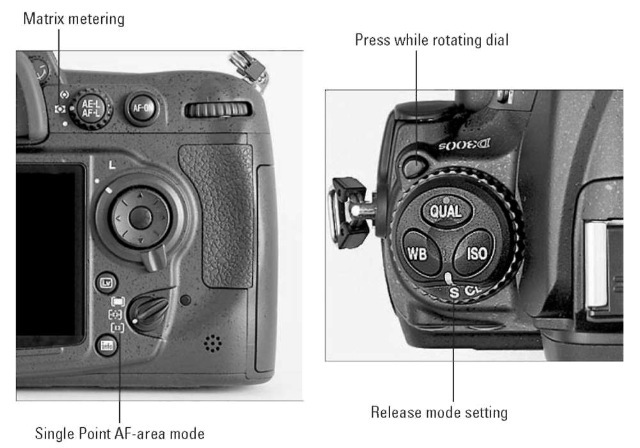
Figure 2-4: Use these Metering mode, AF-area mode, and Release mode settings.
6. Set the AF-area mode switch to the Single Point position, as shown in Figure 2-4.
The AF-area mode setting determines which part of the frame the camera uses to calculate focus. In the Single Point mode, the camera focuses on the object at the center of the frame by default.
7. Set the Release mode to S, as shown on the right in Figure 2-4.
To change the setting, press and hold the little black button labeled in the figure as you rotate the Release Mode dial.
The S (Single Frame) Release mode tells the camera to record one picture each time you press the shutter button. For other options, see “Changing the shutter-release mode,” later in this chapter.
That’s it. Your camera is now set up to operate in its most automatic modes. The next section walks you through the process of actually taking a picture — wow, and only about 50 pages into the topic!
Taking the Shot: The Basic Recipe
After you set up your camera as described in the preceding section, the process of taking a picture is pretty much the same as with any fully automatic, point-and-shoot camera you may have used. The biggest variation is that you can choose to focus manually instead of sticking with autofocus.
Follow these steps to frame, focus, and shoot:
1. Set the focus mode (manual or automatic).
You set the mode through the Focus mode selector switch, shown in Figure 2-5. For manual focusing, set the switch to M; for autofocusing, choose S, as shown in the figure.
The S stands for single-servo autofocus. Check out Chapter 6 for complete details on this autofocus mode as well as its companion, C (continuous-servo autofocus).
If your lens also has a focus mode switch, set it to your desired focus option as well. Figure 2-5 shows the switch as it appears on some Nikon lenses. On this lens, setting the switch to A enables autofocusing; M is for manual focusing.
Also turn on vibration reduction (VR, on Nikon lenses) if your lens offers it and you’re hand-holding the camera. For tripod shooting, check the lens manual to find out which setting the manufacturer recommends.
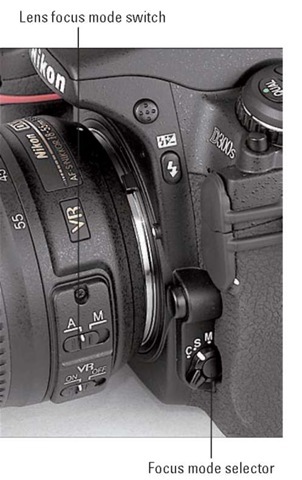
Figure 2-5: You may need to set the focus mode on the lens as well as on the camera body.
2. Frame your subject so that it
appears under the autofocus point, as shown in Figure 2-6.
The autofocus point is the little black rectangle shown in the center of the frame in Figure 2-5. You see the single autofocus point any time you set the camera’s Focus mode selector switch to the M or S position.
3. If focusing manually, twist the focusing ring on the lens to focus.
4. Press and hold the shutter button halfway down.
At this point, a couple of things happen:
• The camera meters the light in the scene and establishes the initial exposure settings.
• If you’re using autofocusing, the camera sets focus on the object under the autofocus point. You also see the green focus indicator lamp in the viewfinder, as shown in Figure 2-7, and hear a beep if the autofocus system is successful in locking focus.
• If you’re focusing manually, you don’t hear a beep, but the focus lamp does light when the object under the autofocus point comes into focus. (This focus aid works only with lenses that offer
a maximum aperture of at least f/5.6, however. See the last section of this chapter for an introduction to aperture settings.)
With autofocusing, focus remains locked as long as you keep the shutter button halfway down, even if you reframe the shot. The exposure settings are
adjusted up to the time you take the picture, however.
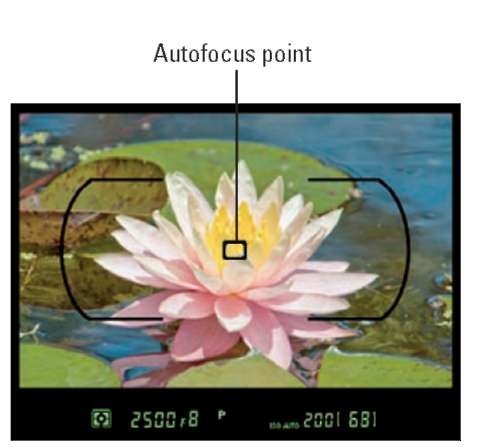
Figure 2-6: Frame your subject so that it falls under the autofocus point.
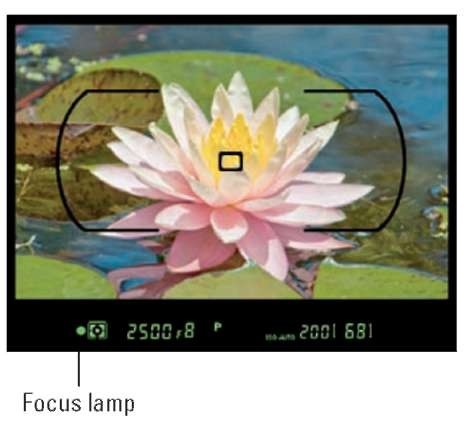
Figure 2-7: The focus indicator lamp lights when the object under the focus point comes into focus.
5. Press the shutter button the rest of the way down to take the picture.
While the camera sends the image data to the camera memory card, the memory card access lamp lights. (It’s the little light just to the right of the AF-area mode selector.) Don’t turn off the camera or remove the memory card while the lamp is lit, or you may damage both camera and card.
See Chapter 4 to find out how to switch to playback mode and take a look at your picture.
A couple of additional tips about focusing:
By default, the camera does not let you take the picture in S autofocus mode until focus has been established. You can change this behavior through an option called AF-S Priority Selection, found on the Custom Setting menu and covered in Chapter 6.
In manual focusing mode, the camera assumes that you know what you’re doing and records the picture even if the scene isn’t in focus. Be sure that you adjust the viewfinder to your eyesight, as outlined in Chapter 1, so that you can gauge focus accurately.
You don’t have to use the autofocus point in the center of the frame as your focusing target. You can move the point to another position within the frame. First, set the Focus-point selector lock switch to the position shown in Figure 2-8. Then press the Multi Selector to move the focus point. You can move the point to any of 51 positions within the bounds of the autofocusing brackets, also labeled in the figure. For example, I moved the autofocus point directly over the museum sign in the figure. (The 51-point availability relies on the default setting for a Custom Setting menu option called AF Point Selection; see Chapter 6 for more details.) If the point doesn’t move when you press the Multi Selector, give the shutter button a half press and release it to wake up the camera’s metering system and then try again.
If you have trouble focusing, you may be too close to your subject; every lens has a minimum focusing distance. Your lens manual spells out this detail.
A blurry photo is not always the result of poor focus; the problem can also be caused by a slow shutter speed. The last section of this chapter introduces you to shutter speed and how you can adjust that setting.
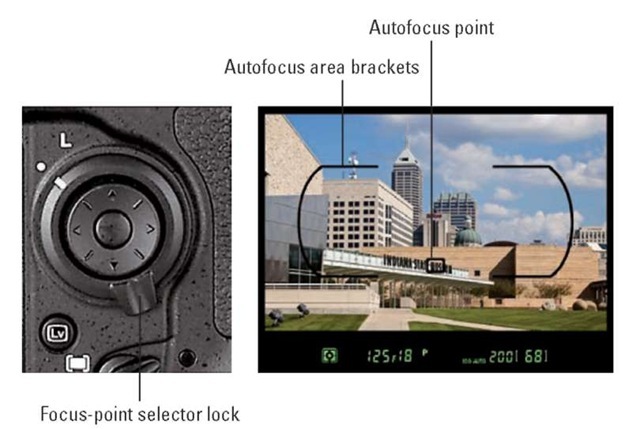
Figure 2-8: You can press the Multi Selector to reposition the autofocus point.
Tweaking the Recipe: Easy Adjustments for Better Results
After you’re comfortable with the basic picture-taking recipe outlined in the preceding section, try out the variations presented in the next three sections.
Adding flash
On most point-and-shoot cameras, the flash fires automatically if the camera thinks additional light is needed to expose the picture. The D300s, however, leaves all flash control in your hands.
You can enable or disable the built-in flash as follows:
To enable flash: Press the Flash button, shown in Figure 2-9, to raise the built-in flash.
To go flash-free: If the flash unit is up, just press it gently back down. The flash will not fire when you take the picture.
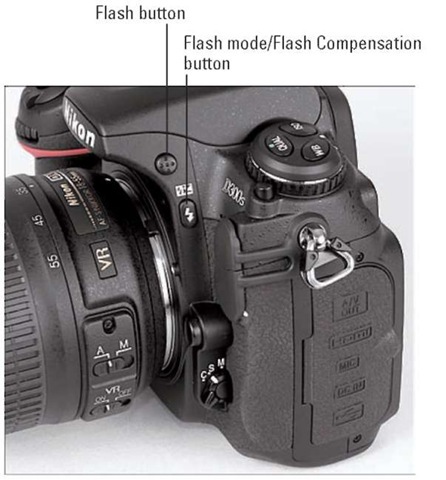
Figure 2-9: Need more light? Just press the Flash button to engage the built-in flash.
If you do use flash, you must also select a flash mode, which affects the behavior of the flash. The current mode appears in the Information display and Control panel, as shown in Figure 2-10. (To display the Information screen, press the Info button.) The viewfinder display doesn’t
advise you of the specific flash mode but instead just shows the universal lightning bolt icon, as shown in the figure, when the flash is enabled, charged, and ready to fire. (The flash needs a moment or two to recharge between shots; be sure to wait until the symbol appears before you take your next picture.)
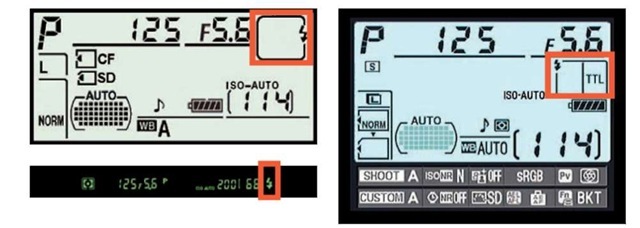
Figure 2-10: The Control panel and Information display show the flash mode; the viewfinder symbol indicates when the flash is charged and ready to use.
In the P exposure mode, you can set the flash to five different flash modes, all of which I cover thoroughly in Chapter 5. But when you use the automatic shooting strategy suggested in this chapter, keep things simple by using one of the following two modes, represented in the displays by the icons you see here:
Front-curtain sync (normal flash): Don’t worry about what “front-curtain sync” means for now. Just think of this mode as “regular flash.”
Red-eye reduction: In this mode, the Red-Eye Reduction lamp on the front of the camera lights up when you press the shutter button halfway. The purpose of this light is to attempt to shrink the subject’s pupils, which helps reduce the chances of red-eye. The flash itself fires when you press the shutter button the rest of the way. If you use this option, be sure to warn your subject to expect the prelight and keep smiling until the actual flash goes off.
The letters TTL that appear with the flash mode in the Information display stand for through the lens and refer to the fact that the camera calculates the proper flash exposure by reading the light that’s coming through the lens.
Changing the shutter-release mode
Introduced in the first part of this chapter, the Release mode determines how the shutter release is triggered. You adjust the setting through the Release Mode dial, shown again on the left in Figure 2-11 to save you the chore of flipping back to its first appearance in the chapter.
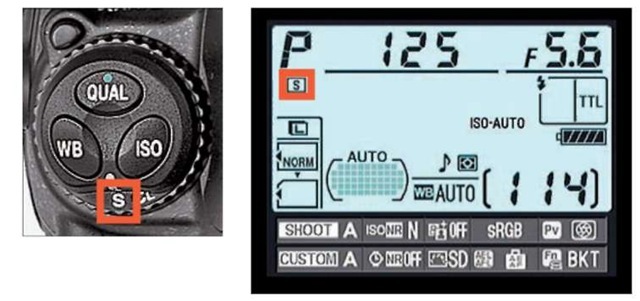
Figure 2-11: You can choose from six Release modes.
To change the setting, press and hold the little black button just above the Qual button while rotating the main command dial. The letter displayed next to the white marker represents the selected setting. For example, in Figure 2-11, the S is aligned with the marker, showing that the Single Frame mode is selected. For all but two Release modes (Quiet and Mirror Up), the Information display shows you the current mode as well, as shown on the right in Figure 2-11.Your camera offers six release modes, which work like so:
Single Frame: This setting, which is the default, records a single image each time you press the shutter button completely. In other words, this is normal-photography mode.
Continuous Low: Sometimes known as burst mode, this mode records a continuous series of images as long as you hold down the shutter button. At the default setting, Continuous Low mode can capture a maximum of three frames per second. But you can set the maximum capture number to any number from one to seven frames per second. Just open the Custom Setting menu, select the Shooting/Display submenu, and then select CL Mode Shooting Speed, as shown in Figure 2-12. The Release mode symbol in the information display shows you the current setting; for example, if you use the default setting, you see the 3 fps in the display.
Why would you want to capture fewer than the maximum number of shots? Well, frankly, unless you’re shooting something that’s moving at a really, really fast pace, not too much is going to change between frames when you shoot at 7 frames per second. So when you set the burst rate that high, you typically just wind up with lots of shots that show the exact same thing, wasting space on your memory card. So I keep this value set to the default, three, and then if I want that max burst rate, I use the Continuous High setting, explained next.
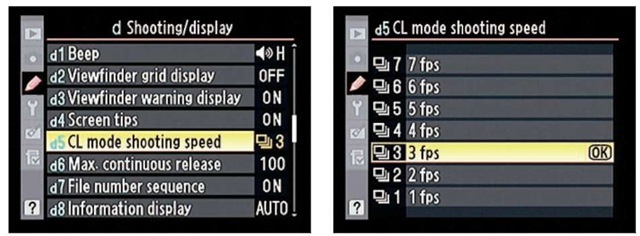
Figure 2-12: You can specify the maximum frames-per-second rate for Continuous Low Release mode.
Continuous High: This mode works just like Continuous Low except that it records up to seven frames per second. You can’t adjust the frame rate for this mode.
Neither of the Continuous modes, by the way, works when you enable flash because the flash can’t recycle fast enough to permit the rapid capture rate. And the actual number of frames you can record per second depends on several factors. At a slow shutter speed, the camera may not be able to reach the maximum frame rate. (See Chapter 5 for an explanation of shutter speed.) The maximum burst rate also drops when you capture photos as 14-bit NEF (RAW) files (explained in Chapter 3) or enable Vibration Reduction. On the other hand, you may be able to achieve a slightly higher frame rate when you use the optional AC power adapter or battery pack; see the camera manual for details if you’re interested.
In addition, you can tweak both modes by limiting the maximum number of shots the camera takes with each press of the shutter button. Again, the idea behind this feature is simply to prevent firing off lots of wasted frames. To make the adjustment, use the Max Continuous Release option, found on the Custom Setting menu, just below the CL Mode Shooting Speed option, as shown in Figure 2-13.
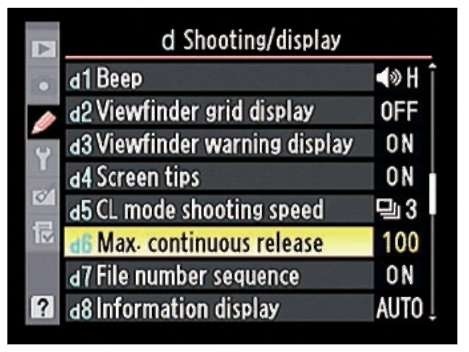
Figure 2-13: This option limits the number of shots recorded with each press of the shutter button in the Continuous Low and Continuous High modes.
Self-Timer: Want to put yourself in the picture? Select this mode and then press the shutter button and run into the frame. As soon as you press the shutter button, the autofocus-assist illuminator on the front of the camera starts to blink, and the camera emits a series of beeps (assuming that you didn’t disable its voice, a setting I cover in Chapter 1). A few seconds later, the camera captures the image.
At the default settings, the capture-delay time is 10 seconds. But you can adjust the delay time by visiting the Custom Setting menu. After you pull up the menu, choose the Timers/AE Lock submenu and then select the Self Timer option, as shown in Figure 2-14. You can select a capture-delay time of 2, 5, 10, or 20 seconds.
Mirror Up: One of the components involved in the optical system of an SLR camera is a tiny mirror that moves when you press the shutter button. The small vibration caused by the movement of the mirror can result in slight blurring of the image when you use a very slow shutter speed, shoot with a long telephoto lens, or take extreme

Figure 2-14: You can adjust the self-timer capture delay via the Custom Setting menu.
close-up shots. To eliminate the possibility, the D300s offers a feature known as mirror lockup, which you enable by setting the Release mode to Mirror Up. When you enable this feature, the mirror movement is completed well before the shot is recorded, thus preventing any camera shake.
Mirror lockup shooting requires a slightly different shutter-button technique: You must press the shutter button fully twice to take the picture. After framing and focusing, press the button all the way down to lock up the mirror. At this point, you can no longer see anything through the viewfinder. Don’t panic — that’s normal. The mirror’s function is to enable you to see in the viewfinder the scene that the lens will capture, and mirror lockup prevents it from serving that purpose. To record the shot, let up on the shutter button and then press it all the way down again. (If you don’t take the shot within about 30 seconds, the camera will record a picture for you automatically.)
For good results, always use a tripod when using mirror lockup to eliminate any chance of camera shake. Adding a remote-control shutter-release cable further ensures a shake-free shot — even the action of pressing the shutter button can move the camera enough to cause some slight blurring. (Or you can just wait the 30 seconds needed for the camera to take the picture automatically, if your subject permits.)
Quiet: This Release mode setting is designed for situations when you want the camera to be as silent as possible. It disables the autofocus beep and also decreases the internal sounds the camera makes from the time you fully depress the shutter button to the time you lift your finger off the button.
When you use Self-Timer mode or trigger the shutter release with a remote control — that is, any time you take a shot without your eye to the viewfinder — you should remove the little rubber cup that surrounds the viewfinder and then insert the little viewfinder cover that shipped with your camera. (Dig around in the accessories box — the cover is a tiny black piece of plastic, about the size of the viewfinder.) Otherwise, light may seep into the camera through the viewfinder and affect exposure. You can also simply use the camera strap or something else to cover the viewfinder in a pinch.
Adding some creative flavor with flexible programmed auto
Your camera has four exposure modes, P, S, A, and M, which determine how much control you have over two critical exposure settings, aperture and shutter speed. You select the mode by pressing the Mode button while rotating the main command dial. The current mode setting appears in the upper-left corner of the Control panel, and it’s also displayed in the viewfinder and Information screen, as shown in Figure 2-15. The aperture and shutter speed settings appear in the areas highlighted in the figure.
What does [r 37] in the viewfinder mean?
When you look in your viewfinder to frame a shot, the initial value shown in brackets at the right end of the viewfinder display indicates the number of additional pictures that can fit on your memory card. For example, in the left viewfinder image below, the value shows that the card can hold 68 more images.
As soon as you press the shutter button halfway, that value changes to instead show you how many pictures can fit in the camera’s memory buffer. In the right image here, for example, the “r 37″ value tells you that 37 pictures can fit in the buffer.

The buffer is a temporary storage tank where the camera stores picture data until it has time to fully record that data onto the camera memory card. This system exists so that you can take a continuous series of pictures without having to wait between shots until each image is fully written to the memory card.
When the buffer is full, the camera automatically disables the shutter button until it catches up on its recording work. Chances are, though, that you’ll very rarely, if ever, encounter this situation; the camera is usually more than capable of keeping up with your shooting rate.

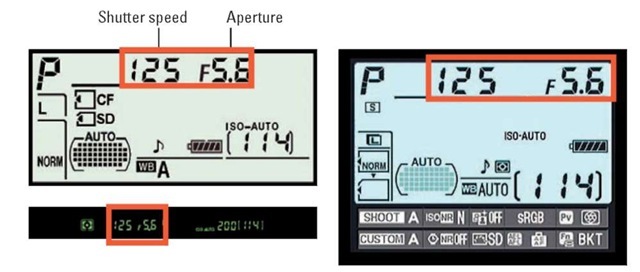
Figure 2-15: The P mode offers fully automatic exposure but still gives you some control over aperture (f-stop) and shutter speed.
For the most automatic operation of your D300s, the P (programmed autoex-posure) is the way to go. In this mode, the camera selects both the aperture and shutter speed for you so that you can get a perfectly exposed photo with no photography experience at all.
If you are familiar with the basics of exposure, you know that aperture and shutter speed affect your picture in ways beyond exposure. The aperture setting, measured in f-stops, affects depth of field, or the distance over which sharp focus is maintained in a scene. And shutter speed, measured in seconds, determines whether any movement of either the camera or the subject creates blur in the photo.
Chapter 5 details all the ins and outs of aperture and shutter speed, but here’s the (very) short story:
A low f-stop number keeps less of the scene in focus than a high f-stop setting. So if you’re shooting a portrait, for example, and want that classic, soft-focus background, you want a low f-stop number. For example, in Figure 2-16, used an f-stop

Figure 2-16: To throw the background out of focus, use an aperture of f/5.6.
of f/5.6. If you instead want the background to be sharper, you select a higher f-stop number. I took that approach to capture the landscape in Figure 2-17, setting the aperture to f/16. In this photo, notice that the walkway remains sharply focused over a great distance. Keep in mind that you can affect this characteristic in other ways, including the lens focal length and your distance to the subject; Chapter 6 spells out this issue.
A fast shutter speed freezes motion; a slow shutter speed blurs it. Shutter speed refers to the duration of the exposure, and it’s measured in seconds. The exact shutter speed needed to stop action depends on the speed of the subject, however. For example, in Figure 2-18, I caught my romping furkid in mid-flight at a shutter speed of 1/160 second. You might need a faster shutter speed to capture a motorbike or

Figure 2-17: For this scene, I wanted to maintain sharp focus over a large distance, so I set the aperture to a high number (f/16).
boat, but a slower speed might work fine for a flower swaying gently in the breeze. Experimentation is key, in other words.
If you’re handholding the camera, you need to avoid very slow shutter speeds to avoid camera shake that can blur your entire photo. How slow you can go also varies depending your lens and your capabilities. If your lens offers vibration reduction, enabling that feature can help you get better results when handholding the camera.
Why get into all of this now, you ask, when the point of this chapter is easy-breezy, automatic photography? Because the P exposure mode allows you to choose from more than one combination of aperture and shutter speed. All of them produce the same exposure, but they deliver different results in terms of depth of field and motion blur (or lack of it). So you have the choice of choosing the combination that the camera originally selects or choosing a different combination that results in the shutter speed or aperture that suits your creative goals.
Nikon refers to the ability of the camera to present different aperture/shutter speed combinations as flexible programmed autoexposure.
Try out these steps to get comfortable with the P mode:
1. Looking through the viewfinder, frame your shot.
2. Press the shutter button halfway to fire up the autoexposure meter.
Now the camera reports its suggested aperture and shutter speed in the view-finder. Take your eye away from the viewfinder, and you can also view the settings in the Control panel and Information display.
The shutter speed values in the displays represent fractions of a second. For example, the shutter speed in Figure 2-19 is 1/160 second. For shutter speeds of 1 second or more, a
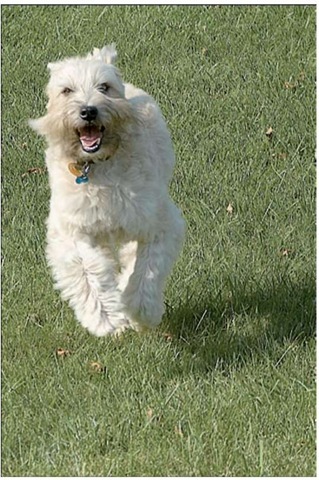
Figure 2-18: If your subject is moving, make shutter speed a priority over f-stop; select a high speed to freeze action.
quote mark appears after the value — 1 second appears as 1, 2 seconds as 2″, and so on.
3. To view other shutter speed/aperture combinations, rotate the main command dial.
How many combinations are available depends on the lighting conditions and the aperture range offered by your lens. (Every lens offers a specific range of f-stops.)
As soon as you rotate the dial, an asterisk appears next to the P in the displays, as shown in Figure 2-19. When you rotate the dial enough to shift back to the original shutter speed/f-stop combo, the asterisk disappears.
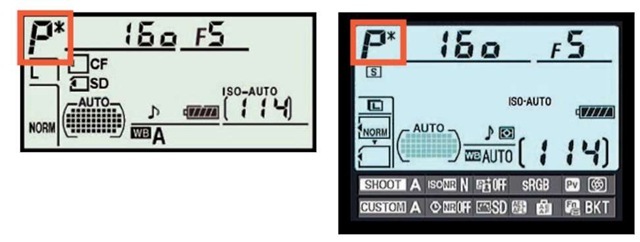
Figure 2-19: The asterisk means that you’ve adjusted the f-stop and shutter speed from the combination originally suggested by the camera.
Again, any of the combos will produce a good exposure in terms of image brightness. So if you don’t care to think about all the depth-of-field/motion blur stuff right now, you can just stick with the original settings the camera selects.
Actually, I should qualify that last statement just a little: Any of the settings will produce a good exposure if the lighting conditions are good. But in very dim lighting or very bright lighting, the camera may not be able to deliver a good exposure. To find out how to deal with exposure and lighting mis-cues, head for Chapter 5. For more help with focusing and color, check out Chapter 6.
