In This Chapter
Transferring pictures to your computer
Using Nikon Transfer and ViewNX to download and organize photos
Processing NEF (RAW) files
Copying pictures between memory cards
Keeping your picture files safe from harm
For many novice digital photographers (and even some experienced ones), the task of moving pictures to the computer and then keeping track of all of those image files is one of the more confusing aspects of the art form. And frankly, writing about the downloading and organizing process isn’t all that easy, either. I know, I know — would I like some whine with that cheese? But the truth is, providing you with detailed instructions is pretty much impossible because the steps vary widely depending on what software you have installed on your computer and which computer operating system you use.
To give you as much help as I can, however, this chapter shows you how to transfer and organize pictures using the free Nikon software that came in your camera box. After exploring these discussions, you should be able to adapt the steps to any other photo program you may prefer. This chapter also covers a few other aspects of handling your picture files, including converting pictures taken in the NEF (RAW) format to a standard image format.
One note before you dig in: Most figures in this chapter and elsewhere feature the Windows Vista operating system. If you use some other version of Windows or another operating system, what you see on your screen may look slightly different but should contain the same basic options unless I specify otherwise.
Sending Pictures to the Computer
You can take two approaches to moving pictures from your camera memory card to your computer:
* Connect the camera directly to the computer. For this option, you need to dig out the USB cable that came in your camera box. Your computer must also have an open USB slot, or port, in techie talk. If you’re not sure what these gadgets look like, Figure 8-1 gives you a look. The little three-pronged icon, labeled in Figure 8-1, is the universal symbol for USB.
0 Transfer images using a memory card reader. Many computers now also have slots that accept common types of memory cards. If so, you can simply pop the card out of your camera and into the card slot instead of hooking the camera up to the computer.
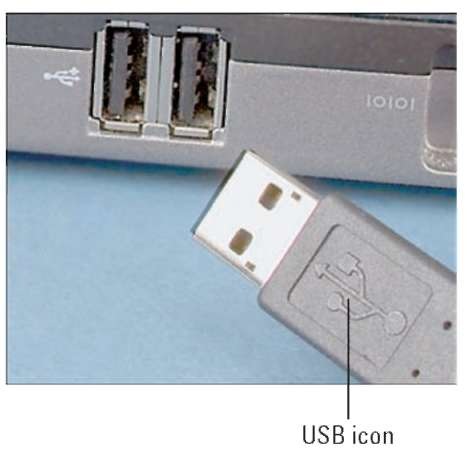
Figure 8-1: You can connect the camera to the computer using the supplied USB cable.
As another option, you can buy stand-alone card readers such as the SanDisk model shown in Figure 8-2. This particular model accepts a variety of memory cards, including those used by your D300s. Check your printer, too; many printers now have card slots that serve the purpose of a card reader. If not, you don’t have to spend much to buy a reader — they cost anywhere from about $10 to $35, depending on how many different types of cards they accept.
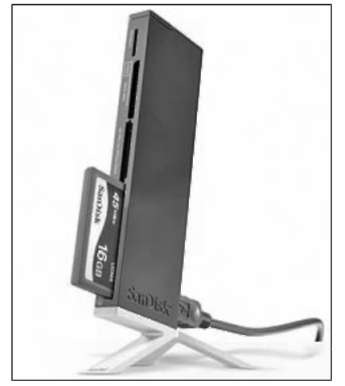
Figure 8-2: A card reader offers a more convenient method of image transfer.
I prefer to use a card reader because to transfer via the camera, the camera must be turned on during the process, wasting battery power. If you want to transfer directly from the camera, however, the next section explains some important steps you need to take to make that option work. For help using a card reader, skip ahead to “Starting the transfer process” to get an overview of what happens after you insert the card into the reader.
Connecting the camera and computer
You need to follow a specific set of steps when connecting the camera to your computer. Otherwise, you can damage the camera or the memory card.
Also note that in order for your camera to communicate with the computer, Nikon suggests that your computer be running Windows Vista, Windows XP, or the Mac operating system. Check the Nikon Web site (www.nikon.com) for a complete list of the compatible versions of each OS (operating systems). For example, Nikon recommends that Vista users have Service Pack 1 installed.
Also check the Nikon support pages if you use another OS for the latest news about any updates to system compatibility. You can always simply transfer images with a card reader, too.
With that preamble out of the way, here are the steps to link your computer and camera:
1. Check the level of the camera battery.
If the battery is low, charge it before continuing. Running out of battery power during the transfer process can cause problems, including lost picture data. Alternatively, if you purchased the optional AC adapter, use that to power the camera during picture transfers.
2. Turn on the computer and give it time to finish its normal startup routine.
3. Turn the camera off.
4. Insert the smaller of the two plugs on the USB cable into the USB port on the side of the camera.
Look under the little rubber door on the left side of the camera, as shown in Figure 8-3, for this port.

Figure 8-3: The USB slot is hidden under the rubber door on the left side of the camera.
5. Plug the other end of the cable into the computer’s USB port.
If possible, plug the cable into a port that’s built in to the computer, as opposed to one that’s on your keyboard or part of an external USB hub. Those accessory-type connections can sometimes foul up the transfer process.
6. Turn the camera on.
What happens now depends on your computer operating system and what photo software you have installed on that system. The next section explains the possibilities and how to proceed with the image transfer process.
7. When the download is complete, turn off the camera and then disconnect it from the computer.
I repeat: Turn off the camera before severing its ties with the computer. Otherwise, you can damage the camera.
Starting the transfer process
After you connect the camera to the computer (be sure to carefully follow the steps in the preceding section) or insert a memory card into your card reader, your next step depends, again, on the software installed on your computer and the computer operating system.
Here are the most common possibilities and how to move forward:
On a Windows-based computer, a Windows message box similar to the one in Figure 8-4 appears.
The dialog box suggests different programs that you can use to download your picture files. Which programs appear depend on what you have installed on your system; if you installed Nikon Transfer, for example, it should appear in the program list, as in the figure. In Windows Vista, just click the transfer program that you want to use. In other versions of Windows, the dialog box may sport an OK button; if so, click that button to proceed.
* An installed photo program automatically displays a photo-download wizard. For example, the Nikon Transfer downloader or a down-loader associated with some other
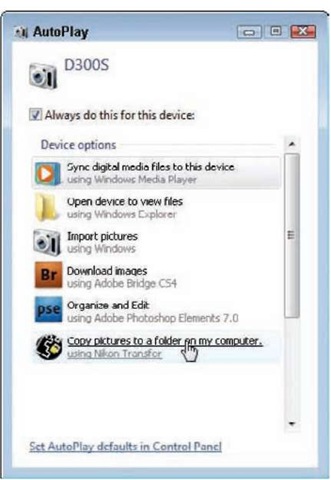
Figure 8-4: Windows may display this initial boxful of transfer options.
photo software may leap to the forefront. Usually, the downloader that appears is associated with the software that you most recently installed. Each new program that you add to your system tries to wrestle control over your image downloads away from the previous program.
If you don’t want a program’s auto downloader to launch whenever you insert a memory card or connect your camera, you should be able to turn that feature off. Check the software manual to find out how to disable the auto launch.
Nothing happens. Don’t panic; assuming that your card reader or camera is properly connected, all is probably well. Someone simply may have disabled all the automatic downloaders on your system. Just launch your photo software and then transfer your pictures using whatever command starts that process. (I show you how to do it with Nikon Transfer later in the chapter; for other programs, consult the software manual.)
As another option, if you work on a PC, you can use Windows Explorer to drag and drop files from your memory card to your computer’s hard drive. Whether you connect the card through a card reader or attach the camera directly, the computer sees the card or camera as just another removable storage drive on the system. So the process of transferring files is exactly the same as when you move any other file from a CD, DVD, or other storage device onto your hard drive. If you have two memory cards in the camera, each will show up as a separate removable drive under the main camera drive (which should be named D300s). Mac users also can drag and drop picture files through the Finder, but only when downloading via a card reader.
In the next sections, I provide details on using Nikon Transfer to download your files and Nikon ViewNX to view and organize your pictures. Remember, if you use some other software, the concepts are the same, but check your program manual to get the small details. In most programs, you also can find lots of information by simply clicking open the Help menu.
Downloading and Organizing Photos with the Nikon Software
Remember unpacking your camera box when you first brought home your D300s? Did you notice a CD-ROM called Nikon Software Suite? If you haven’t already done so, dig out that CD and pop it into your computer’s CD drive. Then install the following two programs:
Nikon Transfer: This program assists you with the process of transferring pictures from your camera or memory card to the computer.
Nikon ViewNX: After downloading your files, you can view and organize your picture files using this program. You also can print and e-mail your photos from ViewNX.
Note that this topic features Nikon Transfer version 1.5.1 and Nikon ViewNX version 1.5, which were the most current at the time of publication. If you own an earlier version of these programs, visit the Nikon Web site to install the updates. (To find out what version you have installed, open the program. Then, in Windows, choose HelpO About. On a Mac, choose the About command from the Nikon Transfer or Nikon ViewNX menu.)
The next several sections give you the most basic of introductions to using Nikon Transfer and ViewNX. If you want more details, just look in the Help system built in to the programs. (Click the Help menu to access the system.)
Before you move on, though, I want to clear up one common point of confusion: You can use the Nikon software to download and organize your photos and still use any photo editing software you prefer. And to do your editing, you don’t need to re-download photos — after you transfer photos to your computer, you can access them from any program, just as you can any file that you put on your system. In fact, for most photo editing programs, you can set things up so that you can select a photo in ViewNX and then open that picture in your chosen photo editor with a click or two. (With some programs, you must first take the step of importing the photo files, which enables the program to build thumbnails and, in some cases, working copies of your pictures.) You can find details in the ViewNX Help system (open the program and then choose HelpOViewNX Help); look for the section called “Setting Up ViewNX.”
Downloading with Nikon Transfer
The following steps explain how to download new pictures to your computer using Nikon Transfer:
1. Attach your camera or insert a memory card into your card reader, as outlined in the first part of this chapter.
Depending on what software you have installed on your system, you may see the initial Nikon Transfer window, as shown in Figure 8-5. Or, in Windows, you may see a dialog box similar to the one shown in Figure 8-4. In that case, click the item that has the Nikon Transfer logo, as shown in Figure 8-4.
If nothing happens, start Nikon Transfer by using the same process you use to launch any program on your computer. (If some other photo software pops up, close it first.)
2. Display the Source tab to view thumbnails of your pictures, as shown in the figure.
Don’t see any tabs? Click the little Options triangle, located near the top-left corner of the window and labeled in Figure 8-5, to display them. Then click the Source tab. The icon representing your camera should be selected, as shown in the figure. If not, click the icon. The dialog box then
displays thumbnails of your images. If you don’t see the thumbnails, click the arrow labeled in Figure 8-5 to expand the dialog box and open the thumbnails area.
If you have two memory cards in the camera, click the little black triangle at the bottom-right corner of the camera icon, as shown in Figure 8-5. You can then choose which card you want the downloader to access.
3. Select the images that you want to download.
A check mark in the little box under a thumbnail tells the program that you want to download the image. Click the box to toggle the check mark on and off.
If you used the in-camera functions to protect pictures (see Chapter 4), you can select just those images by clicking the Select Protected icon, labeled in Figure 8-5. To select all images on the card, click the Select All icon instead.
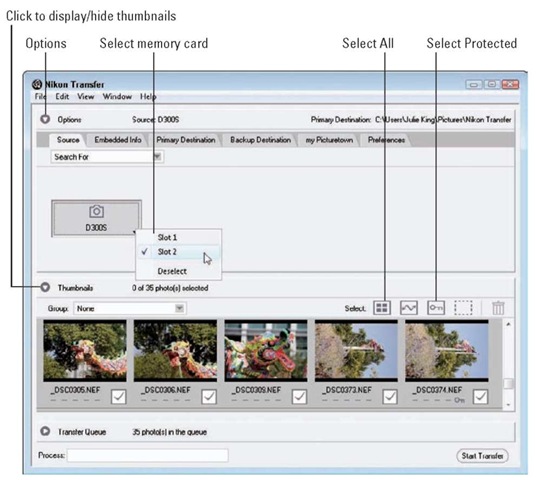
Figure 8-5: Select the check boxes of the images that you want to download.
4. Click the Primary Destination tab at the top of the window.
When you click the tab, the top of the transfer window offers options that enable you to specify where and how you want the images to be stored on your computer. Figure 8-6 offers a look.
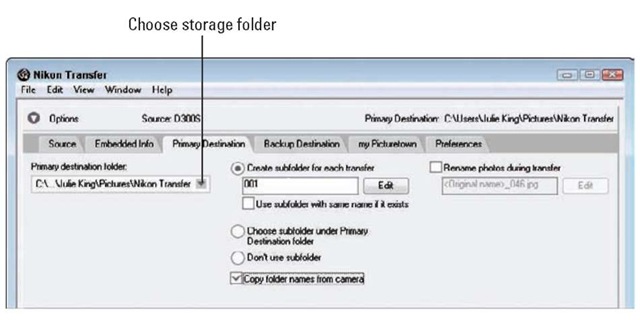
Figure 8-6: Specify the folder where you want to put the downloaded images.
5. Choose the folder where you want to store the images from the Primary Destination Folder drop-down list.
The list is labeled in Figure 8-6. If the folder you want to use isn’t in the list, open the drop-down list, choose Browse from the bottom of the list, and then track down the folder and select it.
By default, the program puts images in a folder titled Nikon Transfer, which is housed inside a folder named My Pictures in Windows XP and Pictures in Windows Vista and on a Mac. That My Pictures or Pictures folder is housed inside a folder that your system creates automatically for each registered user of the computer.
You don’t have to stick with this default location — you can put your pictures anywhere you please. But because most photo programs automatically look for pictures in these standard folders, putting your pictures there just simplifies things a little down the road. Note: You can always move your pictures into other folders after you download them if needed, too. The upcoming section “Organizing pictures” explains how to do so in Nikon ViewNX.
6. Specify whether you want the pictures to be placed inside a new subfolder.
If you select the Create Subfolder for Each Transfer option, the program creates a new folder inside the storage folder you selected in Step 5. Then it puts all the pictures from the current download session into that new
subfolder. You can either use the numerical subfolder name the program suggests or click the Edit button to set up your own naming system.
7. Tell the program whether you want to rename the picture files during the download process.
If you do, select the Rename Photos During Transfer check box. Then click the Edit button to display a dialog box where you can set up your new filenaming scheme. Click OK after you do so to close the dialog box.
8. Click the Preferences tab to set the rest of the transfer options.
Now the tab shown in Figure 8-7 takes over the top of the program window. Here you find a number of options that enable you to control how the program operates. Most of the options are self-explanatory, but a couple warrant a few words of advice:
• Launch Automatically When Device Is Attached. Deselect this check box if you don’t want Nikon Transfer to start every time you connect your camera to your computer or insert a memory card into your card reader.
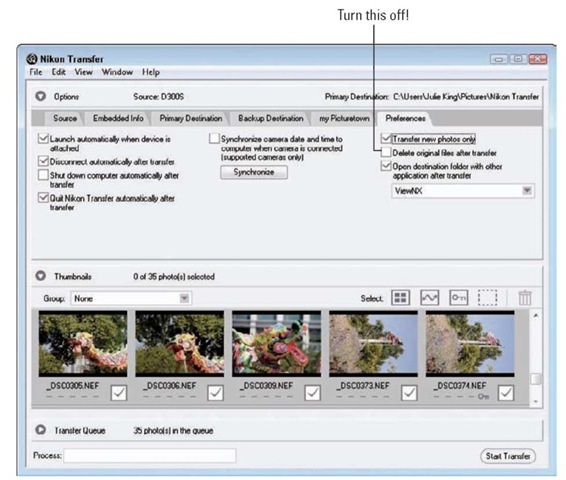
Figure 8-7: Control other aspects of the program’s behavior via the Preferences tab.
• Transfer New Photos Only. This option, when selected, ensures that you don’t waste time downloading images that you’ve already transferred but are still on the memory card.
• Delete Original Files After Transfer. Turn this option off, as shown in Figure 8-7. Otherwise, your pictures are automatically erased from your memory card when the transfer is complete. You should always check to make sure the pictures really made it to the computer before you delete them from your memory card. (See Chapter 4 to find out how to use the Delete function on your camera.)
• Open Destination Folder with Other Application After Transfer. By default, Nikon Transfer shuts itself down when the file download is complete, and Nikon ViewNX then starts automatically so that you can view and organize your images. (That’s assuming that you installed ViewNX, of course.) If you want to use a program other than ViewNX for that task, open the drop-down list, click Browse, and select the program from the dialog box that appears. Click OK after doing so. And if you don’t want Nikon Transfer to close after downloading, uncheck the Quit Nikon Transfer Automatically After Transfer option.
Your choices remain in force for any subsequent download sessions, so you don’t have to revisit this tab unless you want the program to behave differently.
9. When you’re ready to start the download, click the Start Transfer button.
It’s located in the lower-right corner of the program window. (Refer to Figure 8-5.) After you click the button, the Process bar in the lower-left corner indicates how the transfer is progressing. Again, what happens when the transfer completely depends on the choices you made in Step 8; by default, Nikon Transfer closes, and ViewNX opens, automatically displaying the folder that contains your just-downloaded images.
Browsing images in Nikon ViewNX
Nikon ViewNX is designed to do exactly what its name suggests: enable you to view and organize the pictures that you shoot with your D300s. You also can view other photos — pictures you scanned, received from friends via e-mail, or took with a different camera, for example. The only requirement is that the file format is one that ViewNX can read; for still photos, that means JPEG, TIFF, or NEF, which is the Nikon flavor of Camera Raw. (Chapter 3 explains file formats.) For a complete rundown of supported file formats, check the Appendix section of the built-in program Help system.
Figure 8-8 offers a look at the ViewNX window as it appears by default in Windows Vista. The Mac version is nearly identical, although it features the usual Mac look and feel instead of the Microsoft Windows design.

Figure 8-8: You can browse and organize your photos using Nikon ViewNX.
On either type of system, you can customize a variety of aspects of the window layout by using the options on the View and Window menus.
To start viewing your pictures, first display the Folders tab along the left side of the program window, as shown in Figure 8-8. (Just click the tab, labeled in the figure.) Now open the folder that holds the photos you want to view. If you came to ViewNX directly after downloading pictures via Nikon Transfer, the folder that holds the new images may already be selected for you. Thumbnails of those images then appear on the right side of the program window.
By opening the View menu, you can choose from the following viewing options:
Thumbnail View: This is the default layout. For this view, you can choose from two thumbnail display styles. If you select Thumbnail Grid from the View menu, your screen appears as shown in Figure 8-8. You can adjust the size of the thumbnails by dragging the Zoom slider, labeled in the figure. If you prefer, you can instead select Thumbnail List, in which case you see thumbnails with information such as the filenames, the dates the images were taken, file sizes, and so on.
Image Viewer: Select this option from the View menu to display your files as shown in Figure 8-9. Small thumbnails appear along the top of the pane; the selected thumbnail appears in the larger preview area underneath. Use these maneuvers to inspect your images:
• To select an image file, click its thumbnail.
• Magnify or reduce the size of photo thumbnails and the preview by using the Zoom sliders labeled in Figure 8-9.
• Drag in the large preview to scroll the display as needed to view hidden parts of a photo.
• To scroll through your files, click the little arrows under the large preview, labeled Previous Photo and Next Photo in the figure.

Figure 8-9: Change to Image Viewer display to see pictures in filmstrip style.
Full Screen: Want to fill the entire screen with a photo? If you’re working in Thumbnail view (with or without all the data displayed), just double-click the picture thumbnail. In Image Viewer view, first click the thumbnail to display it in the large preview. Then double-click the large preview. Or, in either view, click the thumbnail and then press the letter F. Whichever way you go, your picture opens in a new viewer window, as shown in Figure 8-10.
In Full Screen view, as in the other views, you can magnify still photos by dragging the Zoom slider, as shown in the figure. To view additional photos at full-screen size, click the Previous and Next arrows under the image display. To return to the main browser window, just click the window’s close button or choose a display option from the Display Options drop-down list, labeled in Figure 8-10.
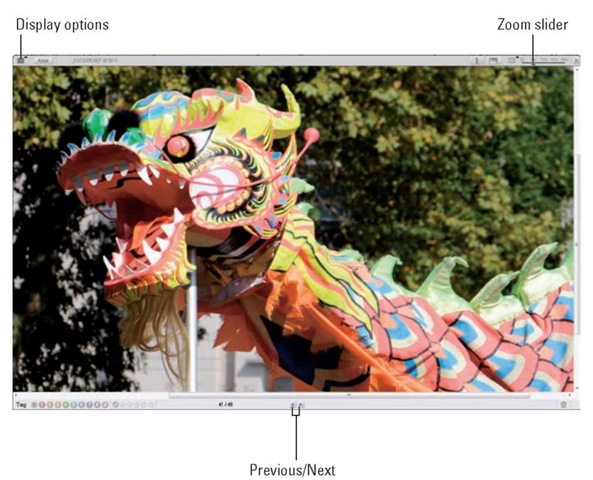
Figure 8-10: Click the arrows to scroll through your photos in Full Screen view.
Viewing picture metadata
When you snap a photo with your D300s, the camera includes in the picture file some extra data that records all the critical camera settings that were in force. This data, known as metadata, also includes the capture date and
time. And, if you take advantage of the Image Comment feature that I cover in Chapter 10, you can even store a brief bit of custom text, such as the shooting location or subject.
Reviewing this data is a great way to better understand what settings work best for different types of pictures, especially when you’re just getting up to speed with aperture, shutter speed, white balance, and all the other digital photography basics. To get the full story on how each setting affects your pictures, see Chapters 5 and 6.
To view the metadata in ViewNX, first select an image by clicking its thumbnail in the ViewNX browser window. Then click the Metadata tab on the left side of the window or choose Window Metadata. The metadata information then comes to the forefront, as shown in Figure 8-11.
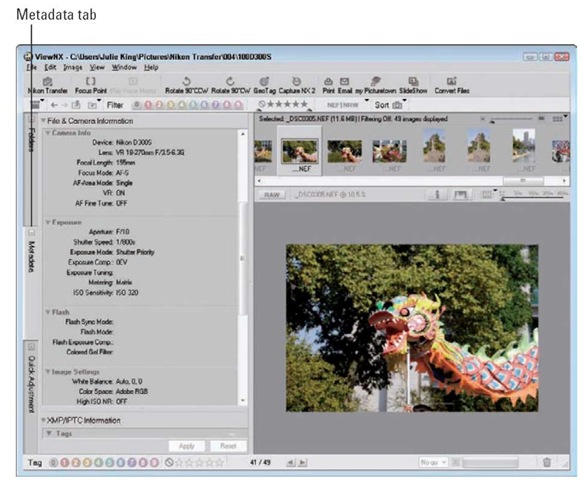
Figure 8-11: Inspecting metadata is a great way to see what settings work best for different subjects and lighting conditions.
The metadata is divided into several sections of related capture settings: File Info 1, File Info 2, Camera Info, Exposure, and so on. To hide or display a section, click the triangle next to it. You may need to use the scroll bar along the right side of the panel to view all the available information. Note that Nikon supplies ViewNX with cameras other than the D300s, and some categories of data apply only to those other models.
The XMP/IPTC Information part of the Metadata panel gives you access to the ViewNX keywords, tags, and rating functions. These functions, along with the program’s search feature, provide you with various tools that make locating specific pictures easier, including the option to search for pictures based on the shooting date.
In case you’re curious, IPTC refers to text data that press photographers are often required to tag onto their picture files, such as captions and copyright information. XMP refers to a data format developed by Adobe to enable that kind of data to be added to the file. IPTC stands for International Press Telecommunication Council; XMP stands for Extensible Metadata Platform.
Organizing pictures
When you download files from your camera using Nikon Transfer, you can specify where on your computer’s hard drive you want to store them. After you get the files on your system, you can further organize them in ViewNX. You can create new folders and subfolders, move images from one folder to another, rename and delete files, and more.
To begin organizing your files, first display the Folders tab on the left side of the program window, as shown in Figure 8-12. In this tab, you can see and manage the contents of all the drives and folders on your computer. From here, you can set up and rearrange your storage closet as follows:
‘ Hide/display the contents of a drive or folder. See a little plus sign (Windows) or right-pointing triangle (Mac) next to a drive or folder? Click it to display the contents of that storage bin. A minus sign (Windows) or a down-pointing triangle (Mac) means that the drive or folder is open; click that minus sign or triangle to close the drive or folder.
Create a new folder. First, click the drive or folder where you want to house the new folder. For example, if you want to create it inside your Pictures or My Pictures folder, click it. Icons representing all the folders and files currently found within that folder then appear in the thumbnail area.
Next, choose File New Folder. An icon representing the new folder should then appear, with the name box activated. Type the folder name and press Enter.
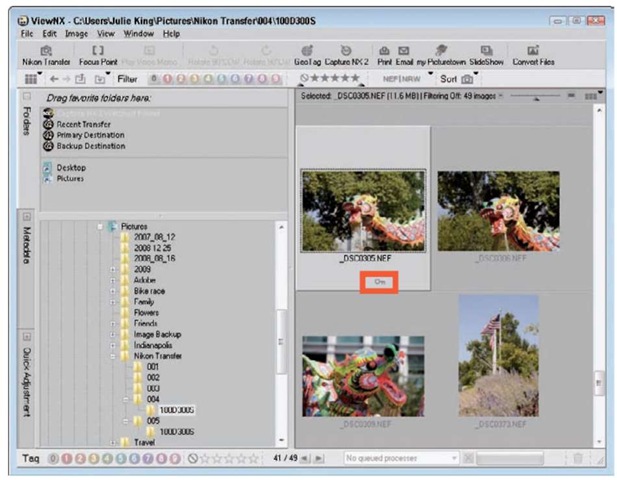
Figure 8-12: As on the camera, the key symbol indicates a protected picture.
Move a file from one folder to another. First, display that file’s thumbnail in the browser. Then drag the thumbnail to the destination folder in the Folder pane.
Delete a file. In Windows, click the thumbnail and then choose Edit Delete or press the Delete key. On a Mac, choose Edit Move to Trash or press 96+Delete. You then see a message asking you to confirm that you really want to trash the file. Click Yes to move forward.
Protect or unlock photos. If you used the Protect feature on your camera to “lock” a file, a process you can explore in Chapter 4, you need to remove the protection if you want to edit the image in your photo software. To do so, choose File Protect Files Unprotect.
You also can protect files in ViewNX; just choose Protect from the File Protect Files submenu. A little key icon then appears on the thumbnail to remind you that the file is now protected from editing or erasing, as shown in Figure 8-12. If you later want to delete the file, you must first unprotect it.
Select multiple files for moving, deleting, or other actions. Click the thumbnail of the first image and then Ctrl+click (Windows) or 96+click (Mac) the rest. To select all images in the current folder, press Ctrl+A (Windows) or 86+A (Mac.)
Processing RAW (NEF) Files
When you shoot in the RAW (NEF) format, introduced in Chapter 3, you must process and convert your picture files to a standard file format before you can share them online or print them from most programs other than Nikon ViewNX. You also can’t get prints from RAW files at most retail outlets or open the files in many photo editing programs.
To process your D300s NEF files, you have a couple of options:
Use the in-camera processing feature. Through the Retouch menu, you can process your RAW images right in the camera. You can specify only limited image attributes (color, sharpness, and so on), and you can save the processed files only in the JPEG format, but still, having this option is a nice feature. See the next section for details.
Process and convert in ViewNX. ViewNX also offers a RAW processing feature. Again, the controls for setting picture characteristics are a little limited, but you can save the adjusted files in either the JPEG or TIFF format. The last section of this chapter walks you through this option.
Use Nikon Capture NX 2 or a third-party RAW conversion tool. For the most control over your RAW images, you need to open up your wallet and invest in a program that offers a truly capable converter. Nikon offers such a program, called Nikon Capture NX 2, which as of this writing sells for about $180. Figure 8-13 gives you a look at the Capture NX 2 RAW converter window.

Figure 8-13: Nikon Capture NX 2 is one option for gaining more control over your RAW conversions.
Another (and less costly option) that I frequently recommend is Adobe Photoshop Elements, which sells for about $90 (www.adobe.com). It includes the Adobe Camera Raw converter, known in the industry as ACR, which is widely considered one of the best available. (Note: The converter in Elements doesn’t offer all the bells and whistles of the version of ACR provided with Photoshop, however.) In addition, Elements is designed for the novice photo editing enthusiast, so it includes lots of helpful onscreen guides, whereas Capture NX 2 is geared more to the advanced digital photographer.
If you do opt for a third-party conversion tool, check the program’s Help system for details on how to use the various controls, which vary from program to program.
Processing RAW images in the camera
Through the NEF (RAW) Processing option on the Retouch menu, you can process RAW files right in the camera — no computer or other software required. This feature is a great convenience, but I want to share a couple of reservations:
First, you can save your processed files only in the JPEG format. As discussed in Chapter 3, that format results in some quality loss because of the file compression that JPEG applies. You can choose the level of JPEG compression you want to apply during RAW processing; you can create a JPEG Fine, Normal, or Basic file. Each of those settings produces the same quality that you get when you shoot new photos in the JPEG format and select Fine, Normal, or Basic from the Image Quality menu.
Chapter 3 details the JPEG options, but, long story short, choose Fine for the best JPEG quality. And if you want to produce the absolute best quality from your RAW images, use a software solution and save your processed file in the TIFF format instead.
You can make adjustments to exposure, color, and a few other options as part of the in-camera RAW conversion process. Evaluating the effects of your adjustments on the camera monitor can be difficult because of the size of the display compared to your computer monitor. So for really tricky images, you may want to forgo in-camera conversion and do the job on your computer, where you can get a better — and bigger — view of things. If you do go the in-camera route, make sure that the monitor brightness is set to its default position so that you aren’t misled by the display. (Chapter 1 shows you how to adjust monitor brightness.)
With those preliminaries out of the way, follow these steps to convert a RAW file:
1. Press the Playback button to switch to playback mode.
2. Display the picture you want to process in the single-image (full-frame) view.
If necessary, you can shift from thumbnails view to single-image view by just pressing the OK button. Chapter 4 has more playback details.
3. Press the OK button.
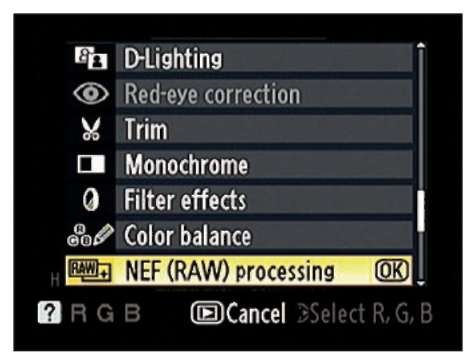
Figure 8-14: In single-image playback mode, press OK to display the Retouch menu over your photo.
The Retouch menu then appears atop your photo, as shown in Figure 8-14.
4. Choose NEF (RAW) Processing and press OK to display your processing options, as shown in Figure 8-15.
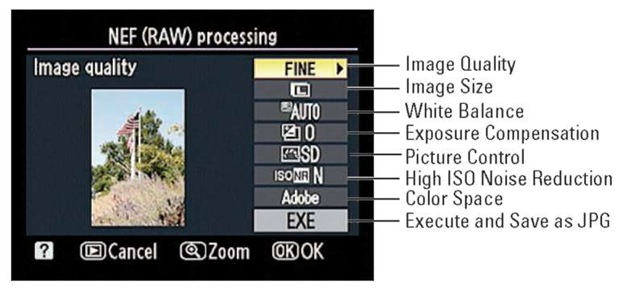
Figure 8-15: Specify the conversion settings here.
This screen is command central for specifying what settings you want the camera to use when creating the JPEG version of your RAW image.
5. Set the conversion options.
Along the right side of the screen, you see a vertical column offering seven conversion options, which I labeled in Figure 8-15. To establish the setting for an option, use the Multi Selector to highlight it and then press the Multi Selector right. You then see the available settings for the option. Use the Multi Selector to highlight the setting you want to use and press OK to return to the main RAW conversion screen.
Rather than detailing all the options here, the following list points you to the chapter where you can explore the settings available for each:
• Image Quality: See the Chapter 3 section related to the JPEG quality settings for details on this option.
• Image Size: The first part of Chapter 3 explains this one.
• White Balance: Check out Chapter 6 for details about White Balance options. After you select your main White Balance setting (Cloudy, Auto, and so on), you can press the Multi Selector right to fine-tune colors.
• Exposure Compensation: With this option, you can adjust image brightness by applying Exposure Compensation, a feature that I cover in Chapter 5.
• Picture Control: This option enables you to adjust color, contrast, and image sharpness. For a review of the available settings, see the last part of Chapter 6. As with White Balance, press the Multi Selector right after choosing a Picture Control to tweak its results. You can adjust sharpening, contrast, brightness, saturation, and hue.
• High ISO Noise Reduction: This filter attempts to soften the appearance of noise that occurs when you use a very high ISO Sensitivity setting. Chapter 5 covers this filter as well as its companion, Long Exposure Noise Reduction.
• Color Space: See Chapter 6 for details on this option, which enables you to select one of two color spectrums, Adobe RGB or sRGB.
6. When you finish setting all the conversion options, highlight EXE on the main conversion screen. (Refer to Figure 8-15.) Then press OK.
The camera records a JPEG copy of your RAW file and displays the copy in the monitor.
Note that the filename of your JPEG copy doesn’t use the same numbering as the RAW original — the camera gives the file a new number that depends on the numbers of the existing JPEG files on your memory card.
Processing RAW files in ViewNX
In ViewNX, you can convert your RAW files to either the JPEG format or, for top picture quality, to the TIFF format. (See Chapter 3 if you’re unsure about the whole concept of file format and how it relates to picture quality.)
Although the ViewNX converter isn’t as full-featured as the ones in Nikon Capture NX 2, Adobe Photoshop, and some other photo editing programs, it does enable you to make some adjustments to your RAW images. Follow these steps to try it out.
1. Click the thumbnail of the NEF (RAW) image to select it.
You may want to set the program to Image Viewer mode, as shown in Figure 8-16, so that you can see a larger preview of your image. Just choose View Image Viewer to switch to this display mode.
2. Display the Quick Adjustment tab by clicking its tab on the left side of the program window.
I labeled the tab in Figure 8-16. The tab provides access to a few controls for fine-tuning your image. You can adjust exposure compensation, white balance, and assign a Picture Control, for example. Each time you adjust a setting, the preview updates to show you the results.

Figure 8-16: Display the Quick Adjustment tab to tweak RAW images before conversion.
A couple of options may require some explanation:
• Launch Utility button: This button, located under the Picture Control option, opens the Picture Control Utility, where you can define your own Picture Controls. I don’t get into this advanced function in this topic, but if you’re curious, open the utility and then click the Help button at the bottom of the window.
• Highlight Protection/Shadow Protection/D-Lighting HS: Try using these options to recover hidden shadow and highlight detail.
• Color Booster: This slider (at the bottom of the panel, not visible in Figure 8-16) enables you to increase saturation. But if you select the People button under the slider, skin tones are left alone. Choose Nature to adjust the saturation of all colors in the photo.
• Axial Color Aberration: Due to an optical phenomenon that’s too complex to fully explore here, some lenses can produce a defect known as axial color aberration or, in some circles, color fringing. This defect results in weird color halos along the edges of an object, typically on the side away from the center of the photo. To check your photo, zoom the display to a magnification of 200 percent or greater — the halos usually aren’t visible when the display size is small — and pay special attention to the corners of the photo, where the problem tends to be greatest. If you spot haloing, check the Auto box for the Axial Color Aberration setting and let the program try to apply the proper correction. You then can drag the slider to tweak the strength of the correction, if needed. (The program may need a few seconds to update the preview after each change, so be patient.)
If you want more details about these or any other of the options, choose Help ViewNX Help to open the Help system, and then display the Help pages related to the Quick Adjustment tab.
3. Click the Save button at the bottom of the Quick Adjustment area.
Or to revert to the original adjustment settings, click Reset.
4. To save the processed file, choose File Convert Files.
Or just click the Convert Files button on the toolbar at the top of the program window. Either way, you see the Convert Files dialog box, shown in Figure 8-17.
5. Select TIFF (8 Bit) from the File Format drop-down list.
You also can opt for TIFF (16 Bit) or JPEG, but I don’t recommend it. TIFF (16 Bit) can cause problems when you try to open the file in certain photo editing and organizing programs. (Most pro-level programs, such as Photoshop, do support 16-bit files, however.) And saving in the JPEG format applies lossy compression, thereby sacrificing some image quality. If you need a JPEG copy of your processed RAW image for online sharing, you can easily create one from your TIFF version by following the steps laid out in Chapter 9.
6. Deselect the Use LZW Compression option, as shown in the figure.
Although LZW Compression reduces the file size somewhat and does not cause any quality loss, some programs can’t open files that were saved with this option enabled. So turn it off.
7. Deselect the Change the Image Size check box.
This step ensures that you retain all the original pixels in your image, which gives you the most flexibility in terms of generating quality prints at large sizes. For details on this issue, check out Chapter 3.
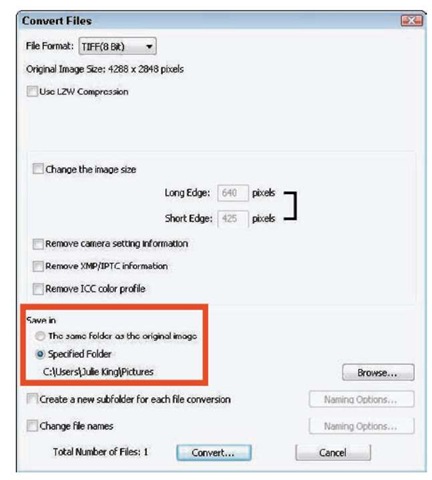
Figure 8-17: You can specify where you want to store the processed file.
8. Deselect each of the three Remove check boxes.
If you select the check boxes, you strip image metadata — the extra text data that’s stored by the camera — from the file. Unless you have some specific reason to do so, clear all three check boxes so that you can continue to access the metadata when you view your processed image in programs that know how to display metadata.
The first two check boxes relate to data that you can view on the Metadata tab in ViewNX; earlier sections of this chapter give you the low-down. The ICC profile item refers to the image color space, which is either sRGB or Adobe RGB on your D300s. Chapter 6 explains the difference.
9. Select a storage location for the processed TIFF file.
You do this in the Save In area of the dialog box, highlighted in Figure 8-17. Select the top option to save your processed file in the same folder as the original RAW file. Or, to put the file in a different folder, click the Specified Folder button. The name of the currently selected alternative folder appears below the button, as shown in Figure 8-17. You can change the storage destination by clicking the Browse button (on the right side of the dialog box) and then selecting the drive and folder where you want to put the file.
By selecting the Create a New Subfolder for Each File Conversion check box, you can put your TIFF file into a separate folder within the destination folder. If you select the box, click the Naming Options button and then specify how you want to name the subfolder.
10. Specify whether you want to give the processed TIFF a different filename from the original RAW image.
To do so, select the Change File Names check box and then click the Naming Options button and enter the name you want to use. If you don’t change the filename, ViewNX gives the file the same name as the original RAW file.
11. Click the Convert button.
A window appears to show you the progress of the conversion process. When the window disappears, your TIFF image appears in the storage location you selected in Step 10.
One neat thing about working with RAW images is that you can easily create as many variations of your photo as you want. For example, you might choose one set of options when processing your RAW file the first time, and then use an entirely different set to create another version of the photo. You could create one image in full color, perhaps, and then open the RAW file again — and this time select the Monochrome Picture Control to create a black-and-white version of the image.
Copying Pictures Between Memory Cards
In addition to being able to process RAW files right in the camera, you can perform another neat file-management trick without downloading to a computer: When you have two memory cards installed, you can copy pictures from one card to the other. Follow these steps:
1. On the Playback menu, choose Copy Images, as shown on the left in Figure 8-18, and press OK.
You see the right screen in the figure.
2. Highlight Select Source and press OK.
You see a screen listing both memory cards (CF and SD).
3. Highlight the memory card that contains the pictures you want to copy and press OK.
You’re returned to the main Copy Images screen.
4. Highlight Select Images, as shown on the left in Figure 8-19, and press OK.
You then see a screen listing all folders on the selected card, as shown on the right in Figure 8-19. If you haven’t created any custom folders, a topic covered in Chapter 10, you see just one folder, as in the figure.
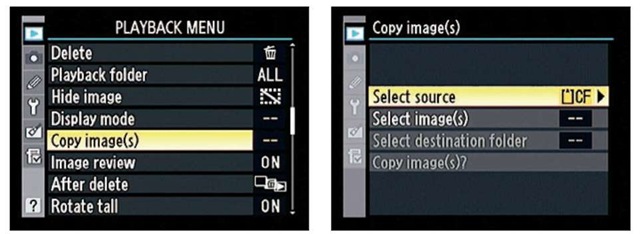
Figure 8-18: You can copy cards from one installed memory card to another.

Figure 8-19: Select the folder that contains the pictures you want to copy.
5. Highlight the folder that contains your pictures and press OK.
The camera now displays the screen shown on the left in Figure 8-20.
6. Choose an initial picture-selection option.
Two of the options are pretty clear-cut: Choose Select All Images if you want to copy every picture on the card; choose Select Protected Images to copy just photos that you tagged with the Protect feature, covered in Chapter 4.
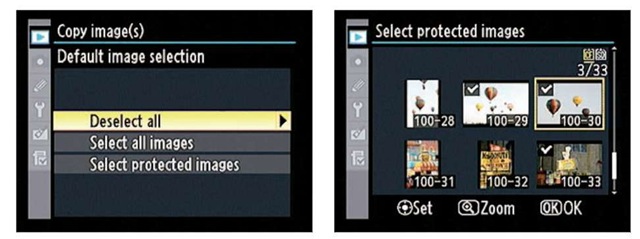
Figure 8-20: Press the Multi Selector center button to add or remove the checkmark that tags a picture for copying.
The third option, Deselect All, is a little counterintuitive. Here’s the deal: The camera initially assumes that you want to copy every picture on the card, so it tries to help by automatically preselecting all of them in the background. You can later deselect the ones you don’t want to copy, but if you’re copying just a few pictures out of a large group, it’s faster to choose Deselect All so that you start out with no pictures selected. Then you don’t have to waste time “untagging” all the ones you don’t want to copy.
7. Press OK to display thumbnails of your photos, as shown on the right
in Figure 8-20.
Checkmarks appear with any photos currently selected for copying, as shown in the figure.
8. Press the center button of the Multi Selector to add or remove a photo from the selection.
Pressing the button toggles the checkmark on and off.
9. After selecting the photos you want to copy, press OK. You’re returned to the main Copy Images screen once more.
10. Choose Select Destination Folder and press OK.
You see a screen offering two options: The first, Select Folder by Number, enables you to specify a three-digit folder number. (Press the Multi Selector left or right to highlight a value and press up or down to change the number.) The second option, Select Folder from List, displays all available folders. After choosing a folder number or folder, press OK.
11. Choose Copy Image(s)? and press OK.
12. Highlight Yes and press OK to copy the photos.
