In This Chapter
Reviewing factors that lead to poor photo quality
Exploring resolution, pixels, and ppi
Calculating the right resolution for traditional print sizes
Deciding on the best file format: JPEG or NEF?
Picking the right JPEG quality level
Understanding the tradeoff between picture quality and file size
Almost every review of the D300s contains glowing reports about the camera’s top-notch picture quality. As you’ve no doubt discovered for yourself, those claims are true, too: This baby can create large, beautiful images. a- *v
What you may not have discovered is that Nikon’s default Image Quality setting isn’t the highest that the D300s offers. Why, you ask, would Nikon do such a thing? Why not set up the camera to produce the best images right out of the box? The answer is that using the top setting has some downsides. Nikon’s default choice represents a compromise between avoiding those disadvantages while still producing images that will please most photographers.
Whether that compromise is right for you, however, depends on your photographic needs. To help you decide, this chapter explains the Image Quality setting, along with the Image Size setting, which is also critical to the quality of images that you print. Just in case you’re having quality problems related to other issues, though, the first section of the chapter provides a handy quality-defect diagnosis guide.
Diagnosing Quality Problems
When I use the term picture quality, I’m not talking about the composition, exposure, or other traditional characteristics of a photograph. Instead, I’m referring to how finely the image is rendered in the digital sense.
Figure 3-1 illustrates the concept: The first example is a high-quality image, with clear details and smooth color transitions. The other examples show five common digital-image defects.
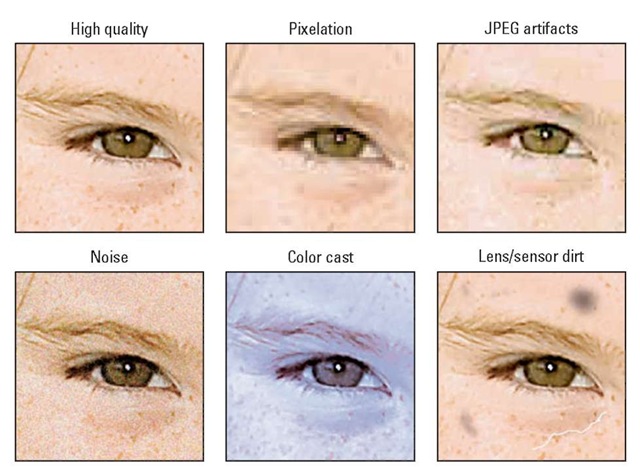
Figure 3-1: Refer to this symptom guide to determine the cause of poor image quality.
Each of these defects is related to a different issue, and only one is affected by the Image Quality setting on your D300s. So if you aren’t happy with your image quality, first compare your photos to those in the figure to properly diagnose the problem. Then try these remedies:
Pixelation: When an image doesn’t have enough pixels (the colored tiles used to create digital images), details aren’t clear, and curved and diagonal lines appear jagged. The fix is to increase image resolution, which you do via the Image Size control. See the next section, “Considering Resolution (Image Size),” for details.
JPEG artifacts: The “parquet tile” texture and random color defects that mar the third image in Figure 3-1 can occur in photos captured in the JPEG (jay-peg) file format, which is why these flaws are referred to as JPEG artifacts. This is the defect related to the Image Quality setting; see “Understanding the Image Quality Options” to find out more.
Noise: This defect gives your image a speckled look, as shown in the lower-left example in Figure 3-1. Noise can occur with very long exposure times or when you choose a high ISO Sensitivity setting on your camera. You can explore both issues in Chapter 5.
Color cast: If your colors are seriously out of whack, as shown in the lower-middle example in the figure, try adjusting the camera’s White Balance setting. Chapter 6 covers this control and other color issues.
Lens/sensor dirt: A dirty lens is the first possible cause of the kind of defects you see in the last example in the figure. If cleaning your lens doesn’t solve the problem, dust or dirt may have made its way onto the camera’s image sensor. You can try running the camera’s internal cleaning routine; Chapter 1 has details. If that doesn’t do the trick, it’s time to take your camera to a professional to have the sensor cleaned. You can do the job yourself with some special tools, but you also can easily trash a really expensive camera if you don’t know what you’re doing. In my area (central Indiana), sensor cleaning costs range from $30-$50.
One more cleaning tip: Never — and I mean never — try to clean any part of your camera using a can of compressed air. Doing so can not only damage the interior of your camera, blowing dust or dirt into areas where it can’t be removed, but also crack the external monitor.
When diagnosing image problems, you may want to open the photos in ViewNX or some other photo software and zoom in for a close-up inspection. Some defects, especially pixelation and JPEG artifacts, have a similar appearance until you see them at a magnified view. (See Part III for information about using ViewNX.)
I should also tell you that I used a little digital enhancement to exaggerate the flaws in my example images to make the symptoms easier to see. With the exception of an unwanted color cast or a big blob of lens or sensor dirt, these defects may not even be noticeable unless you print or view your image at a very large size. And the subject matter of your image may camouflage some flaws; most people probably wouldn’t detect a little JPEG artifacting in a photograph of a densely wooded forest, for example.
In other words, don’t consider Figure 3-1 as an indication that your D300s is suspect in the image quality department. First, any digital camera can produce these defects under the right circumstances. Second, by following the guidelines in this chapter and the others mentioned in the preceding list, you can resolve any quality issues that you may encounter.
Considering Resolution (Image Size)
Like other digital devices, your D300s creates pictures out of pixels, which is short for picture elements. You can see some pixels close up in the right example of Figure 3-2, which shows a greatly magnified view of the eye area in the left image.
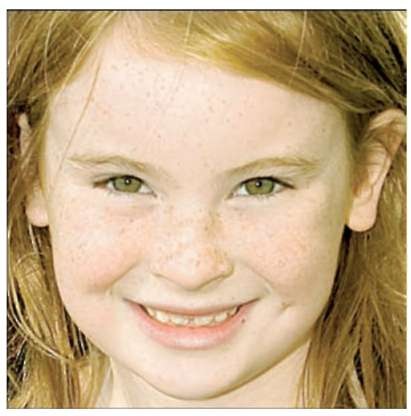
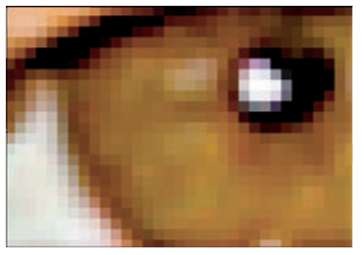
Figure 3-2: Pixels are the building blocks of digital photos.
You can specify the pixel count of your images, also known as the resolution, in two ways:
Shooting menu: The Image Size option is near the bottom of the first screen of the menu, as shown in Figure 3-3.
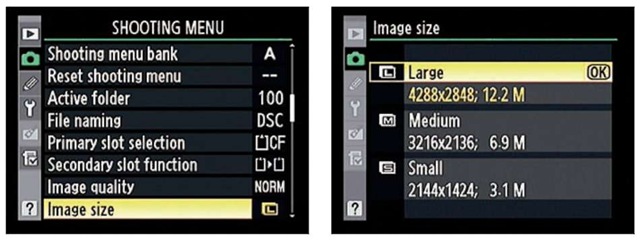
Figure 3-3: Set the Image Size through the Shooting menu.
Qual button + sub-command dial: Hold down the button while rotating the sub-command dial to cycle through the available settings. You can monitor the setting in the Control panel and Information display, in the areas highlighted in Figure 3-4.
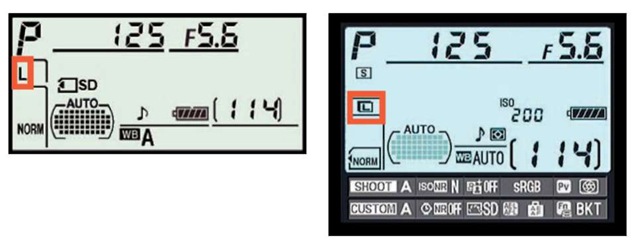
Figure 3-4: The current setting appears in the Control panel and Information display.
Either way, you can choose from three settings: Large, Medium, and Small; Table 3-1 lists the resulting resolution values for each setting.
Table 3-1 Image Size (Resolution) Options
| Setting | Resolution |
| Large | 4288 x 2848 pixels (12.2 MP) |
| Medium | 3216 x 2136 pixels (6.9 MP) |
| Small | 2144 x 1424 pixels (3.1 MP) |
In the table, the first pair of numbers shown for each setting represents the image pixel dimensions — that is, the number of horizontal pixels and the number of vertical pixels. The values in parentheses indicate the approximate total resolution. This number is usually stated in megapixels, abbreviated MP for short. One megapixel equals 1 million pixels.
Note, however, that if you select RAW (NEF) as your file format, all images are captured at the Large setting. The upcoming section “Understanding the Image Quality Options” explains file formats.
So how many pixels are enough? To make the call, you need to understand how resolution affects print quality, display size, and file size. The next sections explain these issues, as well as a few other resolution factoids.
Pixels and print quality
When mulling over resolution options, your first consideration is how large you want to print your photos, because pixel count determines the size at which you can produce a high-quality print. If you don’t have enough pixels, your prints may exhibit the defects you see in the pixelation example in Figure 3-1, or worse, you may be able to see the individual pixels, as in the right example in Figure 3-2.
Depending on your photo printer, you typically need anywhere from 200 to 300 pixels per linear inch, or ppi, of the print. To produce an 8-x-10-inch print at 200 ppi, for example, you need 1600 horizontal pixels and 2000 vertical pixels (or vice versa, depending on the orientation of your print).
Table 3-2 lists the pixel counts needed to produce traditional print sizes at 200 ppi and 300 ppi. But again, the optimum ppi varies depending on the printer — some printers prefer even more than 300 ppi — so check your manual or ask the photo technician at the lab that makes your prints. (And note that ppi is not the same thing as dpi, which is a measurement of printer resolution. Dpi refers to how many dots of color the printer can lay down per inch; most printers use multiple dots to reproduce 1 pixel.)
Table 3-2 Pixel Requirements for Traditional Print Sizes
| Print Size | Pixels for200ppi | Pixels for 300ppi |
| 4 x 6 inches | 800×1200 | 1200×1800 |
| 5 x 7 inches | 1000×1400 | 1500×2100 |
| 8 x 10 inches | 1600 x 2000 | 2400×3000 |
| 11 x 14 inches | 2200×2800 | 3300×4200 |
Even though many photo editing programs enable you to add pixels to an existing image, doing so isn’t a good idea. For reasons I won’t bore you with, adding pixels — known as resampling — doesn’t enable you to successfully enlarge your photo. In fact, resampling typically makes matters worse. The printing discussion at the start of Chapter 9 includes some example images that illustrate this issue.
Pixels and screen display size
Resolution doesn’t affect the quality of images viewed on a monitor, television, or other screen device as it does printed photos. What resolution does determine is the size at which the image appears.
This issue is one of the most misunderstood aspects of digital photography, so I explain it thoroughly in Chapter 9. For now, just know that you need way fewer pixels for onscreen photos than you do for printed photos.
For example, Figure 3-5 shows a 450-x-300-pixel image that I attached to an e-mail message.
For e-mail images, I recommend a maximum of 640 pixels for the picture’s longest dimension. If your image is much larger, the recipient may not be able to view the entire picture without scrolling the display.
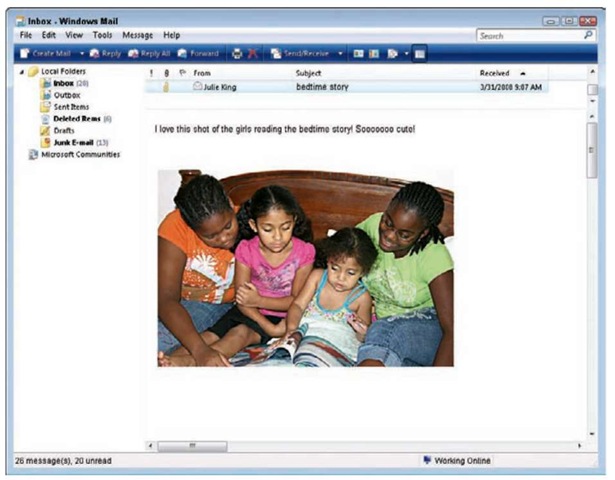
Figure 3-5: The low resolution of this image (450 x 300 pixels) ensures that it can be viewed without scrolling when shared via e-mail.
In short, even if you use the smallest Image Size setting on your D300s, you’ll have more than enough pixels for onscreen use, whether you display the picture on a computer monitor, digital projector, or television set — even one of the new, supersized high-definition TVs. Again, Chapter 9 details this issue and also shows you how to prepare your pictures for online sharing.
Pixels and file size
Every additional pixel increases the amount of data required to create a digital picture file. So a higher-resolution image has a larger file size than a low-resolution image.
Large files present several problems:
You can store fewer images on your memory card, on your computer’s hard drive, and on removable storage media such as a CD-ROM.
The camera needs more time to process and store the image data on the memory card after you press the shutter button. This extra time can hamper fast-action shooting.
When you share photos online, larger files take longer to upload and download.
When you edit your photos in your photo software, your computer needs more resources and time to process large files.
To sum up, the tradeoff for a high-resolution image is a large file size. But note that the Image Quality setting also affects file size. See the upcoming section “Understanding the Image Quality Options” for more on that topic. The upcoming sidebar “How many pictures fit on my memory card?” provides additional thoughts about the whole file-storage issue.
Resolution recommendations
As you can see, resolution is a bit of a sticky wicket. What if you aren’t sure how large you want to print your images? What if you want to print your photos and share them online?
Personally, I take the “better safe than sorry” route, which leads to the following recommendations about the Image Size setting:
Always shoot at a resolution suitable for print. You then can create a low-resolution copy of the image in your photo editor for use online. Chapter 9 shows you how.
Again, you can’t go in the opposite direction, adding pixels to a low-resolution original in your photo editor to create a good, large print. Even with the very best software, adding pixels doesn’t improve the print quality of a low-resolution image.
For everyday images, Medium is a good choice. I find the Large setting to be overkill for most casual shooting, which means that you’re creating huge files for no good reason. Keep in mind that even at the Medium setting, your pixel count (3216 x 2136) exceeds what you need to produce an 8-x-l0-inch print at 200 ppi.
Choose Large for an image that you plan to crop, print very large, or both. The benefit of maxing out resolution is that you have the flexibility to crop your photo and still generate a decent-sized print of the remaining image. Figures 3-6 and 3-7 offer an example. When I was shooting this scene, I couldn’t get any closer to the bee — okay, didn’t want to get closer to the bee — than the first picture shows. But because I had the
resolution cranked up to Large, I was able to later crop the shot to the composition you see in Figure 3-7 and still produce a great print. In fact, I could have printed the cropped image at a much larger size than fits here.
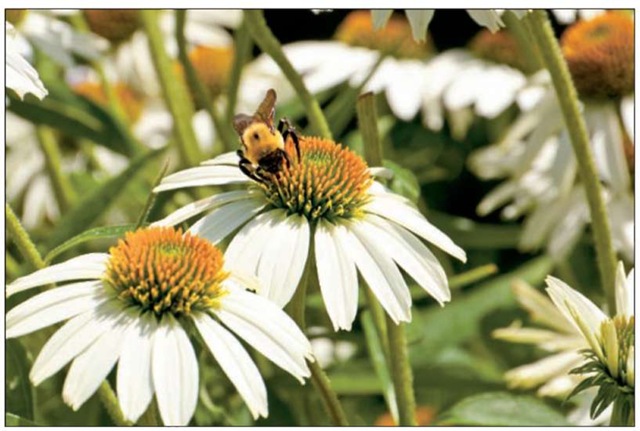
Figure 3-6: I couldn’t get close enough to fill the frame with the subject, so I captured this image at the Large resolution setting.
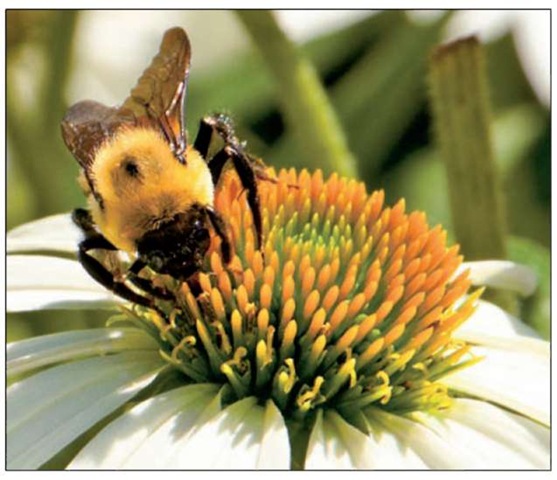
Figure 3-7: A high-resolution original enabled me to crop the photo tightly and still have enough pixels to produce a quality print.
How many pictures fit on my memory card?
As explained in the Image Size and Image Quality discussions in this chapter, image resolution (pixel count) and file format (JPEG, RAW, or TIFF) contribute to the size of the picture file which, in turn, determines how many photos fit in a given amount of camera memory. File size also depends on a few other factors, including the level of detail and color in the subject.
On the D300s, file sizes range anywhere from 36.6MB (megabytes) to 0.4MB, depending on the combination of Image Size and Image Quality settings you select. That means the capacity
of a 4GB (gigabyte) memory card ranges from about 100 pictures to a whopping 7800 pictures, again, depending on your Size/Quality settings.
The table here shows the approximate file sizes for just some Size/Quality combinations; you can find a table that lists all the possibilities in your camera manual if you’re curious. The numbers here assume the default settings for the JPEG Compression and NEF (RAW) Recording options on the Shooting menu, both of which relate to the Image Quality setting and are detailed elsewhere in this chapter.
Image Quality + Image Size = File Size
| Image Quality | Large | Medium | Small |
| JPEG Fine | 6.0MB | 3.4MB | 1.5MB |
| JPEG Normal | 3.0MB | 1.7MB | 0.8MB |
| JPEG Basic | 1.5MB | 0.9MB | 0.4MB |
| NEF (RAW) | 12.1MB | NA* | NA* |
| TIFF | 36.6MB | 20.6MB | 9.3MB |
Understanding the Image Quality Options
If I had my druthers, the Image Quality option would instead be called File Type, because that’s what the setting controls.
Here’s the deal: The file type, more commonly known as a file format, determines how your picture data is recorded and stored. Your choice does impact picture quality, but so do other factors, as outlined at the beginning of this chapter. In addition, your choice of file type has ramifications beyond picture quality.
At any rate, your D300s offers three file types: JPEG, TIFF, and Camera RAW, or just RAW for short, which goes by the specific moniker NEF on Nikon cameras. You also can choose to record two copies of each picture, one in the RAW format and one in the JPEG format. You can view the current format in
the Control panel and Information display, as shown in Figure 3-8. For JPEG, the displays indicate the JPEG quality level — Fine, Normal (Norm, as in the figure), or Basic. (The next section explains these three options.)
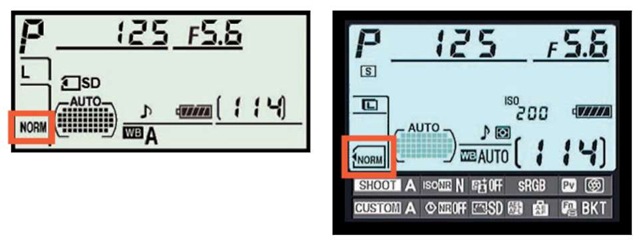
Figure 3-8: The current Image Quality setting appears here.
In the Information display, the icons used for the Quality setting depend on whether you’re using a single memory card or one SD card and one CompactFlash card. In Figure 3-8, the symbol shows that a single SD card is being used. See the Chapter 1 section related to using two memory cards at the same time for information on how to decode this aspect of the display.
The rest of this chapter explains the pros and cons of each file format to help you decide which one works best for the types of pictures you take. If you already have your mind made up, you can select the format you want to use in two ways:
Qual button + main command dial: Hold down the Qual (Quality)
button while rotating the main command dial to cycle through all the format options.
Shooting menu: You also can set the Image Quality option via the Shooting menu, as shown in Figure 3-9.
Scroll to the second screen of the Shooting menu, and you find two additional options related
to the Quality setting: JPEG
Compression and NEF (RAW) Recording. Look for details about these features in the upcoming discussions of each format.
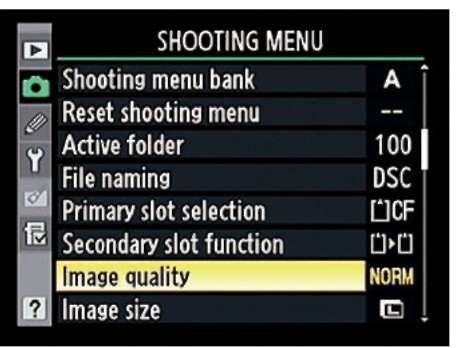
Figure 3-9: The Shooting menu enables you to select the Quality setting plus a few related options.
Don’t confuse file format with the Format Memory Card option on the Setup menu. That option erases all data on your memory card; see Chapter 1 for details.
JPEG: The imaging (and Web) standard
Pronounced jay-peg, the JPEG format is the default setting on your D300s, as it is for most digital cameras. The next two sections tell you what you need to know about JPEG.
JPEG pros and cons
JPEG has become the de facto digital-camera file format for two main reasons:
Immediate usability: All Web browsers and e-mail programs can display JPEG files, so you can share your pictures online immediately after you shoot them. The same can’t be said for NEF (RAW) or TIFF files, which must be converted to JPEG for online use. (Some photo-sharing sites do accept TIFF files and then make a JPEG copy for online display.)
You also can print and edit JPEG files immediately, whether you want to use your own software or have pictures printed at a retail site. The same is true for TIFF files, but not for RAW images. You can view and print RAW files using Nikon ViewNX, the software that comes with your camera, but many third-party photo programs can’t open RAW images — and retail printing sites typically don’t accept RAW files either. You can read more about the conversion process in the upcoming section “NEF (RAW): The purist’s choice.”
Small files: JPEG files are much smaller than NEF (RAW) files and way, way, way smaller than TIFF files. And smaller files consume less room on your camera memory card and in your computer’s storage tank.
The downside — you knew there had to be one — is that JPEG creates smaller files by applying lossy compression. This process actually throws away some image data. Too much compression leads to the defects you see in the JPEG Artifacts example in Figure 3-1.
Fortunately, your camera enables you to specify how much compression you’re willing to accept, as outlined next.
Customizing your JPEG capture settings
The D300s gives you two levels of control over the quality of your JPEG images:
Fine, Normal, or Basic: When you select the file format, whether through the Shooting menu or by using the Qual button with the main command dial, you can choose from three JPEG settings, each of which produces a different level of compression.
• JPEG Fine: At this setting, the compression ratio is 1:4 — that is, the file is four times smaller than it would otherwise be. In plain English, that means that very little compression is applied, so you shouldn’t see many compression artifacts, if any.
• JPEG Normal: Switch to Normal, and the compression ratio rises to 1:8. The chance of seeing some artifacting increases as well.
• JPEG Basic: Shift to this setting, and the compression ratio jumps to 1:16. That’s a substantial amount of compression and brings with it a lot more risk of artifacting.
Compression Priority: The size of the file produced at any of the three quality levels varies from picture to picture depending on the subject matter. The difference occurs because a picture with lots of detail and a wide color palette can’t be as easily compressed as one with large areas of flat color and a limited color spectrum.
By default, the camera applies compression with a goal of producing consistent file sizes, which means that highly detailed photos can take a larger quality hit from compression. But through the JPEG Compression option on the Shooting menu, shown in Figure 3-10, you can tell the camera to instead give priority to producing optimum picture quality when applying compression. To go that route, choose the Optimal Quality setting, as shown in the figure. For the default option, choose Size Priority. Note that the compression ratios just mentioned for the Fine, Normal, and Basic options assume that you use the Size Priority option. The ratios will vary from picture to picture, as will the picture file sizes, if you select Optimal Quality.
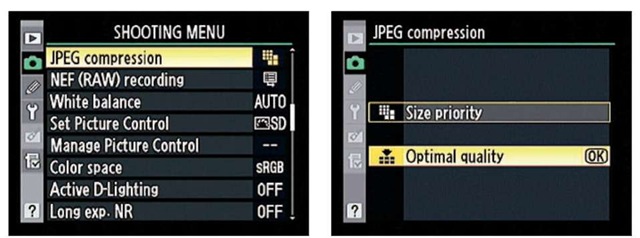
Figure 3-10: Set the JPEG Compression option to Optimal Quality to get the best-looking JPEG pictures.
Note, though, that even if you choose the Size Priority option and combine it with JPEG Basic — thereby producing the lowest-quality JPEG results — you don’t get anywhere near the level of artifacting that you see in my example in Figure 3-1. Again, that example is exaggerated to help you be able to recognize artifacting defects and understand how they differ from other image-quality issues.
In fact, if you keep your image print or display size small, you aren’t likely to notice a great deal of quality difference between the compression settings. It’s only when you greatly enlarge a photo that the differences become apparent.
Take a look at Figures 3-11 and 3-12, for example. I captured the scene in Figure 3-11 four times, keeping the resolution the same for each shot so that the only variable was the Image Quality setting. I captured three JPEG versions, one at each compression level (Fine, Normal, and Basic) and using the default JPEG Compression option, Size Priority, which sets the camera to favor file sizes over picture quality when applying compression. For the fourth image, I used the RAW (NEF) format and selected the default RAW recording options, which result in a non-destructive type of file compression. (See the next section for details about RAW options.)
For the photo you see in Figure 3-11, I used the JPEG Fine setting. I thought about printing the three other shots along with that example, but frankly, you wouldn’t be able to detect a nickel’s worth of difference between the examples at the size that I could print them on this page. So Figure
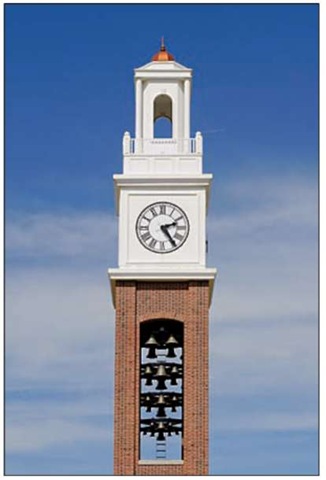
Figure 3-11: This subject offered a good test for comparing the Image Quality settings.
3-12 shows just a portion of each shot at a greatly enlarged size. (During the process of converting the RAW image to a print-ready file, I tried to use settings that kept the RAW image as close as possible to its JPEG cousins in all aspects but quality. But any variations in exposure, color, and contrast are a result of the conversion process, not of the format per se.)
Even at the greatly magnified size, it takes a sharp eye to detect the quality differences between the RAW and Fine images. When you carefully inspect the Normal version, you can see some artifacting start to appear, but again,
you have to look closely — and my guess is that you wouldn’t spot it at all if you weren’t searching for it. Jump to the Basic example, and compression artifacting becomes more obvious.
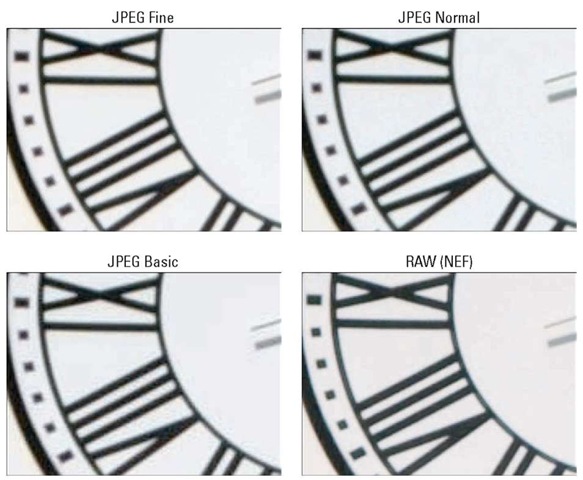
Figure 3-12: Here you see a portion of the tower at greatly enlarged views.
Nikon chose to use the JPEG Normal setting and the Size Priority option as the defaults on the D300s. I suppose that’s okay for everyday images that you don’t plan to print or display very large. And those settings do enable you to fit more photos on your memory card than the higher-quality JPEG settings.
For my money, though, the file-size benefit you gain when going from Fine to Normal and using the Size Priority option instead of Optimal Quality isn’t worth even a little quality loss, especially with the price of camera memory cards getting lower every day. You never know when a casual snapshot is going to turn out to be so great that you want to print or display it large enough that even minor quality loss becomes a concern. And of all the defects that you can correct in a photo editor, artifacting is one of the hardest to remove. So if I shoot in the JPEG format, I stick with Fine and set the JPEG Compression option to Optimal Quality.
I suggest that you do your own test shots, however, carefully inspect the results in your photo editor, and make your own judgment about what level of artifacting you can accept. Artifacting is often much easier to spot when you view images onscreen. It’s difficult to reproduce artifacting here in print because the print process obscures some of the tiny defects caused by compression.
If you don’t want any risk of artifacting, bypass JPEG altogether and change the file type to NEF (RAW) or TIFF. Or consider your other option, which is to record two versions of each file, one RAW and one JPEG. The next sections offer details.
Whichever format you select, be aware of one more important rule for preserving the original image quality: If you retouch pictures in your photo software, don’t save the altered images in the JPEG format. Every time you alter and save an image in the JPEG format, you apply another round of lossy compression. And with enough editing, saving, and compressing, you can eventually get to the level of image degradation shown in the JPEG example in Figure 3-1, at the start of this chapter. (Simply opening and closing the file does no harm.)
Always save your edited photos in a nondestructive format. You can’t save photos in the RAW format, but TIFF is available in most photo editing programs. Should you want to share the edited image online, create a JPEG copy of the TIFF file when you’re finished making all your changes. That way, you always retain one copy of the photo at the original quality captured by the camera. Chapter 9 explains how to create a JPEG copy of a photo for online sharing.
NEF (RAW): The purist’s choice
The second picture file type you can create on your D300s is called Camera RAW, or just RAW (as in uncooked) for short.
Each manufacturer has its own flavor of RAW. Nikon’s is called NEF (for Nikon Electronic Format), so you see the three-letter extension NEF at the end of RAW filenames.
RAW pros and cons
RAW is popular with advanced, very demanding photographers for these reasons:
Greater creative control: With JPEG and TIFF, internal camera software tweaks your images, making adjustments to color, exposure, and sharpness as needed to produce the results that Nikon believes its customers prefer. With RAW, the camera simply records the original, unprocessed image data. The photographer then copies the image file to the computer and uses special software known as a RAW converter to produce the actual image, making decisions about color, exposure, and so on at that point. The upshot is that “shooting RAW” enables you, and not the camera, to have the final say on the visual characteristics of your image.
Higher bit depth: Bit depth is a measure of how many distinct color values an image file can contain. When you choose JPEG or TIFF as the Image Quality setting, your pictures contain 8 bits each for the red, blue, and green color components, or channels, that make up a digital image, for a total of 24 bits. That translates to roughly 16.7 million possible colors.
Choosing the RAW setting delivers a higher bit count. You can set the camera to collect 12 bits per channel or 14 bits per channel. (More about that option and some other RAW-related options momentarily.)
Although jumping from 8 to 14 bits sounds like a huge difference, you may not really ever notice any impact on your photos — that 8-bit palette of 16.7 million values is more than enough for superb images. Where having the extra bits can come in handy is if you really need to adjust exposure, contrast, or color after the shot in your photo editing program. In cases where you apply extreme adjustments, having the extra original bits sometimes helps avoid a problem known as banding or posterization, which creates abrupt color breaks where you should see smooth, seamless transitions. (A higher bit depth doesn’t always prevent the problem, however, so don’t expect miracles.)
Better picture quality: RAW doesn’t apply the destructive, lossy compression associated with JPEG, so you don’t run the risk of the artifact-ing that can occur with JPEG. On the D300s, you can choose to apply two alternative types of compression to reduce RAW file sizes slightly, but neither impact image quality to the extent of JPEG compression. Or you can turn off compression altogether.
As with most things in life, RAW isn’t without its disadvantages, however. To wit:
You can’t do much with your pictures until you process them in a RAW converter. You can’t share them online, for example, or put them into a text document or multimedia presentation. You can print them immediately if you use Nikon ViewNX, but most other photo programs require you to convert the RAW files to a standard format first. So when you shoot RAW, you add to the time you must spend in front of the computer instead of behind the camera lens.
To get the full benefit of RAW, you need software other than Nikon ViewNX. The ViewNX software that ships free with your camera does have a command that enables you to convert RAW files to JPEG or to TIFF. However, this free tool gives you limited control over how your original data is translated in terms of color, exposure, and other characteristics — which defeats one of the primary purposes of shooting RAW.
Nikon Capture NX 2 offers a sophisticated RAW converter, but it costs about $180. (Sadly, if you already own Capture NX, you need to upgrade to version 2 to open the RAW files from your D300s.) If you own Adobe Photoshop or Photoshop Elements, however, you’re set; both include the converter that most people consider one of the best in the industry. (The Elements version is more limited than the Photoshop version, of course.) Watch the sale ads, and you can pick up Elements for well under $100. You may need to download an update from the Adobe Web site (www. adobe.com) to get the converter to work with your D300s files.
Of course, the D300s also offers an in-camera RAW converter, found on the Retouch menu. But although it’s convenient, this tool isn’t the easiest to use because you must rely on the small camera monitor when making judgments about color, exposure, sharpness, and so on. The in-camera tool also doesn’t offer the complete cadre of features available in Capture NX 2 and other converter software utilities.
Chapter 8 offers more information on the in-camera conversion process and also offers a look at the converter found in ViewNX.
RAW files are larger than JPEGs. The type of file compression that you can enable for RAW files doesn’t degrade image quality to the degree you get with JPEG compression, but the tradeoff is a larger file. In addition, Nikon RAW files are always captured at the maximum resolution available on the camera, even if you don’t really need all those pixels. For both reasons, RAW files are significantly larger than JPEGs, so they take up more room on your memory card and on your computer’s hard drive or other picture-storage device.
Are the disadvantages worth the gain? Only you can decide. But before you make up your mind, refer to Figure 3-12 and compare the JPEG Fine example with its NEF (RAW) counterpart. You may be able to detect some subtle quality differences when you really study the two, but a casual viewer likely would not, especially if shown the entire example images at normal print sizes rather than the greatly magnified views shown in the figure. I took Figure 3-11, for example, using JPEG Fine.
That said, I do shoot in the RAW format when I’m dealing with tricky lighting because doing so gives me more control over the final image exposure. For example, if you use a capable RAW converter, you can specify how bright you want the brightest areas of your photo to appear and how dark you prefer your deepest shadows. With JPEG and TIFF, the camera makes those decisions, which can potentially limit your flexibility if you try to adjust exposure in your photo editor later. And the extra bits in a RAW file offer an additional safety net because I usually can push the exposure adjustments a little further in my photo editor if necessary without introducing banding.
I also go RAW if I know that I’m going to want huge prints of a subject. But keep in mind: I’m a photography geek, I have all the requisite software, and I don’t really have much else to do with my time than process scads of RAW images.
Customizing your RAW capture settings
If you opt for RAW, you can control three aspects of how your pictures are captured:
RAW only or RAW+JPEG: You can choose to capture the picture in the RAW format or create two files for each shot, one in the RAW format and another in the JPEG format, as shown in Figure 3-13. The figure shows the list of options that appears when you change the Image Quality setting through the Shooting menu; you can select from the same settings when you adjust the option by pressing the Qual button and rotating the main command dial.
For RAW+JPEG, you can specify whether you want the JPEG version captured at the Fine, Normal, or Basic quality level, and you can set the resolution of the JPEG file through the Image Size option, explained earlier in this chapter. Again, you don’t have a choice of Image Size settings for the RAW file; the camera always captures the file at the maximum resolution.
I often choose the RAW+JPEG Fine option when I’m shooting pictures I want to share right away with people who don’t have software for viewing RAW files. I upload the JPEGs to a photo-sharing site where everyone can view them and order prints, and then I process the RAW versions of my favorite images for my own use when I have time. Having the JPEG version also enables you to display your photos on a DVD player or TV that has a slot for an SD or Compact Flash memory card — most can’t display RAW
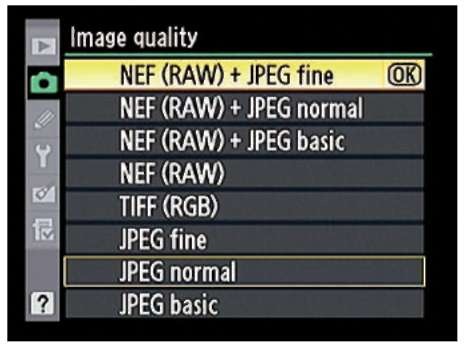
Figure 3-13: You can create two files for each picture, one in the RAW format and a second in the JPEG format.
files but can handle JPEGs. Ditto for portable media players and digital photo frames.
RAW bit depth: You can specify whether you want a 12-bit RAW file or a 14-bit RAW file. More bits means a bigger file but a larger spectrum of possible colors, as explained in the preceding section. You make the call through the NEF (RAW) Recording option on the Shooting menu, as shown in Figure 3-14. Be aware that choosing the 14-bit option reduces the maximum burst rate you can achieve when using either of the continuous Release mode settings to 2.5 frames per second. (Chapter 2 discusses the Release mode options.)
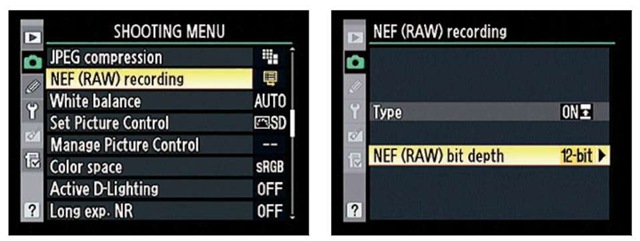
Figure 3-14: Set the file bit depth through this Shooting menu option.
RAW compression: By default, the camera applies lossless compression to RAW files. As its name implies, this type of compression results in no visible loss of image quality and yet still reduces file sizes by about 20 to 40 percent. In addition, the compression is reversible, meaning that any quality loss that does occur through the compression process can be undone at the time you process your RAW images.
You can choose from two other options, again through the NEF (RAW) Recording option on the Shooting menu. After selecting that option, choose Type, as shown on the left in Figure 3-15, to display the screen shown on the right. The Compressed setting achieves a greater degree of file-size savings, shrinking files by about 40 to 55 percent. Nikon promises that this setting has “almost no effect” on image quality. But the compression in this case is not reversible, so if you do experience some quality loss, there’s no going back. The third option, Uncompressed, applies no compression at all to your file, resulting in the largest files of the three settings but no chance of any compression quality loss.
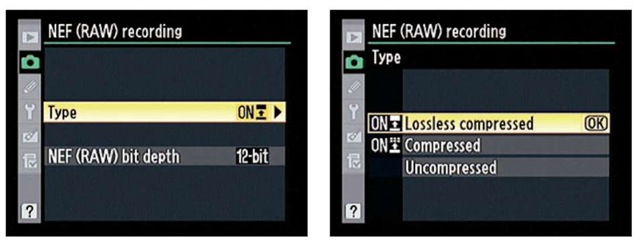
Figure 3-15: You can choose to apply one of two types of compression or leave RAW files uncompressed.
Together, the choices you make for these three settings make a big difference in the size of your picture files and, thus, your memory card capacity. If you combine the 14-bit file type with the Uncompressed setting, a single picture file consumes about 25.4MB of card space. A 12-bit file captured at the compressed setting, by contrast, is only 10.5MB — still large, but less than half that of the “ultimate RAW” 14-bit, uncompressed file. And if you choose RAW+JPEG capture, well, just add the size of the JPEG file into the equation. If you choose the 14-bit and Uncompressed settings for the RAW file and create the second file as a JPEG Fine at the highest resolution, for example, the combined size of the RAW plus JPEG files is (gulp) 31.4MB (25.4MB for the RAW file plus 6MB for the Large/Fine JPEG).
For my purposes, the default RAW settings — 12-bit RAW with Lossless Compression — serve me well. And frankly, I doubt that too many people could perceive much difference between a photo captured at that setting and a 14-bit, uncompressed picture. But if you are using your D300s for commercial photography — whether you shoot weddings, do high-end studio work, or shoot fine-art photography for sale — you may feel more comfortable knowing that you’re capturing files at the absolute maximum quality and bit depth. The higher bit depth also may make sense if you’re shooting in really difficult lighting because, again, it gives you the potential of capturing a broader range of colors and tones.
If you choose to create both a RAW and JPEG file, note a couple of things:
If you’re using only one memory card, you see the JPEG version of the photo during playback. However, the Image Quality data that appears with the photo reflects your capture setting (RAW+Basic, for example). To use the in-camera RAW processing option on the Retouch menu, display the JPEG image and then proceed as outlined in Chapter 8.
If both the JPEG and RAW files are stored on the same memory card, deleting the JPEG image also deletes the RAW copy. See Chapter 1 to find out how you can send the two versions to separate memory cards instead. If you go that route, deleting one file doesn’t delete the other. (Either way, after you transfer the two files to your computer, deleting one doesn’t affect the other.)
Chapter 4 explains more about viewing and deleting photos.
Tiff: A mixed bag
Whereas most cameras limit you to a choice of RAW or JPEG files, the D300s gives you a third format option, TIFF, as shown in Figure 3-16. The acronym stands for tagged image file format, and it’s pronounced tiff, as in tiny spat. The RGB next to the format name indicates that the file is being created using the RGB (red-green-blue) color model, explained in Chapter 6. JPEG and RAW files are also RGB files, and no, I can’t tell you why the designation appears only with the TIFF option in the menus. However, I can tell you that when you
view your pictures during playback, the file type data shows RGB instead of TIFF.
As with RAW and JPEG, TIFF has its good side and bad side:
The good: Like RAW, TIFF doesn’t involve the destructive compression you get with JPEG. In fact, absolutely no compression is applied to TIFF files. That translates to better image quality than JPEG. Unlike RAW files, though, TIFF files don’t have to

Figure 3-16: TIFF is the standard format used in print publishing.
be converted to a standard format because TIFF is a standard format. In fact, it’s been the leading format for files destined for print for many years. So you can print, view, and edit TIFF files in most photo programs immediately after you download them from the camera. Most retail printing outlets also can print TIFF files. The only thing you can’t do with a TIFF file right out of the camera is view it in an e-mail program or Web browser — for that, you need JPEG.
The bad: TIFF files are huge. Wait — make that huge. Captured at the highest resolution setting (Large), a TIFF file weighs in at 36.6MB! That’s significantly larger than the 25.4MB required for a RAW file, even when you use the highest RAW bit depth and apply no compression to the file.
You can reduce the TIFF file size by setting the Image Size to the lowest resolution setting (Small), in which case your final file size is 9.3MB. However, you can’t modify file sizes by using different compression options as you can for RAW and JPEG.
The D300s also caps out bit depth for TIFF files at 8 bits per channel, the same as for JPEG files. So not only do you get larger files than with RAW, but you don’t even gain the expanded color spectrum of a 12- or 14-bit RAW for your trouble.
So who exactly is this format designed to please? Well, I can think of a couple of scenarios that would make TIFF a good choice:
You’re shooting for a publication or client that requires you to submit files in the TIFF format, and you’re on a tight deadline. Instead of taking the time to download your RAW or JPEG originals and then convert them to TIFF, you can send the TIFF files directly.
You’re after the slightly better image quality provided by TIFF but you don’t have the time, interest, or software required to process RAW files.
You should know, however, that any quality differences between a picture shot at the highest quality JPEG settings and a TIFF file are usually pretty difficult to detect — although again, the larger you print your files, the more even the slightest quality difference becomes important. Because I don’t find the quality difference worth the substantially larger file sizes, I don’t use this format unless I need that TIFF file right away, with no time to get to the computer.
Summing up: My take on which format to use when
At this point, you may find all this technical goop a bit much — I recognize that panicked look in your eyes — so allow me to simplify things for you. Until you have the time or energy to completely digest all the ramifications of JPEG versus RAW versus TIFF, here’s a quick summary of my thoughts on the matter:
If you require the absolute best image quality and have the time and interest to do the RAW conversion, shoot RAW. Set the RAW file options (bit depth and compression type) to suit your specific needs, but remember that the maximum bit depth and minimum compression mean really big files. So you’ll need lots of storage space both on your memory cards and on your computer’s hard drives. Again, I opt for 12-bit RAW files with the default compression setting (Lossless Compressed). See Chapter 8 for more information on the conversion process.
If great photo quality is good enough for you, you don’t have wads of spare time, or you aren’t that comfortable with the computer, stick with JPEG Fine and set the JPEG Compression option on the Shooting menu to Optimal Quality.
If you don’t mind the added file-storage space requirement and want the flexibility of both formats, choose RAW+JPEG. If you need your JPEGs to exhibit the best quality, go with RAW+JPEG Fine.
If you go with JPEG only, stay away from JPEG Normal and Basic. The tradeoff for smaller files isn’t, in my opinion, worth the risk of compression artifacts. As with my recommendations on image size, this fits the “better safe than sorry” formula: You never know when you may capture a spectacular, enlargement-worthy subject, and it would be a shame to have the photo spoiled by compression defects. If you select RAW+JPEG, of course, this isn’t as much of an issue because you always have the RAW version as backup if you aren’t happy with the JPEG quality.
If you want top quality but don’t want to deal with RAW processing, you can opt for TIFF. But again, stock up on memory cards and extra hard drive storage space — at almost 40MB per picture file, you’ll run out of space quickly.
Do you need high-speed memory cards?
Memory cards are categorized not just by their storage capacity, but also by their data-transfer speed. But sorting out the numbers requires a little background:
CompactFlash (CF) cards are rated according to the same standards used for CD-ROM recording devices, where speed is based on transferring a 150K (kilobyte) chunk of data. A rating of 1x equals 150K (kilobytes) per second. As I write this, a card with a max speed rating of 666X has just been announced, although is not yet on the market.
SD and SDHC cards sometimes also use the “X” speed ratings but more recently are categorized according to one of three speed classes, Class 2, Class 4, and Class 6, with the number indicating the minimum number of megabytes (roughly 1,000 kilobytes) transferred per second. A Class 2 card, for example, has a minimum transfer speed of 2 megabytes, or MB, per second.
Of course, with the speed increase comes a price increase. Should you make the extra investment? It depends. Photographers who
shoot action benefit most from high-speed cards — the faster data-transfer rate helps the camera record shots at its maximum speed. Users who shoot at the highest resolution or prefer the NEF (RAW) file format also gain from high-speed cards; both options increase file size and, thus, the time needed to store the picture on the card. (See Chapter 3 for details.) Finally, you typically get better movie-recording performance from high-speed cards. As for picture downloading, how long it takes for files to shuffle from card to computer depends not just on card speed, but also on the capabilities of your computer and, if you use a memory card reader to download files, on the speed of that device. (Chapter 8 covers the file-downloading process.)
Long story short, if you want to push your camera to its performance limits, a high-speed card is worth considering, assuming budget is no issue. Otherwise, just about card currently on the market you can buy today should be more than adequate for most photographers (assuming that you’re buying new, as opposed to snapping up some 5-year old cards being sold in an online auction).
