Load Types
There are literally hundreds of applications for AC and DC drives. Though it would be almost impossible to cover all possible types, we will review some of the more common applications.
When we look at applications, it is important to consider the load connected to the motor. The load is the determining factor in what type, style, size, and power producing device the motor should be. The drive is the device that will control the motor. In simple terms, it is best to start with
the application (load), work backward to the motor (prime mover), then to the drive (controller), and then to the automated or manual control (speed control or PLC).
There are three major categories of mechanical loads – Constant Torque, Constant Horsepower and Variable Torque. Any drive application will fall into one of these three categories. When reviewing the following application types, keep in mind that the drive’s primary responsibility it to control the application, protect the motor, and protect itself.
Constant Torque Applications
These types of applications will make up the majority of what we would consider to be industrial applications. Figure 2-34 shows a graph of the characteristics of a constant torque application.
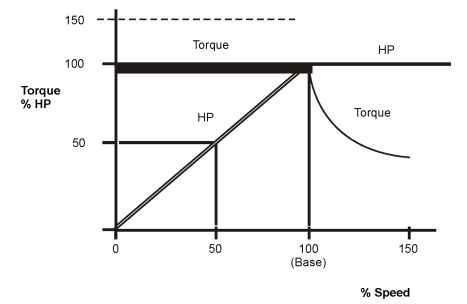
Figure 2-34. Constant torque application
As shown in Figure 2-34, we can see that torque required in this application is 100% and remains constant from zero to base speed (100%). In other words, the rated torque (100%) is required to operate this application, no matter what the speed. In most cases, this application will be operated from only zero to base speed.
It is also evident that this type of application possesses a variable horsepower characteristic. In a constant torque application, horsepower is directly proportional to the speed (i.e., at 50% speed, 50% HP is required, etc.). While the horsepower consumed by the motor varies directly with speed, the torque required to power the load remains constant.
In reality, the load may vary from above rated torque (100%) to below rated level and anywhere in between, until the motor attains full speed (in
many cases, base speed). In many cases, as much as 150% torque is required to break the load away from a stand-still. The 150% dashed line indicates a possible overload requirement from a motor and drive, if connected to this type of load.
Many applications fall into the constant torque category. The standard belt conveyor shown in topic 1 (Figure 1-1) is a prime example. A ball mill in a cement plant is another example. Figure 2-35 shows this process of grinding aggregate into powder for cement.

Figure 2-35. Ball mill in a cement plant
In Figure 2-35, the degree of grinding is controlled by the speed of the AC drive. Speeds of less than 120 rpm cause the ball mill cylinder to internally grind the large raw material into smaller particles and eventually into fine granulated powder. The torque required from the motor can be constant from zero to the maximum speed. Overload torque is needed to initially start the mill rotating—with the amount of overload dictated by the amount of material inside the mill at start-up.
Extruders also fall into the constant torque category. A typical extruder, such as a screw extruder for plastic, often requires overload capability, especially when the raw plastic has cooled somewhat and is less than fluid. Figure 2-36 shows a plastic screw extruder.
In Figure 2-36, the AC drive provides variable speed motor operation. It drives the screw vanes at speeds regulated by the temperature of the plastic or the rate of production and die size (output extrusion hole). AC drives provide a high degree of efficiency, while maintaining a constant rate of production accuracy.
Another application combines the use of a rotating feed turntable and a conveyor. Figure 2-37 shows a Rotating Feed Table, which combines both liner motion (conveyor) and rotating motion of a turntable.
As seen in Figure 2-37, the flow rate of the granules can be controlled by the motor speed that is dictated by the AC drive. This type of AC-drive application is highly efficient because of the ability of the drive to accurately regulate motor speed. With accurate motor-speed control, an opti-
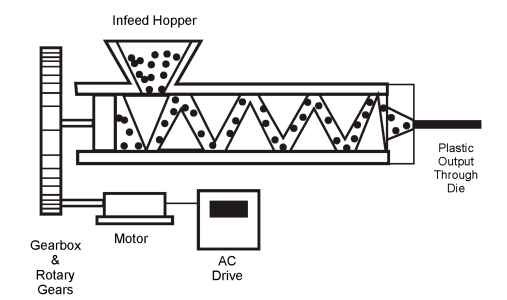
Figure 2-36. Plastic screw extruder
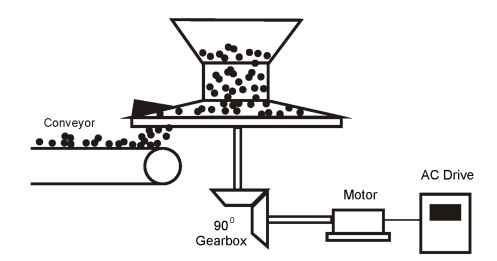
Figure 2-37. Rotating feed table
mum amount of granules can be distributed to the conveyor, which may then be fed to another process, such as heating or coating.
Constant Horsepower Applications
In this type of application, the horsepower required remains constant, while the torque drops off as a ratio of 1/speed2. Figure 2-38 shows the constant horsepower type of load.
Applications of this type operate in the above base speed and below base speed area. The fact that torque drops off as 1/speed2 is an advantage in applications of this type. Figure 2-39 shows a typical constant horsepower application—machine tools.
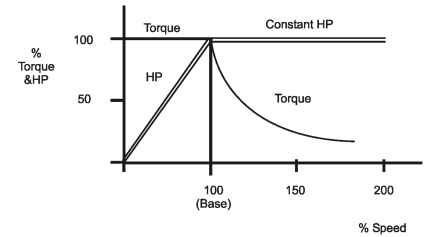
Figure 2-38. Constant horsepower load
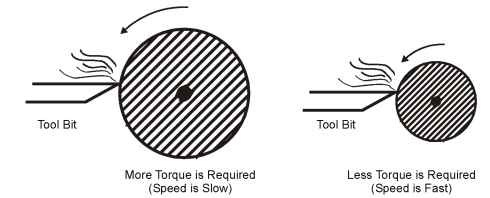
Figure 2-39. Machine tool application (cross section of work piece)
As seen in Figure 2-39, a slow speed is required when the tool bit is taking off large amounts of material. In doing so, a greater amount of torque is required (operating in the “Below Base Speed” section of Figure 2-38). Once the work piece is at the approximate diameter, the speed is increased, and the tool bit is required to take off minimal amounts of material. This process produces a fine, smooth surface (operating in the “Above Base Speed” section of Figure 2-38).
Another example of a constant horsepower application is a center driven winder. Figure 2-40 shows another use of above and below base speed operation.
As seen in Figure 2-40, basically the same scenario exits as with machine tool applications (above and below base speed operation). Very low inertia exists when the take-up roll is first started. This translates to little torque required to start the winding process, thereby allowing a high speed. Once the winding process is started, increasing amounts of inertia are seen at
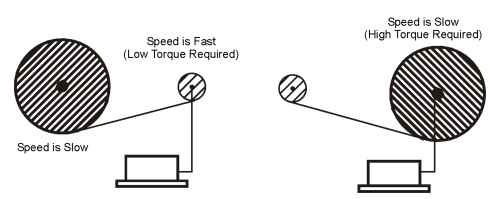
Figure 2-40. Center driven winder (cross section of web roll)
the take-up roll, translating into more torque required, thereby causing the need for a slower speed.
The key to a proper winding process is to have adequate control of torque and speed on the web at all times. If little torque is available at the take-up roll, “telescoping” or bunching of the material is a result. This would be like that of a window shade that is let-go from only one corner. If too much torque is available on the take-up roll, stretching of the material could result, or even worse, a complete break in the web.
Since speed and torque are interactive in this application, it is not necessarily an application for a simple speed-controlled drive. DC drives have found their use in these types of winding applications because of the ease of controlling speed and torque simultaneously. Newer types of AC drives (vector or torque controllers) have also found their way into the control of this type of application in recent years. A more complete discussion of drives specifics in winder applications will be covered in later topics.
Variable Torque Applications
In this type of application, below base speed, torque required varies as speed2. It should also be noted that the horsepower required varies as speed3. Because of this relationship, this type of application is sometimes referred to as the cubed exponential application. Figure 2-41 shows the characteristics of this type of application.
This type of application is a prime candidate for energy savings using AC drives. As seen in the example, to obtain 50% flow rate, only 1/8 or 12.5% horsepower, is required (M> x M> x M>). It should also be noted that the torque and horsepower curves normally end at the 100% spot (100% speed and 100% torque, flow, and horsepower). Because it is easy to over-speed a motor using a drive, users may have a tendency to increase speed above base, to obtain more CFM output. This is not normally recommended because of the mechanical limitations of the motor and the characteristics of the application.
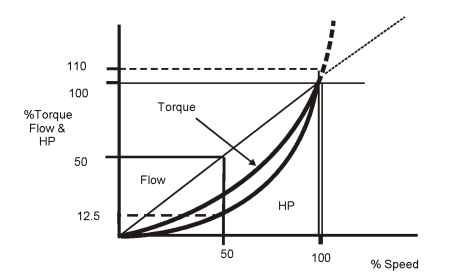
Figure 2-41. Variable torque application
To obtain increased speed above base, a higher output frequency (Hz) must be supplied by the drive. With several Hz output above base, the torque and horsepower curves would follow the natural path indicated by the dashed lines. As shown in the figure, just a few hertz increase in output frequency would cause a much greater demand for motor torque and horsepower. However, flow would continue to increase in a somewhat “linear” manner.
This tremendous increase in torque and horsepower from the motor is now coupled with the fact that decreased motor torque is a natural result of above base speed operation. (Details on this characteristic will be discussed in topic 3 – General Principles of Operation.)
The end result is a slight increase in drive output frequency, causing a very large requirement for torque and horsepower, at the same time motor torque is dropping rapidly. Nearly all of the fan systems engineered today take this phenomenon into account. It is rare to need to over-speed a fan, unless the above characteristics are addressed (duct work changes or over-sizing the motor, or both).
Because HVAC fan systems are engineered for below base speed operation, typical overload requirements are set at 10%. AC drives that are rated to NEMA standards, will allow 110% current for 1 minute as an overload capability.
As shown in the discussion above, this type of application has two main examples: centrifugal fans and pumps. Figure 2-42 shows a standard HVAC fan application.
In this example, we see that the centrifugal fan is coupled to the motor by means of a belt. The air inlet allows air to enter the fan assembly. Depending on the status of the outlet damper (open, part open, closed), the fan
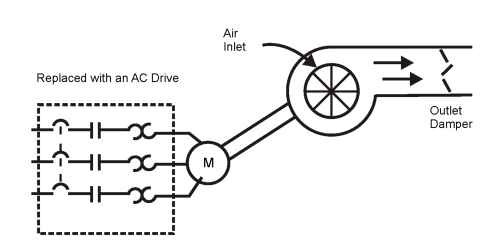
Figure 2-42. HVAC fan application
will blow the amount of air dictated by some control system, typically an actuator. The area in the dashed box indicates a three-phase start contactor and motor overloads to protect the motor, in case of an over-current condition. Also shown is the fact that what’s inside the dashed box can be replaced by an AC drive.
As can be imagined, the fan continues to run at full speed, 24 hours a day. This is required, regardless of the status of the outlet damper, because there is no device controlling the speed of the motor. The device that controls airflow has no effect on the speed of the motor and fan.
This method of variable flow control is quite inefficient. Figure 2-43 shows a graph of how the fan actually operates on the basis of the system shown in Figure 2-42. The fan curve indicates the fixed speed fan. The system curve indicates the status of the outlet damper and also the size and shape of the sheet metal duct work.
To reduce the airflow in this fixed-speed system, the actuator must close down the outlet damper, thereby restricting air output. If 50% airflow is desired, the position of the outlet damper must be modified by the actuator, which changes the system curve (indicated by the dashed curve). The air output is reduced; however, the pressure in the system duct work has increased, placing additional load on the motor. This additional load translates to more horsepower required to operate with less airflow.
If the start contactor assembly were replaced by a variable-frequency AC drive, the outlet damper would be locked in full open position (indicated by the existing system curve). For every output frequency of the AC drive, a new fan curve occurs (indicated by the dashed curves).
As seen, where the new fan curves cross the fixed system curve, a different percentage of flow output is achieved. It can also be seen that the amount of pressure in the duct work never exceeds 100%. In essence, if there is
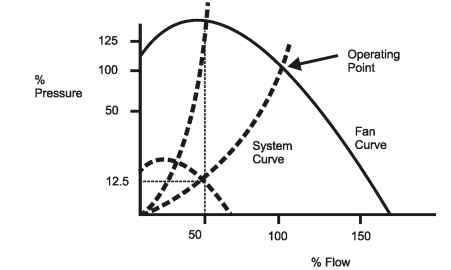
Figure 2-43. Operation of a centrifugal fan
less pressure, the motor doesn’t work as hard and energy is saved, compared with full-speed operation.
This same principle works for centrifugal pumps. Reduced speed is a definite advantage when operating a pump, which leads to reduced energy use. However, when speed reduction is contemplated, the optimum efficiency of the pump must be taken into consideration. Pumps have “efficiency islands” around the crossing of the pump and system curves. Any energy savings gained can be lost if operation is done outside these efficiency islands because of greater pump inefficiency.
Speed, Torque, and Horsepower
Understanding speed, torque, and horsepower is essential to understanding mechanical systems. The following discussion will help you gain a basic insight into these relationships, and will help prepare you for a discussion of inertia.
Torque and horsepower are two very important characteristics that determine the size of the motor required for a particular drive application. The difference between the two can be explained using the illustration in the next section.
Torque
Torque is basically a turning effort. Suppose we have a worker that is required to raise a construction elevator by hand. Figure 2-44 shows this example and demonstrates the process of applying torque.
This worker must supply the required torque to raise the elevator from the first floor to the second floor (Figure 2-44).
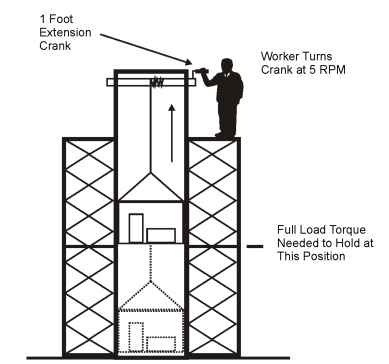
Figure 2-44. Using torque to turn a hand crank
In this example, the worker cannot raise the elevator even though he applies 1 lb-ft of torque.
Note: Torque = Force x Distance. In this case, the worker applies 1 lb of force on the crank, which is 1 foot in length. We say the torque is one pound times one foot or one lb-ft.
If the worker wants to raise the elevator, more torque must be applied to the hand crank. The worker has two choices: either place more force on the crank or increase the length of the crank. The worker chooses to increase the length of the extension on the hand crank. The elevator now moves, even though the worker does not apply any more force. Figure 2-45 shows this procedure.
In this case, the worker has developed 5 lb-ft of torque, more than enough torque to turn the crank and raise the elevator.
If the worker turns the crank twice as fast, the torque remains the same. Regardless of how fast the worker turns the crank, as long as the worker is turning it at a steady rate, the torque is unchanged.
Horsepower (HP)
Horsepower takes into account the speed at which the worker turns the crank. Turning the crank faster takes more horsepower than turning it slowly. Horsepower is a rate of doing work.
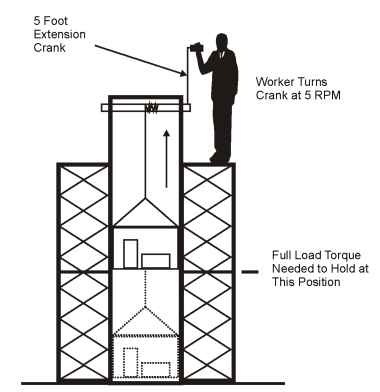
Figure 2-45. Increased length of the hand crank
Note: By definition, 1 horsepower equals 33,000 ft-lb per minute. In other words, to lift a 33,000-lb weight 1 ft in 1 minute would take 1 HP.
By using the formula below, we can determine the horsepower developed by the worker. We know the system in Figure 2-44 is developing 5 lb-ft of torque.
Formula:

T = torque in lb-ft N = speed in rpm
The worker turns the crank at 5 rpm as shown in Figure 2-44. By inserting the known information into the formula, we find that the worker is developing approximately .005 HP (5 x 5 -f 5252 = .0047). As seen by the formula, horsepower is directly related to the speed of turning the crank. If the worker turns the crank twice as fast (10 rpm), he will develop almost .010 HP.
Inertia
Inertia is the measurement of an object’s resistance to change in velocity (speed). The measurement holds true whether the object is at a stop or
moving at a constant velocity. By definition, inertia deals with the presence of mechanical “resistance.” Inertia is resistant to changes in speed or direction.
Note: In electrical terms, an inductor opposes changes in current, due to resistance. In mechanical terms, inertia opposes changes in speed, also due to resistance.
Inertia is the reason why your auto can’t immediately accelerate from 065 mph. As logic would dictate, a 4.5-L engine would be needed to power a large luxury auto, and only a 2.5-L engine would be needed for a small auto. If we apply previously learned concepts of speed, torque, and horsepower, the larger the auto, more horsepower is needed to accelerate from 0-65 mph in 15 seconds. Figure 2-46 shows a comparison of horsepower and speed, in relation to inertia.
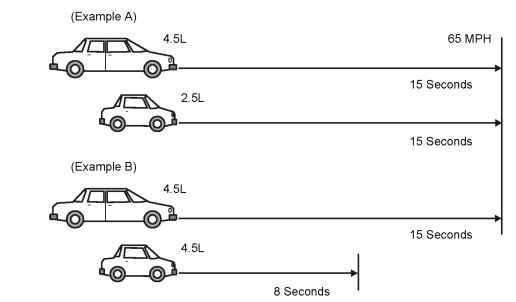
Figure 2-46. Relationship of inertia with speed and horsepower
As seen in Figure 2-46, a higher amount of horsepower is needed to overcome inertia and accelerate the auto, to achieve a speed of 65 mph in 15 s (example A of the figure). The previous would be true if the engines were sized properly in both the large and small autos. However, if the small car needed quicker acceleration capability, we would use the same 4.5-liter engine as in the large auto. The small auto would achieve quicker acceleration because of its oversized engine (example B of the figure).
It should be noted here that the principles of inertia, torque, horsepower, and speed apply to an electromechanical motor. With that in mind, it should also be noted that the extra horsepower of the 4.5-L engine would be needed only on acceleration. A large amount of horsepower is needed for quick acceleration, but only a small amount is needed to keep the auto moving at a constant speed.
This principle is similar to pushing someone on a swing. A large amount of effort is needed to get the person started in a swinging motion, but only a small tap every cycle is needed to keep the person going. The amount of inertia is greater when at a standstill, than when the swing is already in motion.
In relation to rotating machinery, a flywheel would be termed a high-inertia load. It would take a large amount of energy to quickly bring the flywheel up and back down in speed. The main reason is that high inertia loads have high resistance to change (in this case, change in speed).
Inertia has a significant impact on which size of drive is chosen to accelerate a high inertia load. We will take a brief look at some commonly used formulas to calculate acceleration and inertia.
The following information will assist you in your general understanding of inertia-related calculations. The logical place to start is to label terms and units of measure. When looking at inertia, two different ways of labeling are commonly used: WK2 and WR2. Both terms relate the formula to inertia.
WR2 refers to the inertia of a rotating object that was calculated by assuming the weight of the object was concentrated around the rim—at a certain distance. That distance is termed R and is the distance from the center of the object. (By strict definition, WR2 is the weight of an object [W] times its radius [R] squared.) In this definition, inertia is that property by which an object in motion will stay in motion, until acted upon by another force. An example of an inertia calculation of this type is a flywheel.
WK2 refers to the inertia of a rotating object that was calculated by assuming the weight of the object is concentrated at some smaller distance. The smaller distance is termed K. (By strict definition, WK2 is the weight of an object times its radius of gyration value squared.) Examples of this type of inertia calculation would be cylinders, pulleys, or gears.
The units of measurement for inertia is the lb-ft2 (pronounced pound-feet squared). Another unit sometimes found in inertia calculations is in-lb-sec2, used in calculations for the moment of inertia (motion control applications using servos). Initially, calculations using lb-ft2 will be used to demonstrate calculations of inertia.
The next section will present some commonly used formulas using torque, horsepower, inertia, and time. These formulas will be used as examples for calculations based on rotating machinery, which need to be considered before drive selection can begin.
Accelerating Torque
The following formula calculates the torque required for rotating motion to begin:
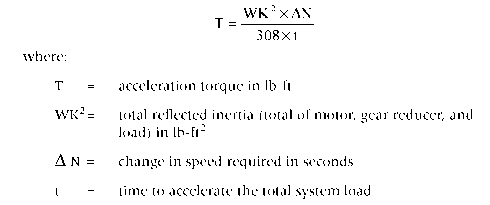
A term above that may not be familiar, is the term reflected inertia. Basically, this term is used to describe the inertia found at the motor shaft, and is a standard term found throughout the rotating machinery industry. A speed reducer (gear box or belt coupler) changes the inertia that the motor shaft actually sees. More on this subject will be discussed later in this topic.
Acceleration Time
The next formula is a rearranged version of the previous one, only it allows for the calculation of the time needed to accelerate, given a specified amount of torque, inertia, and change in speed.
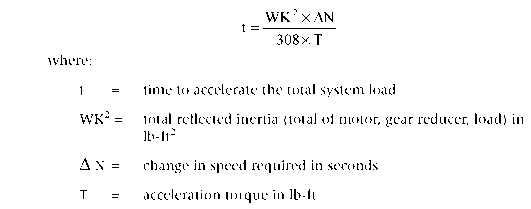
The following are examples of how inertia is calculated and how much time is needed to accelerate a machine with the specified requirements.
One note regarding calculations should be added here. When performing inertia calculations, two measurement units are commonly used: lb-ft2 and in-lb-sec2. For the most part, many calculations are defined in lb-ft2, which is the units of measure for WK2 or WR2. However, in many motion control (servo) applications, inertia is defined in terms of in-lb-sec2, which is the units of measure for the moment of inertia (J). When performing inertia calculations, be consistent with the formulas and units of measure used. For most practical motion-control applications involving inertia

Solid Cylinder Inertia Calculations
To calculate the inertia of a solid cylinder, the following formula is used.
WK2 = .000681 x p x L x D4
where:
WK2 = inertia of a cylinder in lb-ft2 p = density of cylinder material in lb/in3 L = length of the cylinder in inches D = diameter of the cylinder in inches Note: The units of measure for WK2 are in lb-ft2. Refer to Figure 2-47.
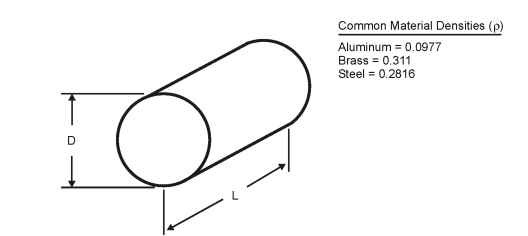
Figure 2-47. Inertia of solid cylinders

Now that the inertia has been calculated (WK2), the time it would take to accelerate the system can be determined as follows:
From 0 to 1200 rpm, with an acceleration torque available of 30 lb-ft, the formula for acceleration time will be used:
Therefore:
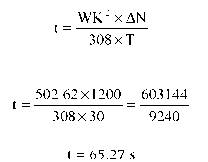
If the time calculated is too long, then the easiest item to control would be the amount of available acceleration torque—meaning the motor. The motor would have to be upsized to have increased available acceleration torque. Motor torque will again be discussed in the topic on DC and AC motors.
Hollow Cylinder Inertia Calculations
To calculate the inertia of a hollow cylinder, basically the same formula can be used, but without the inertia of the hollow section. The formula would be:
![]()
Figure 2-48 shows a hollow cylinder with the formula parts. where:
WK2 = inertia of a cylinder in lb-ft2
p = density of cylinder material in lb/in3
L = length of the cylinder in inches
D2 = outside diameter of the cylinder in inches
D1 = inside diameter of the cylinder in inches.
If we take the previous example and only solve inertia for the hollow cylinder above, we would go through the following calculations. We will assume the same information regarding the cylinder:
Solid aluminum roll has a length of 72 inches, an outside diameter of 18 inches, and an inside hollow diameter of 12 inches. Therefore, we would go through the following calculations:
WK2 = .000681 x 0.0977 x 72 x (184 – 124)
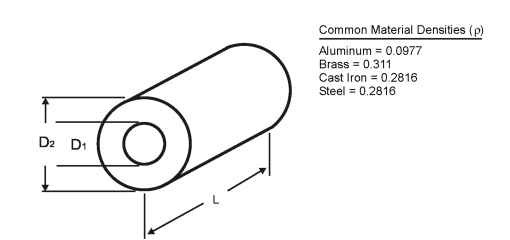
Figure 2-48. Inertia of hollow cylinders

If we use the above inertia, we can again find the time it would take to accelerate the system. We will use the same example:
From 0 to 1200 rpm, with an acceleration torque available of 30 lb-ft, the formula for acceleration time will be used:
Therefore:
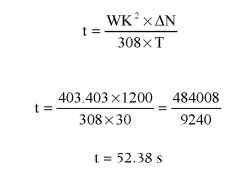
We have determined that the amount of time to accelerate the hollow-cylinder system is definitely less, compared with a solid cylinder. However, it should be noted that the amount of time reduction is not as much as expected. With 66% of the cylinder removed, there was only a reduction of about 13 s of acceleration time. This indicates a characteristic of iner-tia—the largest amount of inertia is concentrated around the rim, as opposed to the center part of the object.
The same formulas would be used to determine the inertia of pulleys, sheaves, and other rotating objects. Simply break up the objects into solid and hollow cylinders and apply the formulas previously discussed. Then
add all the inertia components calculated and determine the time required for acceleration of the system.
Reflected Inertia
One additional note should be stated about inertia. The term reflected inertia is the inertia actually found at the motor shaft. This term is standard throughout the industry. A speed reducer (gear box or belt type of coupling device) changes the inertia that the motor actually sees. Figure 2-49 shows this phenomenon.

Figure 2-49. Reflected inertia of a system
As seen in Figure 2-49, if an adjustable speed drive was sized for an inertia of 12 lb-ft2, it may be much larger than actually necessary. Reflected inertia also includes inertia of the actual motor.
Power transmission devices (gear boxes, belts, and pulleys) serve to make the motor’s job easier. In our next section, we will look at gear boxes and speed reducers in more detail and determine what relationship exists between speed, torque, and horsepower.
