As discussed in topic 1, the DC drive contains the components listed in Figure 4-1. A closer look will now be taken into each circuit within the DC drive unit.
Presently, most DC drives use transistors to convert AC to DC. Historically, the most widely used method, however, is that of silicon controlled rectifiers (SCRs) in power conversion. Our focus will be on the SCR control, used in both analog and digital DC drive technology.
As recalled from topic 1, SCRs conduct current when a small voltage is applied to the gate circuit. Figure 4-2 illustrates this characteristic of SCRs. In Figure 4-2, the SCR is “gated on” early in the cycle, causing current flow for the remainder of the 1/2 cycle. Once the SCR goes through zero, it automatically shuts off (described as line commutation) until it is gated “on” again.
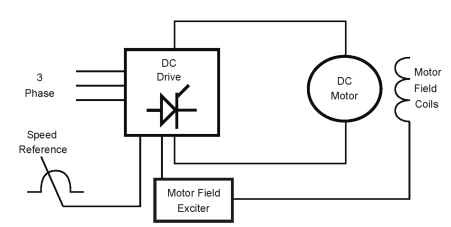
Figure 4-1. DC drive construction
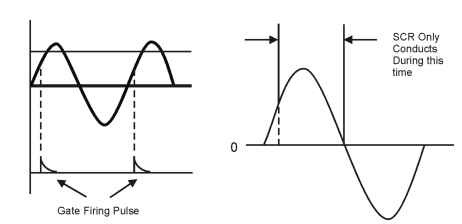
Figure 4-2. SCR controlled by a gate voltage
Some SCR DC drives operate on a single-phase power source and use four SCRs for full-wave rectification. The focus of this section will be on the three-phase DC drives, using six SCRs for a full-wave bridge rectification. Figure 4-3 shows a typical SCR, full-wave bridge circuit, operating from three-phase line power.
Though not widely used, some manufacturers replace the three SCRs on the bottom with diodes and then add a commutating diode across the DC output as a “shut off” circuit. The circuit in Figure 4-3 would be considered a standard analog DC drive.
When the speed-controller circuit calls for voltage to be produced, the M contactor (main contactor) is closed. In some cases the M contactor (sometimes considered a DC loop contactor) does not exist. Some manufacturers rely on a main incoming line contactor ahead of the drive. In that type of control scheme, the drive is completely off until the control calls for speed. In the method shown in Figure 4-3, the drive’s power components are
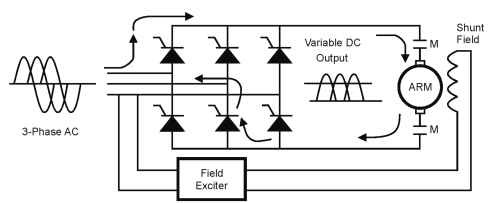
Figure 4-3. SCR full wave bridge rectification
always on and at zero, but not connected to the motor armature until actual speed is required.
When speed is required, the speed controller circuit calls for the SCRs to conduct. Instantly, voltage from the line enters the drive through one phase, is conducted through the SCR, and goes into the armature. Voltage flows through the armature, back into the SCR bridge, and returns through the power line through another phase. When this cycle is about complete, another phase conducts through another SCR, through the armature, and back into yet another phase. The cycle repeats 60 times per second because of the 60-Hz line input.
The amount of average DC voltage conducted depends on how early or late in the AC sine wave the SCRs are “pulsed” or “gated” on. Early gating means a higher amount of voltage output because the SCR conducts for a longer period of time. Late gating would achieve the opposite results.
It should be noted that gating on and off of SCRs occurs rapidly, in milliseconds. When one SCR is almost shut off, another is starting to conduct. For a brief instant, the bridge circuit actually has a “line-to-line” short. When this happens notching occurs, which is actually fed back into the line, supplying the voltage. This phenomenon is illustrated in Figure 4-4.
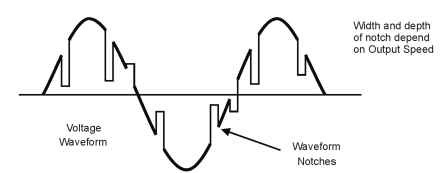
Figure 4-4. Line notching due to SCR rectification
To reduce the affect of notching back onto the power line, line reactors are typically specified by the DC drive manufacturer. A minimum of 1% impedance is required, but most manufacturers would recommend 3%. The line reactor reduces the effects of notching and cleans the power line that is used by other equipment in the building.
The shunt field winding power is supplied by a DC field exciter. In many cases, it is a two-phase unit, which is supplied by the three-phase input from the drive. It may only need to supply several amps, depending on the size of the motor field winding. Depending on manufacturer, the field exciter may be included in the armature supply unit or supplied separately as an additionally purchased item. The field exciter’s mission is to supply a constant voltage to the field winding, creating a constant flux in the motor’s shunt field. In cases where above base speed is required, many field exciters have the ability to reduce voltage supplied to the field. The drive control systematically reduces voltage to the field, which reduces flux and increases motor speed because there is less counter EMF to hold back the armature.
Drives (DC)- Digital
Digital control provides precise output of both motor speed and torque. Improvements in digital control have given this type of drive faster response times and greater flexibility compared with the older analog drives of the 50s and 60s. To fully appreciate the technology, a review of the controller circuitry is necessary. Figure 4-5 shows a simplified speed and current controller digital circuit and its major components.
The whole process starts at the speed reference. A reference signal is given to the drive’s input, which is then fed to the speed controller. Given the amount of speed reference, the speed controller in the microprocessor determines what the output voltage should be to operate the motor at the desired speed. At the same time, the current controller in the microprocessor signals the SCRs in the firing unit to gate on. The SCRs in the converter section convert fixed three-phase voltage to a DC voltage and current output in relation to the desired speed. The current measuring/scaling section monitors the output current and makes current reference corrections on the basis of the torque requirements of the motor (e.g., additional load requiring more amps, more torque).
If precise speed is not an issue, the DC drive and motor could operate open loop. This means that there is no feedback correction signal fed back to the speed controller. Speed regulation of 5-8% can be achieved when operating open loop. (Note: Speed regulation is a measurement of motor speed accuracy when under load. A 2% speed regulation would indicate a 2% drop in speed, from no load to full load.) However, in most cases, the application requires a speed regulation lower than 5%.
When a speed regulation of less than 5% is the requirement, then the speed measuring/scaling circuit will be engaged by making the appropriate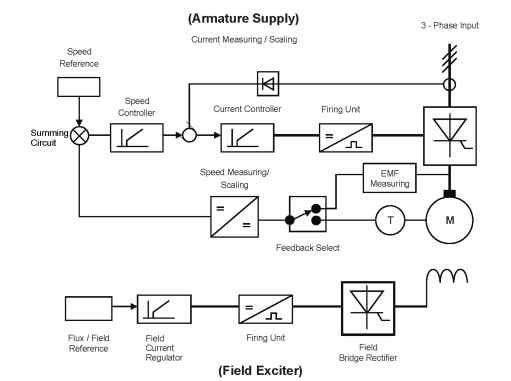
Figure 4-5. Digital speed and current controllers and field exciter
feedback selection. If the feedback is using the EMF measurement circuit, then the speed measuring/scaling circuit will monitor the armature voltage output. The measuring circuit will feed back a scaled voltage to the summing circuit. This scaled voltage is in proportion to the output voltage. The summing circuit will process the speed reference and feedback signal and create an error signal. This error signal is what is used by the speed controller as a new, or corrected, speed command.
Note: Output voltage is a fairly good estimate of actual motor speed. This type of closed loop control is called EMF control, or armature voltage control, because of the corrections made to the armature voltage output. Speed regulation of 1 to 2% is possible with this type of feedback, depending on the motor characteristics.
If tighter speed regulation is required, less than 1%, then tachometer generator feedback is required. Some manufacturers call this tach feedback, or simply tacho. A tachometer is a device that mounts to the end of the motor opposite the shaft. The output of a tach is very precise, in volts per 1000 rpm, for example. When this feedback is given to the summing circuit, very small corrections (error signals) are possible. The speed controller accepts these error signals and makes immediate corrections in the microprocessor.
It should be noted that typically the speed reference is sent to the summing circuit as a positive value (e.g., 0-10 VDC or 4-20 mA). The feedback signal is of opposite polarity. If the summing circuit generates a positive
error, this would indicate a speed increase is required. If the summing circuit generates a negative error, this would indicate a speed decrease is required (the motor is operating faster than commanded speed). A closer look at feedback devices will be taken in topic 5.
To review regulation, any type of regulation circuit acts like a cruise control in an automobile. There is a speed reference in mph or kph (e.g., setting the desired speed on the steering wheel, using the speedometer as a guide). That reference is fed to the cruise control circuit and the engine responds accordingly with a fixed acceleration rate. During acceleration, a feedback circuit sends an opposite polarity signal to the summing circuit. The speed reference and the feedback signal create an error signal. That error signal is used to speed up or slow down the engine.
When going down a hill, the auto coasts and possibly goes over the speed setting. Because there is no real automatic braking method, the auto is at the mercy of inertia and gravity (the auto is in continuous negative error—meaning speed is not required). The only method of speed reduction or braking is a manual mechanical brake (the foot brake pedal). Unlike an auto cruise control system, there are several ways of bringing a DC motor to an automatic stop, quicker than just coasting. This will be the topic of our next section.
Field Exciter
The DC drive unit may also include a separate field exciter as shown in Figure 4-5. The sole purpose of this unit is to generate a fixed DC supply voltage to the motor field windings.
The flux/field reference signal is supplied to the field current regulator. Given the amount of flux reference, the field current regulator in the microprocessor determines what the output voltage should be to operate the motor field windings at the desired flux value. At the same time, the field current regulator signals the SCRs in the firing unit to gate on. The SCRs in the field bridge rectifier section convert fixed three-phase voltage to a DC voltage and current output in proportion to the field flux required.
In many cases, the field bridge rectifier section is powered by only a single phase or two phases, rather than three phases. The amount of current supplied by the field exciter is much lower than that supplied by the armature supply. In addition, the amount of voltage regulation (exactness) is not as critical in generating a field-winding current. The magnetic flux generated is a fraction of that generated by the armature supply.
If a drive is to be operated at extended speed (above base speed), then the field exciter must have the capability to reduce current to the field winding. This is known as field control or operating in the field weakening mode. As mentioned previously, an over-speed safety circuit is always employed. This circuit prevents a lightly loaded motor from rapidly accelerating in speed, possibly to the point of self-destruction. This is termed a runaway
condition and is the result of reducing the field flux and the counter EMF, which allows the speed to increase.
When speaking of armature supplies and field exciters, the quality of the power output can be measured and given a rating. Form factor or ripple factor are the terms most commonly used. Basically, the form factor is a comparison of SCR output power with that produced by a DC generator. Generator power would be considered pure DC, where almost no ripple (distortion) is present. At a rating of 1.0 (generator power), there is a minimum of losses in the armature core and field windings. The form factor is used to match drive equipment to a potential motor. High ripple causes additional motor heating, reduced load rating, and less overall efficiency. Derating (reducing continuous rating) of the motor load could be anywhere from 5-15%, depending on the manufacturer’s specifications.
Figure 4-6 shows several types of SCR power supplies with the corresponding form factor rating.
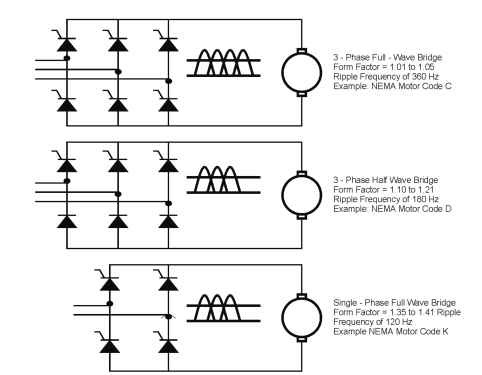
Figure 4-6. SCR bridge power supplies and form factors
As seen in Figure 4-6, the type of bridge rectifier will dictate the range of ripple produced and therefore be an indicator of additional motor heating. Since the SCR circuitry is more expensive (e.g., full wave bridge), the form factor is less. A power supply with a NEMA Motor Code of “K” would be suitable for motors of 5 HP or less. A power supply with a NEMA Motor Code of “E” would be suitable for motors up to 250 HP. A power supply with a NEMA Motor Code of “C” would be suitable for motors in the
1000-HP range. As a general rule, the DC motor manufacturer should always be consulted whenever questions of armature/field exciter suitabil ity arise.
Now that the armature supply and field exciter circuits have been explored, it is appropriate to review the possible operating conditions of a DC motor. By learning the operational characteristics of a DC motor, DC drive systems can effectively be applied.
Single-, Two-, and Four-Quadrant Operation
There are actually four possible modes of motor operation, determined by the relationship of speed, torque, and direction. A brief description of the modes of operation will be helpful at this time. Describing the modes of operation is easiest done by indicating the forward and reverse operation of a DC motor in quadrants. Figure 4-7 indicates the quadrant relationships.
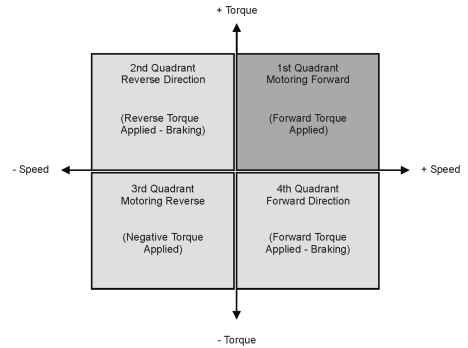
Figure 4-7. Single-, two-, and four-quadrant operation
As seen in Figure 4-7, operating a DC motor in the first quadrant means that the motor is actually driving the load, with torque and speed in the positive direction. This method of operation is usually accomplished with a single controller (one armature SCR bridge rectifier and a field winding supply). To stop the motor, some method of braking is needed. In many cases, the natural inertia of the system will bring the motor to a stop in an acceptable time. This is called coast-to-stop and is a condition of single-quadrant operation.
If coasting to a stop is not acceptable, then a reverse-polarity voltage is applied to the armature, reversing the magnetic field and bringing the motor to a quick stop. This is usually done by a reverse contactor connected to the armature. This method has sometimes been referred to as plug stopping, plugging the motor armature into a reverse polarity.
A drawback to this method is that if the deceleration rate is quick, high levels of current are drawn during the plugging cycle. This places the motor windings under additional stress. If the deceleration time is within the current settings of the drive, a smooth, controllable stop can be accomplished. (Additional methods of stopping will be discussed in the next section.) Using reverse torque to stop a motor is called two-quadrant operation.
If true control throughout the positive and negative speed and torque range is desired, then a 12-SCR bridge controller is required (two armature SCR bridge rectifiers—one in the forward and one in the reverse direction). A field winding supply is also required. The motor can be brought to a very fast stop by engaging the reverse armature supply bridge and regenerating the motor’s energy back into the power line. This procedure is called regenerative braking.
If motoring the load in the reverse speed and torque direction is required, the four-quadrant supply is the device needed to accomplish the procedure. The reverse SCR bridge is now used as the driving supply and the forward SCR bridge acts as the braking device to bring the motor quickly back to zero speed. This mode is called four-quadrant operation.
It should also be noted that another method of regeneration exists. That method is to use a single controller bridge and a four-quadrant field exciter. In this way, control of speed and torque in both the positive and negative direction can be accomplished. However, because of the longer time constant of magnetic field reversal, this method is used when quick reversal of torque and speed is not required.
DC Drives—Braking Methods
The easiest way of bringing a motor to a stop is the simple method of allowing it to coast to zero speed. This method is called coast-to-stop and is used in many applications where the element of stopping time is not a factor.
In fan applications, for example, it may require 60 s for a 75-HP drive to bring the fan up to full speed and keep the drive’s current draw below the maximum limit. Once the fan is at process speed, it may operate there until the end of the work day. Then the fan may be preset to a lower speed for nighttime operation. It is not urgent for the motor to immediately drop in output speed. If it takes the motor 3 to 5 minutes to reduce speed, that is acceptable—especially since no additional power is required.
Note: DC drives are typically not used in fan applications, though they do provide the adjustable speed needed. Fan applications are more easily done with AC drives, for reasons explored in the AC drive section.
There are occasions where motor speed must drop in a specified amount of time. Those methods of reducing speed are explored in the following paragraphs.
Figure 4-8 indicates the relationship of various braking methods employed in DC drives. It should be noted that these methods are also available in AC drives, with several other options available.
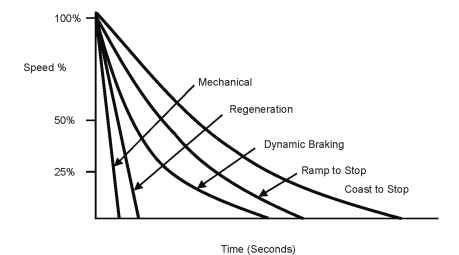
Figure 4-8. Braking methods for DC drives
Coast-to-Stop and Ramp-to-Stop
As seen in Figure 4-8, the coast-to-stop method takes the most time. Basically, during this method the motor is completely disconnected from the drive. Through friction and the dissipation of inertia energy, the freewheeling motor eventually comes to a stop. It should be noted that there is no control over the motor during this time. The motor is at the mercy of inertia and friction forces.
The next fastest method of stopping is called the ramp-to-stop mode. During this mode, the drive has complete control over the motor. The drive’s deceleration setting forces the motor down in speed, within acceptable voltage limits. (Note: During the deceleration process, the motor operates faster than commanded speed. The drive’s deceleration ramp in seconds dictates how fast the motor should decelerate. If the drive’s deceleration rate is faster than the motor speed is dropping, the motor acts as a generator. The motor, now acting like a generator, sends energy back into the drive.) Depending on the drive horsepower, deceleration circuitry, and motor inertia, possible deceleration time could be half of the coast-to-stop time.
Dynamic Braking
As shown in Figure 4-8, the next fastest stopping time would be achieved by dynamic braking. This form of stopping uses a fixed, high wattage resistor (or bank of resistors) to transform the rotating energy into heat. Figure 4-9 indicates a typical DC drive dynamic braking circuit.
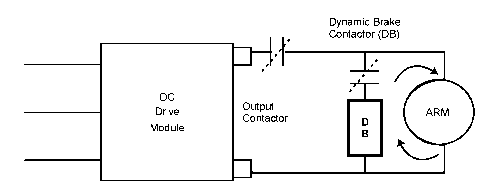
Figure 4-9. DC Drive Dynamic Brake Circuit
Figure 4-9. DC drive dynamic brake circuit
Under normal operation, the output contactor is closed, the dynamic braking contactor is open, and current is flowing through the armature. When a fast stop is commanded, the output contactor opens and the dynamic braking contactor closes. This allows all of the motor’s rotating energy to be fed into the dynamic braking resistor bank (DB). The resistor bank transforms mechanical energy into heat. By allowing all of the motor’s energy to be drained into a resistor, the speed of the motor quickly drops.
It should be noted that the main stopping power of a DB system occurs when the resistor is cold and during the first few seconds of the process. Once the resistor heats up, the amount of braking torque diminishes. This is shown by a flattened out curve close to the zero speed line. The number of times per minute DB is engaged will also determine the effectiveness of braking torque. Duty cycle is the number of times per minute the DB resistor is used. Many DB circuits require a maximum of 10% duty cycle (6 s on, 54 s off time to cool).
Regeneration
The fastest electronic stopping method is that of regeneration. With regenerative braking, all of the motor’s energy is fed directly back into the AC power line. To accomplish this, a second set of reverse-connected SCRs is required. This allows the drive to conduct current in the opposite direction (taking the motor’s energy and generating it back to the line). Figure 4-10 indicates two sets of six SCR bridge rectifier circuits.
This type of drive is known as a four-quadrant drive. It allows driving the motor in the forward and reverse directions, as well as regeneration in both the forward and reverse directions. The control board usually con-
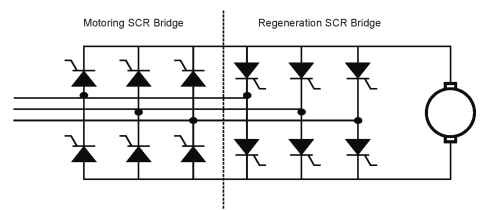
Figure 4-10. Regenerative DC drive (two SCR bridges)
tains the microprocessor that controls the status of the reverse SCR bridge. When the speed of the motor is faster than commanded, the motor’s energy is fed back into the drive. The regeneration circuit senses the increase in reverse voltage and turns on the reverse SCR bridge circuit.
The key to this type of circuitry is to synchronize the voltage fed back to the line with the voltage being generated by the utility. As expected, this type of circuitry requires advanced processing to sense line phase and create SCR timing signals in phase with the existing line.
It should be noted here that this is a very cost-effective means of stopping a motor quickly. It should also be noted that this braking method would be useless if power were to be removed from the drive (e.g., during a power outage). The reverse SCRs could not conduct, and the microprocessor would not operate, if power were not present. Therefore, this method, though quite fast, would not be used for emergency stop situations (at least not without having another method available such as mechanical braking).
Regenerative braking is used in many applications where the possibility of the motor going faster than commanded speed is quite high. Applications such as cranes, elevators, hoists, and ski lifts are just a few examples. Machine tool applications also require regeneration for high speed, high performance, and fast reverse of direction. Figure 4-11 shows another application for regeneration—conveyors.
The out-feed conveyor in Figure 4-11 would be a prime candidate for a regenerative DC drive. The feed conveyor sends the finished product up a slight incline to the next stage (the feed conveyor would be operating in Quadrant 1—motoring). Once the product reaches the process conveyor, the product is moved into the labeling and inspection machine (still operating in Quadrant 1—motoring). When the product has completed its production cycle, it is fed to the out-feed conveyor to be packed at the warehouse.
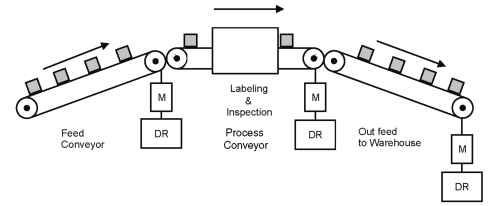
Figure 4-11. Feed conveyors and regeneration
Because the out-feed conveyor is at a slight downward decline, the packages will tend to drive the conveyor motor to a faster speed. Once this happens, the motor turns into a generator and sends excess voltage back to the drive. The drive senses the over-voltage condition and engages the reverse SCRs to accomplish regeneration (operating in Quadrant 4— regeneration). The drive actually uses regeneration for hold-back torque to keep the conveyor from operating at too high of a speed.
Dynamic braking could be used just as well in this application. Excess energy from the motor could be sent to a DB resistor. However, the energy consumed by the resistor would be given out as heat, which is energy wasted. Sending the energy back to the power line is the most effective means of braking and conserving energy.
Mechanical Braking
The fastest means of stopping a motor would be through mechanical braking. In this method, the motor is disconnected from the drive and a brake circuit is activated in the drive. The motor is then subjected to a brake unit clamping onto the shaft, much like an auto brake system (locking the brakes in an emergency stop). The motor quickly comes to a forced mechanical stop.
In industrial applications, this method is often used in conjunction with dynamic braking during emergency stop situations. The energy is fed to the DB resistor, and the mechanical brake effectively locks onto the motor shaft.
Mechanical brakes are typically used in many applications, such as printing presses. Part of the press commissioning deals with emergency stops (e-stops). When the e-stop button is pressed, the entire press must come to a complete stop within 8 s, for example. Massive amounts of inertia must be brought to zero speed. Mechanical braking, as well as DB, is most often used for e-stop in DC drive systems. Mechanical braking is also the most controlled, positive method of bringing a motor down to zero speed. If
power is lost to the drive, the drive’s brake circuit is immediately activated and the brake engages.
Drives (DC)—Technical Concerns
With the advent of SCR control in the 1960s, DC drives and motors enjoyed an increased amount of use in industry. In many DC applications, the existing motor continued to work as specified. The regular motor maintenance (brush replacement, commutator repair, etc.) was a common way of life in these types of industrial environments. With SCR and digital microprocessor control, the DC drive was not just a simple power converter. The DC drive’s ability to provide 200% of full load current for short periods of time makes it a solid choice in applications where overloads are common. The drive has also gained acceptance in communication systems and automated manufacturing schemes.
There are, however, some technical issues with any type of drive (AC or DC) that must be addressed. Those issues will be reviewed here and additional comments made regarding DC drive installation.
Harmonics and Line Notching
Harmonics will be considered in greater detail later in this topic. For now, it is sufficient to say that both DC and AC drives create harmonic distortion. Harmonic voltage distortion will be fed back onto the AC line, which may affect other equipment connected to the same power system. This harmonic voltage distortion is a result of the commutation (switching on/off) of the SCRs. This distortion takes the form of line notching, which was previously discussed.
The need for harmonic limitation is related to the entire system, of which the DC drive is a part. The size (capacity) of the distribution system, the kVA of connected drives, and the total system impedance all play a part in harmonic mitigation requirements.
When viewing electrical-noise output generated by the drive, DC drives of today create far less distortion than drives used before SCR technology. Figure 4-12 indicates DC drive input voltage and output current to the motor.
The ability of the DC drive’s filter circuitry will dictate how smooth of a DC output waveform the motor will see. Any distortion in the output will result in motor heating, which contributes to overall reduced efficiency.
To reduce the effects of harmonic distortion, it is accepted practice to install some type of inductor ahead of the drive. The inductor slows down the rate of rise of notches. The notches fed back to the power line are shallower and narrower compared with no line reactor being connected. Figure 4-13 compares line disturbances with, and without, the use of a line reactor.
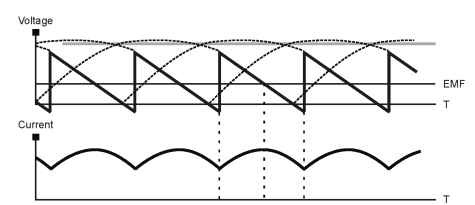
Figure 4-12. DC drive voltage and current waveforms
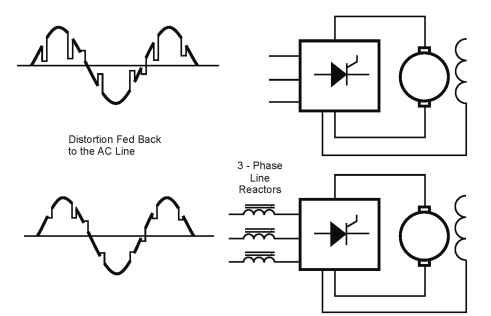
Figure 4-13. Line reactor use to reduce line notches
The minimum impedance for a line reactor would be as little as 1%. Many manufacturers recommend reactors of 3% as a minimum. If an input isolation transformer is used, a line reactor would not be required. From a line-disturbance standpoint, a transformer would have the same equivalent effect as that of a line reactor. Figure 4-14 indicates a typical DC drive installation, with line reactors, contactors, and associated control circuitry.
Displacement Power Factor
When discussing electronic power conversion equipment, there are two ways to identify power factor (PF): displacement and total power factor. Displacement PF is the power factor of the fundamental components of the input-line voltage and current. On the other hand, total PF indicates the effects of harmonic distortion. No matter how the PF is viewed, the
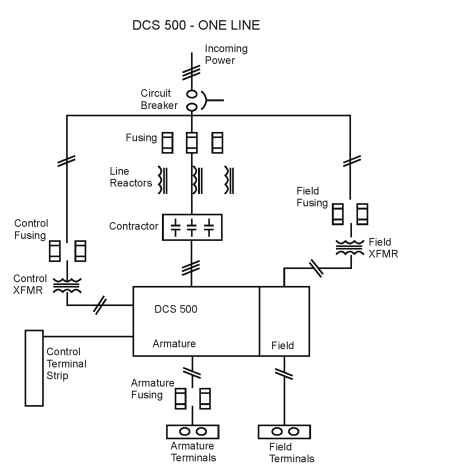
Figure 4-14. DC drive installation wiring diagram
power utility may impose penalties for customers that use equipment with a poor PF.
The displacement PF for a DC drive is roughly 0.8 when at full load and speed. This number drops off to zero when the speed is reduced to zero. The harmonic current distortion is determined by the total values of inductance, capacitance, and resistance, from power source to the load. The power distribution system has impedance, which also enters into the calculations for total PF. Figure 4-15 gives a general indication of displacement and total PF for both DC and AC drives.
The curves shown in Figure 4-15 are for drives at full load and constant torque operation. The shaded area indicates a variation of total PF for typical drive installations.
Shielding and Grounding
In a certain sense, all electrical and electronic devices are radiation generators. Devices that fall into the radiation generator category include electrical contacts and semiconductors, microprocessors, radio transmitters, and cell phones. These human-made devices can cause interference with other
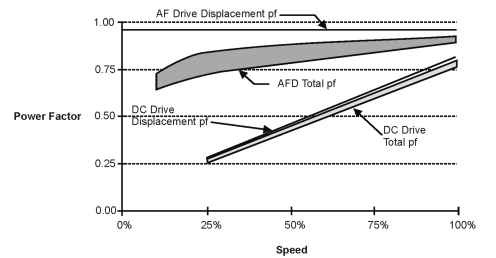
Figure 4-15. Total and displacement PF (DC and AC drives)
electrical equipment. Devices such as cell phones contain transmission circuitry that behaves like a radio station and creates radio frequency interference (RFI).
Electronic drives also fall into the interference category, since they contain semiconductors, contacts, and a small oscillator for timing that would be considered a transmitter. Devices that are considered switch mode power supplies also create interference. These power supplies convert one form of electrical energy into another. In doing so, they alter the original form of energy and create a phenomenon known as electromagnetic interference (EMI). In drives, the rapid switching of the microprocessor and power semiconductors cause high-frequency interference.
Conducted energy generated by drives can be very disturbing to other electronic equipment operated on the same power feed. In addition, SCRs and control circuits in DC drives can be adversely affected by other radiation generators listed above. DC drive-control circuitry could misfire or cause several SCRs to conduct simultaneously, causing short circuits in the power semiconductor circuits.
The most important precaution used in control of EMI is the grounding and shielding of DC drive equipment. This is a must when the drive is installed in environments where it could be affected by other equipment or vice versa. Figure 4-16 shows a DC drive installation from the standpoint of shielding and grounding of components.
As shown in Figure 4-16, there are several grounding points in the installation, but they are all tied to one common grounding point. Multiple common grounds create ground loops or circulating currents. If a conductor in a closed circuit is near another conductor that is energized, the closed circuit conductor will contain an induced voltage. This voltage can contradict or
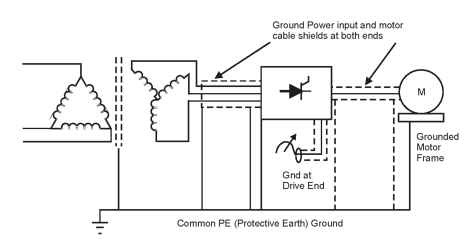
Figure 4-16. DC drive installation—shielding and grounding
detract from voltage already flowing and can cause unstable operation of the entire system. Several other items should be noted here.
Tachometers and process sensors would be shielded and grounded the same point as the speed reference pot indicated in the figure. Therefore, the shield from the tachometer cable would be grounded only at one end—typically at the drive chassis (follow manufacturer’s recommendations). Motor shunt field cables are also considered power conductors and an EMI source, therefore both ends of the cable shielding should be grounded.
When installing DC drives, it is accepted practice to keep the following wiring practices procedures in mind:
Never place motor power cables and low voltage/current control cables in the same cable tray or conduit.
Use shielded cable for control signals (low-voltage or current analog signals) operating at 24 V and below.
If control signal wiring is not in a separate steel conduit, keep them at least 12 inches away from power wiring. (Note: Cross the control and power wiring at 90° if they must be close to one another or intersect.)
Use EMC (electromagnetic compatibility) rated shielded cable where required by the drive manufacturer or by code.
It would be impossible to predict all EMI- and RFI-interference possibilities. Each installation is somewhat different in how the control-, power-, and interface-equipment cabling lies near each other. However, if the above steps are taken, the likelihood of any interference issues will be greatly reduced or eliminated.
Drives (DC)—Innovations and Technology Improvements
DC drives have come along way—from vacuum tube power structures of the 1940s to the SCR semiconductor technology of today. Design improvements have taken the drive from a simple analog “motor turner” to a sophisticated microprocessor design, which includes a minicomputer. The DC drive was once thought to be the “brawn” that was located in harsh industrial environments and caused an application to operate at a specific speed. Now the DC drive, with its microprocessor and PLC-type control, is looked upon as the “brains” and an important piece of automation equipment.
To make intelligent applications choices, it is necessary to review the improvements made in DC drive technology. DC drives have lost their foothold in the industrial world to the more popular AC drives and motors. In a certain sense, the control technology of the DC world revolves around the performance of the DC motor, which requires routine maintenance procedures.
Though more applications are leaning toward AC, the DC drive and motor system has, and will continue to have, its place in certain industrial applications. The DC drive is simple to maintain. When armed with the proper information, anyone who applies the DC drive can realize a cost-effective means of variable-speed control.
The following sections will outline, in general and specific terms, improvements in DC drive design and control. It is meant to generate ideas as to where DC drives and motors can be applied, with little additional equipment required.
All-in-One Package Design
The DC drive systems of today include all of the needed components to operate, troubleshoot, and maintain the system. Typically, the drive unit includes line circuit breaker (or fuse), main contactor, line inductor, SCR converter module, field exciter, line, control and field exciter fuses, auxiliary transformer, heat sink fans, motor blower, motor starter and circuit breaker, communications connector, and control (i/o) wiring terminal block. The entire unit can be operational with three wires in (power input) and four wires out (two armature and two field wires). An additional set of wires would also be needed if an optional tach feedback unit is included in the motor assembly.
The “all-in-one” design is in contrast to the systems of the 1950s and 60s, where separate field exciters, converters, interconnections, and safety devices were found in various areas of the control cabinet. This type of installation required more space and more time to troubleshoot because of the nature of wiring, cable harnesses, and documentation. Designs of today are more compact and require little documentation to troubleshoot (many diagnostic features are visible through the software) and have less
parts that require replacement. In short, DC drives of today are more reliable. Figure 4-17 illustrates this type of package design.
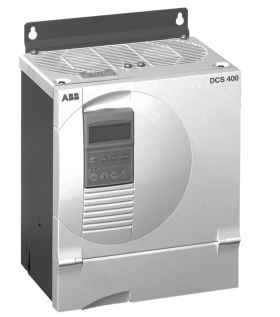
Figure 4-17. Package DC drive design
Digital I/O (Inputs/Outputs)
Digital drives are programmable, which allows for a high degree of application flexibility. The idea is to connect all control and power wiring and set up the drive for the application through software programming. If the application is altered, the drive functions can quickly be reprogrammed through the software instead of rewiring the drive. The programming is typically done with a removable keypad or remote operator panel.
With older analog drives, the drive had to be shut down, and the control terminal block rewired for the new application. Downtime is costly. The less time a system is shut down; the more productivity is obtained.
Typically, the control wiring section of a DC drive will contain analog inputs (AI’s for speed reference), digital inputs (DI’s for controls like start/ stop, reverse, etc.), analog outputs (connection for an auxiliary meter), digital outputs (DO’s for devices such as fault relays, at-speed relays, etc.), and provisions for tach feedback wiring (A+ and A-, B+ and B-, etc.). The digital inputs and outputs would typically operate on ±10 VDC or ±24 VDC logic. A software function would operate if the assigned terminal voltage is high (meaning 8 V or higher on a 10-VDC control). Any voltage less than that would indicate a digital logic low and the function would not operate.
In addition to the standard start and stop speed-reference inputs, the drive would also include I/O for diagnostics such as blower motor acknowledgement, main contactor closed, field exciter operational, and emergency-stop energized—just to name a few. Figure 4-18 shows a typical I/O diagram for a package DC drive.
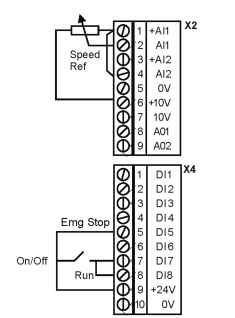
Figure 4-18. Packaged DC drive with standard I/O
IGBT Technology
IGBT technology has been successfully applied to AC drives since the late 1980s. It has not been until recently that DC drives have included these devices in the power structure. SCRs are the standard conversion device for armature circuits because of the current capability and easy control scheme. However, IGBTs are now emerging as field exciter power stage semiconductors. IGBTs can be “turned on” and “turned off” with a small milliamp signal. Smaller control “driver” circuits are required because of the smaller control signals needed, compared with SCRs. Smaller control circuitry also means a smaller-sized field exciter, which translates to less cost. In addition, IGBT technology is ideal for operating a DC motor in the field weakening range and does not require a voltage-matching transformer (typically required to match SCRs to higher input voltage lines).
Multi-Language Programming Panel
Many of the programming panels (touch keypads) are removable and may or may not include a panel extension cord. Up until the last decade and a half, programming panels required continuous attachment to the drive control board. Storage of parameter values was a function of the control board and associated memory circuits.
With the latest advancements in E2PROM™s and flash PROMs, the programming panel can be removed from power. Values can now be stored for an extremely long period of time, with no batteries required for backup. This type of capability allows for a “backup” plan in case any or all parameter values are lost because of a drive malfunction or electrical damage due to lightning.
Drive panels are, in many cases, “back-lit,” meaning that the LCD digits have an illuminated background that can be increased or decreased in intensity. This is helpful when the drive is installed in a brightly or dimly lit room. Many programming panels allow for individual display of several different languages. This is very helpful when the drive is mounted on a machine and shipped to another country. The programming setup can be accomplished in English, for example, and then the language changed to Spanish before shipment to Mexico. Figure 4-19 shows a typical programming keypad.
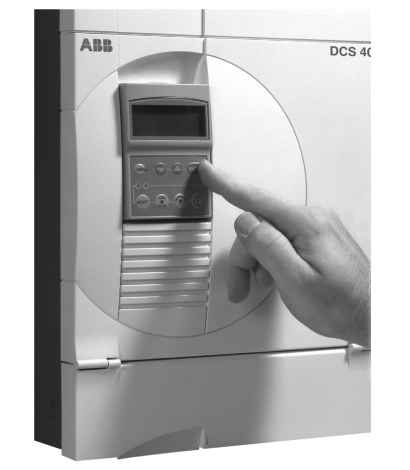
Figure 4-19. Removable, programmable drive panel (keypad)
Programming Macros and Software Function Blocks
Because of the digital design, many DC drives require a multitude of parameters for setup of the system. Armature and field supply parameters are required, along with start/stop, speed reference, current, voltage and feedback controls, and diagnostic parameters for troubleshooting. All totaled, many DC drives contain well over 150 parameters, which all need some type of value attached.
At first glance, it would be a daunting task to individually set each of the parameters. Fortunately, many manufacturers preassign “default” values to each of the parameters. The values would not exactly match the motor and application, but would allow the drive to operate a motor. In addition to defaults, several manufacturers include preprogrammed “sets” of values, known as macros. Individual macros would allow the operator to match the drive parameters and diagnostics to the motor and application that it is connected to. In many cases, all of the parameters can be set in a matter of seconds, rather than individually setting parameters, which could take more than an hour. Macros such as hand-auto, three-wire control, torque control, and jog are available for easy configuration and setup of the drive.
Drive manufacturers try to make required parameter setup easy (i.e., armature and field voltage and current, field weakening point, etc.). One manufacturer includes a “commissioning template” or “wizard” that is much like a template wizard seen in office software programs. The template states the required parameter on the display and waits for the operator’s input before advancing to the next screen display. In a matter of 8 to 10 keypad inputs, the operator can quickly set up the drive for initial operation.
There may be cases where the standard parameter set will not effectively meet the application requirements. In those cases, several manufacturers allow the operator to reconfigure the internal drive software (typically called firmware). The firmware (parameter names and values) can be adjusted through function blocks. These blocks are actually the building blocks of software that, when connected inside the drive, allows for a specific outcome (e.g., three-wire control with a jog and two constant speeds). If a macro does not exist, the operator can create a macro to match a particular application. As expected, this type of programming would be reserved for the more advanced operator or engineer, schooled in drive technology. Serious safety concerns could result when software function blocks are connected and results not completely verified. Figure 4-20 shows a function block screen found in one manufacturer’s firmware.
Self-Tuning Armature, Field, and Current Loops
The DC drive system normally requires “tuning,” once the standard software parameters are set in the drive. The fine adjustments allow the drive to match the feedback loop with the speed reference circuit. Current loops
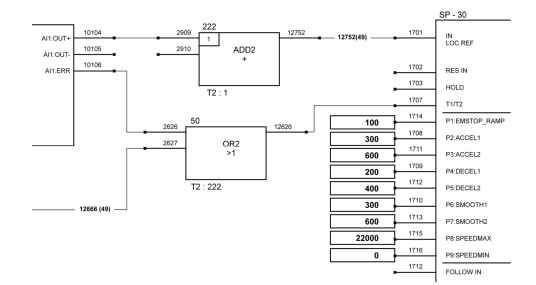
Figure 4-20. Software function block programming (firmware)
also require adjustment if the operator is to obtain the response times when accelerating and changing directions.
In some older DC drives, this tuning procedure is a manual process. The operator must accelerate then decelerate the load, observe the behavior of the system, and make manual adjustments. In some drives, however, this tuning process is done automatically by the drive-control circuitry. The response gains and recovery times are preloaded at the factory. When the drive sees dynamic adjustments occurring during commissioning, it adjusts the tuning parameters to match the outcome of a pre-assigned value set. Drive response times as low as 500 to 800 ms are possible with some systems.
Serial and Fiber-Optic Communications
With today’s digital drives comes access to digital communications. Drives prior to the digital age required hardwiring to the control terminal block. This allowed remote operation only from a distance where control voltage or current loss could be kept to a minimum (maybe 25 feet or less). With today’s serial and parallel mode of information transfer, the DC drive can accept control and speed commands from process equipment several thousand feet away. This allows the DC drive to be integrated into the factory automation environment, where process control equipment is located in a clean, dry control room.
Serial links (3 wires plus a shield conductor) are more normal today, compared with a decade ago. Control and diagnostic data can be transferred to the upper-level control system at a rate of 100 ms. With only three wires for control connections, the drive “health” and operating statistics can be available at the touch of a computer button. The communication speed of
a serial link makes it ideal for simple process lines and general coordination of conveyors, where high-speed accuracy is not required.
Fiber-optic communication uses long plastic or glass fiber and an intense light source to transmit data. With optical fiber, thousands of bits of information can be transmitted at a rate of 4 mega baud (4 million bits per second). An entire factory can be wired with high-speed fiber optics, with very little, if any, electrical interference. This is due to the high frequency of light waves, as opposed to the lower frequency of a wire conductor serial link. With fiber-optic communications, steel processing, coating lines, and high-speed “cut-to-length” applications are possible. With small error signals fed back to the speed controller, the drive can immediately respond with a correction. This keeps the quality of the product very high and the deviation very low in size.
Several drive manufacturers offer serial and fiber-optic software that installs directly to a laptop or desktop computer. With this software installed, all drive parameters are accessible from the stand-alone computer. This makes parameter changes simple and fast. Parameters can be changed in the computer, downloaded to the drive for verification, and saved in the computer as a file or macro. The file can then be easily transferred to other computers or networks, or e-mailed to another factory within the same company. Hundreds, even thousands, of macros and file sets can be saved. The ultimate result is the ability to quickly respond to required changes in drive and application setup.
Serial and fiber-optic communications will be discussed in more detail in topic 6. Figure 4-21 shows a possible fiber-optic connection scheme.
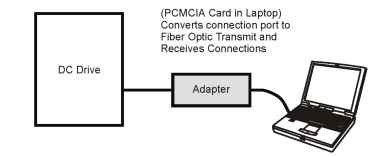
Figure 4-21. Fiber-optic communications
Field Bus Communications (PLCs)
When factory automation systems are engineered, some type of communication system is always specified. Data links to PLCs (programmable logic controllers) are common in many high-speed systems that process control and feedback information. PLCs provide the mathematical calculations, timing circuits, and software “and/or” logic signals required to process drive, sensor, and switch status.
Several manufacturers of PLCs offer a direct connection to many drive products. Because each PLC uses a specific programming language (usually ladder-logic programming), drive manufacturers are required to build an adapter box. This adapter (sometimes called a field bus module) is used to translate one language to another (called a protocol). The drive manufacturer installs one internal protocol and the PLC installs another. Field bus modules allow for a smooth transfer of data to the PLC, and vice versa, with little loss of communication speed. Field bus communications will also be address in topic 6.
