Justifying the Call to Action Headline with the Key Point Headlines
As you begin Act II, your first goal is to write the headlines for the most important slides you will present. If your audience will remember only three key points in your presentation, you need to know specifically where those corresponding slides are in your presentation and allow ample time to show them and speak about them. To create these important slides, you will justify your Call to Action headline. You’ll do this by boiling down to only three Key Point headlines the reasons why your audience should accept your recommended call to action or the main steps that describe how they should implement it. You will accomplish that by writing three headlines in the first column of Act II.
It’s always a good idea to limit your ideas to groups of three, as described in "Tip 1: The Power of Three" later in this topic. But if you need to expand your groupings to four, use the expanded template version that’s described in "Tip 2: Make Room for Four." Remember that working memory can hold three to four chunks of new information at any one time, so if you try to present more than that, you’ll quickly overwhelm it.
To begin filling in Act II in the story template, position your cursor to the right of the Key Point column heading. If the Call to Action headline recommends your audience do something, they will want to know why they should do it. If your Call to Action headline recommends they follow a set of steps, they will want to know how. This is a critical decision-making point, because whether you choose why or how will shape every slide to follow in Act II.
If you choose why, you are giving the entire presentation a persuasive orientation. If you choose how, you are giving the entire presentation an explanatory orientation. When the singular focus of the presentation is to persuade someone to do or think something, choose why. When the audience already has agreed to the idea and now your singular focus is to explain something, choose how. Create a hybrid persuasive-explanatory presentation by choosing how for the first column and why for the others, or vice versa.
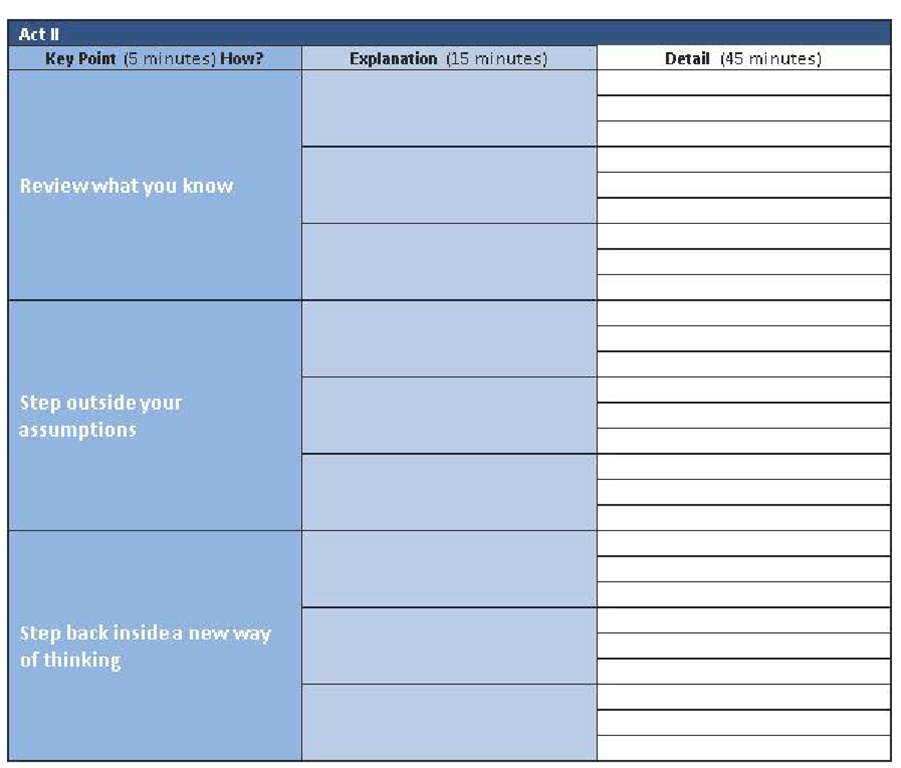
Choose the question that best describes what your audience will want to know next about your Call to Action headline, and type the question to the right of the Key Point column heading—in this case, How?—as shown in Figure 5-7.
FIGURE 5-7 The Key Point column indicates the question "How?"
THREE CRITICAL DECISION POINTS
The three critical decision points that have the biggest impact on your presentation are these: identifying in Act I the gap between a challenge the audience faces in the Point A headline and where they want to be in the Point B headline; defining in Act I the Call to Action headline that focuses the entire presentation; and choosing in Act II why or how for your Key Point headlines, which determines whether the rest of your presentation will have a persuasive or an explanatory orientation.
Your Key Point column heading now indicates the question that your audience is wondering about your call to action—in this case, "How do I change my way of thinking to get breakthrough results?" You’ll answer their question by explaining the three main ways how they should change their thinking.The more concise your Key Point headlines are, the easier they will be to remember, so limit them to a maximum of about two and a half lines, as shown in Figure 5-8.
Your first Key Point headline states "Review what you know"; the second Key Point headline states "Step outside your assumptions"; and your last Key Point headline states "Step back inside to a new way of thinking." These three Key Point headlines are clear, concise, and literally to the point(s), giving your audience a sense of coherence and focus as you develop the details of the information to come. It will be relatively easy for working memory to hold on to these most meaningful visual and verbal pieces and integrate the information into long-term memory.
FIGURE 5-8 Act II of the story template, with the Key Point column cells completed—note the parallel construction of the headlines across the cells.
Your three Key Point headlines might come easily if you’ve been thinking about these issues for a long time and you simply write them down. Or they might take some work because you’re still figuring them out and you need to cluster together related ideas in a single main idea. If you’re at a loss for words, try an interviewing technique by asking someone to read the Key Point column question out loud to you. Speak your answers out loud as you formulate them, and then type them in the Key Point column cells.
Tip
It is not always easy to boil down complexity to its essence, but it’s critical that you do so to reduce the amount of information you present to the limited capacity of your audience’s working memory. You simply cannot show and narrate 100 possibilities; rather, the aim is to distill the information to the three most meaningful concepts. Finding the essence is about simplicity rather than simplification; it’s about raising the cream of your critical thinking to the top, not the fluff.
If you’re still not sure of your answers, draft a placeholder set of Key Point headlines so that you have a place to start. You will want to spend ample time on writing the Key Point headlines because together with the Call to Action headline, they are the most important information you want your audience to remember and apply.
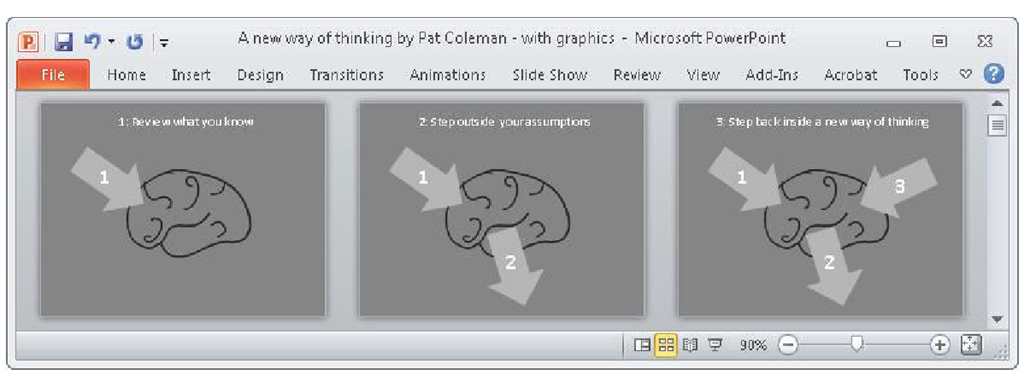
As you formulate your Key Point headlines, think of how they will read when you present them in their corresponding sequence of slides.When you imagine your headlines visually as slides like this, you get a better sense of how they will relate to one another as you present them. The goal is to make these three Key Point headlines a neatly coordinated package that flows together from one idea to the next so that it will be easy to illustrate them when you get to your sketches later.
FIGURE 5-9 Keep in mind how your Key Point headlines will become the foundation for a visual story you tell across the corresponding slides in the storyboard.
Improving Your Key Points
Tighten the relationship among these three Key Point headlines, and increase their memorability by carrying your motif from Act I through their wording. Remember, a motif is about much more than being clever—it is about finding a familiar structure from your audience’s long-term memory that will ease the introduction of new information into working memory. For example, if you use the puzzle motif in the Call to Action headline Put the three pieces of the puzzle together to change your way of thinking, place in front of each Key Point headline the corresponding phrase: Puzzle Piece 1, Puzzle Piece 2, and Puzzle Piece 3. You could use a puzzle motif in two different ways, with the puzzle pieces of the three points either revealing or concealing the final picture.
There are endless ways to lay out the top-level story thread across your Key Point headlines. Whatever you decide depends on what you carry through from the Call to Action headline in Act I. For example, extend a chronology across your Key Point headlines based on the Call to Action headline Follow the story through the three crucial time periods, or use a simple list format based on the Call to Action headline Check off the three items or Follow the three parts. Heighten engagement and suspense through the three Key Point headlines by withholding what will happen, as in Uncover the three secrets or Follow the three clues—allowing the audience to get involved and fill in the blanks for themselves. A trial attorney might tap into a familiar story structure for an opening statement at a jury trial by following a formula such as Motive + means = death or one of its variations such as Denial + deception = injury.
Whichever way you decide to go with your motif, make sure you integrate it through the wording of the Call to Action and the Key Point headlines because later you will apply a similar visual design related to the motif to the corresponding slides. Although it is sufficient to integrate a motif only through a set of Call to Action and Key Point headlines, you may want to extend it through the Explanation headlines if it works.
When you’ve entered your three headlines in the Key Point column, test them by filling in the blanks in this sentence:
The three main reasons/ways (insert audience from Act I) should (insert Call to Action headline) are (insert Key Point headline 1), (insert Key Point headline 2), and (insert Key Point headline 3).
In this presentation example, the completed sentence reads:
The three main ways you (the team members) should change the way you think are review what you know, step outside your assumptions, and step back inside to a new way of thinking.
The Key Point Headlines Test
Test the three Key Point headlines by filling in the blanks in this sentence:
The three main reasons/ways (insert audience from Act I) should (insert Call to Action headline) are (insert Key Point headline 1), (insert Key Point headline 2), and (insert Key Point headline 3).
For this sentence to sound right, each Key Point headline should be written in a similar form and should contain a similar type of information. Just as the Key Point headlines explain the Call to Action headline, the Call to Action headline should also summarize the Key Point headlines.
Your Call to Action and Key Point headlines should neatly distill to the essence what you want to communicate in your presentation and define your measure of success—if your audience can remember and apply these points, you’ve succeeded in your presentation mission. If your measure for success is not present in the wording of your Call to Action and Key Point headlines, you go back and change the wording so that the core of your message is clear and visible without a doubt.
As you test your three Key Point headlines, you might find that the Call to Action headline isn’t exactly what you intended and you need to go back and revise it or entirely rework Act I. Or you might need to revise your three Key Point headlines to make sure that each supports the Call to Action headline in a way that makes your test sentence sound right. You’ll probably need to do a couple of rounds of testing and revising before you’re satisfied with your results and are ready to move on to the next step.
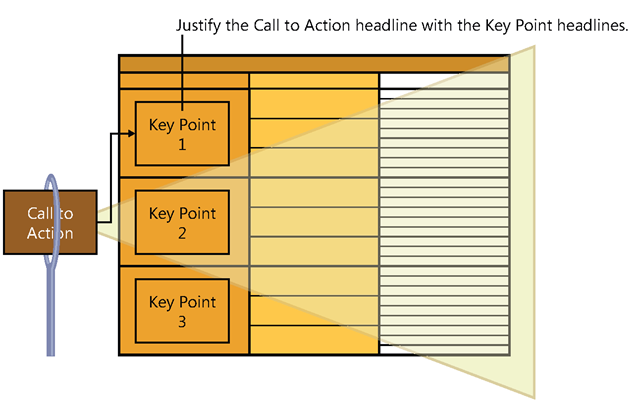
When you have written your three Key Point headlines, you have made sure that you will justify the Call to Action slide with the Key Point slides that follow it. Your Call to Action and Key Point headlines form the most important information at the top level of the hierarchy, as shown in Figure 5-10, which defines the most important and meaningful information that you want your audience’s working memory to engage and integrate into long-term memory.
FIGURE 5-10 The top of your slide hierarchy consists of your most important slides—the Call to Action slide and the three Key Point slides. In a sentence outline, the Call to Action slide corresponds to the thesis statement and the Key Point slides correspond to topic sentences 1, 2, and 3.
Clarifying Each key Point Headline with Its Explanation Headlines
Now that you’ve written the headlines for the Key Point slides, the next step is to write the headlines for the second-most important slides—the Explanation slides. Each Act II scene in your story template is represented by a horizontal row of cells that begins with each Key Point cell and extends to the right to include all the adjacent cells in the Explanation and Detail columns, as shown in Figure 5-11.
FIGURE 5-11 Act II, Scene 1, extends horizontally from left to right in the story template.
As in this example, the headline in the single Key Point cell anchors each Act II scene by maintaining a singular focus horizontally across all three columns. The Explanation and Detail columns will flesh out the main idea in increasing depth as you enter the headlines of your scene from left to right, top to bottom. This keeps all the pieces of information related to the single Key Point headline organized and coherent.
To start writing the rest of Act II, Scene 1, position your cursor to the right of the Explanation column heading and type the question (either why or how) that your audience will want to know next about your three Key Points headlines—in this case, How? Reread your Key Point headline, and ask yourself how this is true—in this case, "How do we review what we know?" As you did in the Key Point column, type your three answers in descending order of importance in the three cells of the Explanation column. When you enter your first reason in the top cell of the Explanation column, your story template should look similar to Figure 5-12.
FIGURE 5-12 Act II, Scene 1, with the top cell of the Explanation column completed.
Enter your second answer in the cell below, and enter the third answer in the cell below that, as shown in Figure 5-13. Your Explanation column answers should offer more detailed support for your Key Point headline and cite specific evidence, such as findings from research, case studies, financial analysis, or anecdotes.
FIGURE 5-13 Testing the three headlines in the Explanation column to make sure that they support the Key Point to the left.
Test the three answers in the Explanation column by filling in the blanks in this sentence:
The three main reasons/ways (insert Key Point headline) are (insert Explanation column, answer 1), (insert Explanation column, answer 2), and (insert Explanation column, answer 3).
In this example, the test sentence reads as follows:
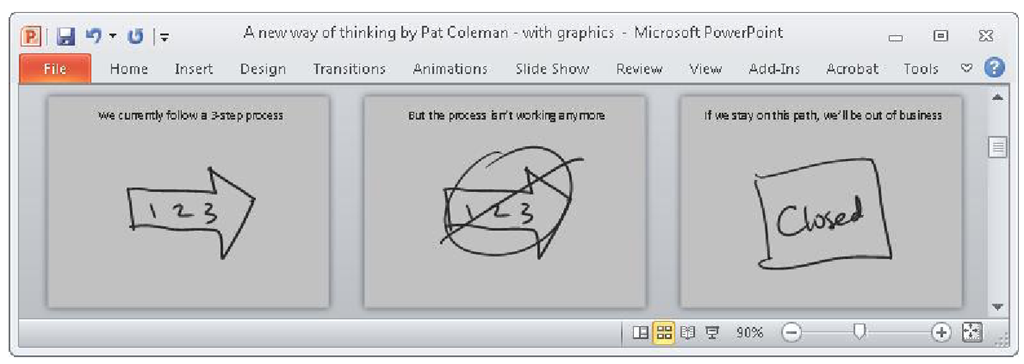
The three main ways to review what we know are we currently follow a three-step process, but the process isn’t working anymore, and if we stay on this path, we’ll be out of business.
As in your earlier test sentence, for this sentence to sound right, each answer should be written in a similar way and should contain a similar type of information. Apply this test visually by reading the test sentence from the left column to the right. You should also test the headlines the other way, from the right column to the left—after you read your three Explanation column headlines, you should find that the Key Point headline summarizes them.
Just as you thought of the Key Point headlines as a tightly related package of thoughts that you will show over a sequence of slides, think of the Explanation headlines the same way. The headlines from the three Explanation column cells in Figure 5-13 will form the headlines for the corresponding Explanation slides in the storyboard, and the sketches in Figure 5-14 show how the sequence of ideas in this example is the foundation for a three-part visual story.
FIGURE 5-14 Keep in mind how your Explanation headlines will become the foundation for a visual story you tell across the corresponding slides in the storyboard.
Breaking up the explanation of each Key Point headline into smaller pieces that you will show and narrate reduces cognitive load across a sequence of slides. This aligns with the research-based temporal contiguity principle, which explains that people learn better when animation and narration are presented simultaneously. For example, if you were to show an entire diagram first and then the narration later, you would split the attention of your audience as their working memory struggles to coordinate what it sees and what it hears. The story template ensures that you break up every explanation into digestible pieces, so you end up tightly coordinating what you say and what you show, one idea at a time.
Organize your ideas within the cells of the Explanation column using a "checklist" structure, a chronology, a list, a 1-2-3 sequence, or any other way you might explain an idea in three parts.
![tmp6132-82_thumb[4] tmp6132-82_thumb[4]](http://what-when-how.com/wp-content/uploads/2012/06/tmp613282_thumb4.png)


