1.7.
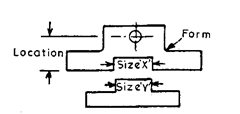
In practice, we come across four basic conditions to be controlled by tolerances, viz, (a) size,
(b) form, (c) location and (d) conditions of assembly, operation, or function. Fig. 1.5 illustrates these.
The difference between sizes X and Y determines the
assembly condition. Size conditions are generally simple
to specify and control ; the form and location conditions
are more complex, especially where composite surfaces
and cumulative tolerances are involved. It will be
appreciated that all these four conditions inter-relate to
define quality characteristics, and the problem of measur-
ing quality characteristics to evaluate conformance to
specifications becomes complex. Lack of true geometric

Fig. 1.5. Product conditions.
perfection makes it difficult to define and control product quality characteristics. It may be noted
that it is easy to define geometric form but difficult to produce. However, to maintain specific quality,
the variation from perfect form must be defined and controlled. The geometric variations known as
macro-errors concern straightness, flatness, parallelism, squareness, angular displacement, sym-
metry, concentricity, eccentricity, roundness. Lack of perfect rigidity caused due to material
properties like expansion, stretching, springing, warping etc., also affect geometric form, size and
location conditions.
The inter-relationships of size, form and location conditions required to define quality
characteristics, coupled with production variations due to geometric form and rigidity errors, lead
to a variety of complex measurement problems involving sophisticated gauging method.
In some cases the configuration of parts is such that accurate measurement becomes difficult.
In some cases, it is not possible for the standard gauge or tool to span the component. Such cases
are : parts having not even a single common plane, irregular curved surfaces, odd number spline
or gear, parts with phantom dimensions (i.e., dimensions to be gauged have to be calculated or their
dimensions are w.r.t. points in space) etc.
The measurement must be correct to a degree commensurate with the specified tolerances
and the required functional service of the product. Following two factors need to be considered when
evaluating the correctness of dimensional measurements : (i) gauging accuracy, (ii) the proper
location of the measured dimension on the physical part. It must be remembered that the improperly
located dimensions, can often have a greater effect on correctness of dimensional measurements
than errors due to insufficient indicating accuracy.
The precision of the measurement can be affected by limitations in either of the basic
requirements, viz. the accuracy of the instrument at the proper location of the gauging points which
determine the dimension being measured on the physical part.
The Measurement Problem (Metrology)
Next post: General Care of Metrological Equipment (Metrology)
Previous post: Classification of Methods of Measurements (Metrology)
