11.4.
Real Surface : is the surface limiting the body and separating it from the surrounding surface.
Geometrical Surface : is the surface prescribed by the design or by the process of manufacture, neglecting the errors of form and surface roughness.
Effective Surface : is the close representation of real surface obtained by instrumental means..
Surface Texture : Repetitive or random deviations from the nominal surface which form the pattern of the surface. Surface texture includes roughness, waviness, lay and flaws.
Surface Roughness : It concerns all those irregularities which form surface relief and which are conventionally defined within the area where deviations of form and waviness are eliminated.
Primary Texture (Roughness) : It is caused due to the irregularities in the surface roughness which result from the inherent action of the production process. These are deemed to include transverse feed marks and the irregularities within them.
Secondary Texture (Waviness) : It results from the factors such as machine or work deflections, vibrations, chatter, heat treatment or warping strains. Waviness is the component of surface roughness upon which roughness is superimposed.
Flaws : Flaws are irregularities which occur at one place or at relatively infrequent or widely varying intervals in surface (like scratches, cracks, random blemishes, etc.). .
Centre line : The line about which roughness is measured.
Lay. It is the direction of the ‘predominant surface pattern’ ordinarily determined by the method of production used.

Fig. 11.3. Terminology for surface roughness.
Traversing length is the length of the profile necessary for the evaluation of the surface roughness parameters. The traversing length may include one or more sampling lengths.
Sampling length (I) is the length of profile necessary for the evaluation of the irregularities to be taken into account. This is also known as the ‘cut-off length in regard to the measuring instruments. It is measured in a direction parallel to the general direction of the profile. It is very difficult to specify any value for spacing (i.e. the length over which the surface profile is to be considered) which could be regarded as forming a definite line of demarcation between roughness and to much extent, it depends upon the manufacturing process employed. Similarly no theoretical value could be assigned to the maximum spacing for considering the waviness, as at the higher value the waviness tends to become merged in more general errors of geometric form. However, for majority of engineering work, value of 0.8 mm is generally considered to be quite satisfactory for instrument cut-off and upper limit of 25 mm is commonly accepted as suitable for most waviness measurements.
Mean line of the profile is the line having the form of the geometrical profile and dividing the effective profile so that within the sampling length the sum of the squares of distances (yu 3>2i •■• yn) between effective points and the mean line is a minimum.
Centre line of profile is the line parallel to the general direction of the profile for which the areas embraced by the profile above and below the line are equal. When the waveform is repetitive, the mean line and the centre are equivalent.
It may be noted that true repetitiveness in any manufacturing process is impossible and as such some difference in mean line and centre line is bound to exist. But, however, in view of its insignificance in relation to other errors or measurement of surface geometry by index, the mean line and the centre line may be considered to be equivalent for practical purposes.

Fig. 11.4. Maximum height of irregularity.
Spacing of the irregularities is the mean distance between the more prominent irregularities of the effective profile, within the sampling length. The information is useful for measuring the wearing in of surfaces in relative motion, and assessing the electrical and thermal conductivity between surfaces in contact. Irregularity spacing and height parameters used in combination are valuable for sheet-steel applications and for friction and lubrication studies.
Arithmetical mean deviation from the mean line of profile (Ra) is defined as the average
value of the ordinates (yu y2,………..yn) from the mean line.
The ordinates are summed up without considering their algebraic sign,


where n is the no. of divisions over the sampling length I.
Ra readings serve well for surface finish control in most instances. It may be mentioned thati?a provides an average reading and several different surfaces can have same average, i.e. although Ra readings may be approximately same, the surfaces will function quite differently. Thus, more knowledge of the surface texture is required. For instance, measurement of peak heights may be needed in painting, plating and glass applications to control the pitting of gear teeth, improve seals between surfaces and increase the stiffness of press fits.
Maximum height of irregularity (Rmax) is defined as the distance between two lines parallel to the mean line and touching the profile at highest points within the sampling length. (Refer Fig. 11.4)
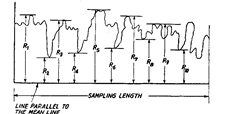
Ten point height of irregularities (Rz) is defined as the average difference between the five highest peaks and the five deepest valleys within the sapling length measured from a line, parallel to the mean line and not crossing the profile. (Refer Fig. 11.5)

Fig. 11.5. Ten point height of irregularities.
![]()
11.4.1.
Terms used to describe surface roughness
![]()
Rt measurement. It is the maximum peak to valley height within the assessment length. This measurement is valuable for analysing finish to provide guidance for planning subsequent metal-cutting operations. Average wavelength = 2jt x RJMean slope.
Bearing area. (Bearing area fraction). This is the fraction of surface at a given height above or below the mean line.
Centre line. A line representing the form of the geometrical profile and parallel to the general direction of the profile throughout the sampling length, such that the sums of the areas contained between it and those parts of the profile which lie on either side of it are equal.
![]()
Rp value indicates amount of material to be removed from a workpiece to obtain 50% bearing area.
Effective profile. The contour that results from the intersection of the effective surface by a plane conventionally defined with respect to the geometrical surface.
Effective surface. The close representation of real surface obtained by instrumental means.
General surface texture. The vertical distance between reference lines formed by truncating the 10 per cent highest peaks, and lowest valleys of the surface texture. It takes into account initial wear and represents a measure of the maximum possible surface wear.
Geometrical profile. The contour that results from the inter-section of the geometrical surface by a plane conventionally defined with respect to this surface.
Geometrical surface. The surface determined by the design or by the process of manufacture, neglecting errors of form and surface roughness.
Land length. Length of intercept with the profile of a line drawn parallel to the profile mean line.
Lay. The direction of the predominant surface pattern, ordinarily determined by the production method used.
Least-squares mean line. A reference line representing the form of the geometrical profile within the limits of the sampling length, and so placed that within the sampling length the sum of the squares of the deviations of the profile from the mean line is a minimum.
Levelling depth, Ru. Distance between mean line and a parallel line through highest
peaks.
Maximum peak-to-valley height. i?max- Largest single peak-to-valley height in five adjoining sampling lengths.
Mean apparent amplitude. Mean of the peak-to-valley heights of 13 consecutive 50 mm lengths.
Mean depth; Rm. Distance between mean line and a parallel line through the deepest
valley.
![]()
Measuring traversing length. The length of the modified profile used for measurement of surface roughness parameters. It is usual for the measuring length to contain several sampling lengths.
Meter cut-off. In a profile instrument, the conventionally defined wavelength separating the transmitted component from the attenuated components of the effective profile.
Modified profit. The effective profile modified by such defined filter means as are used for suppressing those undulations of the real profile that are not or are not fully to be included in the measured parameters of the surface.
![]()
Peak-to-valley height. Separation of highest peak and lowest valley.
Real profile. The contour that results from the intersection of the real surface by a plane conventionally defined with respect to the geometrical surface.
Real Surface. The surface limiting the body, separating it from the surrounding space.
Recording traversing length. The maximum recording movement of the stylus along the surface.
Reference line. A line chosen by convention to serve for the quantitative evaluation of the roughness of the effective profile.
![]()
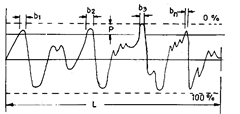
Bearing ratio (tp) is the length of bearing surface and provides guidance for improving production. tp% is the ratio at selected depth P (Refer Fig. 11.6). and
![]()
This measurement helps improve production processes.
Roughness. The irregularities in the surface texture which are inherent in the production process, but excluding waviness and errors of form.
![]()

Fig. 11.6. Bearing ratio.
Run out length. Vertical projection on to the mean line of the last part of the traversing length which is not used for numerical evaluation.
Sampling length. The length of the effective profile selected for the evaluation of the surface roughness, without taking into account other types of irregularities.
Secondary texture. Irregularities outside the bandwidth of wavelengths of the primary texture.
Single peak to valley height. Separation of highest peak and lowest valley within a single sampling length.
Shape factor or smoothness index. Ratio of the separation of the mean line and a parallel line through the highest peak to the average roughness.
Skew will show whether porous, sintered and cast iron surfaces will yield a meaningful Ra measurement. Also, the criterion for a good bearing surface is that it should have a negative value of skew.
Start-up length. Length of the first part of the traversing length projected vertically on the mean line and not used for numerical evaluation. Transient oscillations shall fade out within the start-up length.
Surface texture. Irregularities which, recurring many times across the surface, tend to form on it a pattern or texture. Also known as primary texture.
Surface volume. The volume per unit area enclosed by the surface and a plane.located by the highest summits.
Ten-point height. Separation of average of five highest peaks and five lowest valleys within a single sampling length.
Traversing length. The length of the effective profile necessary for the evaluation of surface roughness parameters for the surface inspected. The traversing length may include one or more sampling lengths.
True profile length. The length obtained by following all the undulations of the profile along a sampling length.
Waviness. That component of surface texture upon which roughness is superimposed. Waviness may result from such factors as machine or work deflections, vibrations, chatter, heat treatment or warping strains.
Waviness height. Separation of highest peak and lowest valley of waviness over a waviness sampling length, corrected for roughness.
