15.4.
The gears (gear teeth) are generally made by one of the following two methods :
(i) Reproducing method, in which the cutting tool is formed involve cutter, which forms the gear teeth profiles by reproducing the shape of the cutter itself. In this method, each tooth space is cut independently of the other tooth spaces. _
(ii) Generating method, in which the cutting tool (hob) forms the profiles of several teeth simultaneously during constant relative motion of the tool and blank.
The various sources of errors in the gear made by reproducing method be due to (i) incorrect profile on the cutting tool, (ii) incorrect positioning the tool in relation to the work and (Hi) incorrect indexing of the blank.
The sources of error when gears are made by generating method are : (i) Errors in the manufacture of the cutting tool (ii) errors in positioning the tool in relation to the work and (Hi) errors in the relative motion of the tool and blank during the generating operation.
15.4.1.
Gearing Operation Requirements
. The gears can be classified into three categories according to the operation requirements as follows :
(i) High speed gears, (ii) High power gears, (iii) Precision gears.
The chief requirements, which an idle gearing must fulfil are : (i) The maintenance of a constant gearing ratio ; (ii) Provision of contact along the full length of the tooth, and (Hi) Providing the proper backlash.
(The backlash or side play of a gear is clearance between teeth of meshing gears which provides for a slight rotation of one gear in reference to the mating gear.)
The important factor in case of high speed gears in a limitation of variations in the gearing ratio. When gears are operating at very high speeds then considerable acceleration appears even for small gearing ratio variations. These accelerations cause large dynamic loads which can damage the gear tooth.
High power gears are generally operated at low speeds but their teeth have to transmit large force. Therefore the gear teeth for this purpose should specify fullest possible contact along the tooth length.
The man requirement of the precision gears is the constant gearing ratio. These gears are generally used for counting and timing purposes, or in the measuring instruments and indexing devices, and usually have small face width and are of small module.
From what has been said above for the gearing operation requirements, it can be concluded that gears can be graded on the basis of the following accuracies :
(i) Kinematic accuracy of the gear, (ii) Smoothness of gear operation. (iii) Tooth bearing contact.
We shall now discuss about these accuracies in more details :
15.4.2.
Kinematic Accuracy.
This is represented by the permissible accumulated error in gear rotation per revolution of the gear.
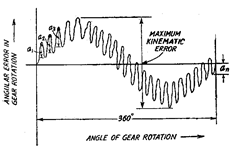
The index of kinematic accuracy of a gear is the maximum kinematic error, which is defined as the maximum angular error in rotation of a gear, when it meshes in single-profile engagement with a precise (master) gear. This error is evaluated by drawing the kinematic error curve as shown in Fig. 15.10. This error is caused when the gear is being cut, due to errors in positioning the tool in rela-
tion to the blank, as well as to kinematic errors (errors in gear train) of the gear-cutting machine.

Fig. 15.10. Kinematic Error Curve.
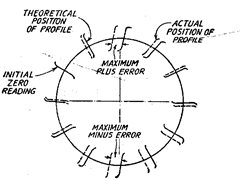
The kinematic error may also be evaluated by the maximum accumulated error in the circular pitch. This is the maximum error between like profiles of any two teeth measured on a single gear.
Thus in Fig. 15.11 the maximum accumulated error in circular pitch = maximum plus error + maximum minus error. Another index of kinematic error may be the variations in the base tangent length. This constitutes the difference between the maximum base tangent and the minimum value on a single gear.
15.4.3.
Smoothness of gear operation.
Smoothness of gear operation is of vital importance to provide for noiseless engage-

Fig. 15.11
ment and longer service life of gearing. It is represented by the value of the components of the full error in the angle or rotation of a gear, which are repeated many times per revolution of the gear. The index of smoothness of gear operation is the cyclic error which in the kinematic error curve in Fig. 15.12, is represented by Cyclic error = (oi + a% + a3 + … an)ln.
Thus the cyclic error may be defined as the mean value of the range of variation in the kinematic error of the gear taken for all cycles during one revolution.
Smoothness of gear operation is also ensured by limiting the maximum permissible deviations in basic pitch and the involute profile tolerance.
15.4.4.
Tooth bearing contact.
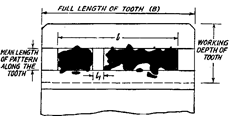
The index of tooth bearing contact in gearing is the gear contact pattern, which is the part of the surface on a gear tooth profile showing traces of bearing contact with the teeth of the mating gear after they have been run together with the
drive gear braked slightly.
Bearing contact for mating gears is represented by the relative size of the bearing contact pattern in per cent.
Along the tooth length it is denoted by the ratio of the traces of contact, subtracting gaps or skipped places large than the size of the module in mm, to the full length of the tooth.

Fig. 15.12. Tooth bearing contact pattern.
![]()
Gear errors. Various possible types of error on spur, helical, bevel and worm gears are described below :
(i) Adjacent pitch error Actual pitch—design pitch.
(ii) Cumulative pitch error Actual length between corresponding flanks of teeth not
adjacent to each other—design length. (Hi) Profile error The maximum distance of any point on the tooth profile
form and normal to the design profile when the two coincide at the reference circle.
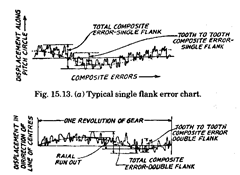
(iv) The tooth to tooth com- The range of difference between the displacement at the posite error—single flanks pitch circle of a gear and that of a master gear meshed
with it at fixed centre when moved through a distance (Refer Fig. 15.13 a). corresponding to one pitch with only the driving and
driven flanks in contact.
(v) The total composite The range of difference between the displacement at the errors—single flank pitch circle of a gear and that of a master gear meshed
with it at fixed centre distance when moved through one revolution with only the driving and driven flanks in contact (Refer Fig. 15.3 a).

Fig. 15.13. (6) Composite Errors—Typical double flank error chart.
| (vi) | The tooth to tooth | The range of variation in the minimum centre distance |
| composite error—double | between a gear and a master gear when rotated through | |
| flank | a distance corresponding to the pitch of the teeth (Refer Fig. 15.13 a). | |
| (vii) | The total composite | The range of variation in the minimum centre distance |
| error—double flank | between a gear and a master gear when the gear is rotated through one revolution (Refer Fig. 15.13 b). | |
| (viii) | The tooth thickness error | Actual tooth thickness measured along the surface of the reference cylinder—design tooth thickness. |
| (ix) | Cyclic error | An error occurring during each revolution of the element under consideration. |
| (x) | Periodic error | An error occurring at regular intervals not necessarily corresponding to one revolution of the component. |
| (xi) | Run out | It is the total range of reading of a fixed indicator with the contact point applied to a surface rotated, without axial movement about a fixed axis. |
| (xii) | Radial run out | It is the run-out measured along a perpendicular to the axis of rotation. |
| (xiii) | Eccentricity | It is half the radial run-out. |
| (xiv) | Axial run-out (wobble) | It is the run-out measured parallel to the axis of rotation, at a specified distance from the axis. |
| (xv) | Undulation | A periodical departure of the actual tooth surface from the design surface (Refer Fig. 15.13 b). |
| (xvi) | Undulation height | The normal distance between two surfaces that contain respectively the crests and the troughs of the tooth undulation (Refer Fig. 15.13 c). |
| (xvii) | Wavelength of an | The distance between two adjacent crests of an undula- |
| undulation | tion (Refer Fig. 15.13 c). | |
| (xviii) | Tooth alignment error | The distance of any point on a tooth trace from the design tooth trace passing through a selected reference point on that tooth (Refer Fig. 15.13 c). |
The presence of these errors caused interference in efficient operation of gears. These result in non-smooth and noisy operation which ultimately affect the working life.
