2.62.
Although slip gauges can be used for many purposes without the aid of any auxiliary
equipment, but their field of application is considerably extended by a few simple accessories, viz.,
holders, jaws, scribers and centre points etc. The use of holders becomes very important when it is
desired to use the slip gauge combination of considerable overall length, in order to ensure more
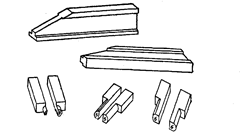
Fig. 2.174. Measuringjaws.

Fig. 2.175. Slip Gauge Accessories.
rigid assembly. The slip gauges after being selected are inserted in the holder (Refer Fig. 2.174)
which comprises of two slotted side plates secured to end block whereby they may be lightly clamped
in position. The gripping pressure is usually applied by means of a knurled head screw passing
through a tapped hole in one of the end blocks ; however in case of the longer holders some form of
rapid adjustment is desirable which is achieved by providing a sliding block which can be clamped
to the side plates of the holder in any desired position by means of a knurled nut.
As already pointed, in order to increase the utility of slip gauges, it is essential that extensive
use be made of slip gauge accessories. These in conjunction with slip gauges are used for the
inspection of gauges and precision equipment; for the measurement of plug and ring gauges ; and
for marking out tools also. The beauty of these accessories is that these can be built up quickly and
used as a temporary limit gauge.
The various accessories may be listed out as follows :
(i) Measuringjaws.
(ii) Scribing and centre point.
(iii) Holders and base.
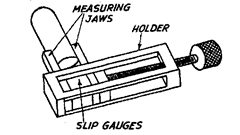
Fig. 2.176. Type A measuringjaws being
used for external measurement.
SUP GAUGES
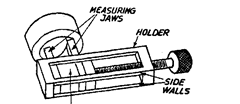
Fig. 2.177. Type A measuringjaws being used
for internal measurement.
The slip gauge accessories are made from suitable
steel free from defects and hardened uniformly upto a
minimum hardness of 800 HV. The working surfaces of
the measuring faces of measuringjaws and the working
surface of the base are finished to obtain good wringing
surface without the use of any extraneous agent.
2.62.1.
Measuringjaws.
The measuringjaws are
always supplied in pairs. These are available in two types,
viz., for both external and internal measurements (Type
A) and the other type intended for external measurement
only (Type B).
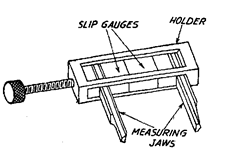
Fig. 2.178. Type B measuringjaws intended
for external use only.
In Fig. 2.179 the most important dimension is the size of measuring jaws. This nominal size
is always engraved on the front end face of the jaw. In Fig. 2.179, the various other dimensions of
the measuring jaw have been shown for the measuring jaw size of 5.0 mm. Other sizes available
are 2.5 mm and 6.0 mm.

Fig. 2.179. All dimensions are in mm. Type A measuring Jaw.
It may be noted that in type B measuring jaw, no dimension is very important as it does not
come into measurement. The only important
item is the wringing face which should be flat
to within 0.0002 mm. This limit of accuracy
holds good for type A also. For type A jaw, the
nominal size of the jaw should be accurate to
within ± 0.0007 mm. When the pair of jaws are
wrung together the error in overall dimension
should not exceed + 0.0001 mm. The faces
perpendicular to the wringing faces should be
accurate to within 90° + 0.3′ from the wringing
face.
2.62.2.
Scribing and Centre
Points. These in conjunction with the
holder and slip gauges constitute very
accurate device for marking out pur-
poses. The scribing and centre points
are designed in such a way that when
they are used in combination, the
diameter of a final scribed circle does
not differ from twice the size of the
slip gauge combination inserted be-
tween the points by more than ± 0.05
mm. The scribing points and centre
are shown in Fig. 2.181 and Fig. 2.182
respectively.
In this case too, the wringing
face is very important and it should
be flat to within 0.0002 mm. The faces
perpendicular to wringing face should
be accurate to within 9° + 0.3′ from the
wringing face.

Fig. 2.180. Type B Measuring Jaw.
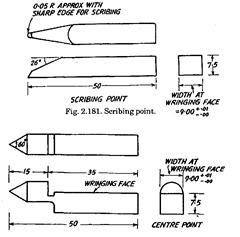
Fig. 2.182. Centre point.
2.62.3.
Holder.
The holders are available in three ranges, viz., 0 to 60 mm, 50 to 110 mm,
and 100 to 210 mm. These are made of suitable design for holding rigidly combination of slip gauges
within their range. The surface upon which the gauges are wrung should be flat to within 0.0001
mm and parallel to the base.
2.62.4.
Base (Refer Fig. 2.183).
It is made of robust construction and designed such that it
remains stable when used with the longest size holder. Suitable provision is made for the attachment
of the holder with the base in a position, normal with respect to the wringing surface of the base.
The wringing surface of the base should be flat to within 0.0002 mm and suitably relieved and an
air vent provided. The sides of the base are suitably relieved so as to provide convenient finger grip.
The surface upon which gauges are wrung should be flat within 0.0001 mm and parallel to the base
within 0.0002 mm. The normal height of the base should be in agreement with the dimension
marked on the base to within 0.0007 mm.
