3.7.
The end standard can be directly compared to wavelengths of light by absolute means,
without involving any mechanical movement or time lag (Refer Fig. 3.9). It would be noted that the
terminal surfaces of end standard are used as optical reflectors in the interferometre arrangement
shown in Fig. 3.9.

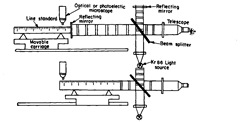
Fig. 3.10. Movement of carriage is required (not absolute method).
Fig. 3.10 shows the indirect comparison of line standard to the light wave standard. It
involves movement of a carriage holding the mirror. The line on the scale is picked up’ optically or
optoelectrically. It would be noted that in view of high magnification of microscope, the lines
engraved on scale should be very fine ones. This arrangement (Refer Fig. 3.10) requires a
fringe-counting interferometer, which takes a signal and collimates it to a photosensitive cell.
Temperature has to be maintained constant throughout.
The error in straightness of travel of carriage, if any, has to be accounted for. It would thus
be obvious that line standards can’t be compared to the official light wave standard by absolute
means.
3.7.1.
New Trends for the Materialisation of the Meter.
Significant advances in new
sources, new lines, optical clocks, new techniques and tools have taken place for calibration of meter
to accuracy of about 10~u.
An atomic meter is defined as 1,650,763.73 wavelength of the 2p 10 – 5 d 5 transition in krypton.
The transfer to physical length measurement is achieved by interferometry.
In 1983, CGPM (Conference Generate des Poids et Mesures) fixed the SI numerical value of
the speed of light in vacuum, and established a light-related meter as the distance travelled by light
during a given time interval.
The set-up and the calibration of secondary references for the meter in the visible or nearby
should ensure the traceability on the time reference, i.e. the calibration against the caesium clock.
International comparisons of the reference frequencies in iodine cells around 633 nm exhibit
a standard relative deviation of about 3 x 10-11.
Good progress has occurred in the set up of an optical clock, i.e. a physical system with an
optical resonance, monitored using a ultra high resolution spectroscopic technique, that would be
more stable and reproducible than the RF caesium clocks.
The iodine molecule presents promising characteristics to get references in an extended
spectral range, to demonstrate the usefulness of new ultra high resolution (UHR) spectroscopic
techniques. It has proved to be a very efficient wavelength reference tool for the transfer to
calibration centers, which are using improved interferometric techniques to calibrate material
references.
Solid state lasers having intrinsic low noise and long term stability are used to^study new
lines.
Frequency stabilisation of the laser sources used to materialise the meter in the optical
domain generally requires two servo-loops. The first one is devoted to short term stabilization, using
optical feedback on semiconductor lasers. The second one ensures the long term stability of the
frequency on an atomic or molecular secondary reference.
