13.4.
The methods discussed hear are from the point of view of measurement of gauges, but they can obviously be applied to precise work, threading tools, taps and hobs etc. We will be dealing with the measurement of most important six elements, i.e. major, minor and effective diameters, pitch, angle and form of thread.
13.4.1.
Measurement of major diameter.
For the measurement of major diameter of external threads, a good quality hand micrometer is quite suitable. In taking readings, a light pressure must be used as the anvils make contact with the gauge at points only and otherwise the errors due to compression can be introduced. It is, however, also desirable to check the micrometer reading on a cylindrical standard of approximately the same size, so that the zero error etc., might not come into picture.
For greater accuracy and convenience, the major diameter is measured by bench micrometer. This instrument was designed by N.P.L. to estimate some deficiencies inherent in the normal hand micrometer. It uses constant measuring pressure and with this machine the error due to pitch error in the micrometer thread is avoided. In order that all measurements be made at the same pressure, a fiducial indicator is used in place of the fixed anvil. In this machine there is no provision for mounting the workpiece between the centres and it is to be held in hand. This is so, because, generally the centres of the workpiece are not true with its diameter. This machine is used as a comparator in order to avoid any pitch errors of micrometers, zero error setting etc. A calibrated setting cylinder is used as the setting standard.
The advantage of using cylinder as setting standard and not slip gauges etc., is that it gives greater similarity of contact at the anvils. The diameter of the setting cylinder must be
nearly same as the major diameter. The cylinder is held and the reading of the micrometer is noted down. This is then replaced by threaded workpiece and again micrometer reading is noted for the same reading of fiducial indicator. Thus, if the size of cylinder is approaching that of major diameter, then for a given


Fig. 13.8. Bench Micrometer.
13.4.2.
Major diameter of internal threads.
The measurement of the elements of an internal thread is more cumbersome. Since it is difficult to approach the elements of internal thread, an indirect approach is followed by making a cast of the thread. The main art thus lies in obtaining a perfect cast, because once good cast is available the various elements can be measured as for external threads.
Cast may be made by plaster of paris, dental wax, or sulphur. The part whose internal thread is to be measured is first cleaned and brushed with a fine oil. The part is then mounted between two wooden blocks whose upper surface lie about half-way up the ring. Cast material is then poured to a depth less than the radius of part to permit easy removal of cast without screwing it out. After the plaster is set, it should be taken out without rotating, but by pulling up the middle portion of the cast. It may be men-
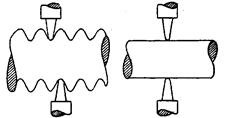
Fig. 13.9. Measurement of minor diameter.
tioned that taking out of sulphur cast is easier than the plaster. Oiling is not necessary in case of sulphur cast.
13.4.3.
Measurement of minor diameter.
This is also measured by a comparative process using small Vee-pieces which make contact with a root of the thread. The Vee-pieces are available in several sizes having suitable radii at the edges. The included angle of Vee-pieces is less than the angle of the thread to be checked so that it can easily probe to the root of the thread. To measure the minor diameter by Vee-pieces is suitable for only Whitworth and B.A. threads which have a definite radius at the root of the thread. For other threads, the minor diameter is measured by the projector or microscope.
The measurement is carried out on a floating carriage diameter measuring machine in which the threaded work-piece is mounted between centres and a bench micrometer is constrained to move at right angles to the axis of the centre by a Vee-ball slide. The method of the application of Vee-pieces in the machine is shown diagrammatically in Fig. 13.9. The
dimensions of Vee-pieces play no important function as they are interposed between the micrometer faces and the cylindrical standard when standard reading is taken.
It is important while taking readings, to ensure that the micrometer be located at right angles to the axis of the screw being measured. The selected Vees are placed on each side of the screw with their bases against the micrometer faced. The micrometer head is then advanced until the pointer of the indicator is opposite the zero mark, and note being made of the reading. The screw is then replaced by standard reference disc or a plain cylindrical standard plug gauge of approximately the core diameter of the screw to be measured and second reading of the micrometer is taken.
If reading on setting cylinder with Vee-pieces in position = Ri and reading on thread = i?2 and diameter of setting cylinder = Dlt Then minor diameter = Di + (R2 – Ri).
Readings may be taken at various positions in order to determine the taper ovality.
Before proceeding to the measurement of effective diameter, the screw diameter measuring-machine is first described in brief here. The machine is shown in Fig. 13.10. Also refer Fig. 13.16 for schematic sketch. If consists of three main units. A base casting carries a pair of centres, on which the threaded work-piece is mounted. Another carriage is mounted on
it and is exactly at 90° to it. On this is provided another carriage capable of moving towards the centres. On this carriage one head having a large thimble enabling reading upto 0.002 mm is provided. Just opposite to it is a fixed anvil which is spring loaded and its zero position is indicated by a fiducial indicator. Thus the micrometer elements are exactly perpendicular to the axis of the centres as the two
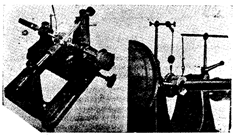
Fig. 13.10. Screw measuring machine.
carnages are located perpendicular to each other. On the fixed carriage the centres are supported in two brackets fitted on either end. The distance between the two centres can be adjusted depending upon the length of the threaded job. After job is fitted between the centres the second carriage is adjusted in correct position to take measurements and is located in position. The third carriage is then moved till the fiducial indicator is against the set point. The readings are noted from the thimble head. It is now obvious that the axis of the indicator and micrometer head spindle is same and is perpendicular to the line of two centres. The indicator is specially designed for this class of work and has only one index line, against which the pointer is always to be set. This ensures constant measuring pressure for all readings. Sufficient friction is provided by the conical pegs to restrain the movement of carriage along the line of centres. The upper carriage is free to float on balls and enables micrometer readings to be taken on a diameter without restraint. Squareness of the micrometer to the line of centres can be adjusted by rotating the pegs in the first carriage which is made eccentric in its mounting.
Above the micrometer carriage, two supports are provided for supporting the wires and Vee-pieces for measurement of effective diameter etc.
13.4.4.
Minor diameter of internal threads.
Minor diameter of internal threads can be measured conveniently by the following methods :
(i) Using taper parallels. The taper parallels are pairs of wedges having radiused and parallel outer edges. The diameter across their outer edges can be changed by sliding them over each other as shown in Fig. 13.11. The taper parallels are inserted inside the thread and adjusted until firm contact is established with the minor diameter. The diameter over the outer edges is measured with a micrometer. This method is suitable for smaller diameter threads.
(ii) Using rollers. For threads bigger than 10 mm diameter, precision rollers are inserted inside the thread and proper slip gauge inserted between the rollers as shown in Fig.
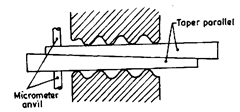
Fig. 13.11. Measuring minor diameter of internal thread using taper parallels.
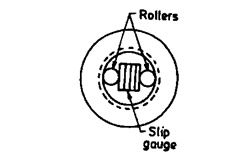
Fig. 13.12. Measurement of minor diameter of internal thread using rollers.
13.12, so that firm contact is obtained. The minor diameter is then the length of slip gauges plus twice the diameter of rollers.
13.4.5.
Effective diameter measurements.
The effective diameter or the pitch diameter can be measured by any one of the following methods :
(i) Micrometer method ■»
(ii) One wire, two wire, or three wire (or rod) method.
13.4.5.1.
Thread micrometer method.
The thread micrometer resembles the ordinary micrometer, but it has special contacts to suit the end screw thread form that is to be checked. In this micrometer, the end of the spindle is pointed to the Vee-thread form with a
corresponding Vee-recess in the fixed anvil. When measuring threads only, the angle of the point and the sides of Vee-anvil, i.e. the flanks of the threads should come into contact with the screw thread (Fig. 13.13).
Jf correctly adjusted, this micrometer gives the pitch diameter.
This value should agree with that obtained by measurement by outside diameter and pitch from the following relation:
Pitch dia = D – 0.6403p (in case of Whitworth thread) where 0.6403p = depth of thread, D = outside dia.,p = pitch.
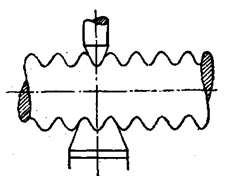
Fig. 13.13. Thread micrometer for effective diameter.
Limitations of Thread Micrometer :
The micrometer must be set to a standard thread plug. If not done so in the first instance, there will be error due to helix angle of the thread being measured. When setting the instrument to a standard plug gauge it will be observed that the reading is not exactly zero, as previously inferred, when the spindle and anvil are brought together.
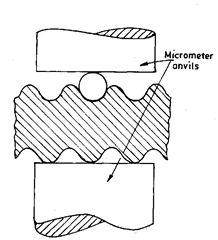
Fig. 13.14. One-wire method.
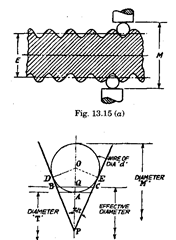
Fig. 13.15 (b). Two wire method.
For correct results it is necessary to use a separate thread micrometer for every size of screw thread to be gauged, otherwise there will always be a small amount of error inherent in thread micrometer.
A big advantage of thread micrometer is that this is the only method which shows the variation for the drunken thread.
13.4.5.2.
One-wire method.
In this method, one wire is placed between two threads at one side and on the other side the anvil of the measuring micrometer contacts the crests as shown in Fig. 13.14. First the micrometer reading is noted on a standard gauge whose dimension is nearly same as to be obtained by this method. Actual measurement over wire on one side and threads on other side = size of gauge ± difference in two micrometer readings.
This method is used for measuring effective diameter of counter pitch threads, and during manufacture of threads.
The difficulty with this method is that the micrometer axis may not remain exactly at right angles to the thread axis.
13.4.5.3.
Two-wire method.
The effective diameter of a screw thread may be ascertained by placing two wires or rods of identical diameter between the flanks of the thread, as shown in Fig. 13.15, and measuring the distance over the outside of these wires. The effective diameter E is then calculated as
E = T + P, where T = Dimension under the wires = Af – 2d
M = dimension over the wires, d = diameter of each wire The wires used are made of hardened steel to sustain the wear and tear in use. These are given a high degree of accuracy and finish by lapping to suit different pitches.
Dimension T can also be determined by placing wires over a standard cylinder of diameter greater than the diameter under the wires and noting the reading J?! and then taking reading with wires over the gauge, say R2. Then T = S – (Ri – R2).
P = It is a value which depends upon the dia of wire and pitch of the thread.
If p = pitch of the thread, then
P = 0.9605p – 1.1657d (for Whitworth thread), P = 0.866p – d (for metric thread).
Actually P is a constant value which has to be added to the diameter under the wires to give the effective diameter. The expression for the value of P in terms of p (pitch), d (diameter of wire) and x (thread angle) can be derived as follows :

Two wire method can be carried out only on the diameter measuring machine described for measuring the minor diameter, because alignment is not possible by 2 wires and can be provided only by the floating carriage machine. In the case of three wire method, 2 wires on one side help in aligning the micrometer square to the thread while the third placed on the
other side permits taking of readings.
A simplified diagram of this measuring machine is shown in Fig. 13.16. As already pointed out the machine ensures that the axis of the micrometer is maintained at 90° to the axis of the screw under test. In Fig. 13.16, the lower slide (wrongly indicated as lower side in Fig. 13.16) is capable of movement parallel with the axis of thread while the top slide moves at 90° to the thread axis.
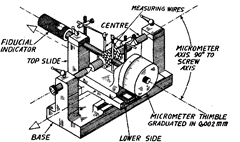
Fig. 13.16. Thread measuring machine.
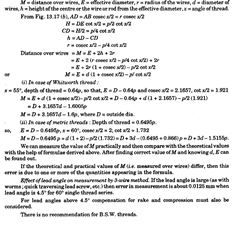
13.4.5.4. Three wire method. This method of measuring the effective diameter is an accurate method. In this three wires or rods of known diameter are used : one on one side and two on the other side [Fig. 13.17 (a) and (6)]. This method ensures the alignment of micrometer anvil faced parallel to the thread axis. The wires may be either held in hand or hung from a stand so as to ensure freedom to the wires to adjust themselves under micrometer pressure.

Fig. 13.17.Three wire method of measuring effective diameter .
![]()
(Also refer Problem 13.5 at the end of this chapter for rake correction and compression correction).
13.4.6.
Best Size Wire.
This wire is of such diameter that it makes contact with the flanks of the thread on the effective diameter or pitch line. Actually effective diameter can be measured with any diameter wire which makes contact on the true flank of the thread, but the values so obtained will differ from those obtained with ‘best size’ wires if there is any error in angle or form of thread. It is recommended that for measuring the effective diameter, always the best size wire should be used and for this condition the wire touches the flank at mean diameter line within ± 1/5 of flank length (Refer Solved Problem 13.2). With best size wire, any error on the measured value of simple effective diameter due to error in thread form or angle is minimised.
![]()
13.4.7.
Measurement of Effective Diameter of Tapered Threads.
The measurement of the effective diameter of taper threads is not made perpendicular to the axis, but at an angle depending on the taper. The measurement is made at a given point or distance from the end of the thread, and in the three wire method, the single wire is placed at this point. The other two wires are placed in the two opposite grooves and care must be taken to ensure that the micrometer or measuring anvils make contact with each of the three wires.
![]()
13.4.8.
Effective Diameter of Internal Threads (Fig. 13.18).
Thread comparator. In this case a pair of ball tips engage the flanks of the threads in the work and measure the effective diameter only.
The ball tip on the right is fixed at the end of a measuring jaw attached to a floating head in the sliding bracket (B). The floating head has extension in contact with the spindle of the dial indicator and the movement of floating head towards the indicator is constrained by a spring. (The set-up in Fig. 13.18 does not show the ball tips).
The instrument is set to a reference standard, with the dial pointer at zero. To use the gauge, the floating head is retracted to insert the ball tips in the internal threads of the work, and released to allow the tips to engage the flanks of the thread under the pressure of the spring. The dial indicator then shows the deviation from the nominal size to which the gauge
is set. The instrument may be used on work in the machine, or on the working bench. The fixed head (A) carrying the left hand ball tip is adjusted by a fine screw to set the gauge to the reference standard. The reference standard is built up from slip gauges as shown in Fig. 13.19. The two end pieces have V-jaws of an angle of Vee corresponding to the thread, i.e. 60 degree or 55 degree.
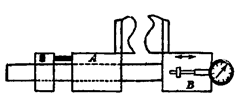
Fig. 13.18
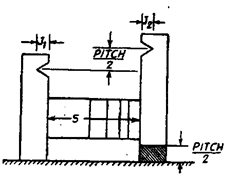
Fig. 13.19
The dimensions J1 and J2 are marked on the pieces, and are the depths from the face to the apex points of the Vees. Assuming the effective diameter and pitch of the thread to be known, the distance S is found from the formula
S=X+y-Z
where X = Mean effective diameter.
y = Depth of the thread from apex to the apex of the V-form.
The value of y (Fig. 13.20) depends on the included angle of the thread, and is equal to 0.9605p for 55° threads and 0.866p for 60° threads.
Z = Ji + J2 ie., constants for the end gauge pieces.
The assembled slips are set in a holder with a slip equal to half the pitch, beneath one end piece to compensate for the helix angle.
The reference gauge thus assembled is ready for setting the comparator. Ball tips must be of a suitable size for the
thread. The size is not critical provided the ball point fist the thread so as to bear on the flack near the mean pitch line.
For threads from 4 to 7 t.p.i., a ball of 0.095 inch dia is used, from 7 to 12 t.p.i., 0.060
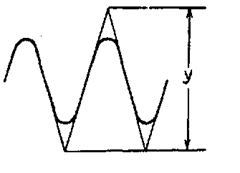
Fig. 13.20
inch diameter and from 12 to 20 t.p.i., 0.035 inch diameter balls are used. A pair of V-jaws, 55° or 60° covers all pitches from 4 to 20 t.p.i. The method of calculating the value of S from the effective diameter excluded the radius OY at the crest and root of the thread, (Fig. 13.21) as the form is considered to extend to the apex of the Vee. In some cases it may be necessary to accept the major diameter as it may be the basic dimension of the thread, and the form at the crest and root of the thread must then be taken into account.
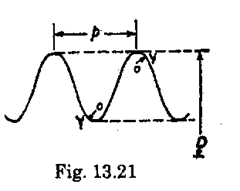
For metric threads, S = D + 0.2165p – Z; For Whitworth threads, S = D + 0.3202/j – Z. (Hi) Layman’s method of finding the effective diameter (internal thread) is by taking the impression of threads with the help of wax or any other material, say sulphur. Sulphur is mostly used because it can be used many times.
13.4.9.
Checking the “Thread Form” and “Angle” by Optical Projection of Thread.
This method is applicable only to external threads because internal threads cannot be projected.
The standard type of projector is used, consisting of a projector lamp, a condenser lens or collimator, the projection lens and the screen.
The screw thread to be examined is placed in the parallel beam of light between the condenser lens and the projector lens.
The modern projectors are equipped with work holding fixtures, the projection lamp and the lenses situated on top of the cabinet, and the screen at the front. The light rays from the lens are directed downwards into the cabinet, and hence to the screen by a system of prisms and mirrors, bringing every thing within the reach of the operator.
The enlarged image of the thread form appears on the ground-glass screen on which is mounted the temnlate or drawine of the form made to scale eaual to the magnification of the
lens. This way the two forms (i.e. ideal and projected) are compared.
One of the difficulties in projecting screw thread is the fact that form is specified on an axial plane. So we must consider the correction for it.
Referring to Fig. 13.22 (i), the normal pitchp is less than the axial pitch P and is given by the relation :p = P cos $ ; where <)> is the helix angle.
Referring to Fig. 13.22, (ii)..
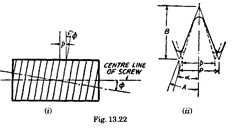

Values of A and <|> are known and 2X”is the included angle of the thread projected on the screen.
On the projected thread form we find the included angle ZX and then compare it to the theoretically calculated value. 2X = 2 tan-1 (tan A cos $).
The included angle can also be determined by two ball method (Refer Art. 9.8.3 and Prob. 13.7).
13.4.10.
Measurement of Pitch.
The accuracy of pitch in any form of thread is very important. Therefore, it is very important to be able to measure this element of thread to high degree of accuracy, at least double that of the effective diameter measurement. The measurement must be made in such a way that other features or dimensions e.g., diameter and thread angle do not influence the result.
13.4.10.1.
External Threads.
1. For less accurate methods, the Zeiss pitch or lead measuring instrument may be used. It utilises contact members having two ball points which are applied to the effective surface of the thread. These points are aligned parallel to the thread axis either by a thread pin at the back or a special back rest having a plane face parallel to the thread axis. The instrument is adjusted to zero before making a measurement, with the aid of a special micrometer gauge supplied for the purpose, or by using a standard plug gauge. Upon applying the instrument to the thread it registers the pitch deviation from the standard measurement. The scale of the indicator has a range of ± 0.1 mm and each division reads to 0.01 mm. The measuring accuracy of the indicator is ± 0.003 mm.
2. The pitch of external threads can be measured by using screw pitch or profile gauge. Such a gauge consists of series of thread forms with varying pitch. The one which coincides perfectly with the thread under test gives the pitch. The accuracy of measurement depends on the method of sighting used to judge the perfectness.
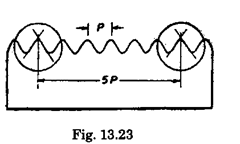
3. A more accurate method is the microscope method. Screw threads can be inspected and their profile angles and linear pitches checked with the aid of a goniometric microscope. The parts to be gauged are usually held between centres and illuminated from below, their silhouettes appearing in the field of the viewing eyepiece. Effective pitch diameters can also be measured bv this method.
The method of measuring pitch is shown in Fig. 13.23. The microscope has two raticules that can be oriented to the slopes of the thread and the point of intersection of these is used as the measuring reference. The movement of the longitudinal carriage is read off the linear scale, the micrometer microscope being employed for this purpose.
The linear measuring accuracy is within 0.001 mm and for angles, it is 10 sec. of arc.
A comparatively simple method of testing the pitch of a screw thread with the Cooke tool room microscope fitted with its projection screen is as follows :
The screw to be checked is mounted in a cradle under the microscope objective and the necessary adjustments made to project the sharp enlarged image of the thread on the screen. The appropriate thread form on the microscope thread template is then brought into coincidence with the projected image, as shown in (Fig. 13.24) and a reading of the longitudinal table micrometer screw taken ; this can be done to an accuracy of 0.0025 mm. The table is then moved by means of the micrometer screw until the image of the next thread on the screen under inspection fills the template profile and the reading of the micrometer again taken. The difference between the readings gives the measured pitch of the screw. The procedure is repeated for each individual thread in order to find the separate pitch error, if any. Finally, the difference between the
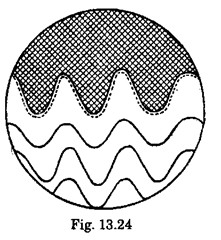
initial and last readings of the micrometer when divided by the number of threads that have been measured enables the “mean pitch” of the screw to be estimated.
For still more accurate purposes it is necessary to employ a special screw pitch measuring machine by which the actual pitch error of individual threads can be measured. The Pitter and Matrix are typical examples of pitch measuring machines.
The Pitter screw measuring machine employs various stylus points to suit screw threads that are to be checked. The screw under measurement is held stationary between centres on the machine. The indicator unit, carrying the stylus which bears on the flanks of each thread successively, is carried on a slide which is mounted on balls. The slide is actuated by means of a micrometer. The act of rotating the micrometer spindle causes the slide to move in relation to the fixed centres, i.e., causes the indicator to move in relation to the work being measured. The stylus which is mounted on a leaf spring, falls in and out of each thread ; the pointer of the indicator reads zero (it is adjusted to read zero in the first groove) when this stylus is in a central position in each successive thread. The micrometer reading is taken each time the indicator reads zero ; these readings then shown the pitch error of each thread of the screw that is being measured. Special graduated discs are provided to fit the micrometer to suit all ordinary pitches whilst special can be provided for.
It may be mentioned that a small handwheel below the micrometer actuates screw for the purpose of moving the indicator in relation to the slide so as to bring the stylus opposite to the screw to be tested in any position between the centres. The total travel of the micrometer is 25 mm.
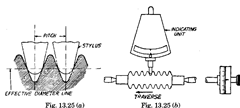
Illustrating that for best results the stylus point should make contact on or near the effective diameter.
As the pitch of the micrometer screw is checked accurately when the machine is inspected and a curve of errors is provided, it is possible to attain a high standard of precisior in measuring screws. The pitch errors are extremely small, being of the order of 0.002 mm fo] a thread. A test screw is also supplied with the machine and a chart of pitch error for this screw.
The Matrix pitch measuring machine operates on a similar principle to the Pitter machine. It is robust in construction and sensitive in measurement, revealing pitch accuracies of 0.0025 mm over a distance of 50 mm for all thread forms. In this machine (Refer Fig. 13.26) a micrometer head is provided on the headstock which is fixed to the base. The rotation of micrometer head produces movement of the longitudinal carriage along the bed of the base.
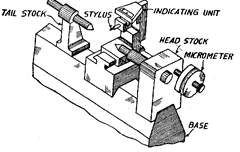
-Fig-13.26
Another carriage carrying the indicating and amplifying units comprising a radiused stylus and visual scale allowing a zero reading to be taken, and also capable of moving at 90° to the longitudinal carriage ; is mounted on the former carriage, and can be traversed longitudinally and locked in any position. A weight ensures a unidirectional thrust at all times. The micrometer screw of 40 t.p.i. has a 50 mm traverse and also has a compensator for any small residual pitch errors. In operation, the screw thread to be checked is placed between centres and the correct stylus mounted in the indicating head.
When the test screw is in position between the centres, and the correct stylus chosen i.e., the one which makes contact at or near the effective diameter, the carriage carrying the indicating unit is traversed until the stylus is located in the first thread of the test screw and the indicator is coincident with the fiducial line ; the second carriage is then locked. The stylus, by virtue of an ingenious mounting device, is capable of free movement riding up and down the thread flanks on linear movement of the screw thread by rotation of micrometer head. The stylus is now traversed along the thread, pitch by pitch, reading being taken each time the indicator is set at zero. The micrometer can be fitted with a series of graduated dials that can be changed quickly. With the proper dial for the pitch that is to be measured the readings of the errors are obtained from the displace-
ment of the lines on the disc which is graduated in (0.002 mm) divisions. It is after making this test, to turn to the first thread and repeat the readings, and the micrometer should read zero again.
13.4.10.2.
For Internal Threads.
The pitch of an internal thread can be measured on any of the standard pitch machines by using an adaptor. This adaptor carries a bar which can be inserted into the ring, the stylus being fitted to the bar end engaging with the thread in the usual manner. The ring gauge is mounted on a face plate or on the head stock of the machine, which will accommodate rings upto several cm. in diameter. For very large rings, a special set up on a surface plate is necessary, utilising an indicator and slip gauges.
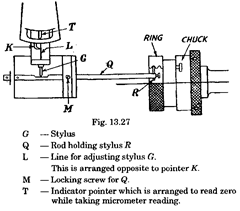
13.4.10.3.
Additional description of pitch measuring machines.
To correct any errors in pitch of the micrometer screw a compensator bar is provided.
The instrument is checked periodically with a master reference screw which is placed between centres and measured for the pitch over full range of micrometer. In this case variation in the reading is taken to indicate errors in the micrometer screw, and the compensator bar modified accordingly.
The micrometer screw has 40 t.p.i. and with a graduated dial of 250 divisions numbered every 10 divisions, the instrument is read as an ordinary micrometer calibrated to 0:0001 inch. The micrometer dial may be replaced by any one of the five alternative dials to simplify the measurement of the threads of certain pitches. Each of the dials is marked with a number of divisions to suit a range of pitches as follows :
| Dial | No. ofdiv. | For measurement of |
| A | 6 | 6,12, 24, 48,15, 30, 60 t.p.i. |
| 9 | 4, 5, 9.18, 36 t.p.i. | |
| B | 7 | 7, 14, 28, 56, 5, 10, 20, 40 t.p.i. |
| 11 | 11, 2 t.p.i. | |
| C | 8 | 4, 8, 16, 32 t.p.i. |
| D | 13 | 13, 26 t.p.i. |
| 19 | 19 t.p.i. | |
| E | 250 | (Each 0.002 mm. numbered every fifth division) |
| 20 | Pitch-multiples of 0.025 mm. |
Dial C is for British association, metric or non-standard pitches. Dial E is for metric machines only. The provision of a dial marked to suit a particular pitch simplifies pitch measuring, a division on the dial is opposite the zero mark for nominal pitch of each thread. Any variation of the division from the zero may then be read directly to 0.0001″ on either side of the zero line.
Stylus points are available to suit any particular thread. Care should be taken to make the stylus point touch the thread at or near the pitch line. The stylus holder is pivoted to allow the stylus point to follow in and out of the threads, as the carriage is moved along, and is adjustable for pressure.
While measuring the major diameter, the micrometer must be allowed to align itself in order to avoid “sine errors” which are likely to be introduced if the thread on centres and the micrometer are mal-aligned. Therefore, for measuring the major diameter, the screw thread should not be placed on the centres. In the measurement of effective diameter and minor diameter, vees are used and with the help of wires or vees only a negligible cosine error can be introduced by such mal-alignment.
(b) Both the measurements introduce either a secant or tangent or both the errors, but the error over wires is negligible for such a small angle.
For major diameter : For maximum length (I) of thread portion that can be accommodated within the micrometer faces of 5 mm diameter
![]()
Since, it will not be possible and practicable for all the 5 pitches to be accommodated, this being theoretical, I can be taken as 4.5 pitches = 9/2×1 = 4.5 mm.
Now one thread crest contacts at T and opposite crest at D.
:. True diameter TR or HD = d sec a -1 tan a since sec 5′ = 1.000001, it can taken as 1.
.-. TR, i.e., true diameter = d – 4.5 x tan 5′ = d – 4.5 x 0.00145 = d – 0.006525
For effective diameter : I = 1/2 pitch = 0.5 mm, .-. 0.5 x tan 5′ = 0.5 x 0.000145 = 0.00725 mm
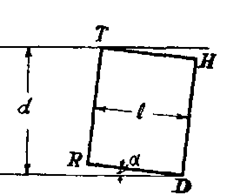
Fig. 13.32
When opposing wires are at T and D, true diameter is larger than measured and when opposing wires are at H and R, true diameter is larger than measured.
Hence, gauge ends should be removed from handles for measurement.
Problem 13.4.
(a) A special form of buttress thread has a sharp crest and root, and an included angle of 50°. The leading flank is inclined at 5° and the trailing flank at 45° to a line perpendicular to the thread axis. If this thread is measured by the NPL method, show that the P value is given by
P = 0.9105 x Pitch – 1.1233 x Cylinder diameter.
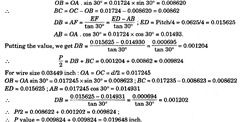
(b) Two thread measuring needles having diameters of 0.03448 inch and 0.03449 inch respectively are used to check a screw of 16 t.p.i. BS. Whitworth threads having included angle of 60°. Determine whether these needles are smaller or bigger compared to the best size wires. Also find the P value for this set uv.
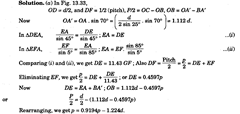
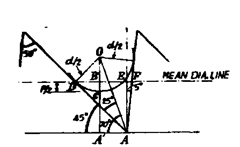
Fig. 13.33
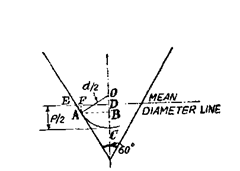
Fig. 13.34

Hence, the given needles are small.
We shall calculate P/2 for the given needles, and their sum is the required value. For wire size 0.03448 inch ;OA = OC = d/2 = 0.01724
Problem 13.5.
What are the two corrections applied in the measurement of effective diameter by the method of wires.
Solution.
The two corrections applied are : (i) Rake correction, and (ii) Compression correction.
(i) Rake correction. The rake correction becomes necessary because in the determination of formula for effective diameter by three wires method, a plane axial section of the thread had been considered and it is assumed that the wire touches each flank of the thread in this plane. This assumption is true for angular grooves with zero helix angle, but not for screw threads which have a helix ; and in the later case wire lies parallel to the helix at the radius of the point of contact. The points of contact on opposite flanks will lie on opposite sides of the mean
axial plane. As a result of this, the wire lies slightly farther from the thread axis than what has been assumed and a correction has to be applied to the effective diameter as measured and calculate. This correction is different for different effective diameters being measured.
A general formula for calculating rake correction is
![]()
This correction is always subtracted from the measured diameter.
(ii) Compression correction. As the micrometer exerts some force on the wires while measuring the effective diameter of threads, some degree of compression takes place and as a result the diameter observed is less. This correction is, therefore, added to the value of diameter obtained. This correction is more pronounced on fine threads and those whose included angle is small e.g. B, A, threads. For measuring forces upto about 350 gm. The correction is within 0.0025 mm for thread diameter down to about 3.5 mm and only 0.005 mm at 1 mm diameter. For larger threads, for the some measuring force, the compression is less and can be ignored.
Formula for determining compression correction is

where E = measuring force in newtons ; and E = effective diameter in mm.
Problem 13.6.
Draw a table giving value of best size wire and effective diameter for various values of pitch for metric thread. Also give formulae for maximum and minimum size of wire for various threads.
Solution.
See table below :
Formulae: Effective diameter = Size over wires -K,otE = M-K where K = a constant = d (1 + cosec x/2) – p/2 cot x/2 where x/2 = Half of profile angle, and d = size of wire
The nearest available size of wire is used in determining the value of K and effective diameter in the table.
| Thread Profile | Pitch (p) in mm | Size of best wire | Value ofK |
| 0.3 | 0.170 | 0.250 | |
| 0.35 | 0.201 | 0.300 | |
| 0.4 | 0.232 | 0.350 | |
| Metric | 0.45 | 0.260 | 0.390 |
| Thread 60″ | 0.5 | 0.291 | 0.440 |
| 0.7 | 0.402 | 0.600 | |
| 0.8 | 0.461 | 0.690 | |
| 1.0 | 0.572 | 0.850 | |
| 1.25 | 0.724 | 1.090 |
| Thread Profile | Pitch (p) in mm | Size of best wire | Value ofK |
| 1.5 | 0.866 | 1.299 | |
| 2.0 | 1.157 | 1.739 | |
| 2.5 | 1.441 | 2.158 | |
| B.S.P. and B.S.W. 55° | 0.907 (28 TPI) | 0.572 | 0.940 |
| 1.337 (19 TPI) | 0.724 | 1.008 | |
| 1.814 (14 TPI) | 1.008 | 1.449 | |
| 2.309 (11 TPI) | 1.157 | 1.444 |
Size of best wire

The maximum and minimum size of wire for particular thread can be calculated by the expressions :
![]()
where r = crest and root radius, and h = height of truncation.
| Thread | Angle | Size over wire, M | Best wire | Min. wire dmin | Max. wire dmax |
| Whitworth | 55° | E + 3.1657 d-0.9604p | 0.5637p | 6p | 0.853p |
| Metric | 60° | E + 3d- 0.866p | 0.5773p | 0.505p | l.OlOp |
| B.A. | E + 3.4829d-1.1263p | 0.5462p | 0.498p | 0.730p |
Problem 13.7.
In measuring the thread angle of a standard metric thread the diameters measured over the wires ofO. 750 and 1.500 are 19.50 and 21.75 mm respectively. Find the angle of the thread and the possible error in the measurement if the diameters of the wire are certified to an accuracy of within 0.001 mm and each measurement over the wires is having a possible error of 0.01 mm.

Since r and c both have errors, differentiating partially the error in angle x, we have

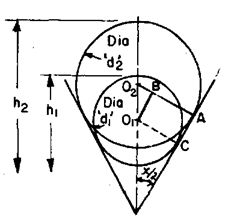
Fig. 13.35
Problem 13.8.
It is desired to measure the
(a) Effective diameter of a 32 x 3.5 mm pitch metric plug screw gauge. For this purpose, following readings (average values) were noted.
Micrometer reading over the standard cylinder of30.500 mm and the wires of2.000 mm diameter as 13.3768 mm.
Micrometer reading over the gauge and wires as 12.248.
(b) Calculate the effective diameter considering the rake and compression corrections, assuming a measuring force of 2.5 newtons.
Solution,
(a) Effective diameter = T + P where T = dimensions under the wires = S- (Ri – R2); S = diameter of standard = 30.500 mm Ri = reading over wires located above the cylinder = 13.3768 mm R2 = reading over wires located over the gauge = 12.2428 mm T = 30.500 – (13.3768 – 12.2428) = 29.3600 mm For metric threads P is a constant = 0.866p – d = 0.866 x 3.5 – 2 = 1.0312 mm .-. E = T + P = 29.3660 + 1.0312 = 30.3972 mm.
![]()
x/2 = half the included angle of thread = 30°, / = lead = pitch (single start thread), d = diameter of curve = 2.000 mm

Problem 13.9.
If in Problem 13.8, the pitch error is 0.006 mm and thread error angle on right hand and left hand flanks are 8 and 10 minutes of arc, then determine the virtual effective diameter.
Solution. Virtual effective diameter = E + 1.7228p + 0.0131 x (8/60 + 10/60)
= 30.3972 + 1.722 x 0.006 + 0.0131 x 18/60 = 30.3972 + 0.01033 + 0.0039 = 30.4214 mm.
