2.59.
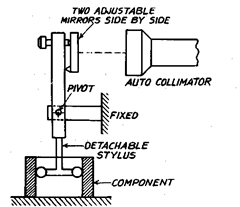
This method is shown diagrammatically in Fig. 2.155. A ball ended stylus, slightly smaller
than the hole to be measured, is set along a diameter of the component and swung into contact with
the surface of the hole first at one side and then at the other. The mirrors shown in Fig. 2.155 are

Fig. 2.155. Principle of small hole measurement
by autocollimator and pivoted stylus.

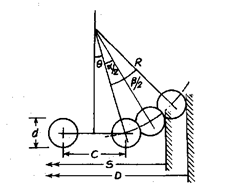
Fig. 2.156. Geometry of small hole measurement.
adjusted so that one of them gives a reflection into the autocollimator when the stylus is at one
extreme position and the other when the stylus is swung over its other position. The readings of
the autocollimator scale are compared with those obtained when a gap, built up with slip gauges
to a dimension about equal to the diameter of the hole, is substituted for the component. The
difference in angular tilt is then converted into difference in length by means of the formula below.
Referring to Fig. 2.156, where S is the gap formed by the slip gauges and D is the diameter of the
hole,

The value of 8 is found from the relation sin 8 = C/2R. This is then inserted in Eq. (2) above
to obtain the value of the angle a. The difference in angular movement of the stylus, determined
from the autocollimator readings, is the angle (p – a), which is then used in Eq. (3) to find the
dimension D.
If a single ball is at the end of the stylus, the angle 8 is zero and then
![]()
In Fig. 2.156, it has been assumed that the stylus is centrally disposed in relation to the
standard gap and to the hole being measured and this is a necessary condition for accuracy ; if it is
not observed there is a slight cosine error in the result obtained.
An investigation of the possible error in the diameter resulting from errors in the measure-
ments and with an instrument having a stylus with a single ball yields the following result.
![]()
If R = 50 mm ± 0.01 mm, a = 10° ± 0.01′ and 8 = 9° ± 0.1′
then the error is found to be approximately 0.003 mm. By using an autocollimator capable of giving
readings to a finer degree of accuracy, less error will occur, for the errors in angles a and (3 are the
main source of inaccuracy in the final result.
Measurement of Small Bore by a Pivoted Stylus and Autocollimator (Metrology)
Next post: Slip Gauges (Metrology)
Previous post: Digital Measurement Equipment (Metrology)
