ABSTRACT
This paper demonstrates the potential for using field applied structural coatings to reinforce traditional framing members and standard building ties, thereby providing an improved and continuous foundation to roof load pathway. Tension tests are performed on rafter top plate model joint connections, some of which were reinforced with a hurricane tie, to establish how much of a difference a polyurea coating made as the joints between the stud and top plate, and top plate and rafter, were loaded to failure.
Polyurea provides universal strengthening compared to hurricane ties with the added advantage that members and joints can be protected from a multitude of threats including corrosion due to moisture, damage due to flood; and, with self-extinguishing properties, fire. Results show that the failure mode of the structures tested can be controlled by using different types of field or factory applied polymer coatings.
The addition of the coating allowed both unreinforced and reinforced configurations to withstand higher loads (200-400% more). In general, the polyurea delayed the onset of failure and significantly strengthened every configuration by increasing the amount of work/energy required to pull it apart; in some cases, by almost 800%. INTRODUCTION
It is evident that significant problems exist in coastal buildings and there is a need for new water resistant building materials and techniques that can reinforce new and existing structures while providing safety for building occupants. FEMA technical notes and bulletins outline many of these problems including flood hazard information and recommendations for reconstruction practices [1], the structural needs for occupant safety and the criteria for designing hurricane and tornado safe rooms [2], material ratings for common building materials and evidence of the need for Class 5 water resistant materials [3], and recommendations for home construction in storm pathways [4].
In their Home Builder’s Guide to Costal Construction [4], FEMA also stresses the need for wall to sill plate reinforcement, foundation to shear wall reinforcement, and the development of continuous foundation to roof load pathways. They highlight problems with practices used to tie and strengthen framing members to the foundation or roof, framing member to framing member, etc.
The goals of this research were to develop new composite building materials and construction techniques involving coatings containing polyurea or polyurethane or hybrids thereof; and, test the effectiveness of using field applied polymer coatings to solve issues of roof joist to wall framing attachment and foundation-rim joist wall framing to produce a continuous foundation to roof load pathway and to supplement standard hurricane and construction ties.
POLYUREA
Polyurea is a high strength polymer with scalable and predictable material characteristics that can be sprayed onto a substrate to make it waterproof. The polymer has a variable gel time; tensile strengths in commercially available materials vary from 13.8 to 34.5 MPa (2000 to 5000 psi) with inversely related elongation rates. The polymer can be field applied with a brush, a high temperature pump applicator, or a low temperature low pressure dispenser.
Polyurea is currently used for truck bed liners and for explosive blast resistant walls. Thin interlayers of polyurea have been shown to increase blast resistance of carbon fiber foam composites [5]. Because polyurea strain hardens under load [6], the US Army uses polyurea to coat and harden field buildings against explosive blast; and, it is likely used to retrofit Government offices. Polyurea adheres well to concrete, metal and to wood. However, to our knowledge, prior to this investigation, polyurea had never been tested as a field applied structural adhesive for framing in combination with standard framing techniques.
TEST PROGRAM
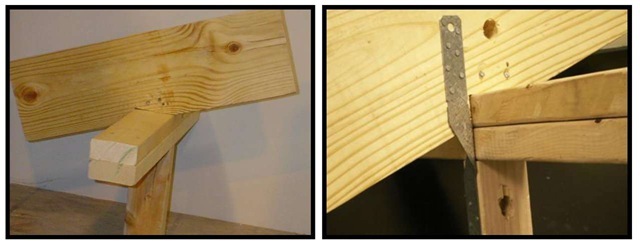
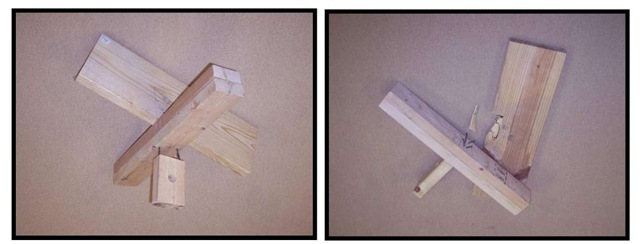
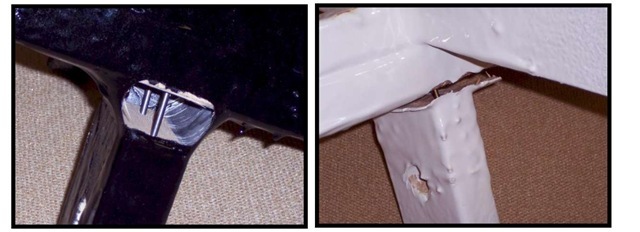
We selected a framing connection for testing and had a licensed carpenter make several rafter top plate model joint constructions (subsequently referred to as the "configuration") from Southern Pine. As illustrated in the photo shown to the left in Fig. 1, he nailed a vertical 2 by 4 stud to the bottom of a doubled top plate using two, 16d x 3.5" nails. Then, he toe nailed a 2 by 8 rafter having a bird’s mouth to the top plate using four, 16d x 3.5" long nails.
In some cases, the configuration was reinforced by using a Simpson LTS12 hurricane tie fastened between the stud and the rafter with 14 (fourteen) 4d x 1.5" nails (see the photo shown to the right in Fig. 1). We used fourteen 4d nails, as opposed to twelve 10d nails as recommended, to anchor the tie in order to avoid splitting the stud. For reference, according to the manufacturer, when properly installed, the LTS12 is designed to withstand a maximum allowable lift load of 3.2 kN (720 lb).
We applied loads in the vertical direction in an attempt to either pull the stud away from the top plate or fail the toe nail joint between the rafter and the top plate. During construction, no attempts were made to control the orientation and coarseness of the grain structure in the configurations and these varied widely for different structural members. In the rafter joint shown in the photo to the left in Fig. 1, for example, the gain runs in a direction perpendicular to the applied load, whereas the grain structure in the vertical stud runs parallel to it.
In selecting our mode of loading, we assumed that the rafter lifts directly upward from the vertical stud and top plate, thereby placing both joints in tension. By positioning the hurricane strap where we did, its outer surface is subjected to an additional tensile load due to eccentric loading.
As described below, we tested standard nailed configurations with and without the metal hurricane tie and used the results to define our control standards. While testing the configurations, we neglected the reinforcement effects caused by plywood sheathing that may be nailed to the top plate and the stud.
Fig. 1 A basic framing connection was constructed (left) and, in some case, reinforced with a hurricane tie (right)
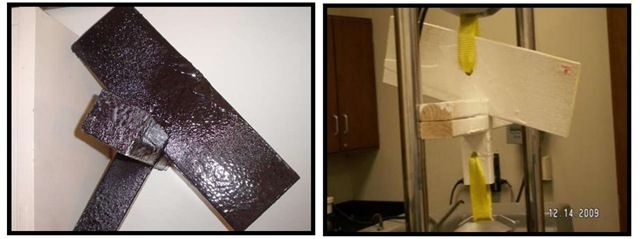
Then, as illustrated in the photos shown in Fig. 2, we sprayed polyurea on similar configurations continuously around the stud and up and around the top plate and rafter. For most retrofitting applications, the top plate to stud will not be available in the soffit. In this case, only the rafter to top plate can be easily coated.
Two different types of polyurea were employed: 1) a black version having a relatively large elongation and low elastic modulus and 2) a white version having a relatively low elongation and high elastic modulus. The tensile strengths of these products were about the same.
The thickness of the polyurea coatings varied throughout a configuration, and from configuration to configuration. An average value of the coating thickness was obtained for all of the coated configurations by making measurements: 1) across the thickness of the rafter at a point located midway between the centerline of the upper hole and the upper surface of the top plate, and 2) across the smaller dimension of the lower 2 x 4 at a point located midway between the centerline of the lower hole and the lower surface of the top plate. The average thicknesses for the black and white coatings were 2.0 mm (.078 in.) and 2.4 mm (.095 in.), respectively.
Fig. 2 Some configurations were coated with polyurea (black at left, white at right) prior to subjecting them to uniaxial tension (right)
As illustrated in the photo shown to the right in Fig. 2, the configurations were initially placed in uniaxial tension by passing Kevlar straps through two 2.34 cm (15/16 in.) diameter holes drilled in the 2 by 4 and rafter. Each hole was reinforced using a 3.8 cm (1.5 in.) long section of aluminum pipe. The 98 kN (22 kip) capacity MTS testing machine used to conduct the tests was equipped with a load cell; and, comparisons and observations were made between uncoated and coated specimens that were pulled in deflection controlled tests at a rate of 1.27 cm/min (0.5 in/min).
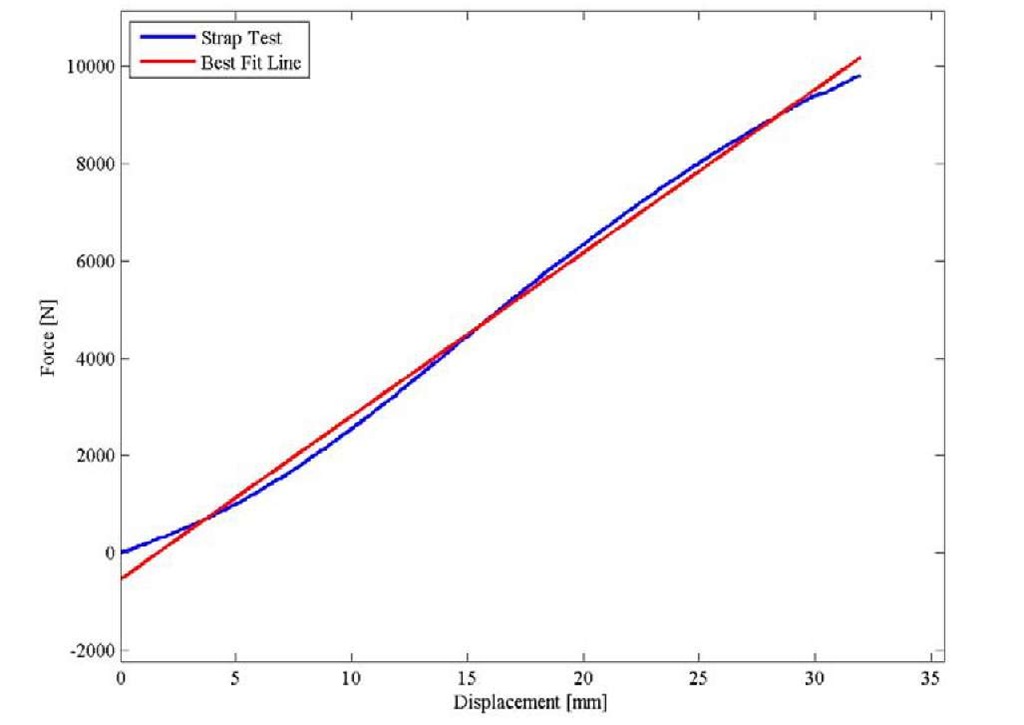
A net deflection for each configuration was calculated by subtracting the deflection in the pull straps from that measured for the crossheads. The deflection in the pull straps was computed based on Fig. 3 which shows a load deflection plot obtained by placing a 50 cm (19.5 in.) long segment of one of the pull straps in tension.
Fig. 3 Load versus deflection plot for a 50 cm (19.5 in.) long Kevlar pull strap
A calibration factor, C, of 6 ^e/N (26.8 ^e/lb) was obtained for the case when a 2.54 cm (1 in.) long segment of the strap wa s subjected to a 4.45 N (1 lb) load by fitting a linear curve through the data in Fig. 3 over the load range observed during our test program [0 to 9790 N (0 to 2200 lb)].
Referring to the configuration shown in the photo to the right in Fig. 2, each side of the upper and lower straps carries one half of the total load. Hence, the total deflection in the pull straps is:
where P is the load and L is the total length of all straps used to pull on the configuration [approximately 55.9 cm (22 in.)]. The strain energy, U, is equal in magnitude to the area under the load/deflection plot. For the configuration that we used:
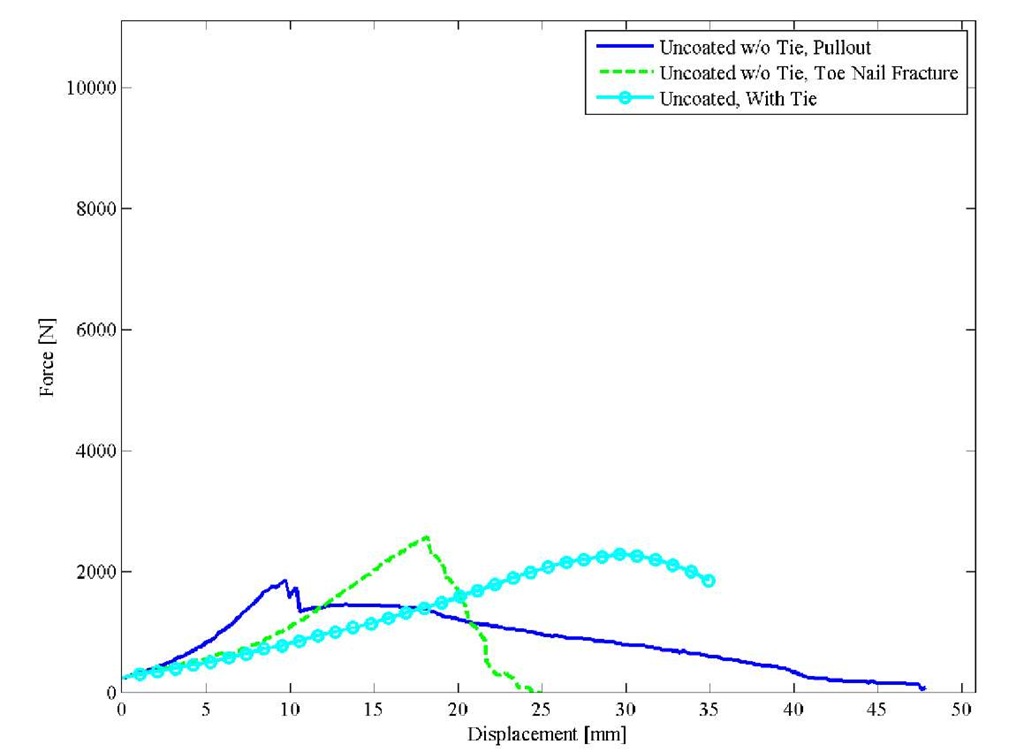
Figure 4 shows plots of load versus total deflection (of the configuration and the pull straps) corresponding to three uncoated specimens. Two of the configurations were unreinforced (w/o tie) while one was reinforced with a hurricane tie. Note that the scale on the vertical axis was kept constant in all of the plots presented in this section so that direct visual comparisons could be made.
Fig. 4 Load versus deflection plots for uncoated specimens See legend and Figs. 5 and 7 for details
One of the uncoated configurations without the tie failed gradually as the nails in the top plate pulled out of the stud (see the photo shown to the left in Fig. 5). This configuration held a maximum load equal to 1850 N (416 lb); and, we considered this our "standard" for 2 by 4 end nail failure; i.e., pull out between the stud and top plate in an unreinforced configuration.
In contrast, the other uncoated configuration without the tie represented our "best case" scenario. This configuration held a higher load [2562 N ((576 lb)] and failed relatively quickly as the toe nailed joint between the rafter and top plate fractured and gave way (see the photo shown to the right in Fig. 5). As explained later, we considered this as the "standard" for toe-nail rafter failure; i.e., failure of the toe nail joint between the top plate and rafter in an uncoated configuration. But, since nail pull out occurred in every other initial pull test except for this one; a forensic analysis was conducted to understand why.
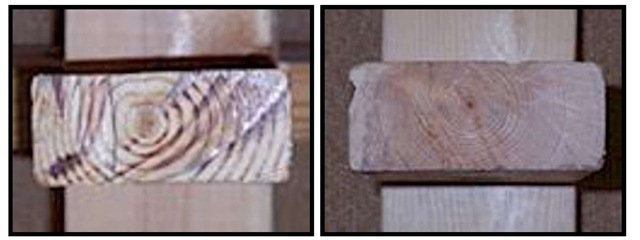
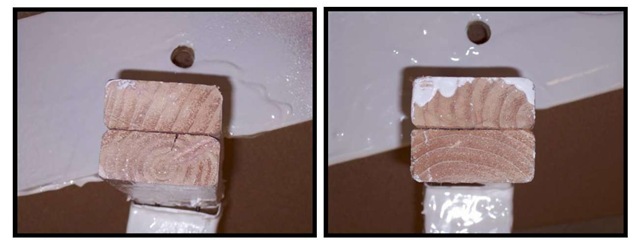
Inspection of the lower joints in each of the specimens shown in Fig. 5 revealed that all nails were driven vertically through the top plate into the stud. But Fig. 6 shows photographs taken of the grain structures in the studs for the configurations that experienced end nail failure (left) and toe-nail rafter failure (right). The ring patterns indicate that both studs were centrally cut; however, the one shown to the right had an unusually fine grain structure that resulted in toe-nail rafter failure as opposed to the end nail failure associated with the stud on the left.
As described later, we subsequently tested the joint in the configuration shown to the right by placing pull straps over the top plate and through the hole in the stud. The partial configuration held 2998 N (674 lb), substantially higher than the load applied to fail the toe nail joint.
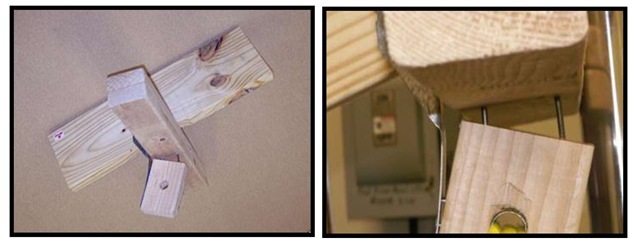
Referring again to Fig. 4, the third plot is typical of an uncoated configuration that was reinforced with a Simpson LTS12 hurricane tie. As illustrated in the photos shown in Fig. 7, failure occurred when the tie deformed as the nail farthest away from it pulled out of the stud. The specimen held a maximum load equal to 2277 N (512 lb) which we considered "standard" for pull out failure of an uncoated, reinforced configuration.
Fig. 5 The unreinforced configuration failed gradually as a result of 2 by 4 end nail failure (left) or, in one case, abruptly as a result of toe-nail rafter failure (right)
Fig. 6 When the grain structure in the stud was relatively fine (right), the joint was much stronger
Fig. 7 Failure of a reinforced configuration occurred when the nail farthest from the tie pulled out of the stud
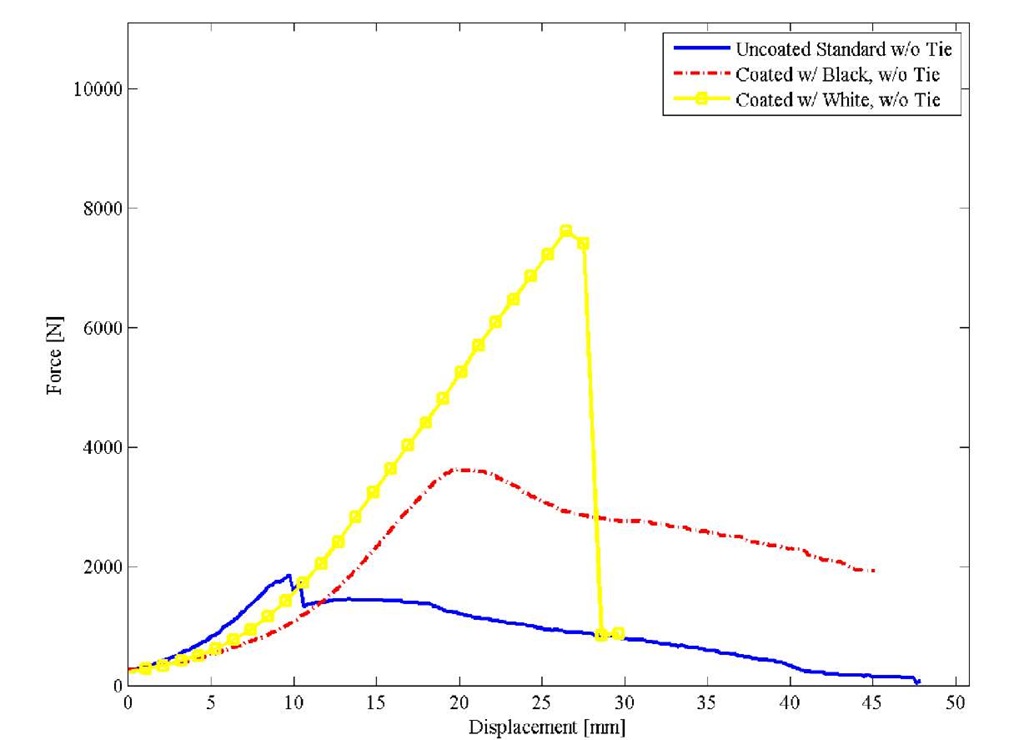
Figure 8 shows the load/deflection plots obtained for the unreinforced standard along with those for typical configurations coated with black and white polyurea.
The configuration that was coated with black polyurea held a maximum load of 3621 N (814 lb) and as seen from the plot, failed relatively slowly. As seen in the photo shown to the left in Fig. 9, wood fibers fractured in the top plate and the nails in the stud loosened and the coating stretched.
In contrast, the configuration coated with white polyurea held a maximum load of 7624 N (1714 lb) and as seen in the photo shown to the right in Fig. 9, abruptly failed when the wood fibers fractured in the top plate.
Although the white polyurea coating was on average slightly thicker than the black, the tensile strength of the black polyurea is slightly higher than that of the white. So, we attributed the superior performance of the white coating to the higher stiffness ratio between the polyurea and the wood and a better bond between the two.
The higher stiffness ratio associated with the white polyurea forces more stress into the coating, thereby stiffening the overall configuration relative to that coated with the black version. This is evident in Fig. 8, where the slope associated with the white version is higher than the slope associated with the black version.
The superior bonding associated with the white polyurea was attributed to greater penetration into the wood substrate. A comparison of the photos shown in Fig. 9 reveals that the fracture plane associated with the white polyurea is deep within the wood grain as opposed to the fracture plane associated with the black version which is very close to the surface.
Fig. 8 Load versus deflection plots for 2 by 4 end nail failure in the uncoated unreinforced standard and coated unreinforced configurations
Fig. 9 The coated unreinforced configurations experienced 2 by 4 end nail failure relatively slowly (left) and quickly (right) when wood fibers fractured in the top plate
An interesting observation was made during a forensic analysis of the coated unreinforced configurations. Figure 10, for example, shows the grain structure in the top plates of two different unreinforced configurations that were both coated with white polyurea. These configurations had very similar load/deflection plots but the configuration to the left held 7019 N (1578 lb) while the one to the right (described above and shown to the right in Fig. 9) held 7624 N (1714 lb). The difference is attributed to the orientation of the grain structure in the lower 2 by 4 that comprises the top plate. When the grain is oriented vertically (left) and placed in shear, the joint is relatively weak as compared to when the grain is oriented horizontally (right) and placed in tension.
Fig. 10 When the orientation of the grain in the lower member of the top plate was horizontal (right), the joint was stronger
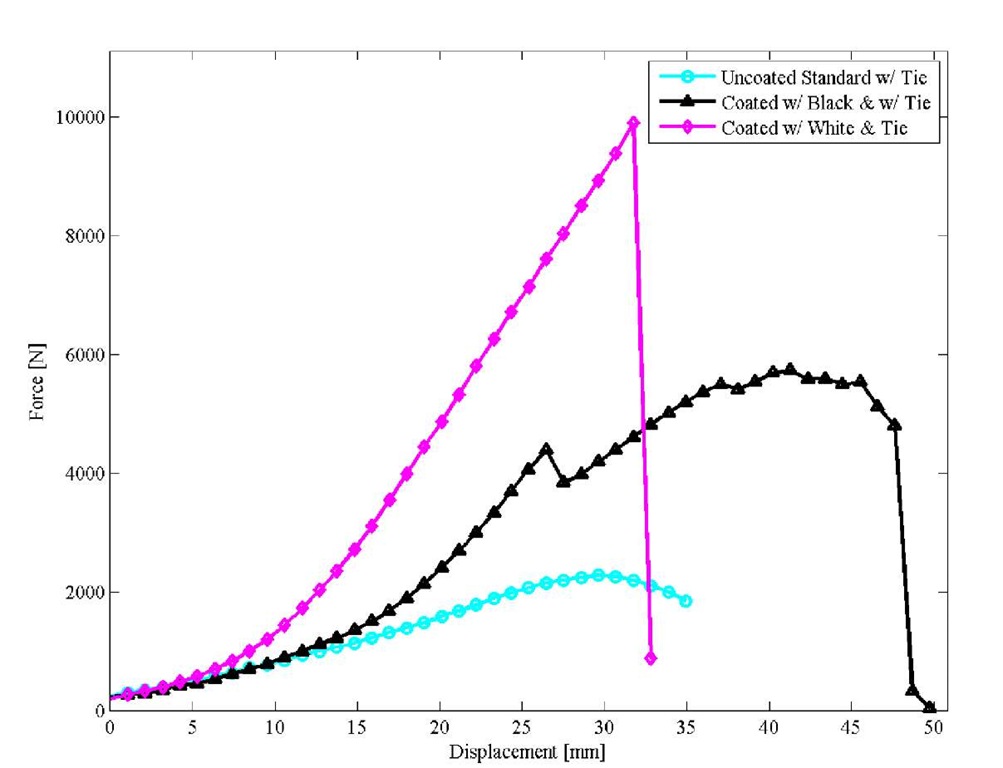
Figure 11 shows the load/deflection plot obtained for the reinforced standard along with those for typical configurations coated with black and white polyurea.
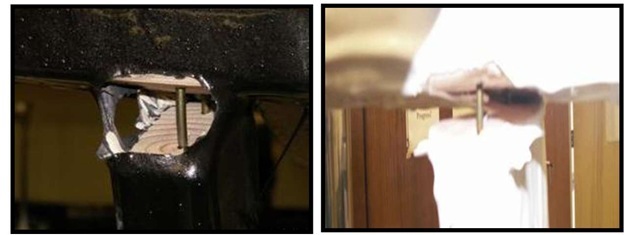
The configuration that was coated with black polyurea held a maximum load of 5738 N (1290 lb). As illustrated in the photo shown to the left in Fig. 12, the wood fibers, diametrically opposed to the hurricane tie and along the sides of the stud, fractured in the lower member of the top plate. Then while the coating stretched, the nails in the stud loosened.
In contrast, the sample coated with white polyurea held a maximum load of 9906 N (2226 lb). As illustrated in the photo shown to the right in Fig. 12, the configuration abruptly failed when the wood fibers, diametrically opposed to the hurricane tie and along the sides of the stud, fractured in the lower member of the top plate.
Fig. 11 Load versus deflection plots for 2 by 4 end nail failure in the uncoated reinforced standard and coated reinforced configurations
Fig. 12 The coated reinforced configurations failed relatively slowly (left) or quickly (right) when wood fibers fractured in the top plate
Referring again to Fig. 11, it is clear from the slopes of the plots that that coatings stiffen the configuration, the white much more so that the black. Although the white coated configuration holds more load, the black coated configuration is able to sustain more deformation.
The secondary peak observed at a deflection of about 2.54 cm (1 in.) in the curve associated with the black coated configuration was seen in every test conducted on configurations of this type. The peak may correspond to the fracture that takes place in the wood and, if so, could provide some insight into the relative bond strength associated with the two polyurea coatings. Assuming that the wood fibers fracture in the white coated configuration at failure, the bond strength associated with the white coating is more than twice that associated with the black.
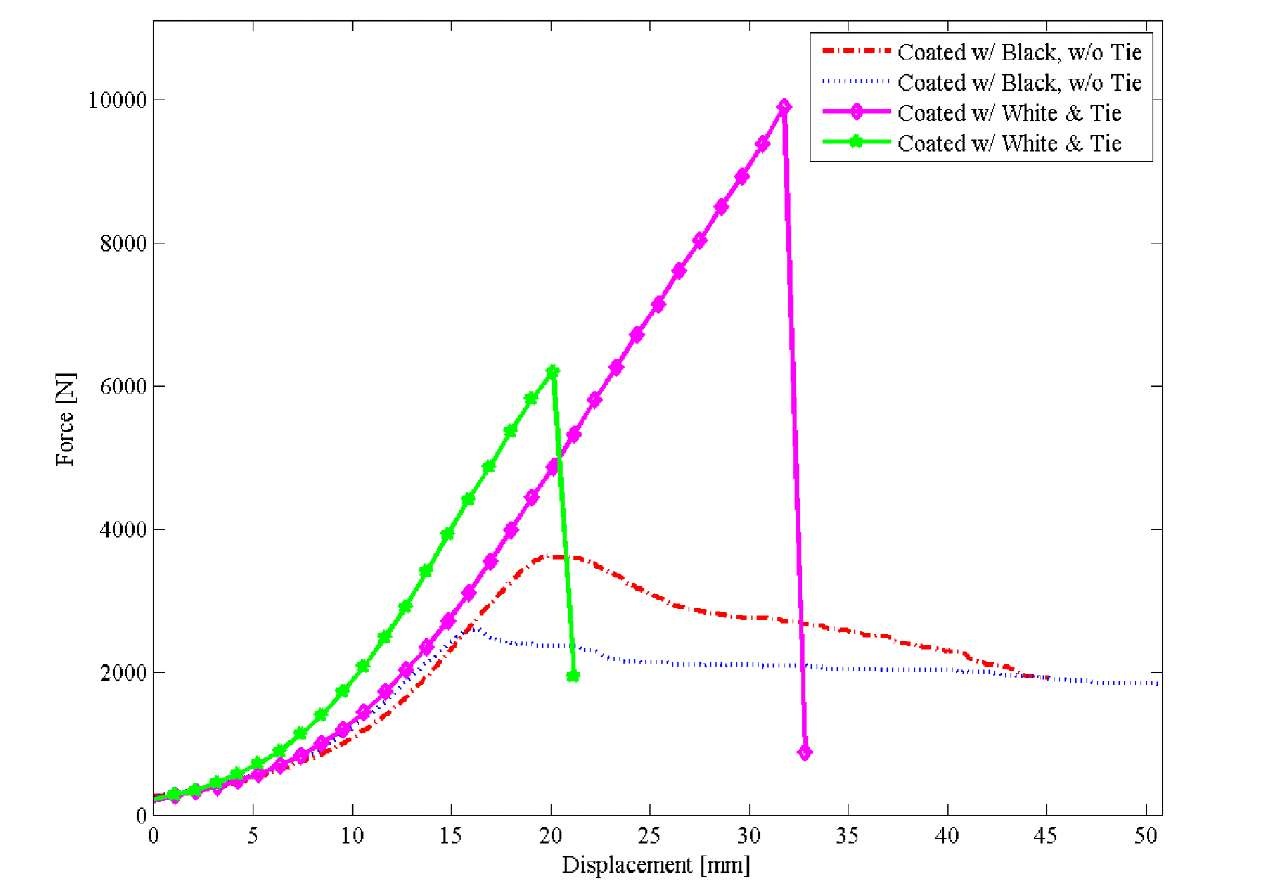
During the initial pull test program we had two coated configurations that held substantially lower loads than those reported above: 1) an unreinforced configuration coated with black polyurea and 2) a reinforced configuration coated with white polyurea. The load/deflection curves obtained for these cases are plotted in Fig. 13 along with those corresponding to their stronger counterparts.
Fig. 13 Load versus deflection plots for 2 by 4 end nail failure in similar specimens that withstood very different peak loads
