Exercise 3.3 Surfacing Glass
1. Make sure VIPER is opened and set off to the side of the Surface Editor so you can see your changes in real time. You can press F7 to open it.
With the Ball_1 surface still selected as the current surface in the Surface Editor, go down the list of options and set each one accordingly.
2. Make sure that the value of Luminosity (the option just underneath Surface Color) is 0.
Luminosity is great for objects that are self-illuminating, such as a lightbulb, candle flame, or laser beam. Note though that this does not make your surface cast light unless radiosity is applied, under the Global Illumination tab. This is in the Render Globals panel on the Render tab.
3. Set the value of Diffuse to roughly 60% to tell the glass surface to accept 60% of the light in the scene.
The Diffuse value tells your surface what amount of light to pick up from the scene. For example, if you set this value to 0, your surface would be completely black. Although you want the glass to be black, you also want it to have some sheen and reflections. A 0 Diffuse value renders a black hole—nothing appears at all.
4. Set the value of Specularity to 90%.
Specularity, in simple terms, is a shiny reflection of the light source. 0% is not shiny at all, whereas 100% is completely shiny.
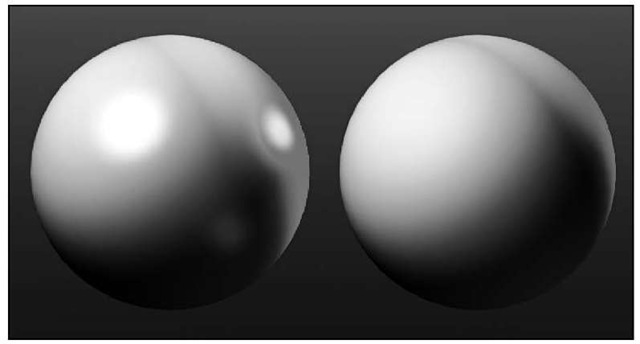
When you set Specularity, you almost always adjust the glossiness as well. Glossiness, which becomes available only when the Specularity setting is above 0%, is the value that sets the amount of the "hot spot" on your shiny (or not-so-shiny) surface. Think of glossiness as how much of a spread the hot spot has. The lower the value, the wider the spread. For example, Figure 3.29 shows two spheres, one with a low Specularity setting of 5% and Glossiness set to 15%. The result resembles a dull surface, like plastic.
On the other hand, the sphere to the right has a Specularity setting of 75% and Glossiness of 40%. The result looks closer to a shiny glass surface with reflections turned on. A higher Glossiness setting gives the impression of polished metal, or glass in this case. There will be a lot of surfacing ahead in this topic for you, such as glass, metal, human skin, and more.
5. Now, back to the surfacing your balls. Set the value of the Glossiness for the Ball_1 surface to 70%.
This gives you a good, working glass surface for now.
6. Set the value of Reflection for the Ball_1 surface to 40%.
Most glass and clear plastic surfaces generally reflect their surroundings. In this case, the balls are placed on a simple set composed of just a few polygons. Three basic spotlights illuminate the scene, along with one set light.
Figure 3.29 The sphere on the right has a low Specularity and a low Glossiness setting, which results in a surface that looks dull.The sphere on the left with a high Specularity and high Glossiness setting looks more like glass.
Note
It’s a good idea when setting reflections to make the Reflection value and the Diffuse value add up to roughly I00%.The current surface has Diffuse at 60% and Reflection at 30% for a total of 90%.This is not law, but just a guideline. If your Diffuse setting is 100% and you add a reflection of 40% or more, you’ll end up with an unnaturally bright surface.
7. To see the image underneath the glass ball surface, it needs to be transparent. Set Transparency to 90%. There’s one more option—Smoothing. You use this setting to smooth the surface.
Note
A shader is an algorithm that affects the surface properties of an object. It can change color, reflection, smoothing, reflectivity, and more. Shaders also can add special effects like procedural brick textures or fractal noise.The Smoothing setting employs a Phong shader. Developed by Bui Tuong-Phong in 1975, this shader works well on surfaces that emulate plastics, metals, and glass. Later when we get to the Node Editor, you’ll learn about LightWave v9′s other cool shaders.
8. Because the ball_1 surface is round, the Smoothing option is necessary. With objects that are more round, this will take away any visible facets in the geometry Turn Smoothing on and set the value to 30.
Note
Flatter surfaces are sometimes simply "too" smooth, and create odd renders. Reducing their smoothing thresholds can fix that.
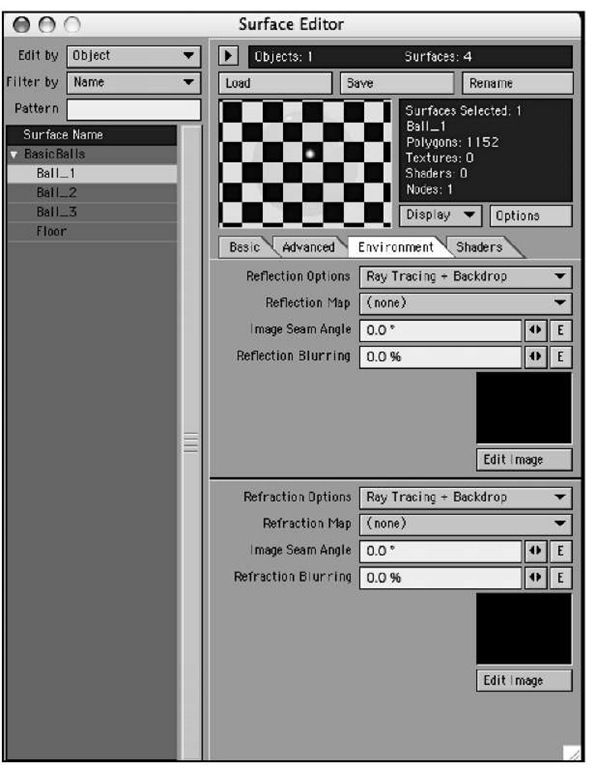
9. Click the Environment tab within the Surface Editor panel (Figure 3.30).
Figure 3.30 The Environment tab is where you set up reflection options in LightWave.
10. Make sure Reflection Options is set to Ray Tracing + Backdrop, if it’s not already.
This tells the surface to reflect what’s around it (in this case, an essentially bare set). If other objects were in the scene, they would be reflected too.
Because LightWave can calculate reflections, setting a reflecting image can often help create a more realistic surface. You’ll do this for the metal ball surface (Ball_2). Glass, on the other hand, should reflect its surroundings, so Ray Tracing is used.
For LightWave to be able to calculate and draw the reflections for the glass surface, you need to tell the render engine that you want it to calculate reflections.
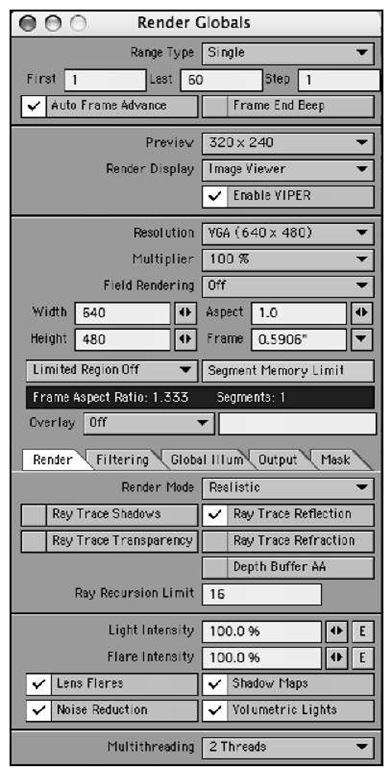
11. In Layout, click the Render menu tab at the top. On the left side of the interface, click the Render Globals button to open the panel. Make sure Ray Traced Reflections is checked on the Render tab, as in Figure 3.31.
Figure 3.31 For Ray Trace Reflections to work for a surface, you must tell LightWave’s renderer to calculate them.
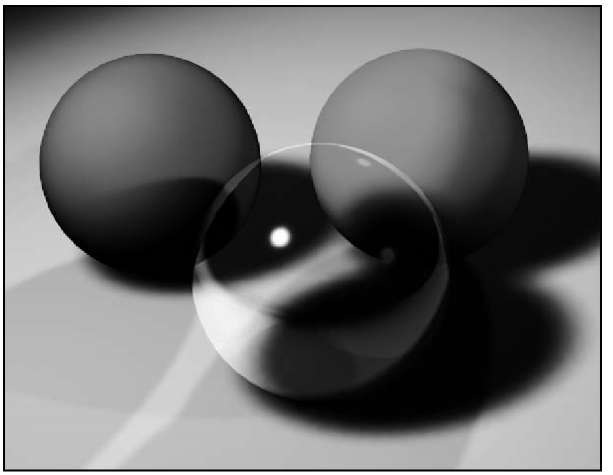
12. After you have this turned on, press F9 for a single frame render. While you’re in the Render Options panel, make sure Render Display is set to Image Viewer to see a pop-up of your rendered image. Figure 3.32 shows the render.
What’s that? It looks like a bubble? Not really glass? Figure 3.32 shows the render with the surface changes to the Ball_1 surface, but for some reason, it’s not quite right.
Figure 3.32 The Ball_I surface is sort of looking like glass, but not quite.There’s a problem with the surface!
If you look carefully, you can see right through the glass ball. You can see the hot spots from the specularity and glossiness, and even though you have a transparent surface set for the glass, it is still casting a shadow. There’s one more thing to set to make this look more like glass.
13. Make sure the Ball_1 surface is still selected in the Surface Editor, and back on the Basic tab, set Refraction to 1.33. This tells the rays of light to bend, or distort, as they pass through the transparent surface. 1.33 is a general value often used for glass.
14. On the Render tab, back in the Render Globals panel, make sure that the Ray Trace Refraction option is selected. Press F9 again to render the current frame. The result is shown in Figure 3.33.
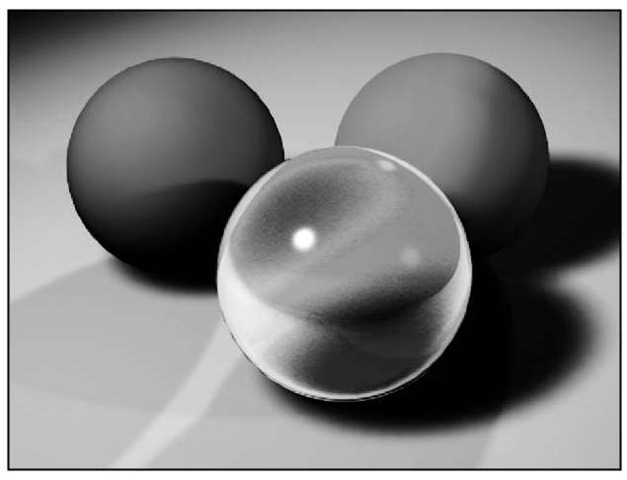
Figure 3.33 For glass to look like glass, light needs to refract.With ray traced refraction turned on in the Render Globals panel, and a refraction level of 1.33 set in the Surface Editor, the Ball_1 surface looks like a glass ball. Can you see your future?
15. Choose Save All Objects from the Save submenu in the File drop-down. This saves the surfaces you’ve just set. Then, choose Save Scene from the same Save submenu to save the lighting, ray trace settings, and so forth. Now it’s time for the metal!
Creating Metallic Surfaces
With any object you create, even a few balls, you might think it would be difficult to match the real-world properties of metal. Believe it or not, this is easy to do within LightWave v9. The right amount of color, specularity, glossiness, and reflection helps create the visual effect. You’ve created the transparent glass surface, so how about something completely different? In this particular instance, a metal surface could work very well. This same metal can be applied to almost any metallic surfaces you create—from logos, to machines, to fas-teners—with only minor variations. This section takes you through the steps required to create a metal surface.
Exercise 3.4 Creating a Metallic Surface
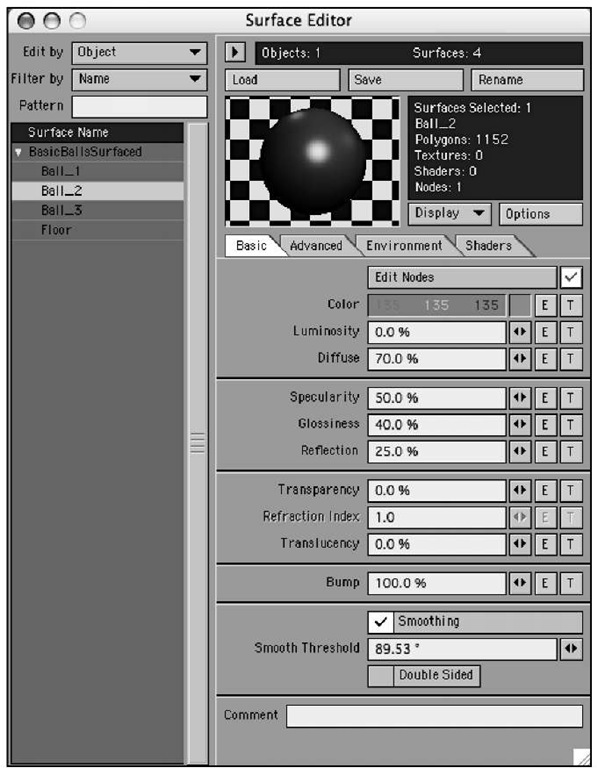
1. In the Surface Editor, select the Ball_2 surface. Set the color to a soft gray to simulate a silver metallic surface. Try setting all three RGB values to 180.
2. Set Diffuse to 70%, Specularity to 50%, and Glossiness to 40%.
3. A reflection is needed, so set Reflection to 25%.
At this point, the surface doesn’t look much different than when you loaded it other than a color change. Remember that other factors, such as surroundings and lighting, play a role in surfacing but you still need to apply the reflection environment. Figure 3.34 shows the surface settings.
Figure 3.34 Metal surfaces begin with basic color properties and a low gloss setting.
4. With the Ball_2 surface still selected, click the Environment tab to the right of the Basic tab.
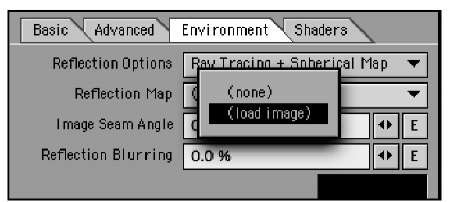
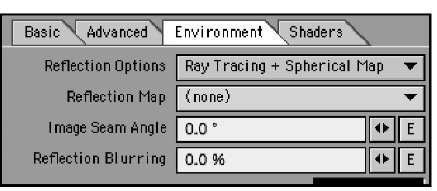
5. Set Reflection Options to Ray Tracing + Spherical Map, as in Figure 3.35. This tells the surface to reflect not only what’s around it but an image as well.
6. For the Reflection Map option, click the drop-down and select Load Image.
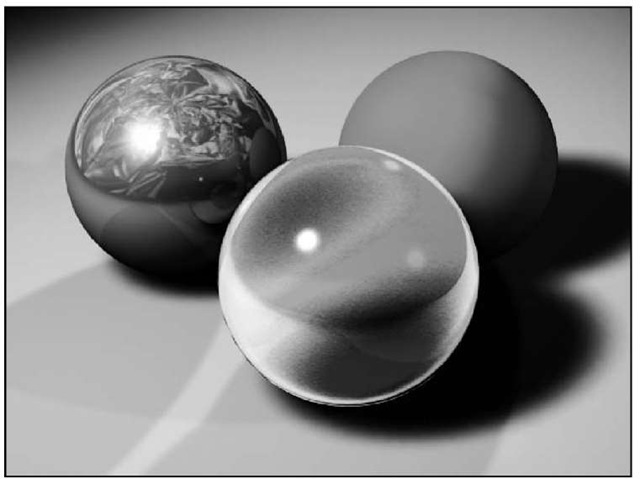
7. Guess what? That’s about it for this surface! Press F9 to see how it looks. Figure 3.37 shows the new surface applied to the backing.
Figure 3.35 The Ray Tracing + Spherical Map setting is a great way to make realistic metallic surfaces.
Figure 3.36 You can load an image directly from the Reflection Options in the Environment tab.
It’s subtle, but effective. Now, you’ll copy this surface to another surface.
Figure 3.37 Adding ray-traced reflections and a reflection image to a gray surface helps sell a metallic look for the area under the glass.
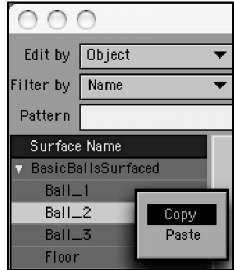
Figure 3.38
Right-clicking on a surface name in the surface list enables you to quickly copy all its settings.
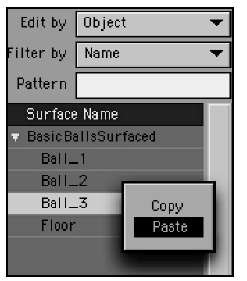
Figure 3.39
Right-clicking on a surface name in the surface list enables you to quickly paste what you’ve just copied.
8. Click back to the Basic tab, right-click on the Ball_2 surface (Mac people, Ctrl-click!), and select Copy, as in Figure 3.38.
You can also open the Presets from the Window drop-down in Layout and then double-click the preview display window in the Surface Editor to save this preset surface.
9. As you might have guessed, you can now select another surface and paste what you’ve copied. Select the Ball_3 surface, right-click again (Mac people, you know what to do!), and paste the copied surface. Figure 3.39 shows the operation.
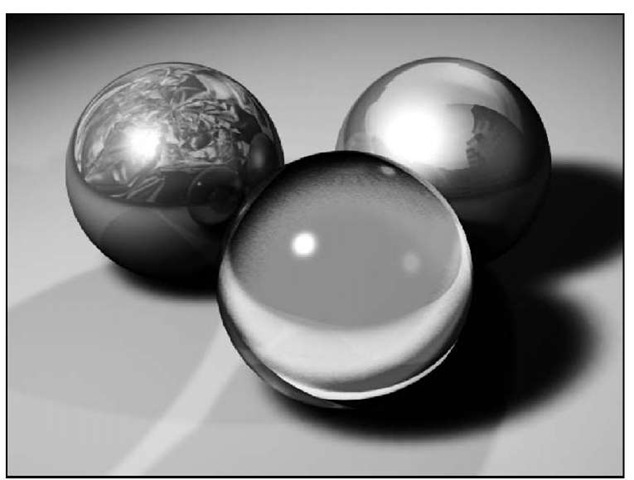
10. Feel free to vary the color and reflection amount on the Ball_3 surface. By copying and pasting the surface from Ball_2, you’ve saved yourself a lot of work and helped keep the surface values consistent. Note that you do not have to right-click and copy the surfaces each time you want to paste them. Copy once, paste many! Just remember that if you accidentally copy something else, you need to go back and copy the desired surface again. Figure 3.40 shows the render with the new surfaces applied, using a different color and different reflection image.
Figure 3.40 You can paste the metallic surface to other surfaces to quickly copy settings.
Note
While holding the Shift key on your keyboard, you can select the first surface in the Surface Name list, then select the last surface in the list and you’ll select all of the sur-faces.You can then change surface properties for all of them at the same time.
From this point, you can work with any other object surfaces you like, and apply similar metals, glass, or your own combination of both. You can even select all but the glass surface and change the basic gray color to a yellow-orange. Render again, and you’ve now made gold. All the other surface settings still apply.
A few final thoughts on surfacing with reflections: Many factors come into play, such as the glancing angle of the camera, light, and shadows. The angle of the camera in the previous steps could have been moved to reveal more of the reflection. You can also try changing the metal reflections to just a spherical map in the Environment tab, rather than using the Ray Tracing + Spherical Map setting. This tells the surface to reflect only the image.
Note
Remember that simply saving a LightWave scene file does not save your surfaces.You must save your object in addition to saving your scene if you want to keep the surfaces applied.
You’ll often come across situations where you need to use the same surface settings on multiple surfaces, such as in the previous exercise. With so many variables being set within the Surface Editor, keeping track of identical surfaces could be a problem. Not to mention, you might want a quick reference to the changes you’ve made to the current surface. This is where the Preset Shelf comes in.
