Selecting Existing Surfaces
Take control of your surfaces, and you’ll have a better time navigating through the Surface Editor panel. You have three modes to assist you in quickly selecting the surface or surfaces you want:
• Edit By
• Filter By
• Pattern
The Edit By drop-down, found at the top-left corner of the Surface Editor panel, has two options: Object and Scene. Here, you tell the Surface Editor to control your surfaces within just that, an object or the scene. For example, say you have 20 buildings in a fantastic-looking skyscraper scene, and eight of those buildings have the same surface on their faces. Using Edit By Object, adjusting that surface’s characteristics would mean applying surface settings eight times; with Edit By Scene, changes to surface settings apply globally to all objects that contain that surface.
You should always be aware of the Edit By mode when you’re tweaking surfaces. (LightWave remembers the Edit By setting when it saves models and scenes, so check each time you start the program to make sure you’re in the mode you think you’re in.) Applying and saving scene-wide changes when you only mean to change one object can have grim consequences. To avoid this, always make each surface name unique, and name your surfaces accordingly when building objects. For example, let’s say you created a slick interior for an architectural render. In it, there are lots of white marble surfaces. (Why? Who knows, but that’s what the client wanted.) Anyway, to properly isolate and organize those surfaces, you should name the different surfaces so they are unique to the geometry but familiar to you. You could choose something like "interior_marble_stairs" then "interior_marble_columns," and so on. This way, there is no confusion when using the Surface Editor. In addition, creating and naming surfaces properly in Modeler makes surfacing easier, and you end up using the Edit By feature as an organizational tool, not as a search engine.
Note
As a reminder, any surface settings you apply to objects are saved with those objects. Remember to select Save All Objects as well as Save Scene. Objects retain surfaces, image maps, color, and so on. Scenes retain motion, items, lighting, and so on. Both objects and scenes should always be saved before you render. This is a good habit to get into!
At the top-left corner of the Surface Editor panel, you’ll see a Filter By listing. Here, you can choose to sort your surface list by Name, Texture, Shader, or Preview. Most often, you’ll select your surfaces by using the Name filter. However, say you have 100 surfaces, and out of those 100, only 2 have texture maps. Instead of sifting through a long list of surfaces, you can quickly select Filter By and choose Texture from the drop-down list. This displays only the surfaces that have textures applied. You also can select and display surfaces that use a Shader, or you can use Preview. Preview is useful when working with VIPER because it lists only the surfaces visible in the render buffer image.
Note
You won’t have access to the Edit By, Filter By, and Pattern sorting commands with a collapsed Surface Name list. Expand the list to access these controls.
Just beneath the Filter By setting, you have a field available to type in a pattern name. The Pattern field enables you to limit your surface list by a specific name, and it works in conjunction with Filter By. Think of this as an "include" filter. Only surface names that "include" the pattern will show up in the Surface Name list. For example, suppose you created a scene with 200 different surfaces, and 6 of their names include "carpet." Type carp into the Pattern field and your list will narrow to surfaces whose names contain that letter sequence—the six carpet surfaces, and possibly others related to carports, escarpments, carp (the fish), and so on. Continue typing the full word carpet and your list will probably narrow to just the six surfaces you seek. Handy feature, isn’t it? Just remember that if you don’t see your surface names, check to see whether you’ve left a word or phrase in the filter area.
Working with Surfaces
After you decide which surface to work with and select it from the Surface Name list, LightWave provides you with four commands at the top of the Surface Editor panel that are fairly common to software programs: Load, Save, Rename, and Display.
The first command, Load, does what its name implies. It loads surfaces. You can use it to load a premade surface for modification or application to a new surface.
The second command, Save, tells the Surface Editor to save a file with all the settings you’ve specified. This includes all color settings, texture maps, image maps, and so on. The ability to save surfaces lets you build an archive of useful surfaces you can use again and again.
Note
Storing surfaces in LightWave’s Preset Shelf, which organizes samples in a visual browser, is often more useful than using the Surface Editor Save command. We discuss the Preset Shelf in detail later in this topic.
With the third command, Rename, you can rename any of your surfaces—a habit you should get into from the start in your work with 3D surfaces. If you apply preset surface settings called "rusty_steel" to part of a Jeep model, for instance, you might rename that surface "jeep_rusty steel" to keep things orderly. With a few objects, surface names that really don’t mean anything are fine. You could name a rusty surface "Lobesha" and you’d still be able to work without skipping a beat. But as your scenes grow, so do your objects and surfaces. This is why properly identifying surfaces is a good habit to practice right from the start. If you find that a surface name created in Modeler is not exact, you can use the Rename option to clarify or to give a more specific name to a surface.
The fourth command, Display, and its companion Options button determine what you see in the Display window at the top of the Surface Editor panel (the one that contains the sphere in Figure 3.8). As you assign and adjust surface attributes in the Surface Editor, you’ll see them applied to that sphere, so you can gauge your progress without having to render your scene or model.
Figure 3.8
Use the Display window within the Surface Editor to preview the results of your surface-attribute settings.
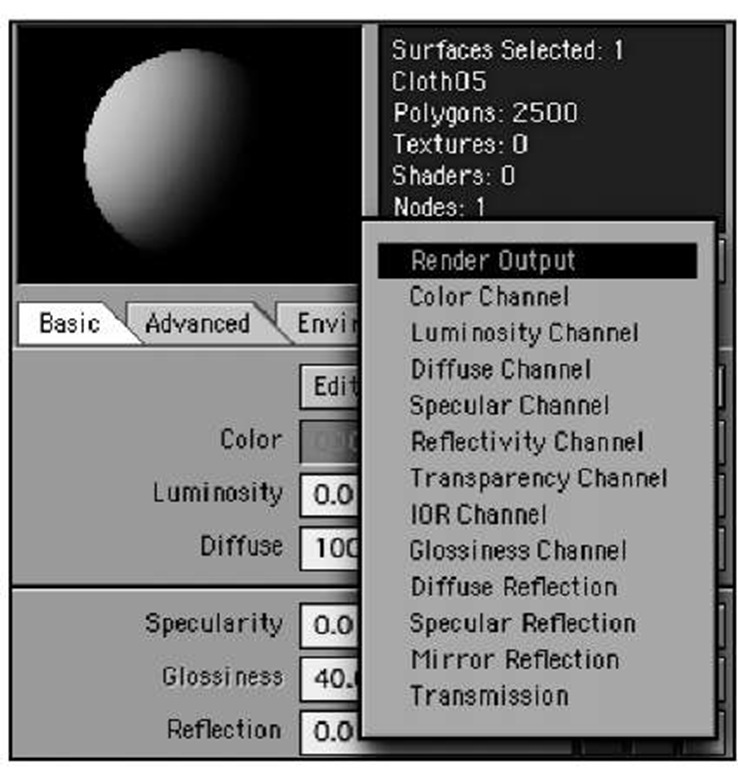
By default, the preview window (Figure 3.9) shows how your surface will look with all your surface settings applied collectively. You can use the Display drop-down to switch from this mode (which is called Render Output) to preview the effects of each attribute setting in isolation.
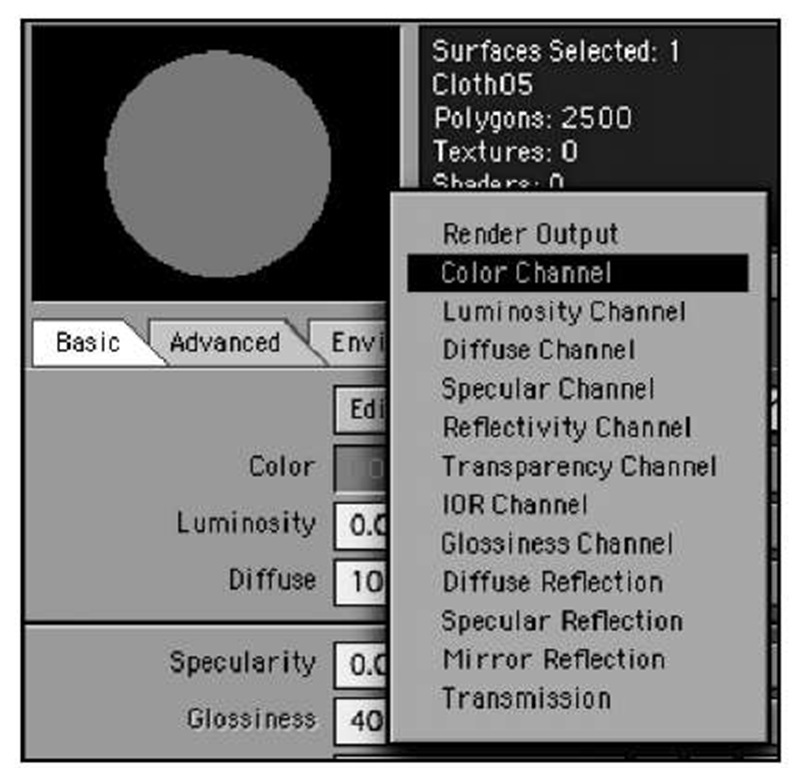
When you need to focus only on color, for instance, choose Color Channel from the Display drop-down (Figure 3.10) and you’ll see only the color component of the surface, rather than a complex surface with specularity, bumps, and more.
You can change this display to any surface aspect you want to concentrate on, such as the transparency of the surface, glossiness, or reflection. If you are using a procedural texture for luminosity, for example, you might want to display just the Luminosity Channel. The choice is up to you. Most commonly, this value can stay at Render Output, but you have the control if you need it.
Figure 3.9 The Display drop-down list’s default option, Render Output, shows the collective results of all surface-attribute settings in the preview window.
Figure 3.10 The same surface in the Display window with the Color Channel selected. Notice that the bump texture and specularity do not display as in Figure 3.9.
Note
Except for Render Output and Color, all the channels are grayscale, with pure white representing 100 percent of that surface attribute and black being 0 percent.
Click the Options button to the right of the Display drop-down to display a panel that lets you use a cube instead of a sphere as the preview object. The Options button also allows you to change the preview window’s background and lighting effects.
The Preset Shelf
Building surfaces is fun, no doubt, but seeing results right away can be even better. The LightWave v9 Preset Shelf, a visual browser for surfaces, comes loaded with hundreds of prebuilt surfaces you can apply instantly to your models. (It also holds other types of preset attributes, such as camera handlers and environment handlers, along with surfaces).
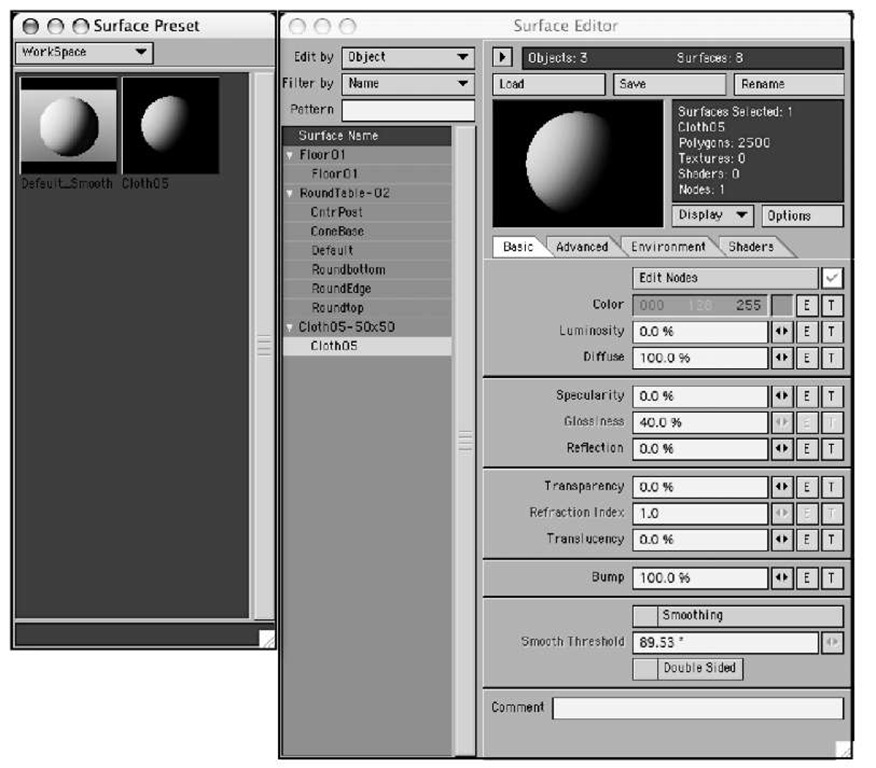
To sample the prebuilt surfaces in the Preset Shelf, make sure the Surface Editor panel is open and choose Presets from the Windows drop-down, or just press F8. In the Surface Preset window that appears (Figure 3.11), click the Library drop-down (labeled WorkSpace, the default name for a new empty library) and choose any of the listed surface libraries.
Figure 3.11 The Surface Preset panel is home to hundreds of readymade surfaces, as well as any you decide to add..
To copy a surface setting from the Surface Preset panel to another selected surface, first select the new surface name in the Surface Editor panel and then double-click in the preset surface in the Surface Preset panel. Also, double-click in the preview window to use the Save Surface Preset function. Be sure to have the Preset window open to see the saved surface. Double-click that surface preset to load it to a new surface. Similarly, you can right-click on the preview window for additional options such as Save Surface Preset. To save a surface to the Preset Shelf, double-click the Display window in the Surface Editor, and the currently selected surface will be added to the library.
Note
OK, if you’ve opened the Preset Shelf and don’t see anything, make sure the Surface Editor panel is open. If it is,you may have moved LightWave’s Presets folder, which belongs inside a folder named programs, in your main LightWave application folder.
If you right-click in the Surface Preset panel, you can create new libraries for organizing your surface settings. You also can copy, move, and change the parameters.
Setting Up Surfaces
The main functions you use to set up and apply surfaces in the Surface Editor occupy four tabs: Basic, Advanced, Environment, and Shaders (Figure 3.12). Each controls specific aspects of a selected surface. This topic introduces you to the most commonly used tabs, Basic and Environment.
Figure 3.12 Surface Editor controls are organized in four tabs.
Basic Tab
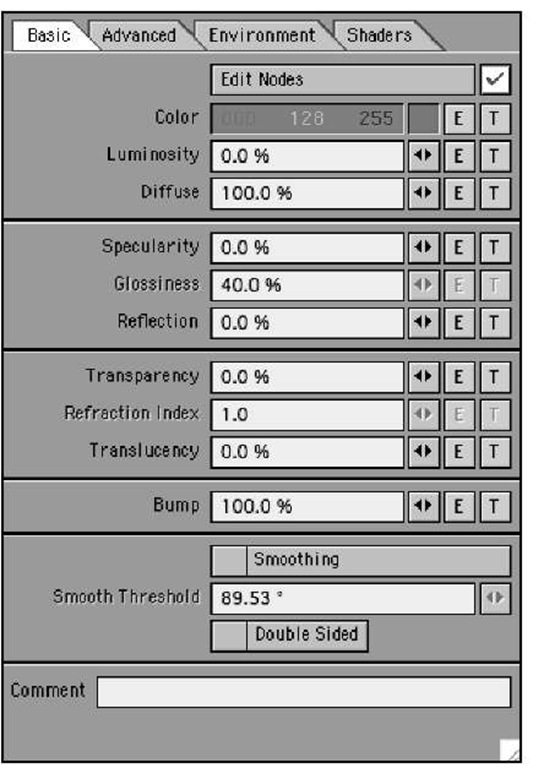
Aptly named, the Basic tab is home to all your basic surfacing needs. It’s here that you start most surfacing projects (Figure 3.13).
Within the Basic tab, you’ll find the following controls arranged from top to bottom:
• Edit Nodes. This new feature in LightWave v9 allows you to control surfaces in an entirely new way. You would click this button and use it instead of the basic Surface Editor. This feature will be introduced shortly, and you’ll see it used later in the topic as well.
• Color. Here, you can set the color of the selected surface by entering values from 0 to 255 for each of three RGB (red-green-blue) or HSV (hue-saturation-value) color channels. Right-click in the number field to toggle RGB and HSV modes. Click and hold your mouse button on a channel’s numerical setting and slide the mouse right to increase the value or left to reduce it. Or just click the swatch to the right of the numerical field to open the standard color picker for your operating system.
Figure 3.13 The Basic tab in the Surface Editor is home to the most commonly used surface settings.
To the right of the Color control, as well as the remaining controls in the Basic tab, you’ll find buttons marked E and T. Recall that E stands for Envelope—a function that enables a given surface-attribute value to vary over time. T stands for Texture, a function that lets you vary an attribute’s setting spatially, over the area of the surface. We’ll cover envelopes and textures later in the topic. The rest of the controls in the Basic tab all work the same way. Each contains a number field you can click and type into in order to enter a setting. To the right of each number field is a LightWave adjuster called a mini-slider. To use one, click on it, and holding down the mouse button, move your mouse left or right to change the setting value. The range of each mini-slider generally covers the observed values for that attribute in natural materials. Many controls let you type in values outside those naturally occurring ranges to achieve special effects.
• Luminosity. This controls the brightness, or self-illumination, of a surface.
• Diffuse. This is the amount of light the surface receives from the scene. You’ll learn more about this shortly.
• Specularity. This value specifies the amount of shine on a surface. High specularity settings are appropriate for surfaces such as glass, water, and polished metal.
• Glossiness. Often confused with specularity, glossiness determines how shine spreads on a surface. A surface with high glossiness exhibits tight highlights or "hot spots"; this option is dimmed if specularity is 0.
• Reflection. If you want a surface to reflect light, you specify how much with this control; a mirror would have a high reflection setting. When you want to control what’s reflected in a reflective surface, you’ll use the Environment tab.
• Transparency. This controls the degree to which you can see through a surface.
• Refraction Index. This value controls the amount that light bends as it passes through a transparent surface. Material with an index of 1 doesn’t bend light at all; the index for glass is about 1.5, and for water, about 1.3. This control is dimmed on surfaces with zero transparency.
• Translucency. This value specifies the degree to which light can pass through a surface from behind, as it might a thin leaf or piece of paper.
• Bump. This controls a function that makes surfaces look irregular. It gives an illusion of surface bumpiness, but doesn’t actually cause any elevation or depression of the surface geometry. The default setting is 100%.
• Smoothing. This shading routine, which is activated by default, makes surfaces consisting of polygons appear smooth. Uncheck the box to turn it off.
• Smoothing Smooth Threshold. When smoothing is turned on, this specifies the sharpest angle between polygons that LightWave should try to smooth out. Generally, the default of 89.5° is too high. A typical beveled surface on a logo should have a threshold of about 30°.
• Double Sided. Check the box next to this option if you want selected polygons to exhibit surface attributes on both their front and back sides. Ideally, you don’t want to use this unless you have to. All models created in LightWave Modeler have their surfaces facing in one direction. This option fakes it and forces the surface to face the opposite way as well.
• Comment. Use this field to enter notes on your surface as reminders or to include more detailed descriptions. This is a great feature when you’re sending objects to colleagues and clients.
