Some of the coolest 3D animation you see is work you don’t even notice. That’s right, animators and compositors spend months in front of computers creating visual effects that you aren’t aware of. For example, in the movie Hart’s War starring Bruce Willis, animators used LightWave to add snow outside a moving train. If you saw the movie, you wouldn’t even think twice that the snow wasn’t real. Or how about the movie A Beautiful Mind starring Russell Crowe? There’s a scene where a little girl is running around a park, surrounded by pigeons. If you’ve ever run toward a pigeon, you’d know that as soon as you get close enough, it flies away. But in A Beautiful Mind, director Ron Howard needed the girl to be a figment of the main character’s imagination. Because she’s not real, the birds do not notice her and don’t fly away. This too was done in 3D. However, achieving this movie magic took more than modeling, texturing, and animation; it all comes down to compositing.
If you took a movie of a street and then brought it into LightWave, you could easily place a 3D object, such as a car, into the shot. After you’ve taken your shots with your camera and set up your 3D objects, you need to composite them to match the scene—to look as if they’re integrated into the footage. This, my friends, is an art all its own. Do it correctly, and no one will notice your work. That is the mark of a good composite—it’s seamless! Read on to learn more about compositing in LightWave.
When we talk about compositing, we’re talking about seamlessly blending 3D computer-generated images either with other 3D computer-generated images or with 2D images, such as photographs of real settings or people. Most of the visual effects created for film and video consist of 3D animation and digital effects composited over or, more accurately, into live-action footage. The live action can include photography, video, and film, as well as AVI or QuickTime movies. Using compositing, you can make it seem as though a 3D object is there when it actually isn’t.
An important aspect of compositing with LightWave is that it enables you to expand your creativity, especially if your system is not as fast as you’d like it to be. Compositing in this sense enables you to blend multiple images together. Of course, before you can complete a composite in LightWave, you’ll need to render! Later in this topic, you’ll learn about the steps needed to render your composite animations for many types of applications.Production houses often have entire departments devoted to the task and thousands of dollars invested in the software. From the optically composited spaceships of Star Wars (the first three original films) to the digital, computer-generated people of The Matrix trilogy, compositing has come a long way. Over the years, compositing technology has evolved from purely optical techniques, such as matte paintings and frame-by-frame painting, to completely digital methods, but compositing will always be an important part of animation and visual effects. It is its own unique art and takes a lot of skill. That is the core of success for most Hollywood production studios.
Indeed, the enormous importance of compositing has led to the development of many high-powered, complex, and expensive programs dedicated to the task. But LightWave comes with its own, rather extensive set of tools, both for compositing within the program and for exporting images to be composited in other software packages.
Compositing Basics: Background and Foreground Images
Compositing can be an extraordinarily complicated process, combining hundreds of separate 2D and 3D elements into one final image. However, many times, it’s just as simple as placing a 3D object against a background image. A background image, or background plate, as it is commonly called, is a 2D image. It is usually a digitized photograph or sequence of film, though not necessarily; sometimes, other rendered 3D footage is used as the back- ground image. A 3D object is placed against the background image to make it appear as though the 3D object was always a part of the background. An example of this is the creatures in Jurassic Park III. Real settings were filmed with a regular camera, the footage was digitized, and then the 3D dinosaurs were composited into the footage to make them appear to be part of the picture.
Of course, compositing can be more complex than the preceding simple example. Regardless of how complex the composite, it all begins with the background, be it a still image or moving video.
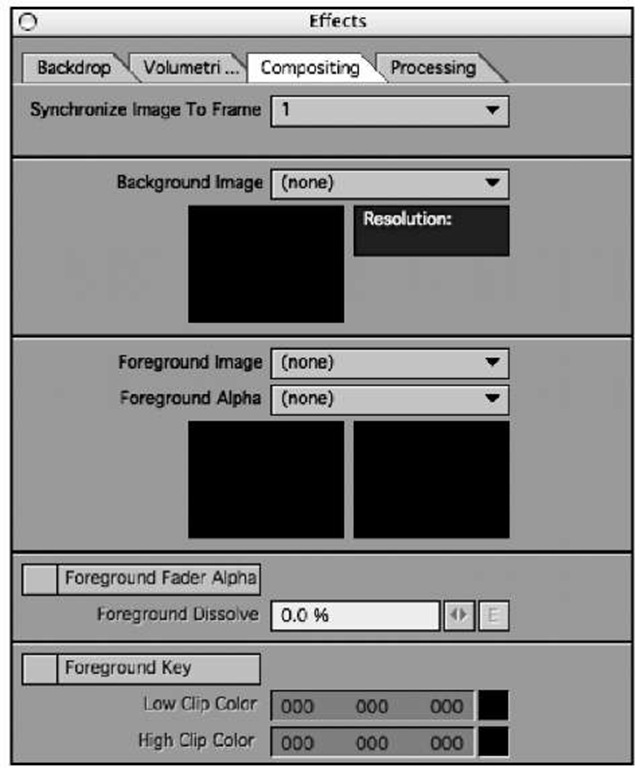
In LightWave, the background image or movie has its place in the Effects panel under the Compositing tab (see Figure 16.1). This is where you begin the first exercise.
Figure 16.1 The Compositing tab is located within the Effects panel. Most everything needed for compositing in LightWave can be found here.You can open this directly from the Window drop-down menu at the top left of Layout or by pressing Ctrl+F7.
Exercise 16.1 Adding a 3D Object to a Still Image
In this first exercise, you’ll learn the basics for setting up just about any composited scene. You’ll find out how to load a background plate, as well as a 3D object, and marry the two seamlessly. Study this process because it will be the same for any composite you do in LightWave, including those involving video footage.
1. From Layout, press Ctrl+F7 to open the Compositing tab of the Effects panel.
Note
At the top of the Compositing tab, there is a setting labeled Synchronize To Frame with a choice of 1 or 0. This is useful for sequences and movie clips. LightWave defaults to 1.
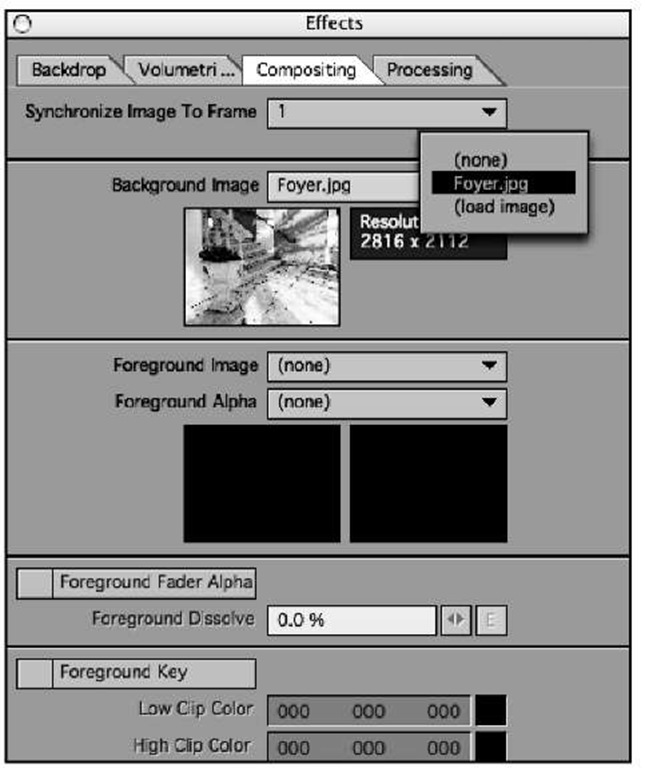
2. Click the drop-down menu for Background Image and select Load Image.
3. Load the Foyer.jpg image fromthe Projects\Images\CH16 directory on the DVD, as shown in Figure 16.2. You can do this from the Image Editor panel, or select Load Image from the Background Image dropdown in the Compositing tab of the Effects panel.
Figure 16.2 A shot of an outdoor foyer loaded into Layout.
Note
In addition to loading images directly from the Compositing tab, you also can go directly to the Image Editor (press F6) and select Load Image.This enables you to load your image or sequence while having access to image-editing features.
4. Render a frame by pressing the F9 key. You’ll see the Foyer image and nothing else. Exciting, isn’t it?
Only the image is displayed in the render because nothing else has been added to the scene. There are a few important things to note at this point that apply to both still and moving images:
• When you use a background image, it overrides any backdrop color or gradient backdrop.
• The background image is not affected by fog, though it can be used as the fog color instead of a solid color.
• By default, the background image is not refracted by transparent objects. However, you can set this option for each surface in the Surface Editor.
• The background image is always centered and stretches itself to fill the camera’s entire field of view. (This also is true of the foreground image, which you’ll get to shortly.)
• The background image can be seen directly in Layout through Camera view if the Camera View Background is set to Background Image in the Display Options tab (press d).
• Even though the Foyer image used here is over 2000 x 2000 pixels in size, it will only render in the size you specify in the render options.
The next step involves adding a 3D object into the scene.
5.This is a 3D vase, similar to the one in the photo.
6. Select the Camera in Layout and press 6 on the numeric keypad to switch to Camera view. Make sure that Camera View Background is set to Background Image in the Display Options tab (press d).
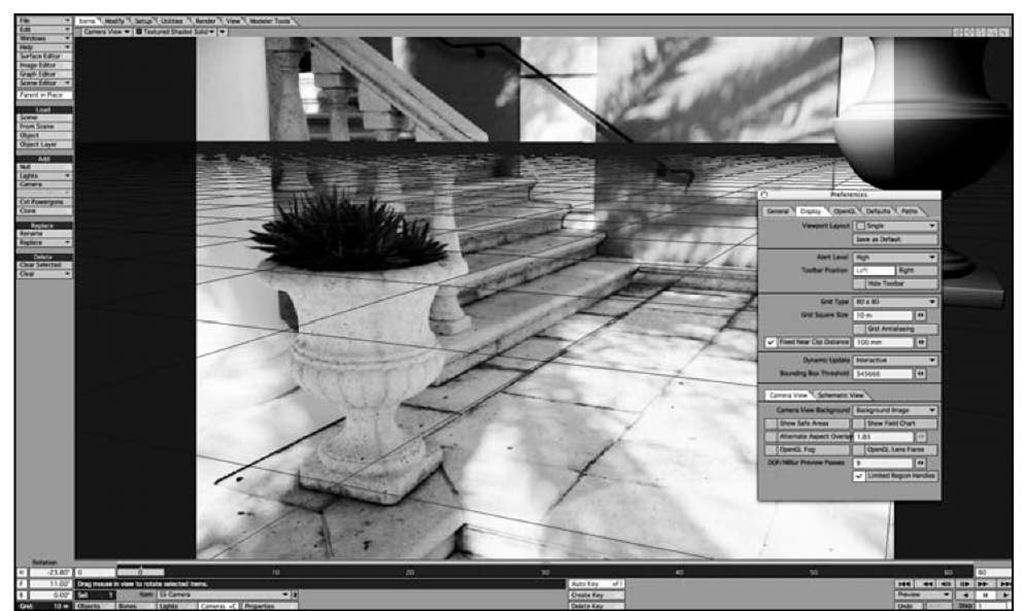
7. Move the camera so that the LightWave grid is roughly in line with the floor in the Foyer background image, as in Figure 16.3. Start by moving the camera up and then rotating it.
Figure 16.3 To make your compositing job easier, first move the camera into a position that more closely matches the position of the real-world camera that took the original photograph.You can align the camera easily by using LightWave Layout’s grid as a guideline.
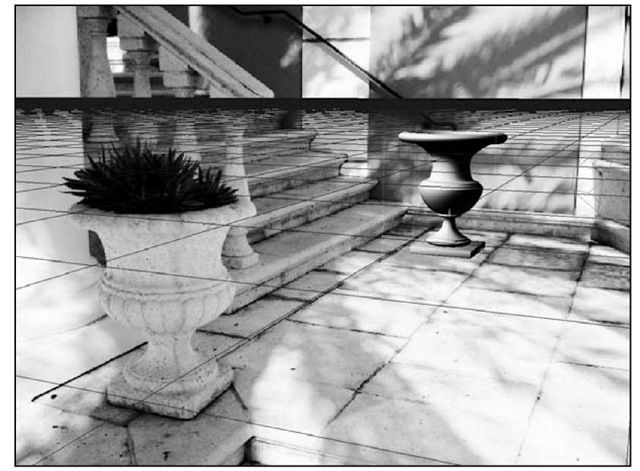
8. Move the Vase object back into the frame and rotate it so that it is resting on the ground plane. Create a keyframe at frame 0 for the vase to lock it into its new position, as shown in Figure 16.4.
Figure 16.4 To composite the vase, move it into position so that it rests in front of the stairs.
Now, the 3D object is composited against the background image, the most basic of all compositing situations. By moving the camera into a similar position as the camera that took the photograph, positioning the vase was not too difficult. The LightWave grid helps you align to the background image.
This technique works for any situation in which a 3D object does not need to go behind a 2D image. You can also render, say, a logo background as its own animation. That rendered animation then can be applied back into LightWave as a background image. The 3D letters would then be animated on top. The benefit of this is control—not only do you have control over what you deliver your client, but you also have control over shadows, reflections, lights, shaders, and more. Rendering in passes is vital to proper compositing, and it is covered more fully later in this topic. LightWave v9′s Real Lens Camera settings can help isolate the view.
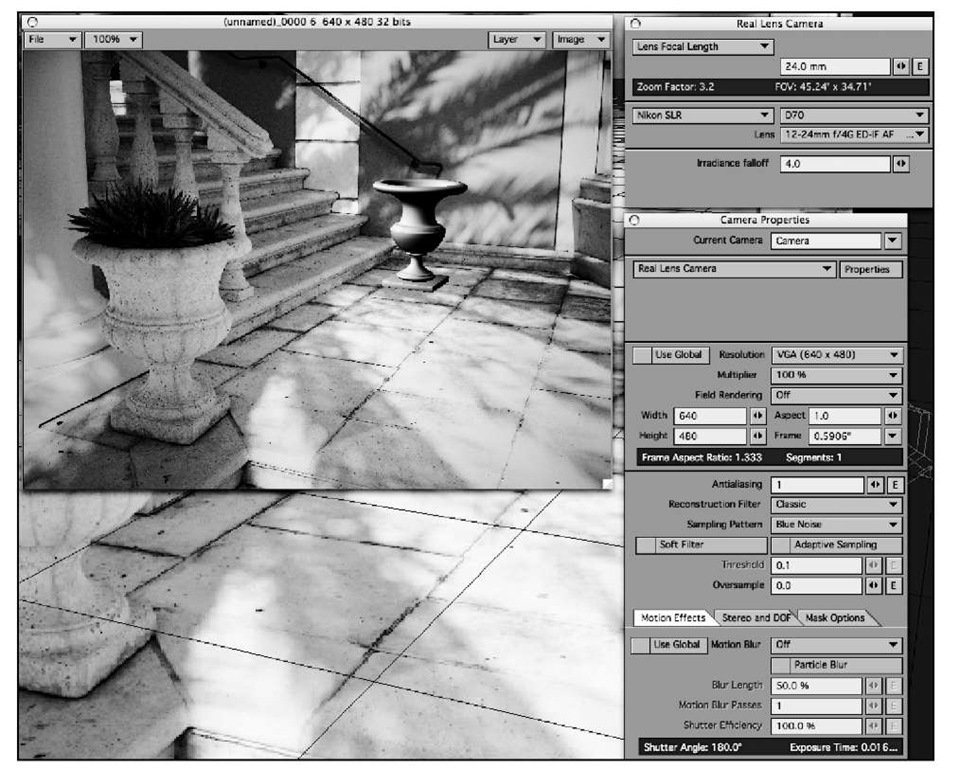
9. Open the Camera Properties panel. At the top of the panel, click the camera selector, which currently reads Classic Camera, and choose the Real Lens Camera.
10. In the panel that opens, choose Nikon SLR, then D70, with a 12-24mm lens, as shown in Figure 16.5.
Figure 16.5 Using the Real Lens Camera settings,you can enhance LightWave’s compositing efforts even further by instantly matching the camera lens that shot the image.
Often, you’ll need to use a foreground image for situations in which a 3D object needs to go behind a 2D image. For example, suppose that a 3D car driving down the street needs to pull up behind other cars that are in the footage. Using a combination of foreground images (the cars) and a background image (the other parts of the footage), you can literally put a 3D element "into" your still or moving imagery.
The foreground image behaves in most ways like the background image. The main difference is that whereas the background image appears behind the 3D objects in the scene, the foreground image is applied on top of the 3D objects.
