Setting Up the Render Nodes
Setting up the nodes is relatively simple compared to setting up the master computer because you can set up one node and then simply copy the same set of files to the other nodes, changing only a few bits of information.
At this point, you need to decide whether your master computer itself is a render node. When ScreamerNet is up and running, the master computer isn’t doing anything more than passing commands around, and it’s certainly not doing any rendering. So unless you plan to do some work while the other computers are rendering, you could make the master a render node, too.
Whether you decide to use your master computer as node 1 is up to you, but the process of setting up the master as a node is exactly the same as if it were a totally different computer. You simply run both LightWave and the LWSN.exe program.
Before you start with the detailed stuff, the first thing you’ll need to do is copy some files from the master computer onto the hard drive of each computer that will be a render node.
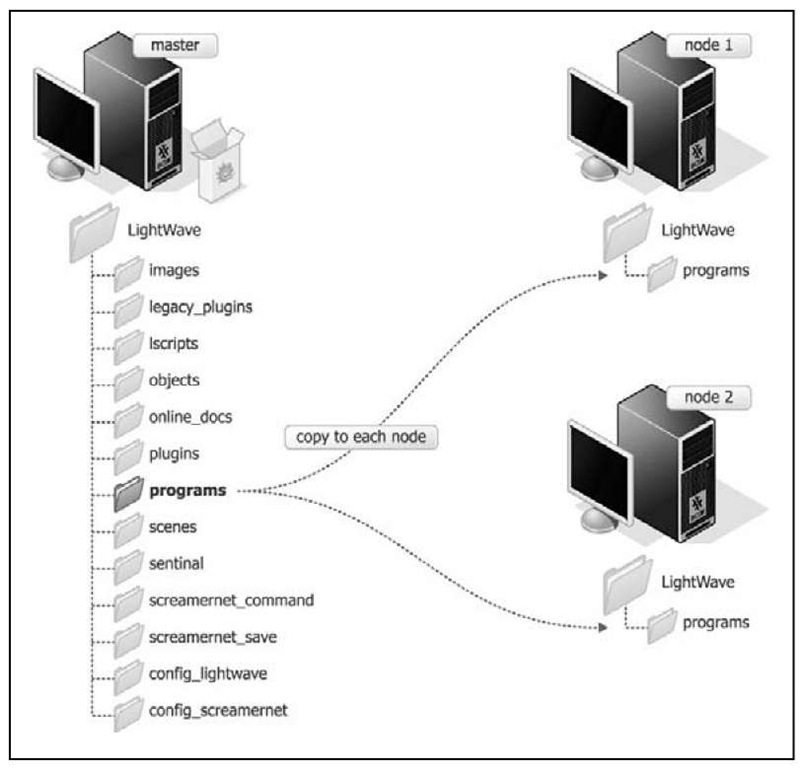
Create a folder called LightWave on the main hard drive (usually the C: drive) of each node computer (obviously, you don’t need to do this on the master because it should already have LightWave installed). Now copy the entire folder called Programs from the master computer into the LightWave folder you’ve just created on each node (see Figure 15.41).
Figure 15.41 Copy the LightWave programs folder to each node, as shown here.
The last part of setting up a node requires a little explanation. If you are unfortunate enough to remember computers in the days of MS-DOS, you’ll be familiar with running programs through a command line. MS-DOS didn’t have a lovely GUI with icons for programs, so you had to type the name of the program to run it, along with any "commands" the program needed after its name.
Well, nostalgia is back! Despite the lovely Windows XP interface, some programs still require you to run them through the command line, and LWSN.exe is one of them!
The LWSN.exe program needs to know a few things at runtime: where the config files are stored, where the content directory is located, and which job and ack number it is going to be in order to distinguish itself from the other render nodes.
Having to type all this information for each node every time you needed to run ScreamerNet would be a pain. Fortunately, Windows enables you to create a text file that acts as a stored command line. This text file has a special name—a batch file. It has the .bat file extension, but really it’s just a plain text file..
Now save the file (as a text file) with the .bat extension and place it inside the LightWave folder of the computer that will be node 1. You can call the batch file sn_init_1.bat, for example, although you can call it anything you like.
The render batch file script might look complicated to users unfamiliar with MS-DOS, but it’s pretty straightforward when broken down, so let’s do it.
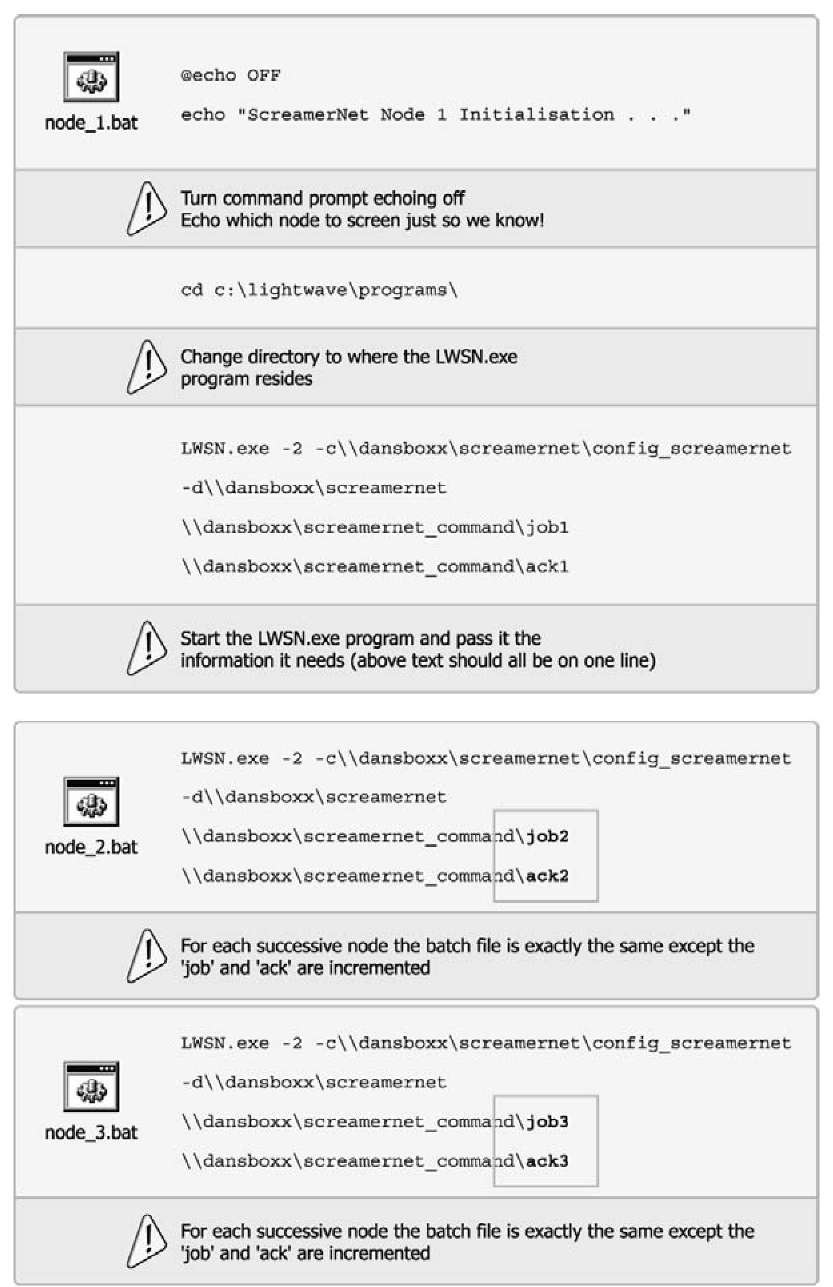
echo "LightWave ScreamerNet Node 1 Initialisation…"
This line has nothing to do with ScreamerNet whatsoever; it’s just a little text that is echoed to the screen to tell you to which node number the batch file has been assigned. You can leave this out if you want.
cd c:\lightwave\programs\
This line changes the current directory to the Programs directory on the main hard drive so that the next line knows where to find the LWSN.exe program. If you installed LightWave somewhere else, then change this line to reflect where you put it.
LWSN -2
This runs the LightWave ScreamerNet program. The -2 sets up which mode ScreamerNet will run in. The -2 basically says you’re accepting commands from the master computer on which scene or frame to render. There is a -3 mode, which enables you to specify the scene and the start/end frames, but this mode defeats the point of using several computers to render a scene because -3 mode only enables you to pass it one scene. Basically, you’ll never need to use -3 mode!
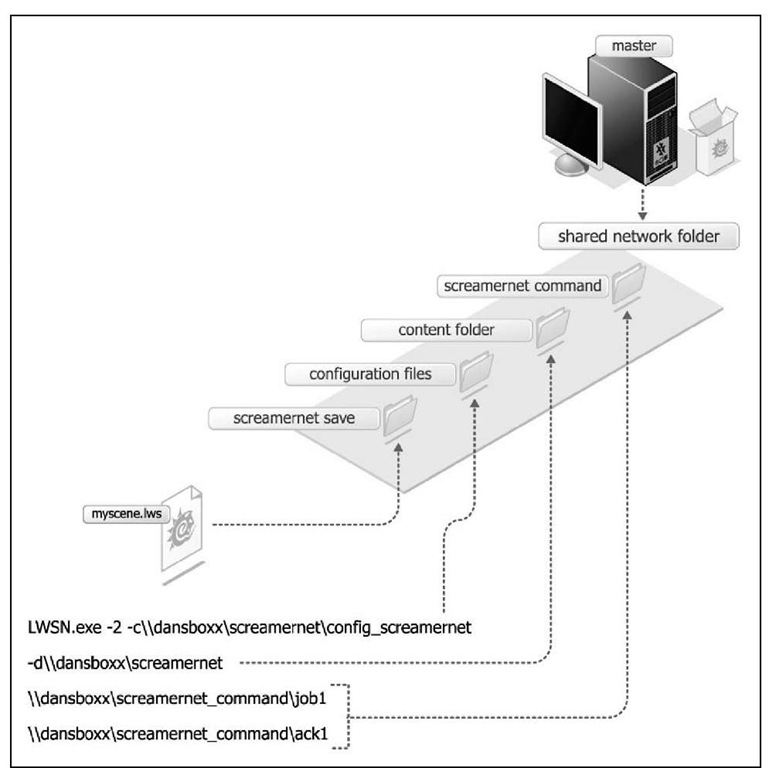
This command tells LWSN.exe where the config files are kept on the network. The -c is the switch that says the following text is the path to the config files. If you have your config files elsewhere, now is the time to tell ScreamerNet where they are. Remember, LWSN.exe needs to know the location of the config files in order to find the location of the plug-ins, the paths to which are stored in the LWEXT9.cfg file. Note that it’s important that there is no space between -c and the pathname after it.
This command tells LWSN.exe where the content directory is on the network. The -d is the switch that says the following text is the path to the content directory. I’ve never quite understood why you need to tell ScreamerNet this because it should be stored in the LW9.cfg. I guess it’s just in case you want to store them somewhere else.
No switch this time, but this is where you tell LWSN.exe where to look for job commands and which job number it is to be allocated.
This is almost the same as the previous line, but instead of a job number, an acknowledgement number is provided. The number must be the same as the job number.
The diagram in Figure 15.42 shows how this all links up with the shared network folder you set up earlier.
Figure 15.42 A batch file matches shared folder locations.
That’s the node 1 setup. To set up the other nodes, simply copy the sn_init_1.bat file (or whatever you named it) to the LightWave folder on all the other nodes.
After copying, you need to rename the file to reflect the render node it is going to be. You also need to edit the job and ack numbers to reflect the node number. Depending on how many nodes you have, you should have something like what is shown in Figure 15.43.
Figure 15.43 Successive nodes are set up as shown here.
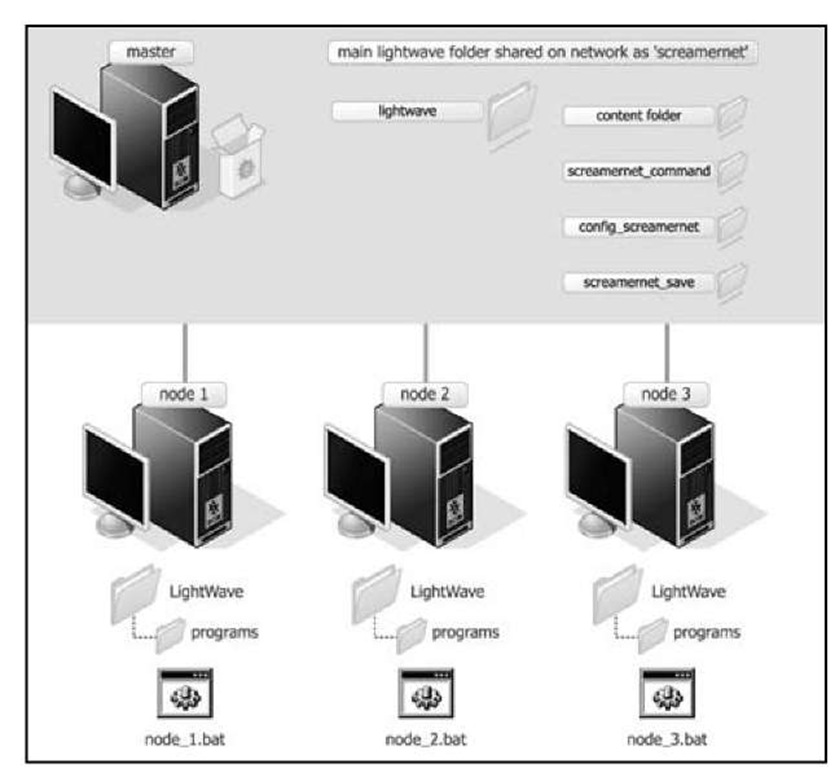
Before you run ScreamerNet through its paces, Figure 15.44 presents an overview of what’s been set up.
Figure 15.44 Here’s an overview of what’s been set up for ScreamerNet.
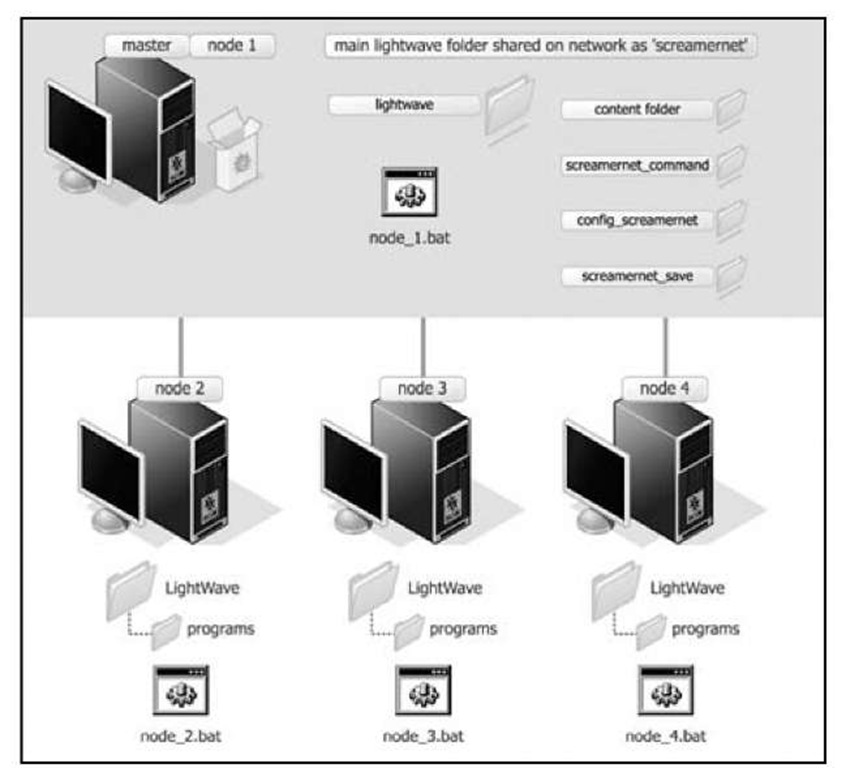
If you decided to set up the master computer as a node, it should look like Figure 15.45.
Figure 15.45 The master node setup for ScreamerNet.
Setting the Save Location
You need to do one last thing before you run ScreamerNet, and that is set the save location for the rendered frames. You could have all the render nodes save their frames locally; the only downside to this is that you have to go hunting for them across the network before you can build them into the final animation.
It makes sense then to use the shared folder that all the machines can see because all the frames can be saved in one place, making them nice and easy to find. As I’m sure you guessed already, this is why you created the screamernet_save folder earlier.
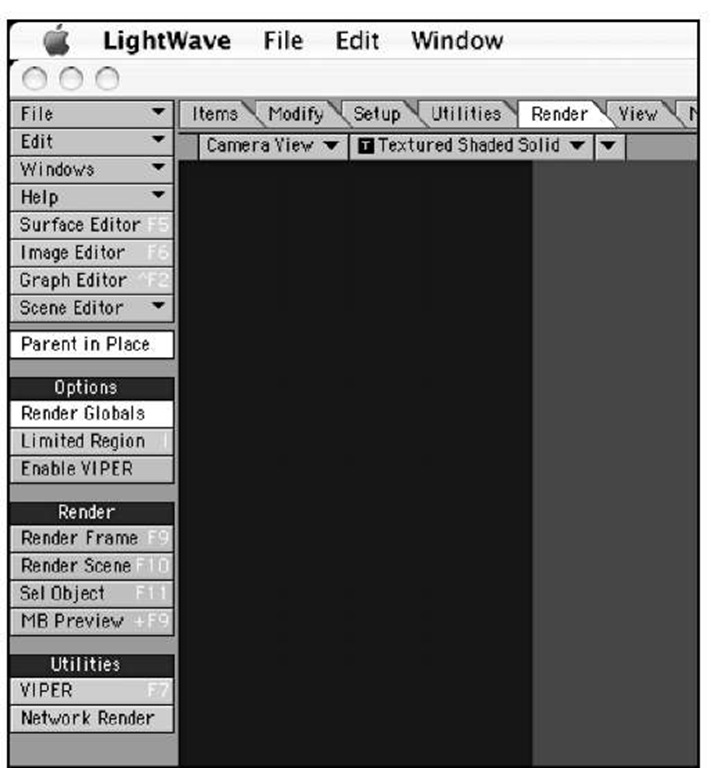
Figure 15.46 LightWave’s Render Globals panel is found under the Render tab in Layout.
The only place you can set the save location for the rendered frames is within the scene file itself. So run the version of LightWave using the normal config files, open up the scene you want to render, and bring up the Render Globals panel (found under the Options category within the Render tab), as shown in Figure 15.46.
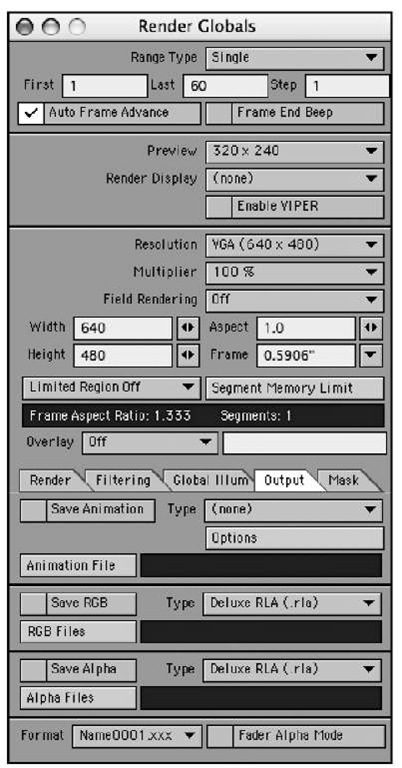
In the Render Globals panel under the Output tab, there is an option to Save RGB. Clicking the check box invokes a file-save window; here you need to set the location for the rendered frames. This should ideally point to the screamernet_save folder in the shared network folder, although this can be anywhere you like, as long as all render nodes can see it on the network. With that done, save the scene, and you’re ready to render it using ScreamerNet (see Figure 15.47).
Figure 15.47 LightWave’s Render Globals panel enables you to set a save path for renders.
![tmp42-62_thumb[2][2][2] tmp42-62_thumb[2][2][2]](http://what-when-how.com/wp-content/uploads/2011/09/tmp4262_thumb222_thumb.jpg)
