In This Chapter
Reading stitch patterns Deciphering the lingo Knitting classic stitch patterns
In Chapter 2, you find out about the importance of making a swatch (a small knit sample of a stitch used in a pattern). Now you finally get to put theory into action and pick up your needles! This chapter covers just a few of the almost infinite number of stitch patterns you can use. The patterns here are everyday classics that you’ll see time and again, so they’re well worth getting comfortable with.
To practice the six stitch patterns in this chapter, you can make a 4-inch square swatch for each pattern and then sew them into a soft block to give to a baby or to decorate your desk. I give you specific directions for knitting each stitch swatch throughout the chapter. You find other inventive uses for swatches in Chapter 16.
By making several swatches, you’ll discover that different stitch patterns knit to different gauges even with the same yarn and needles. For instance, if you cast on 20 (or 21) stitches for each swatch with worsted weight yarn, the widths of your swatches will vary. They’ll be close enough in size, however, that you can still make them into your block when you’re done. After you’ve knit your swatches, take time to measure your stitch and row gauge for each swatch. (See Chapter 2 for information on measuring your gauge.) Doing so gives you a chance to get better at measuring your gauge accurately and gives you concrete evidence of how various stitch patterns are more or less similar to one another.
Starting with Garter Stitch
Garter stitch is where all knitters start. This is because all the stitches are knits — as long as you’re knitting flat. And, because garter stitch looks the same on both sides, it’s completely reversible. It has a bumpy texture, a bit like the purl (or reverse) side of stockinette stitch (see the next section for more about this stitch), but it’s much thicker and denser. For this reason, some knitters see it as somewhat humble; though in finer-gauged yarns, garter stitch can be quite refined. Check out a close-up of garter stitch in Figure 5-1.
Because it’s easy to knit, garter stitch is usually the best choice if you’re using novelty yarns, particularly the hairy or fuzzy varieties that make stitches difficult to see.
Garter stitch is obedient. Like a good dog, garter stitch lies down where you want it to. If you want your edges to stay flat and the piece to keep its shape, garter stitch is the ticket. Garter stitch is an obvious choice for baby blankets or scarves, but it’s also great for hems that you don’t want to roll (like stockinette stitch) or pull in (like ribbing, which I discuss in Chapter 6). It doesn’t need extra finishing around its edges, so garter stitch is a great “quick knit” stitch choice. The baby sweater in Chapter 10 is a great example.
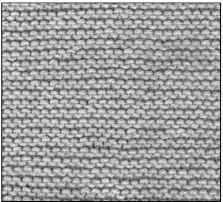
Figure 5-1:
Garter stitch.
Garter stitch has a lot of stretch, particularly vertically. Sometimes this stretch is desirable, but it can also be a disadvantage, particularly if you’re knitting a large piece in heavy yarn, as it tends to grow in length.
To knit garter stitch working flat:
For all rows: Knit.
To knit garter stitch in the round (see Chapter 11 for details on knitting in the round):
Round 1: Knit. Round 2: Purl.
Repeat these 2 rounds for the pattern.
To make a garter stitch swatch for your block, cast on 20 stitches and knit 40 rows or until your block is square. Bind off (see the appendix if you need a refresher).
Knitting and Purling Stockinette Stitch
Stockinette stitch, or stocking stitch as the Brits call it, is really the ultimate knitting stitch. Chances are that if you summon up an image of knitting in your head, it will be stockinette, with those little rows of V’s all lined up so obediently (check out Figure 5-2 to see what I mean).
Stockinette stitch, which alternates rows of knits and rows of purls, makes an even, smooth fabric that drapes pleasantly and can be knit at a wide range of gauges to create different effects. Because it’s the smoothest of the knitting stitches, stockinette is usually the best one for many sorts of color work (which I cover in Chapter 7). It also makes a great backdrop for more complex details, such as a lace panel, ruffled cuffs, or contrasting trims.
The one issue with stockinette stitch is that its edges will roll. This is truer with some yarns than with others, but that’s just its nature. So, unless you want to use the rolled edge as a feature, as you would with a rolled brim hat, use a different stitch pattern along the exposed edges of your piece.
To knit stockinette stitch when you’re working flat:
On right-side rows (RS): Knit. On wrong-side rows (WS): Purl.
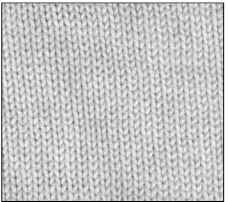
Figure 5-2:
Stockinette stitch.
To knit stockinette stitch in the round (see Chapter 11 for details on knitting in the round):
For all rounds: Knit.
When you’re knitting in the round, you never turn the work to the wrong side, which means that all rows or rounds are right-side rows.
To make a stockinette stitch swatch for your block, cast on 20 stitches. Alternate between knit and purl rows as I’ve described. Bind off when the block measures 4 inches.
Mixing It Up with Reverse Stockinette Stitch
Reverse stockinette stitch is simply stockinette stitch viewed from the wrong side, or the purl side (see Figure 5-3). You can use reverse stockinette stitch any time you would use stockinette stitch to get a different look from the “same” piece. In fact, for the most part, you don’t really have to decide which side will show until you’re almost finished. Just remember that if reverse stockinette stitch is what you want to use, you should do the finishing with the purl side as the right side.
Reverse stockinette stitch is particularly effective as a backdrop for cables, because when knit and purl stitches are worked in columns (think ribbing), the purls recede and the knits come forward. So, a reverse stockinette background for your cables really makes them stand out. (Head to Chapter 6 for more information on cables.)
To knit reverse stockinette stitch when you’re working flat:
On right-side rows (RS): Purl. On wrong-side rows (WS): Knit.
To knit reverse stockinette stitch when you’re working in the round (see Chapter 11):
For all rounds: Purl.
To make a reverse stockinette stitch swatch for your block, cast on 20 stitches. Alternate between purl and knit rows as I’ve described. Bind off when your block measures 4 inches.
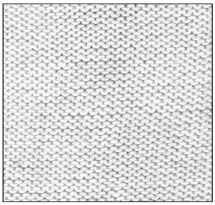
Figure 5-3:
Reverse stockinette stitch.
Staying Simple with Seed Stitch
Seed stitch, shown in Figure 5-4, is both beautiful and simple. It has a regular texture of little bumps that look a bit like seeds (albeit highly organized ones!). Like garter stitch (which I describe earlier in this chapter), seed stitch lies flat and looks the same on both sides, so it’s great for edgings and is a beautiful choice for scarves or blankets. Seed stitch makes a wonderful background for cables (see Chapter 6) or other more intricate patterns, but you also can use it on its own for something more understated. And I think it’s universally true that people will swoon over any baby garments that are knit in seed stitch.
Seed stitch involves a bit more work than stockinette or garter stitch because you must move the yarn from front to back between each stitch. But remember that the results are well worth it.
To knit seed stitch working flat on an odd number of stitches: For all rows: *K1, pi, repeat from * to last st, kl.
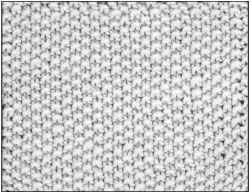
Figure 5-4:
Seed stitch.
To knit seed stitch in the round on an even number of stitches:
Round 1: *K1, p1, repeat from * to end of round. Round 2: *P1, k1, repeat from * to end of round. Repeat these 2 rounds for the pattern.
After the knit-purl-knit-purl is established in the first row, all you have to remember to make seed stitch is that you must always knit the purls and purl the knits.
To make a seed stitch swatch for your block, cast on 21 stitches. Follow the directions for knitting seed stitch flat until your swatch measures 4 inches. Bind off.
Creating Box Stitch
Box stitch is a close cousin of seed stitch in the previous section; they certainly have a lot in common! Box stitch, shown in Figure 5-5, has virtually the same personality as seed stitch, but on a larger scale. Like its cousin, box stitch is a great choice for blankets and scarves, but it can also give a great allover texture to a piece like a jacket. Box stitch also makes a great edging. For instance, if you don’t like the bottom of your sweater to pull in at the hips, box stitch makes a fine substitute for 2 x 2 rib (see Chapter 6 for more on this rib).
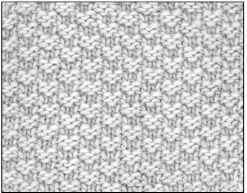
Figure 5-5:
Box stitch.
To knit box stitch when knitting flat, you need a number of stitches that’s equal to a multiple of 4 plus 2:
Rows 1 and 4: *K2, p2, repeat from * to last 2 sts, k2. Rows 2 and 3: *P2, k2, repeat from * to last 2 sts, p2. Repeat these 4 rows for the pattern.
To knit box stitch in the round (see Chapter 11), you need a multiple of 4 stitches:
Rounds 1 and 2: *K2, p2, repeat from * to end of round. Rounds 3 and 4: *P2, k2, repeat from * to end of round. Repeat these 4 rounds for the pattern.
To make a box stitch swatch for your block, cast on 18 stitches. Follow the directions for working box stitch flat. Bind off when your swatch measures 4 inches.
Working Half Linen Stitch
Half linen stitch is one of my favorite stitches! You can see it in Figure 5-6. It isn’t difficult to work and it creates an interesting fabric that looks almost woven — it behaves a little more like woven fabric, too. Half linen stitch resists vertical stretching, so it’s a great choice for projects like bags or belts or larger garments like a coat. The edges of half linen stitch do roll. But a three- or five-stitch border in seed stitch, which I describe earlier in this chapter, is the perfect fix.
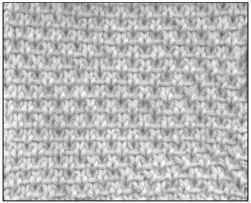
Figure 5-6:
Half linen stitch.
Half linen stitch looks great in a solid color, but if you try it with a variegated yarn or alternate between two colors, switching at the beginning of every right-side row, you can get some great effects.
To work half linen stitch knitting flat on an odd number of stitches: Cast on and purl 1 row.
Row 1 (RS): *K1, bring yarn to front and sl 1 st purlwise, bring yarn to back, repeat from * to last st, k1. (Chapter 9 has details on bringing yarn to the front.)
To slip a stitch purlwise, insert the needle into the stitch as if to purl, and then slide it over to the right-hand needle. But remember that you don’t purl the stitch. Instead, you simply move it from one needle to the other, carrying the yarn along the front of the stitch as you do.
Row 2: Purl.
Row 3: K2, *bring yarn to front, sl 1 st, bring yarn to back, k1, repeat from * to last
st, k1.
Row 4: Purl.
Repeat these 4 rows for the pattern. To work half linen stitch in the round on an even number of stitches: Cast on and knit 1 round.
Round 1: *K1, bring yarn to front, sl 1, bring yarn to back, repeat from * to end of round.
Round 2: Knit.
Because you don’t have edges to worry about, you can start right in with the slip stitches when you work in the round.
Round 3: *Bring yarn to front, sl 1, bring yarn to back, k1, repeat from * to end of round.
Round 4: Knit.
To make a half linen stitch swatch for your block, cast on 21 stitches and follow the directions for working half linen stitch when knitting flat. Bind off when your swatch measures 4 inches.
