In This Chapter
Discovering why it’s hip to be square (actually, rectangle) Knitting classic scarves and wraps Creating accessories for the whole family. When I first started thinking about writing a topic of straightforward patterns based on simple shapes, I joked about rectangles and that classic first knitting project: the garter stitch scarf (and yes, I’ve come up with a version of it). But the more I thought about the knitted rectangle, the more I came to like it. The rectangle lying flat may seem boring, but when it’s draped over your body or filled with a bit of stuffing, it takes on form and style.
On the surface, knitting rectangles is about casting on the appropriate number of stitches and just knitting away. But varying the yarns you use, the gauge you knit them at, the stitch pattern, or the size of the rectangle can turn this basic shape into a thousand beautiful things. Anyone who has successfully knitted a few rows can happily knit the most basic versions of these patterns. You don’t increase or decrease (see Chapters 11 and 12 for more about these skills), and each project can be knit in a simple stitch pattern. However, just because these patterns are simple doesn’t mean that seasoned knitters can’t enjoy them! Those of you who are ready for more adventure in your knitting should try some of the variations given at the end of each pattern; they offer plenty of options for color and stitch work. And, of course, knitters of all skill levels can use these basic ideas as templates for their own improvisations.
With this chapter, you can make oodles of scarves using the patterns and variations for the garter stitch scarf, ribbed scarf, and box stitch scarf. You’ll also find a hat pattern that’s sized for the whole family and slippers that are sure to bring back waves of knitted nostalgia with each wearing. I also include two wraps, both of which are stunning and no more difficult to knit than a scarf. I especially love how the loose rib wrap can make a great updated poncho or a sleeves-only shrug. I round out the chapter with a project that I call the box top. While the knitting in this project is purely rectangular, by using a wisely placed combination of simple stitches, the top recalls a 1940s pin-up girl.
Garter Stitch Scarf
If you’ve ever knit anything before, chances are you have at least started a garter stitch scarf. The pattern for it is sort of like a recipe for toast — it barely merits writing down. But the thing is, even after centuries of knitting, you can still do a bunch of cool things with a garter stitch scarf. Try my pattern (see Figure 8-1), or use it as a jumping off point to find your own special recipe. (For the basics on garter stitch, head to Chapter 5.)
This scarf pattern is enormously flexible. Cast on more or fewer stitches. In fact, any number is fine. Try adding in a quadruple or even quintuple wrap, or if you want, change the spacing between the elongated rows.
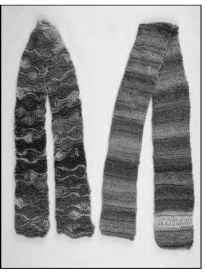
Figure 8-1:
Garter stitch scarves feature elongated stitches.
New skill: The double wrap (and beyond)
A double wrap is a shockingly easy way to get a lacy look. It works with any number of stitches and can add a bit of visual interest to the bottom of a sweater, a shawl, or, in this case, a scarf.
To work the double wraps, follow these instructions:
1. On the row specified in the pattern, insert the needle into the stitch as if to knit, but instead of wrapping the yarn once around the needle as you usually do, wrap it around a second time as shown in Figure 8-2.
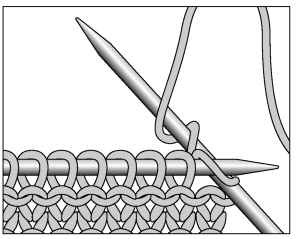
Figure 8-2:
Making elongated stitches with a double wrap.
2. Do the same on the next stitch and on each stitch across the row.
At the end of the row, you’ll end up with what looks like a lot of stitches on the needle.
3. On the next row, insert the needle into the first wrap of the first stitch normally, and knit it, wrapping the yarn only once.
Even though you have lots of wraps on the needle, the bottom of the stitch should look the same as a normal knitted stitch.
4. As you complete the stitch, let the extra wraps fall as shown in Figure 8-3.
Dropping these wraps creates the elongated stitches.
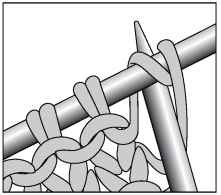
Figure 8-3:
Dropping the extra wraps forms elongated stitches.
A triple wrap is worked the same way (and you can extend this number as far as you want, wrapping four, five, or more times). Wrap each stitch in the row three times, and then let the extra wraps fall on the next row. The more times you wrap, the longer your stitches will be.
Materials and vital statistics
Yarn: Trendsetter Tonalita (50% wool, 50% acrylic); 100 yards (91 meters) per 50 grams; 2 balls; color: 2348
Needles: US 7 (4.5 mm) needles, or the size needed to match gauge
Other materials: Yarn needle for weaving in ends
Size: 5 inches wide by 62 inches long
Gauge: 16 stitches and 32 rows per 4 inches in garter stitch (matching gauge precisely isn’t critical for this project)
This scarf features rows of elongated stitches that are made by wrapping the yarn around the needle multiple times. This allows light to shine through and really show off your yarn. Combine these airy rows with a self-striping yarn, and you’ll have yourself something quite eye-catching. This scarf is quick to knit and won’t deplete your yarn stash — a boon to the knitter in need of a speedy project that won’t break the bank.
Directions
Cast on 20 sts.
Rows 1, 2, and 3: Knit.
Row 4: Knit, wrapping the yarn twice around the needle for each st. It will look like there are 40 sts on the needle.
Row 5: Knit, dropping extra wraps. You will have 20 sts.
Rows 6, 7, and 8: Knit.
Row 9: Knit, wrapping the yarn 3 times around the needle for each st. It will look like there are 60 sts on the needle.
Row 10: Knit, dropping the extra wraps. You will have 20 sts.
Repeat Rows 1-10 until you’re nearly out of yarn or until your scarf is as long as you like, ending with Row 3 or Row 8. Bind off and weave in ends.
Variation: Using beautiful yarns
Chances are that you’ve had a ball of yarn that looked better on the coffee table than it did when it was knit up. Some yarns, like hand-spun yarn, are beautiful on the skein, but their beauty gets lost when they’re knit because you don’t see enough of the yarn in any one place. If I ever have a small amount of a beautiful yarn that can’t seem to find its rightful place, I try using it with this garter stitch scarf pattern or the lovely seafoam stitch variation in the next section. Use needles of whatever size are right for the yarn. (See Chapter 2 for more on gauge and needle size.)
Variation: Creating a seafoam stitch scarf
This kicked-up version of the garter stitch scarf uses the same idea of wrapping the yarn two, three, and four times around the needle, but it uses these different numbers of wraps all in the same row, creating an undulating pattern of elongated stitches.
Here are the directions to knit this very quick and pretty variation:
Cast on 27 sts (try 17 sts with very fat yarn or 37 sts with thinner yarns). You don’t need to use a larger needle to make the stitches loose; the extra wraps take care of that.
Rows 1 and 2: Knit.
Row 3: K1, *k1 wrapping twice, k1 wrapping 3 times, k1 wrapping 4 times, k1 wrapping 3 times, k1 wrapping twice, k5, repeat from * to last st, ending the last repeat with k1 instead of k5.
Row 4: Knit, dropping extra wraps as you go. Rows 5 and 6: Knit.
Row 7: K6, *k1 wrapping twice, k1 wrapping 3 times, k1 wrapping 4 times, k1 wrapping 3 times, k1 wrapping twice, k5, repeat from * to last st, k1.
Row 8: Knit, dropping extra wraps as you go.
Repeat these 8 rows to form the seafoam stitch. Continue until the scarf measures approximately 60 inches, or desired length, ending with Row 6.
Bind off and weave in ends.
Ribbed Scarf
A ribbed scarf is an undeniably classic knit. You see them in stores, in magazines, and around dozens of necks in cooler weather. In this section, I offer a pattern for a Fibonacci ribbed scarf (which you can see in Figure 8-4). A basic pattern in the variation section allows you to create scads of scarves with any yarn you choose. For the fundamentals of making ribs, see Chapter 6.
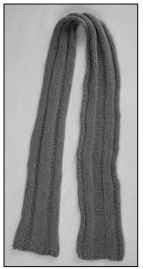
Figure 8-4:
A Fibonacci ribbed scarf is classic.
New skill: Switching from knit to purl and back again
Many new knitters make a common mistake: When they’re working a row that has both knit and purl stitches in it, they bring the yarn over the needle between stitches, which creates a yarn over and an extra stitch. If you look closely, you’ll be able to spot the yarn overs because they’ll sit diagonally on the needle.
This mistake is an easy one to remedy, though. Just remember to move the yarn from back to front between and under the needles as shown in Figure 8-5. Practice knitting 2 x 2 rib by following these steps:
1. Knit 2 stitches and then bring the yarn from back to front between and under the needles.
2. Purl 2 stitches and then bring the yarn from front to back between and under the needles.
3. Repeat these two steps across the row.
To find out more about making yarn overs on purpose, go to Chapter 6.
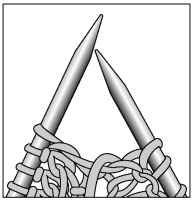
Figure 8-5:
Bring the yarn between and under the needles when switching from knits to purls.
Materials and vital statistics
Yarn: Baby Alpaca Chunky (100% baby alpaca); 108 yards (99 meters) per 100 grams; 3 skeins; color: 551 Pink
Needles: US 13 (9 mm) needles, or the size needed to match gauge Other materials: Yarn needle for weaving in ends Size: 6 inches wide by 60 inches long
Gauge: 11 stitches and 14 rows per 4 inches in stockinette stitch
Ribs don’t always have to be even. In fact, they’re often more interesting to look at if they aren’t. You can choose almost any combination of knits and purls to create your ribs. In this pattern, I use the numbers of the Fibonacci sequence.
Directions
Cast on 19 sts.
Row 1: K1, p1, k2, p3, k5, p3, k2, p1, k1. Row 2: P1, k1, p2, k3, p5, k3, p2, k1, p1.
Repeat these 2 rows until scarf measures 60 inches, or your desired length. Bind off and weave in ends.
If you want to use a yarn that knits to a gauge between 4 and 5 stitches to the inch, follow these instructions instead:
Cast on 32 sts.
Row 1: K1, p1, k2, p3, k5, p8, k5, p3, k2, p1, k1. Row 2: P1, k1, p2, k3, p5, k8, p5, k3, p2, k1, p1.
Repeat these 2 rows until scarf measures 60 inches, or your desired length. Bind off and weave in ends.
Variation: Ribbed scarves with any yarn
The variations on ribbed scarves are endless. This section walks you through the steps needed to make a ribbed scarf with any yarn you choose.
First, make a swatch in stockinette stitch with your chosen yarn to check your gauge. You want to make a looser fabric for a scarf than for a sweater because you want the scarf to fall becomingly around your neck. So, use needles about two sizes larger than those suggested on the yarn label. (See Chapter 2 for information on getting your gauge right, if you’re unsure.)
After you’ve come up with the right gauge for your yarn, consult Table 8-1 to decide how many stitches to cast on. Then follow the directions for 1 x 1 rib, 2 x 2 rib, broken rib, or two-stitch rib in Chapter 6. Bind off when your scarf measures 60 inches or the desired length.
| Table 8-1 | The Cast-On Numbers for Different Gauges |
| Your Gauge per Inch | Stitches to Cast On |
| TA | 1 8 |
| 3 | 22 |
| 3′A | 26 |
| 4 | 30 |
| 4Vi | 34 |
| 5 | 38 |
Remember that scarves are forgiving projects. It doesn’t matter if your gauge is exactly right, and a scarf that’s skinnier or wider than my suggested 6 inches is still a great scarf.
Box Stitch Scarf
Just like the garter stitch scarf or the ribbed scarf, which are both described earlier in this chapter, the basic box stitch scarf has so many variations that it’s always sure to be fresh and interesting. Try the stitch by holding two yarns together, or have a go with my twins scarf, which is a variation that features two different takes on box stitch. See a box stitch scarf in Figure 8-6, and head to Chapter 5 for more about box stitch.
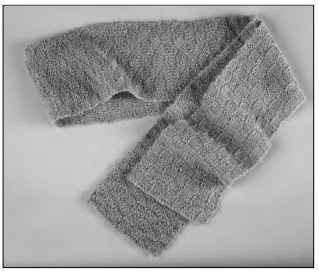
Figure 8-6:
A box stitch scarf is always fresh.
Materials and vital statistics
Yarn: Rowan Kid Classic (70% lambswool, 26% kid mohair, 4% nylon); 151 yards (140 meters) per 50 grams; 2 balls; color: Straw
Needles: US 9 (5.5 mm) needles, or the size needed to match gauge
Other materials: Yarn needle for weaving in ends
Size: 6 inches wide by 60 inches long
Gauge: 18 stitches and 24 rows per 4 inches in stockinette stitch
Working box stitch is a lot like knitting ribs — you’re regularly alternating between knits and purls. See the earlier section “New skill: Switching from knit to purl and back again” if you find you’re having trouble.
Directions
Cast on 28 sts.
Rows 1, 3, and 5: *K4, p4, repeat from * to last 4 sts, k4. Rows 2 and 4: *P4, k4, repeat from * to last 4 sts, p4.
You now switch so that the boxes that were purled are now knit and vice versa. Rows 6, 8, and 10: *K4, p4, repeat from * to last 4 sts, k4. Rows 7 and 9: *P4, k4, repeat from * to last 4 sts, p4.
Repeat these 10 rows until scarf measures 60 inches, or your desired length, ending with Row 5 or Row 10.
Bind off and weave in ends.
Variation: Twins scarf
Work the first half of the scarf exactly the same as the basic pattern. When your scarf measures 30 inches, or half the desired length, end with Row 10 of the box stitch pattern, and switch to the leaning box stitch as follows:
Row 1: *K4, p4, repeat from * to last 4 sts, k4.
Row 2: K1, *p4, k4, repeat from * to last 3 sts, p3.
Row 3: K2, *p4, k4, repeat from * to last 2 sts, p2.
Row 4: K3, *p4, k4, repeat from * to last st, p1.
Row 5: *P4, k4, repeat from * to last 4 sts, p4.
Now the boxes switch from knit to purl and switch to lean the opposite direction.
Row 6: P4, *k4, p4, repeat from * to end.
Row 7: P1, *k4, p4, repeat from * to last 3 sts, k3.
Row 8: P2, *k4, p4, repeat from * to last 2 sts, k2.
Row 9: P3, *k4, p4, repeat from * to last st, k1.
Row 10: *K4, p4, repeat from * to last 4 sts, k4.
Repeat Rows 1-10 of leaning box stitch until scarf measures 60 inches, or your desired length, ending with Row 5 or Row 10.
Bind off and weave in ends.
Variation: Two-yarns scarf
This variation uses two yarns — a mohair yarn and a ribbon yarn — held together. Why not give it a try? It’s a great way to make something totally unique because you’re making your own multistrand yarn. Not only are you doing something interesting with the texture of the scarf, but you’re also playing with color. For example, a yarn that’s too bright can be toned down when paired with a subdued mohair. Or a novelty yarn can gain both structure and substance when you use it with a more conventional yarn.
When trying out this variation, hold both strands of yarn together and treat them as a single strand of yarn (see Figure 8-7). Be sure to pick up both strands of yarn for each stitch. If you’re worried that the strands will tangle, put each yarn in its own zippered sandwich bag. And don’t limit yourself to two yarns: You can use three, five, or even a dozen yarns held together!
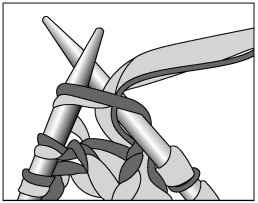
Figure 8-7:
Knitting with two yarns held together.
To get an idea of what needles to use, add the needle sizes (in millimeters) that are recommended for each yarn. (This information is found on the yarn’s label.) The resulting number of millimeters tells you what size needles to use. For example, if you want to use a yarn that suggests a US 6 (4 mm) needle paired with a yarn that suggests a US 8 (5 mm) needle, you should knit them on a 9 mm needle (4 mm + 5 mm = 9 mm). A 9 mm needle is a US 13 needle. It’s handy to have a needle gauge close by when you’re making this sort of calculation (see Chapter 1 for more about this tool).
Remember, though, this calculation gives you only a suggestion for needle size. Cast on a few stitches, knit a few rows, and see if you like the fabric you’re creating. Switch to smaller or larger needles to get the look and feel that you’re after.
Ready to knit? Use one strand of Crystal Palace Deco Ribbon and one strand of Crystal Palace Kid Merino held together. (Or try any ribbon combined with a mohair blend, depending on the look you want.) Use a US 13 (9 mm) needle, or the needle that makes a fabric you like.
Cast on 20 stitches and follow the earlier basic pattern. You can also try 28 or 36 stitches if you want something even larger and more dramatic.
Flat Hat
A flat hat (shown in Figure 8-8) is so simple to make. It may look a little goofy just sitting there, but put it on a baby’s head and you’ll swoon at its cuteness. The hat looks great in a single color or striped. The basic pattern is knit in stockinette stitch, but if you’d prefer garter stitch, check out the variation that follows the basic pattern.
Knit this flat hat in gender-neutral colors and then add embellishment after the baby is born. Gender-neutral colors, in my topic, include all those that aren’t pink or baby blue. Babies look darned cute in red or grey — and this way they’ll stand out from the rest of the baby crowd.
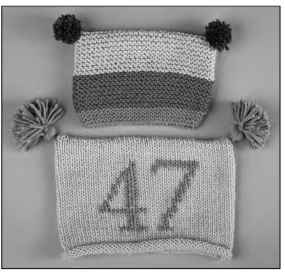
Figure 8-8:
Flat hats workgreat for babies.
Materials and vital statistics
Yarn: RYC Cashsoft Aran (57% merino wool, 33% microfiber, 10% cashmere); 95 yards (87 meters) per 50 grams; 1 skein; color: 001 Oat
Needles: US 9 (5.5 mm) needles, or the size needed to match gauge; US 7 (4.5 mm) needles for rolled edge and three-needle bind-off
Other materials: Yarn needle for weaving in ends
Size: Newborn (toddler, child)
• Finished circumference: 14 (16, 18) inches
• Finished length: 5 (6, 6)2) inches
Gauge: 18 stitches and 24 rows per 4 inches in stockinette stitch
This hat is worked flat and then seamed up the side. When knit in a plain color, it’s a great backdrop for all kinds of adornment, whether it’s tassels, buttons, or embroidery. Or try your hand at duplicate stitch, which is outlined in Chapter 7, to personalize a baby’s hat. Pair the hat with the baby blanket in Chapter 9 and you have a memorable gift.
Directions
Cast on 64 (72, 82) sts with the smaller needles.
Work in stockinette stitch (knit RS rows, purl WS rows) for 1 inch. The edge will roll.
Switch to larger needles and continue working in stockinette stitch until the hat measures 5 (5V2, 6) inches with the edge rolled, ending with a purl row.
Finishing: Knit across 32 (36, 41) sts so that half the stitches are on each needle.
Fold the hat in half, with the RS facing you and the needles held parallel in your left hand.
Use the three-needle bind-off to close the top of the hat. (See Chapter 10 for directions on this bind-off if you’re unfamiliar with it.) Cut the yarn and pull it through the last stitch to secure.
Turn the hat right side out and use mattress stitch to sew up the side seam. (See the appendix for the how-to on mattress stitch.) Weave in ends.
If desired, decorate the two top corners of the hat with pompoms, tassels, jingle bells, or O-rings covered in contrasting yarn.
Variation: Knitting a garter stitch flat hat
For this variation of the basic flat hat, you use the same yarn and needles as in the basic pattern, plus small amounts of two contrasting colors (CC1 and CC2). With a garter stitch, you should have a gauge of 16 stitches and 32 rows per 4 inches. The following hat pattern covers the same sizes as the previous stockinette stitch version:
Cast on 56 (64, 72) sts with CC2.
Work in garter stitch (knit all rows) for 1 inch.
Switch to CC1 and continue in garter stitch for 2 inches.
Switch to the main color and continue in garter stitch until your hat measures 5 (5V2, 6) inches.
Finishing: Work across half of the stitches, and then use the three-needle bind-off to close the top of the hat as in the main pattern.
Sew up the side seam and weave in ends. (See the appendix for information on seaming up garter stitch.)
Retro Slippers for Baby
This retro slipper (see Figure 8-9) is hardly more than a swatch. Still, if you grew up around knitters, chances are they’ll fill you with nostalgia. Just because these slippers are labeled as “nostalgic” and “retro,” however, doesn’t mean that they aren’t cute! You can adorn them with old-school pompoms, bows, or buttons that match the ones you use on the one piece baby sweater in Chapter 10 for an oh-so-cute matching ensemble.
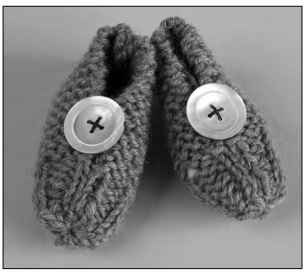
Figure 8-9:
Try these easy slippers for baby — and the whole family!
Materials and vital statistics
Yarn: Cascade 220 Superwash (100% superwash wool); 220 yards (203 meters) per 100 grams; 1 skein; color: 860 Gray Heather
Needles: US 7 (4.5 mm), or the size needed to match gauge
Other materials: Yarn needle
Size: Newborn (6-12 months, 1-2 years), 4 (5, 6) inches square Gauge: 18 stitches and 36 rows per 4 inches in garter stitch
These slippers are a cinch to make. They’re quick to knit and a great way to use up leftover yarn. Essentially, all you have to do is knit your rectangle and then sew it up. After making some for baby, why not try making some for yourself? See the variations that follow.
Directions
Make 2 slippers with the following pattern: Cast on 18 (22, 26) sts.
Work in garter stitch (knit all rows) for 3 (3V2, 4) inches. Switch to rib as follows:
Row 1 (RS): K2, *p2, k2, repeat from * to end of row.
Row 2 (WS): P2, *k2, p2, repeat from * to end of row.
When slipper measures 4 (5, 6) inches, stop knitting, but don’t bind off.
Finishing: Cut the yarn, leaving a 12-inch tail.
Thread the end of the tail through the yarn needle, and then pass the yarn through all the stitches on the needle. Pull snugly to gather the stitches, and then draw the yarn through the stitches again to secure. This creates the toe.
Without breaking the yarn, use mattress stitch to sew the edge of the slipper from the end of the toe about halfway up the edge of the work to form the top of the slipper.
Cut the yarn and weave in the end.
Fold the cast-on edge of the slipper in half and sew together to form the back of the slipper, as shown in Figure 8-10.
Variation: Using different yarns
You can knit these slippers with any sturdy yarn. But, unless you’re knitting for a baby whose feet will never touch the ground, I’d recommend a washable yarn. For babies learning to walk, use caution: Slippers can be slippery!

Figure 8-10:
Folding and sewing your slippers.
Yarn labels give an estimated gauge in stockinette stitch, but you’re knitting these slippers in garter stitch. The perfectionists will swatch. But if you’re making baby slippers, you’re more or less making a swatch anyway. So just go for it. A typical worsted weight yarn that knits at 20 stitches per 4 inches in stockinette stitch will give you the garter stitch gauge that you’re after.
Variation: Sizing up
Sure these slippers are cute on baby feet, but you can easily scale them up to fit anyone. Use Table 8-3 to find the correct cast-on number.
You’re better off making the slippers a little smaller if you’re in doubt of the proper size — they’ll stretch, and you don’t want them to slip off.
| Table 8-3 | Cast-On Chart for Adult Retro Slippers | |
| Size | Cast on | Foot Length |
| 4-6 years | 30 stitches | 7 inches |
| 6-10 years | 34 stitches | 8 inches |
| Small adult | 38 stitches | 9 inches |
| Medium adult | 42 stitches | 10 inches |
| Large adult | 46 stitches | 11 inches |
Cast on the number of stitches specified for your size.
Knit in garter stitch until your slipper measures 5 (6, 7, 8, 9) inches.
Knit 2 (2, 3, 3, 3) inches in rib as described in the baby slipper pattern, and then follow the finishing directions there.
Longways Multiyarn Stole
This multiyarn stole lets a collection of beautiful yarns do the work for you — the knitting could hardly be simpler, yet the result is stunning. I’ve chosen a mohair yarn, a thick and thin wool, and a shiny ribbon with glints of silver for mine. But choose any combination of yarns with a variety of textures and colors you love, and you’ll create a showstopping stole that’s guaranteed to bring drama to any outfit. See what I mean in Figure 8-11.
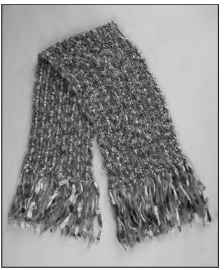
Figure 8-11:
A longways multiyarn stole is breathtaking.
New skill: Changing colors
Many new knitters have angst about changing from one yarn to the next, but really you have nothing to worry about. When a pattern asks you to join a new yarn, here’s what to do:
1. Knit to the end of the row with the first color. Cut the yarn, leaving a 6-inch tail.
2. Insert the needle into the first stitch, ready to start the next row.
3. Pick up the second color of yarn and lay it across the back (right-hand) needle with a 6-inch tail on the left and the working yarn on the right.
This step is equivalent to wrapping the first stitch. See Figure 8-12 to see how this step should look.
4. Bring the yarn through the first stitch, giving both tails a gentle tug to tighten up the stitch.
If you want to, at this step you can tie the two tails in a single knot — just like the first step in tying a shoelace.
That’s all there is to it. Later, weave in the ends with a yarn needle.
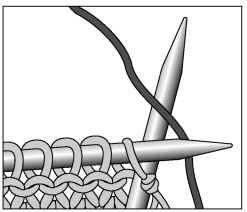
Figure 8-12:
Knitting the first stitch in a new color.
New skill: Making fringe
Adding fringe to a piece of clothing can totally change its personality. Fringe can be long or short, widely or narrowly spaced, knotted, beaded, or plain. Fringe showcases particularly well yarns that vary in color, texture, or size, but any yarn adds movement and visual interest to a finished piece. Fringe also adds length to knitting projects that come up a little short. If you’ve run out of yarn, consider adding fringe in a contrasting color or texture.
You may typically think of fringe as being on the two short ends of a scarf, but you can also consider fringing two short sides and one long side of a stole for something more out of the ordinary. Or you might consider fringing the edges of a shawl or poncho, the cuff of a mitten, or the hem of a sweater.
To make fringe, begin by calculating how many pieces of fringe you want and how long you want the fringe to be. The lengths of yarn used to make fringe are doubled over, so use two strands of yarn to make four lengths of fringe in one spot. You can use just a couple of strands for each group and space them closer together or hold several strands together for tassel-like fringe and space them further apart. You don’t have to follow any rules — just experiment to your heart’s content.
The fringe lengths need to be twice as long as you want your fringe to be, plus about an inch for the knot at the top. As you can imagine, fringe can use a lot of yarn. So, plan for it in the yarn-buying phase. A quick way to make uniform lengths of fringe is to wrap your yarn around an appropriately sized topic, and then make a single cut along the spine of the topic.
To attach your fringe:
1. Stick your crochet hook through the edge of the work from the wrong side to the right side.
2. Grab the center of the length of fringe with the hook, and then pull through a loop of yarn about 1 inch long.
3. Using your fingers or the crochet hook, pull the tails of the fringe through the loop and give them a gentle tug to secure them.
Materials and vital statistics
Yarn: You need the following three types of yarn:
• Yarn A: Dive Mohair Kiss Ombre (73% mohair, 22% wool, 5% polyamide); 98 yards (90 meters) per 50 grams; 3 skeins; color: 40377
• Yarn B: Dive Fiamma (100% wool); 55 yards (50 meters) per 50 grams; 2 skeins; color: 40377
• Yarn C: Dive Luxus (91% nylon, 9% polyester); 51 yards (47 meters) per 50 grams; 2 skeins; color: 40377
Needles: US 15 (10 mm) circular needle, 24-inch length or longer, or the size needed to match gauge (if you tend to cast on tightly, use an even bigger needle to cast on and bind off)
Other materials: Large crochet hook; yarn needle to weave in ends Size: 65 inches long by 16 inches wide, without fringe Gauge: 8 stitches and 12 rows per 4 inches in garter stitch
In this pattern, you have to change yarns, but don’t worry — it isn’t as difficult as it sounds. Just remember that when making this wrap, you should carry the mohair (yarn A) loosely up the side of the work since you’re using it every other stripe. The other two yarns are cut and rejoined as indicated in the pattern.
Directions
With yarn B (the thick and thin wool), cast on 130 sts loosely. Knit 1 row. Cut yarn B.
Rows 1 and 2: Join yarn A (the mohair) and knit 2 rows. Don’t cut yarn A. Rows 3 and 4: Join yarn C (the ribbon) and knit 2 rows. Cut yarn C. Rows 5 and 6: Knit 2 rows with yarn A. Don’t cut yarn A. Rows 7 and 8: Join yarn B and knit 2 rows. Cut yarn B.
Repeat these 8 rows until your stole measures approximately 16 inches, ending with Row 7. Bind off loosely with yarn B.
Weave in any loose ends.
Finishing: From the remaining yarn, cut 20-inch lengths for the fringe. Cut 18 pieces each from yarn B and yarn C. Cut 36 pieces from yarn A. Divide the pieces of fringe into 18 groups with 2 strands of A, 1 strand of B, and 1 strand of C in each group. Attach fringe every 2 inches along each short side of the stole.
If you like, use scissors to give the ends of your fringe a trim.
Variation: Changing yarns
The sky’s the limit in selecting yarns for your multiyarn stole. Choose any three yarns you like — or choose more than three. Just be sure to stick to the basic formula of going back to yarn A between the other yarns you’ve chosen. This formula gives your project the continuity it needs. I’ve chosen a monochromatic palette for my stole, but you can vary the look by going for greater contrast in color as well as texture. Even yarns that don’t “go” together at first glance can create a pleasing result. Don’t be afraid to experiment!
Loose Rib Wrap
If you knit this simple ribbed wrap (see Figure 8-13) with a sumptuous yarn at a loose gauge, it can add glamour to any outfit. Even though the knitting creates only a simple rectangle, the way you put the rectangle together allows you to create many different garments — a wrap, a poncho, or a fun sleeves-only shrug. That the humble rectangle can do so much is really one of the marvels of knitted fabric! Mohair, thin ribbon, and hand-dyed silk all make great choices for this project that you’ll want to do again and again.
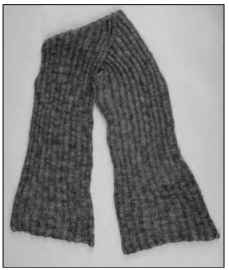
Figure 8-13:
A loose rib wrap is a glamorous accessory to any ensemble.
Materials and vital statistics
Yarn: S. Charles Collezione Rittrato (28% mohair, 53% viscose, 10% polyamid, 9% polyester); 198 yards (183 meters) per 50 grams; 3 skeins; color: 73
Needles: US 8 (5 mm) needles, or the size needed to match gauge
Other materials: Yarn needle for weaving in ends
Size: 14 (16) inches wide by 60 inches long after blocking
Gauge: 16 stitches and 20 rows per 4 inches over rib pattern, lightly stretched
This delightful wrap is worked from one short side to the other. If you plan to wear it as a wrap, you can make either size. The first size will fit any small- to medium-sized woman as a shrug or poncho (see the later variations). If you have larger arms or want a bit more coverage, make the larger size.
Directions
Cast on 61 (71) sts.
Row 1: K2, *p2, k3, repeat from * to last 4 sts, p2, k2. Row 2: P2, *k2, p3, repeat from * to last 4 sts, k2, p2. Repeat these 2 rows until your wrap measures 60 inches. Bind off loosely and weave in ends.
Finishing: Block the wrap to the measurements given in the “Materials and vital statistics” section (see the appendix for more details on blocking).
Variation: Make your wrap a poncho
From the basic rectangle of the loose rib wrap, you can create a fantastic poncho. This poncho shape is my favorite — it’s a bit more contemporary looking and its unconventional shape allows you to wear it in lots of different ways. I love the drape and hint of sparkle in this feather-light yarn. It looks terrific with your favorite little black dress or even with jeans and a T-shirt!
To make the wrap into a poncho, follow these steps:
1. After blocking the basic wrap, place markers or pins 15 inches in from each end of one long side of the rectangle to mark the placement of the seam.
2. Fold the wrap into a horseshoe shape with the two short ends closest to you and the markers you’ve just placed touching (as shown in Figure 8-14).
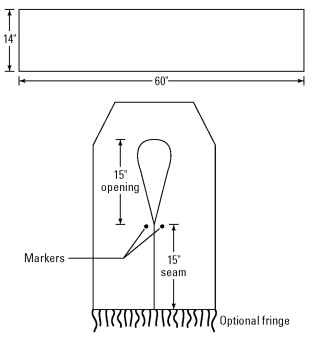
Figure 8-14:
Putting the poncho together.
3. Using mattress stitch, sew from the outside edge to the markers, creating a seam about 15 inches long and leaving an opening for the head.
You can create fringe for the straight side if you want. (See the section “New skill: Making fringe” earlier in this chapter for details.) Fringe draws attention to the great asymmetrical shape of this poncho.
Variation: Make your wrap a shrug
Another fun way to use the basic rectangle is to create a little shrug. Even though you start with just a rectangle, it actually does create sleeves and a bit of a back — the perfect thing to wear with a halter top or a sleeveless dress. But you can also layer it over a T-shirt or turtleneck to add a bit of warmth and fun. Just follow these steps:
1. After blocking the basic wrap, fold the piece in half lengthwise as shown in Figure 8-15.
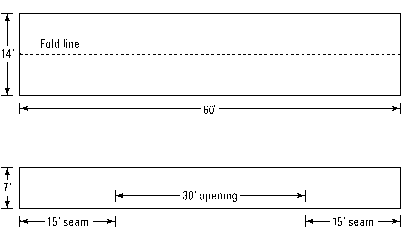
Figure 8-15:
Turning a rectangle wrap into a shrug.
2. Starting at the outside (where your wrist will be), use mattress stitch to sew a seam toward the center that’s about 15 inches long.
3. Do the same on the other side, leaving an opening in the center that’s about 30 inches wide.
Be sure to try on the shrug before finishing the seams, and adjust as necessary for a perfect fit.
Box Top
From the looks of Figure 8-16, it’s hard to believe that this boat neck top is really just a pair of rectangles, but it is! You don’t have to do any increasing or decreasing — it’s just changing from the simplest of lace patterns, to rib, to stockinette stitch that makes the difference.
This box top is lovely and a little out of the ordinary. It’s perfect with a skirt or pants, and you can wear it in the office or on the town. You can knit this top in bamboo or a cotton blend, but the pure silk yarn that I use in this pattern drapes beautifully on the body and is a pleasure to wear.
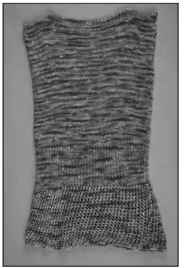
Figure 8-16:
The unboxy box top.
Check out the schematic in Figure 8-17 to see how using stitch patterns that knit at different gauges adds shaping to the garment. To me, this top recalls a 1940s pin-up girl with its capped sleeves and nipped waist. If you want to skip the lace, you can just make the ribbed section longer and have a different, but equally elegant, look (see the variation at the end of the pattern for details).
Materials and vital statistics
Yarn: Curious Creek Fibers Isalo (100% silk); 262 yards (238 meters) per 95 grams; 3 (3, 4, 4, 5, 6) skeins; color: Sunrise on Daffodils
Needles: US 6 (4 mm) needles, or the size needed to match gauge; US 4 (3.5 mm) needles for the ribbing
Other materials: Stitch markers or safety pins; yarn needle for weaving in ends ‘ Size: Women’s XS (S, M, L, 1X, 2X) or actual chest size of 30 (34, 38, 42, 46, 50)
• Finished chest circumference: 30 (34, 38, 42, 46, 50) inches
• Finished length: 23 (23, 24, 25, 26, 27) inches
Figure 8-17 is a schematic of the finished dimensions ‘ Gauge: 20 stitches and 28 rows per 4 inches in stockinette stitch
This top is worked from the lower edge to the shoulder in two pieces, and the front and back are the same. Keep track of the numbers of rows you work over the openwork and ribbed sections as you knit the back. That way, when you knit the front you can make it exactly the same.
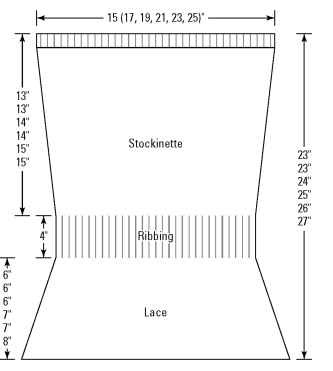
Figure 8-17:
The box top schematic shows its shapeliness.
Starting with the back
Cast on 75 (85, 95, 105, 115, 125) sts with larger needles and begin the lacy openwork pattern:
Row 1 (RS): K2, *yo, k2tog, repeat from * to last st, k1. Row 2: Purl.
If you haven’t tried a yarn over (yo) before, you can read all about this lace basic in Chapter 6. You also find out about knitting 2 stitches together (k2tog) in Chapter 6.
Repeat these 2 rows until the lace section measures 6 (6, 6, 7, 7, 8) inches. (Note that this lace pattern has a bias. Don’t fret though: When you block the fabric and sew the pieces together, it will turn out just right.)
Switch to smaller needles and begin ribbing as follows:
Row 1 (RS): K1, *p1, k1, repeat from * to end.
Row 2: P1, *k1, p1, repeat from * to end.
Repeat these 2 rows until the ribbed section measures 4 inches (for all sizes).
Switch to stockinette stitch (knit a row, purl a row) and work until the bodice measures 13 (13, 14, 14, 15, 15) inches from the end of the ribbing.
Work 1 inch in ribbing, and then bind off all sts.
Moving to the front
Make the front the same as the back.
Finishing your top
Weave in ends.
Block the two pieces, but don’t stretch the ribbing out too much; you want this top to be shapely (see the appendix for more details on blocking). Find the center of the neck, measure 6 inches out from this point to either side, and place a marker or safety pin. Sew each shoulder seam from the outside edge to the marker.
Because you don’t have to shape the neck, you can make the head opening wider or narrower to suit your own style. If you work both shoulder seams at once, you can try the top on as you go.
Starting at the bottom, sew up the side seams up leaving the upper 8 (8, 9, 9, inches open for the armhole. Again, because you don’t have to shape any part of this top, simply make the armhole the right size for you by trying it on before you finish the seam. See the appendix for more on finishing.
Variation: Short and simple
This shorter top (see the schematic in Figure 8-18) is meant to hug the body and to end just below the waist. The total length will be 22 (22, 23, 23, 24, 24) inches.
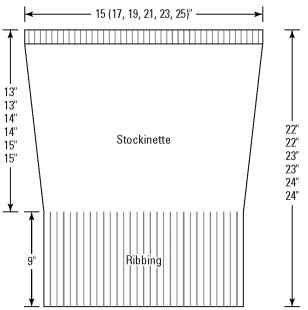
Figure 8-18:
The box top made short and simple.
For the front and the back of this variation follow these instructions:
Cast on as described in the basic pattern, but use the smaller needles, skip the lace section, and start right in with the ribbing. Continue the ribbed section until it measures 9 inches (for all sizes).
Switch to stockinette stitch and continue as described in the basic pattern.
