In This Chapter
Crafting potholders
Trying your hand at pillows and blankets Whipping up journal covers
There are so many rectangles worth knitting that they’ve spilled over into a second chapter! Like the projects in Chapter 8, these knits for the home appeal to knitters at all skill levels. Any of the knits in this chapter make wonderful gifts. But that doesn’t mean you shouldn’t consider knitting them for yourself too.
The felted potholders are quick to knit and are a great way to use up your scrap wool. Pair them with matching coasters and you’ve got a perfect housewarming gift. The baby blanket knit as a set of nested squares will keep a newborn warm with style. Knit it larger to cover the back of your sofa or favorite chair. Hand-knit throw pillows are great to update your home decor. And finally, check out the journal cover. Knit the larger size for a loose-leaf binder and the smaller one for your diary or appointment topic.
Felted Potholders
The potholders in Figure 9-1 are fun to make and are a great way to practice some new skills. Knit them with three colors and miters as I do in the basic pattern and you’ll add pizazz to any kitchen. You can also make your potholders plain or striped. You’ll find directions for these following the main pattern. Make a set to match your friend’s kitchen for an out-of-the-ordinary hostess gift. You can use the same techniques to make coasters or even a great blanket. Read the variation sections to find out how.
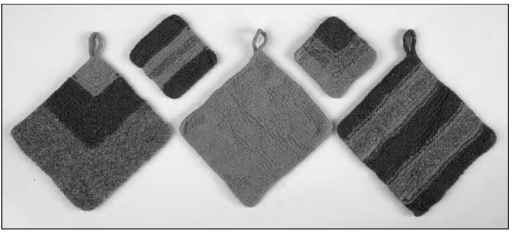
Figure 9-1:
Felted potholders (and coasters) are quick and easy to make.
Wool is a good choice for potholders because it insulates well and is slow to ignite. Still, always use caution when handling hot things, and test your potholders before you rely on them to remove your 20-pound turkey from the oven.
New skill: Making miters
A miter is simply a corner where the two edges come together at a diagonal. Think of the edge of a picture frame or window. With the felted potholders, you’ll be making a square by casting on the stitches for two adjacent sides and working diagonally to finish with a single stitch at the opposite corner. It may be tough to wrap your mind around, but this technique isn’t difficult to do. After you get the hang of it, you’ll be able to extend the technique to create not only potholders, but beautiful dishcloths or even afghan squares (as I show you in the later variation sections).
To make a mitered square, follow these instructions:
1. Cast on an even number of stitches that’s equal to the length of two sides of your finished square.
For the potholder, you cast on 64 stitches (32 stitches for each of the two sides of the square).
2. Place a marker between the 2 center stitches.
3. On Row 1 and all wrong-side rows: Knit.
4. On Row 2 and all right-side rows, decrease twice in the center as follows: Knit to 2 stitches before the marker, k2tog, slip the marker, ssk, knit to the end of the row.
If you’re unfamiliar with decreasing using k2tog and ssk, see Chapter 6 for details.
5. Repeat Rows 1 and 2 until you have only 2 stitches left, and then knit these last 2 stitches together on the last wrong-side row.
Change colors every few rows as described in the pattern.
Place a safety pin or some other little marker on the right side of your square. Then, when you can see the safety pin, you know that you’ve reached a decrease row.
Materials and vital statistics
Yarn: Cascade 220 (100% wool); 220 yards (201 meters) per 100 grams
• Color 1: 8686 Brown; 1 skein
• Color 2: 8907 Teal; 1 skein
• Color 3: 8400 Gray; 1 skein
You can use any worsted weight yarn that’s 100% wool. However, don’t use a wool that’s labeled “superwash,” because this type of yarn has been specially treated to resist felting.
Needles: US 10M> (6.5 mm) needles, or the size needed to match gauge
Other materials: Stitch markers; large crochet hook; yarn needle for weaving in ends
Size: The measurement before felting is about 9% inches wide by 13 inches long; the measurement after felting is about 7 inches wide by 7 inches long
Gauge: 14 stitches and 20 rows per 4 inches in garter stitch before felting; 18 stitches and 36 rows per 4 inches after felting
These potholders are a great way to get your feet wet with felting. You may not be familiar with the technique, but if you’ve ever accidentally put a sweater through the laundry, you’ve unwittingly experimented with felting. When you do it intentionally though, the results can be great. You use the same approach (a washing machine with hot water, agitation, and soap) to turn your loosely knit potholder into a sturdy, dense fabric. Flip to the appendix for felting tips and techniques.
Directions
The felted potholders are worked in garter stitch. It’s difficult to see the rows in garter stitch, but it’s easy to see what knitters call garter ridges. Each ridge is made up of 2 rows.
With color 3, cast on 64 sts, placing a marker in the center of the row between the 32nd and 33rd sts.
Row 1 (WS): Knit.
Row 2 (RS): Knit to 2 sts before the marker, k2tog, slip marker, ssk, knit to the end of the row.
Repeat these 2 rows 5 more times for a total of 12 rows.
Switch to color 1 and work Rows 1 and 2 10 times. There will be 20 rows or 10 garter ridges in color 1. (If you need a refresher on changing colors, see Chapter 8.)
Switch to color 2 and continue repeating Rows 1 and 2 until there are only 2 sts left.
Next row: K2tog. There is 1 st on the needle. Place this st on your crochet hook and make a chain about 5 inches long. Slip stitch through the last knit stitch to form a loop. (See the appendix for crochet chain basics.) Cut the yarn and weave in the ends.
Finishing: To felt, place your potholders in a zippered pillowcase or lingerie bag and run it through the washing machine along with a pair of jeans for added agitation. Set the machine for a hot wash and a small load. You may need to run the wash cycle more than once to felt your items completely.
When the potholders look like felt and measure about 7 inches square, remove them from the washer. They may need to be wrestled into shape, but you can’t hurt them, so be rough if you need to. Allow the potholder to dry thoroughly before using them.
Variation: Single-color potholders
With the color of your choice, cast on 32 sts. Knit 64 rows or until you can see 32 garter ridges.
Bind off all your stitches, but don’t cut the yarn or pull it through the last stitch. Instead, using your crochet hook, make a chain about 5 inches long. Slip stitch through the last knit stitch to form a loop, and then cut the yarn and weave in the end. Finish your potholder as I describe in the earlier directions.
Variation: Striped potholders
Cast on 32 sts with color 1. With color 1, knit 8 rows. Switch to color 2 and knit 4 rows. Switch to color 3 and knit 8 rows. Switch to color 2 and knit 4 rows. Switch to color 1 and knit 16 rows. Switch to color 2 and knit 4 rows. Switch to color 3 and knit 8 rows. Switch to color 2 and knit 4 rows. Switch to color 1 and knit 8 rows.
Bind off all your stitches, but don’t cut the yarn or pull it through the last stitch. Instead, using your crochet hook, crochet a chain about 5 inches long. Slip stitch through the last knit stitch to form a loop, and then cut the yarn and secure the end. Finish your potholder as I describe in the earlier directions.
Variation: Coasters
You can use the earlier mitered, single-color, and striped patterns to make coasters that measure 4 by 4 inches. For the striped and mitered coasters, I’ve made suggestions for pleasing color layouts, but let your imagination guide you. A set of six or eight coasters stacked together and tied like a present with a bit of yarn makes a great gift for any home. Here are the basic instructions for the different types of coasters:
Mitered coasters: Cast on 36 stitches, placing a marker in the center of the row, between stitches 18 and 19.
Follow the earlier directions for the mitered potholder, switching colors every 6th row.
When there are 2 stitches left, k2tog, and then cut the yarn and pull the tail through the last stitch.
Single-color coasters: Cast on 18 stitches. Knit 36 rows, and then bind off all stitches.
Striped coasters: Cast on 18 stitches. Work 12 rows in each color for a total of 36 rows (or 18 garter ridges), and then bind off.
Follow the directions for felting the potholders to felt your coasters.
Variation: Mitered square afghan
To make a wonderful blanket that’s tons of fun to knit, choose a yarn that recommends a gauge between 334 and 4 stitches to the inch, and use needles that are one size larger than recommended on the yarn label. But, remember, because blankets don’t need to be an exact size, don’t worry too much about gauge. Instead, use the needles and yarn needed to create a fabric that you like. (See Chapter 2 for more on gauge.)
While it’s important to use a yarn that will felt for the potholders and coasters, you’ll likely want a yarn that’s more washable when you’re making a blanket. Take that into consideration when you’re buying yarn.
You need approximately 600 yards (550 meters) of yarn for a baby blanket or lap quilt. A blanket made with 2,400 yards will cover the bed of the truly ambitious. Use three colors or a self-striping yarn to get the look that you’re after.
To get started on your blanket, follow the basic potholder pattern to make 16 squares, but bind off the final stitch of each square and leave off the crocheted loop. You can make more or fewer squares depending on the size of blanket you want. When you’re finished with your squares, don’t felt them. Instead, lay them out in an arrangement that you like, and then sew the edges together. You can see from Figure 9-2 that both regular and haphazard placement of the squares can yield interesting results. Find tips on sewing things up in the appendix.
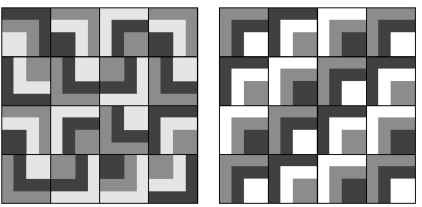
Figure 9-2:
How you arrange your squares makes a dramatic difference in style.
Throw Pillows
Use this pattern to create some great throw pillows for your sofa or bed (check some out in Figure 9-3). A couple of new pillows can really liven up your decor, and the knitting will give you a chance to hone some new skills. The basic pattern creates a simply textured pillow in a single color; the later variations give you two different options for slip-stitch color patterns.
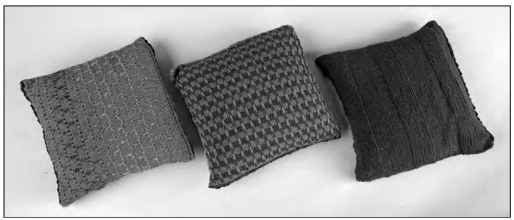
Figure 9-3:
Spruce up your living space with throw pillows.
Materials and vital statistics
Yarn: Berrocco Ultra Alpaca (50% alpaca, 50% wool); 215 yards (198 meters) per 100 grams; 2 skeins; color: 6282 Cranberry
Needles: US 7 (4.5 mm) needles, or the size needed to match gauge Other materials: Yarn needle; 14-inch pillow form Size: 14 inches square
Gauge: 20 stitches and 26 rows per 4 inches in stockinette stitch
This throw pillow is worked in two pieces and then stitched up. If you want more pillows with less knitting, use cloth for the backs of your pillows. Cut the fabric into a 15J/2-inch square, and then hem the edges so that the backing measures 14 inches square. Then you can attach the fabric to your knitted piece with a needle and thread.
Directions
Make 2 pieces the same. To make the simplest pillow, make the back piece exactly the same way as you made the front. But, if you want to vary the sides, follow one of the later variations.
Cast on 70 sts and work 1 inch in stockinette stitch (knit RS rows, purl WS rows).
Work in garter stitch (knit all rows) for 2 inches.
Work in stockinette stitch for 3 inches.
Work in garter stitch for 2 inches.
Work in stockinette stitch for 3 inches.
Work in garter stitch for 2 inches.
Work in stockinette stitch for 1 inch.
Bind off and weave in ends.
Finishing: Block your finished pieces to measure 14 inches square. Using the working yarn and a yarn needle, sew three sides together. Insert the pillow form and sew the last side closed. You can find details on blocking and sewing seams in the appendix.
Variation: Retro check pillow
Lots of knitting abbreviations look funny, and to my eye, wyif and wyib (featured in this variation and the next) are right near the top of the list! Here’s what they mean:
Wyif stands for “with yarn in front.” What this phrase means is that you need to bring the yarn to the front (or into the purl position) before you perform the next step. If your yarn is already in front, don’t do anything; just carry on with the next instruction.
Wyib stands for “with yarn in back.” This phrase means that you need to bring the yarn to the back of the work (or into the knit position) before you perform the next step. If your yarn is already in back, you don’t have to move it.
When you change your yarn’s position to the front or back, remember to bring it between and under the needles and not up over the needle. (Chapter 8 has a figure of how to perform this task.)
Usually wyif and wyib accompany slipped stitches (I cover the basics of slipping stitches in Chapter 5). The position of the yarn, at the front or the back of the work, dictates where the horizontal float will be. You create floats when dragging the yarn over an unworked stitch. If the float is in the front on the right side, or in the back on the wrong side, it shows and becomes part of the decoration. Check out wyif and wyib stitches in Figure 9-4.
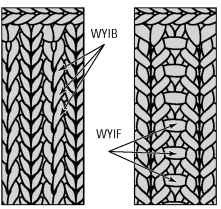
Figure 9-4:
Stitches made with yarn in back and with yarn in front.
For the retro check pillow, you need two colors of yarn. Choose two colors with high contrast like orange and avocado green for a retro look. Or choose two shades of the same color if you’re looking for a more subtle pattern. For each side of the pillow, you need one skein of each color.
Because you’re alternating colors every 4 rows, you don’t need to cut the yarn each time you switch colors. Just carry the unused color loosely up the side.
Cast on 71 sts with the first color.
Purl 1 row.
Row 1 (RS): With the second color, k3, *slip 1 st wyib, k3, repeat from * to end. Row 2 (WS): With the second color, p3, *slip 1 st wyif, p3, repeat from * to end. Row 3 (RS): With the second color, repeat Row 1. Row 4 (WS): With the second color, purl.
Row 5 (RS) With the first color, k3, *slip 1 st wyib, k3, repeat from * to end. Row 6 (WS): With the first color, p3, *slip 1 stitch wyif, p3, repeat from * to end. Row 7 (RS): With the first color, repeat Row 5.
Row 8 (WS): With the first color, purl.
Repeat these 8 rows 11 more times or until piece measures 14 inches.
Bind off and weave in ends. Make a second piece the same.
Follow the directions for finishing in the main pattern.
Variation: Bean sprout pillow
Barbara Walker, a famous collector of stitch patterns and a profoundly influential knitter, calls this color pattern “bean sprouts.” Whatever you call it, it’s a fun slip stitch pattern to try. A strong contrast like black and white will definitely make this pattern stand out, but a combination like orange and red will also create a wonderful result. Or, for an effect that looks almost like stained glass, use a self-striping yarn for one yarn and a plain color for the other. To make both sides of a pillow, you need two balls of the main color (MC) and one ball of the contrasting color (CC). You can see this pillow in the color photo insert.
In this pattern, you work 6 rows in the main color between the rows you work in the contrasting color. You can carry the contrasting yarn up the side, twisting it with the main color at the beginning of each odd-numbered row. But take care not to pull it too tight, because if you do, that side of the pillow will pucker. If you prefer, cut the contrasting color each time and weave in the ends when you’re finished. You don’t need to cut the main color yarn because the contrasting color is only worked for 2 rows. (You can find more information about changing colors in Chapter 8.)
Cast on 71 sts with MC. Row 1 (RS): With MC, knit. Row 2 (WS): With MC, purl.
Row 3 (RS): With CC, k2, *slip 1 st wyib, k1, repeat from * to last st, k1. Row 4 (WS): With CC, k1, *k1, slip 1 st wyif, repeat from * to last 2 sts, k2. Note that this WS row (Row 4) is knit rather than purled. Rows 5 and 7 (RS): Using MC, k5, *slip 1 st wyib, k5, repeat from * to end. Rows 6 and 8 (WS): Using MC, p5, *slip 1 st wyif, p5, repeat from * to end. Rows 9 and 10: Repeat Rows 1 and 2.
Row 11 (RS): With CC, k1, *slip 1 st wyib, k1, repeat from * to end. Row 12 (WS): With CC, k1, *slip 1 st wyif, k1, repeat from * to end. Again, this WS row (Row 12) is knit rather than purled.
Rows 13 and 15 (RS): With MC, k2, *slip 1 st wyib, k5, repeat from * to last 3 sts, slip 1 st wyib, k2.
Rows 14 and 16 (WS): With MC, p2, *slip 1 st wyib, k5, repeat from * to last 3 sts, slip 1 st wyib, k2.
Repeat these 16 rows until the pillow measures approximately 14 inches. End with Row 2 or Row 10 of the pattern repeat. Bind off and weave in ends. Make a second piece the same, and then follow the directions for finishing in the earlier pattern.
Journal Cover
Knitted journal covers, like the one in Figure 9-5, are fun to knit, and like the other items in this chapter, are nothing more than simple rectangles. The basic pattern is for a journal cover that’s worked in stockinette stitch with a simple seed stitch edging. It’s sized to fit a standard three-ring binder with a 2-inch wide spine. The variation is for a smaller half linen stitch journal cover that fits a standard 5-by-8-inch blank topic.
Even though you can keep just about anything inside your binder, I think this one is particularly well-suited for use as a knitter’s journal. You can use it to keep track of your projects.
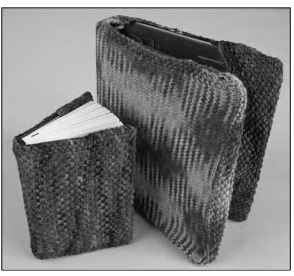
Figure 9-5:
Journal covers that fit blank topics or standard loose-leaf binders.
Materials and vital statistics
Yarn: Schaefer Yarns Miss Priss (100% merino wool); 280 yards (256 meters) per 115 grams; 1 skein; color: Jane Adams
Needles: US 9 (5.5 mm) needles, or the size needed to match gauge
Other materials: Three-ring binder with a 2-inch spine; yarn needle for finishing
Size: Fits a standard 10-by-12-inch three-ring binder
Gauge: 18 stitches and 22 rows per 4 inches in stockinette stitch
The journal cover is worked from side to side, starting with a 4-inch flap that will be turned under to form the inside of the cover. I love the way the variegation plays across this journal cover, but you might also consider a plain-colored cover with duplicate stitch initials or doodling.
Directions
Cast on 57 sts.
Work the flap in seed stitch as follows (Chapter 5 gives more details on seed stitch): All rows: K1, *p1, k1, repeat from * to end. Repeat this row until the flap measures 4 inches. Knit 1 WS row to form a turning ridge.
Begin working in stockinette stitch (knit RS rows, purl WS rows) with a three-stitch seed stitch border for the front of the journal cover as follows:
Row 1 (RS): K1, p1, k1, knit to last 2 sts, p1, k1.
Row 2 (WS): K1, p1, k1, purl to last 3 sts, k1, p1, k1.
Repeat these 2 rows for 21 inches.
Knit 1 WS row to create a turning ridge.
Switch back to seed stitch and work 4 more inches before binding off.
Finishing: Block the piece so that it measures 12 by 29 inches and the edges are square. (See the appendix to find out about blocking.) When the piece is dry, fold the flaps toward the WS and sew the flap in place along the top and bottom edges. See the appendix for more information on finishing. Insert your binder by opening it and inserting the front and back covers into the pockets that you’ve created with the flaps.
Variation: Small journal cover in half linen stitch
To make this easy variation, use the same yarn and needles specified in the basic pattern. Your gauge should be approximately 17 stitches and 28 rows per 4 inches in half linen stitch (see Chapter 5 for details on working half linen stitch). Change needles if necessary to match gauge. If you’re having trouble with the gauge, remember this: It’s more important to match the stitch gauge than the row gauge. This pattern makes a journal cover that fits an 8-by-5-inch blank topic.
Should you slip stitches knitwise or purlwise? The short answer: When in doubt, slip purlwise. Slipping a stitch knitwise twists the stitch. So, you only want to slip knitwise when you actually want the stitch twisted (ssk and skp decreases, for instance; see Chapter 6 for more about ssk and Chapter 12 for more about skp). Slipping purlwise is neutral and leaves the stitch in the normal position, ready for the next row. If you’re simply moving the stitch from one needle to the other, as you are with half linen stitch, slip purlwise.
Cast on 37 sts.
Work for 234 inches in seed stitch to form the first flap: For all rows: K1 *p1, k1, repeat from * to end. Knit 1 WS row to create a turning ridge.
On the next RS row, begin working half linen stitch with a three-stitch seed stitch border on each side as follows:
Row 1 (RS): K1, p1, k2, *slip 1 st purlwise wyif, k1, repeat from * to last 3 sts, k1, p1, k1. Row 2 (WS): K1, p1, k1, purl to last 3 sts, k1, p1, k1.
Row 3 (RS): K1, p1, k1, slip 1 st purlwise wyif, *k1, slip 1 st purlwise wyif, repeat from * to last 3 sts, k1, p1, k1.
Row 4 (WS): K1, p1, k1, purl to last 3 sts, k1, p1, k1.
Repeat these 4 rows until the journal cover measures 11 inches from the turning ridge.
Knit 1 WS row to create the second turning ridge.
Work in seed stitch until the second flap measures 234 inches.
Bind off and weave in ends.
Finishing: Block the piece so that it measures 8)4 by 16 inches and the edges are square (see the appendix for more about blocking). When it’s dry, fold the flaps toward the wrong side and sew them in place along the top and bottom edges. Insert your blank topic by opening it and inserting the front and back cover into the pockets that you’ve created with the flaps.
Nested Squares Baby Blanket
This blanket (see Figure 9-6) features a center panel framed by contrasting colored stripes. With a blanket made of nested squares, you can easily extend the technique to create a larger blanket if you like.
New skill: Picking up stitches along a garter stitch edge
When you’re knitting something with blocks or stripes of different colors, you have several options. For example, you could work this blanket with intarsia, working the outer stripe in one color, the inner stripe in a second color, and the central panel in a third color. But that means you’re stuck juggling yarns and managing all the colors at once.
Instead, I’ve chosen to work this blanket out from the center. If you look at Figure 9-7, you can see that the panels are numbered. You start with Section 1, switch yarns and knit Section 2, and then switch yarns again for Section 3. These directions are all pretty straightforward. To knit the other panels, though, you turn the work on its side and pick up stitches along the edge of the piece that you’ve already made. This technique is especially great for blankets because you can continue adding on as the spirit moves you, expanding in any direction.
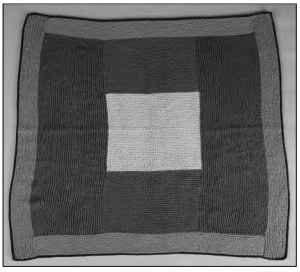
Figure 9-6:
A paneled blanket makes a perfect gift for baby.
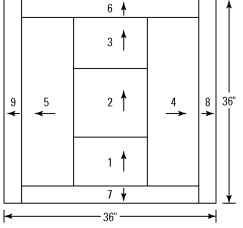
Figure 9-7:
The order and direction in which to knit each section of your blanket.
Fear not, though, because in garter stitch, picking up stitches is easy to do (which is another reason to embrace garter stitch!). If you look at a piece that was knit in garter stitch, you’ll see that it has prominent ridges, one for each two rows of knitting. Notice also that a bit of each ridge sticks out a smidge at the edge — that’s the loop of the edge stitch, as you can see in Figure 9-8.
To pick up stitches along the edge of a garter stitch, following these steps:
1. Make sure that the right side (the public side) is facing up and that the edge you’re working on is at the top.
2. Beginning at the left edge of the piece, stick your needle through the edge stitch of the first ridge.
3. Continue picking up each of these edge stitches, putting one stitch on the needle for every garter ridge, as shown in Figure 9-8.
4. When you get to the right edge, attach your yarn and knit the stitches that you’ve picked up, carrying on with the pattern as directed (see Chapter 8 for more on switching colors).
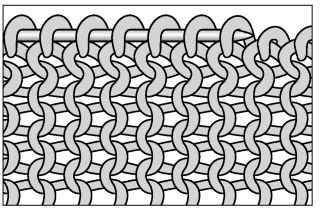
Figure 9-8:
Picking up stitches on a garter edge.
Note that picking up stitches on a garter edge is slightly different from the technique usually called “pick up and knit.” Pick up and knit means that you’re picking up and knitting at the same time. (See Chapter 10 for details on this technique.)
Materials and vital statistics
‘ Yarn: RYC Cashsoft Aran (57% merino wool, 33% microfiber, 10% cashmere); 95 yards (87 meters) per 50 grams
• Main color (MC): 001 Oat; 2 balls
• Contrasting color 1 (CC1): 003 Mole; 9 balls
• Contrasting color 2 (CC2): 006 Bud; 5 balls
• Contrasting color 3 (CC3): 008 Tornado; 1 ball (for optional edging and surface details)
Needles: US 9 (5.5 mm) circular needles, 36-inch length or longer
Other materials: Two extra circular needles to use as holders (US 9 or smaller); US H (5 mm) crochet hook (for optional edging)
Size: 36 inches square
Gauge: 16 stitches and 32 rows per 4 inches in garter stitch
This blanket is worked out from the center, using one color at a time. Refer to Figure 9-7 to see the order and direction in which to knit the panels of the blanket.
Directions
For Section 1: With CC1, cast on 48 sts very loosely and knit 72 rows (9 inches).
Cut CC1.
You’re going to pick up these stitches later, so make it easier on yourself by casting on loosely (use a larger needle if you need to). See the appendix for more about cast-on methods.
For Section 2: Attach MC and knit 96 rows (12 inches). Cut MC. For Section 3: Attach CC1 and knit 72 rows (9 inches).
Up to this point, the pattern isn’t at all unusual. But now comes the twist: Transfer the stitches to one of the holder needles. Cut the yarn leaving a tail that’s long enough to convince you that your stitches won’t unravel — at least 6 inches.
For Section 4: With the RS facing you, turn the blanket 90 degrees (clockwise or counterclockwise — it doesn’t matter!).
Start at the left edge and pick up 120 sts along the edge — 36 sts from each of the CC1 sections and 48 sts from the center MC section.
When picking up stitches in this pattern, it’s okay to use a needle that’s a different size from your working needle. Just be sure to switch to the working needle when you begin working the picked-up stitches.
Reattach CC1 and knit 72 rows (9 inches). Cut the yarn and slip the stitches to a holder needle.
For Section 5: Turn the blanket 180 degrees and repeat the instructions for Section 4.
For Section 6: Go back to the top of the piece where 48 sts remain on the holder needle (Section 3). Use the ends of the needle to pick up 36 sts from the CC1 sections (Sections 4 and 5) on each end. There are now 120 sts on the needle.
With RS facing, attach CC2 and knit 24 rows (3 inches), and then bind off.
For Section 7: Turn the blanket 180 degrees. Working from left to right, pick up 36 sts from Section 4, 48 sts from the cast-on edge (pick up 1 st for every cast on st), and 36 sts from Section 5. There are now 120 sts on the needle.
Attach CC2 and knit 24 rows, and then bind off.
For Section 8: Turn the blanket 90 degrees. With the circular needle that’s attached to this side, pick up 12 sts from the CC2 section (from Sections 6 and 7) on each end. There are now 144 sts on the needle.
With RS facing, attach CC2 and knit 24 rows, and then bind off.
For Section 9: Turn the blanket 180 degrees and repeat the instructions for Section 8.
Finishing: If desired, work a row of single crochet around the edges of the blanket with CC3. Crocheting around the edge not only adds a splash of another color, it also provides added strength to the spots that get the most strain. Read up on basic crochet skills in the appendix.
Consider crocheting some surface detailing onto the blanket, such as a baby’s name or initials. (See Chapter 7 for the scoop on surface crocheting.)
Variation: Substituting yarns
Most people are looking for very specific colors when they make a baby blanket, whether it’s classic pink and baby blue or some other colors that the mother-to-be or knitter favors. Luckily with this blanket, you can use any aran weight yarn that you think is appropriate (see Chapter 1 for more about this weight). Gauge isn’t critical for a blanket, so if you follow the directions exactly at a tighter or looser gauge, you’ll get a blanket that’s smaller or larger. Twice as big may be a problem, but an inch or two here or there isn’t significant. Just remember that fatter yarns will require more yardage.
